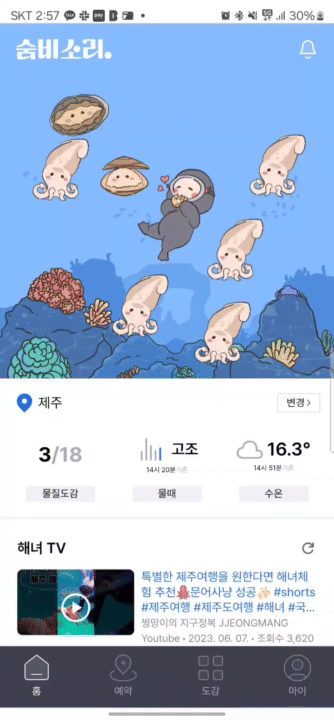
숨비소리 프로젝트를 진행하면서 해산물과 바다를 표현하기 위해 사용한 Matter.js
1. 들어가며
1-1. 도입배경
숨비소리는 구름톤에서 처음 시작했고, 당시에는 Unity 개발자가 있어서 react-unity-webgl를 활용해 화면을 구현할 수 있었다. Unity를 통해 해산물을 생생하게 표현할 수 있다는 장점이 있었지만, 동시에 치명적인 단점들도 몇 가지 있었다.
- 유지보수 불가
- Unity 개발자가 사라진 뒤에는 해당 코드를 수정할 수 없었다.
- Unity 화면의 성능 부담
- 간혹 프론트 화면이 정지되는 이슈가 있었고, 그 원인조차 파악하기 어려웠다.
이 문제들을 해결하기 위해 몇가지 방법을 고안했는데,
- unity를 배워 직접 사용하고 처음부터 다시 구현
- Matter.js를 사용해 처음부터 다시 구현
두가지 방법 중 Matter.js를 사용해 구현하는 방법을 채택하였다.
1-2. Matter.js란?
Matter.js는 웹을 위한 2D 물리 엔진으로, JavaScript로 작성되어 다양한 웹 애플리케이션에서 물리 기반의 상호작용을 구현할 수 있게 해준다.
Matter.js를 활용하면 충돌 감지, 중력, 마찰 등 복잡한 물리 현상을 간단하게 구현할 수 있다는 장점이 있다.
숨비소리 바다의 요소들을 충분히 표현할 수 있었고, 관련 레퍼런스를 참고하여 구현할 수 있었다. 그리고 디자이너한테 미리 요청해서 수족관에 들어가는 모든 요소들을 분리해달라고 했다.
2. 구현 과정
2-1. 엔진 및 기본요소 지정(벽, 배경이미지)
useAquarium 훅을 통해 Matter.js 엔진과 기본 요소들을 설정했다.
export const useAquarium = (
  containerRef: React.RefObject<HTMLDivElement>,
  canvasRef: React.RefObject<HTMLCanvasElement>,
) => {
  useEffect(() => {
    // 엔진 및 렌더 초기화
    const Engine = Matter.Engine;
    const Render = Matter.Render;
    const Runner = Matter.Runner;
    const World = Matter.World;
    const Bodies = Matter.Bodies;
    const Events = Matter.Events;
    const pixelRatio = window.devicePixelRatio || 1;

    // 중력 설정
    const engine = Engine.create();
    engine.gravity.x = 0;
    engine.gravity.y = 0.1;

    const container = containerRef.current!;
    let { width, height } = container.getBoundingClientRect();

    const render = Render.create({
      element: container,
      engine: engine,
      canvas: canvasRef.current!,
      options: {
        width: width,
        height: height,
        wireframes: false,
        background: `${IMAGE_PATHS.AQUARIUM}/Background-01.png`,
        pixelRatio: pixelRatio,
      },
    });

    // 벽 생성
    let topWall = Bodies.rectangle(width / 2, 0, width, 20, {
      isStatic: true,
      render: { visible: false },
    });
    let leftWall = Bodies.rectangle(0, height / 2, 20, height, {
      isStatic: true,
      render: { visible: true },
    });
    let rightWall = Bodies.rectangle(width, height / 2, 20, height, {
      isStatic: true,
      render: { visible: true },
    });
    let bottomWall = Bodies.rectangle(width / 2, height, width, 20, {
      isStatic: true,
      render: { visible: true },
    });

    World.add(engine.world, [topWall, leftWall, rightWall, bottomWall]);

    // 동작 제어 (윈도우 리사이즈, 속도 제한)
    const updateSize = () => {
      const { width: newWidth, height: newHeight } =
        container.getBoundingClientRect();

      // @ts-expect-error MatterJS 타입이 잘못되어 있어서 발생하는 에러
      Matter.Render.setSize(render, newWidth, newHeight);

      World.remove(engine.world, [topWall, leftWall, rightWall, bottomWall]);

      topWall = Bodies.rectangle(newWidth / 2, 0, newWidth, 20, {
        isStatic: true,
        render: { visible: true },
      });
      leftWall = Bodies.rectangle(0, newHeight / 2, 20, newHeight, {
        isStatic: true,
        render: { visible: true },
      });
      rightWall = Bodies.rectangle(newWidth, newHeight / 2, 20, newHeight, {
        isStatic: true,
        render: { visible: true },
      });
      bottomWall = Bodies.rectangle(newWidth / 2, newHeight, newWidth, 20, {
        isStatic: true,
        render: { visible: true },
      });

      World.add(engine.world, [topWall, leftWall, rightWall, bottomWall]);
      width = newWidth;
      height = newHeight;
    };

    window.addEventListener('resize', updateSize);

    // 정리 및 리소스 해제
    const runner = Runner.create();
    Runner.run(runner, engine);
    Render.run(render);

    return () => {
      window.removeEventListener('resize', updateSize);
      Render.stop(render);
      Runner.stop(runner);
      Engine.clear(engine);
      World.clear(engine.world, true);
    };
  }, [containerRef, canvasRef, seafoods]);
};
1. 엔진 및 렌더러 초기화
Matter.js의 물리엔진과 렌더러를 초기화 했다. 그리고 바다 중력에 맞게끔 약간의 중력을 부여해서 표현을 했다.
2. 벽 생성
기본적으로 Matter.js의 벽은 반응형을 고려하여 설계되지 않았기 때문에 다양한 모바일 기기 고려하여 최초 벽과 화면이 변했을 때 벽을 지우고 다시 만드는 과정을 반복하게 끔 했다.
updateSize()역할을 보면 canvas의 상위 div container의 사이즈 변화를 감지하여 새로운 벽을 다시 만들 수 있다.
render: { visible: false }로 변경하면 투명한 벽으로 바꿀 수 있다.
2-2. 배경 레이어

세가지 배경 레이어 요소들을 바다에 표현하기 위해 사용했다.
 const addBackgroundLayers = (
      engine: Matter.Engine,
      width: number,
      height: number,
      texturePaths: {
        path: string;
        originalHeight: number;
        position?: 'bottom' | 'middle';
      }[],
    ) => {
      const backgrounds: Matter.Body[] = [];

      texturePaths.forEach((texture) => {
        const backgroundImage = new Image();
        backgroundImage.src = texture.path;

        backgroundImage.onload = () => {
          // 비율 유지하면서 높이 계산
          const backgroundWidth = width; // 컨테이너의 너비와 동일
          const scale = backgroundWidth / backgroundImage.width;
          const backgroundHeight = texture.originalHeight * scale;

          // Y 좌표 설정 (position에 따라 다르게 설정)
          let y;
          if (texture.position === 'middle') {
            y = height / 2; // 화면의 중간
          } else {
            y = height - backgroundHeight / 2; // 기본값: 화면 하단
          }

          // X 좌표는 중앙에 고정
          const x = backgroundWidth / 2;

          // 충돌하지 않는 Body 생성
          const backgroundBody = Matter.Bodies.rectangle(
            x,
            y,
            backgroundWidth,
            backgroundHeight,
            {
              isStatic: true,
              render: {
                sprite: {
                  texture: texture.path, // 이미지 경로
                  xScale: scale,
                  yScale: scale,
                },
              },
              collisionFilter: {
                group: -1, // 그룹 분리
                mask: 0x0000, // 충돌 비활성화
              },
            },
          );

          // 물리 세계에 추가
          Matter.World.add(engine.world, backgroundBody);
          backgrounds.push(backgroundBody);
        };
      });

      return backgrounds;
    };
 ...
     addBackgroundLayers(engine, width, height, [
      {
        path: `${IMAGE_PATHS.AQUARIUM}/Background-04.png`,
        originalHeight: 600,
        position: 'middle', // 중간에 위치
      },
      {
        path: `${IMAGE_PATHS.AQUARIUM}/Background-02.png`,
        originalHeight: 745,
        position: 'bottom',
      },
      {
        path: `${IMAGE_PATHS.AQUARIUM}/Background-03.png`,
        originalHeight: 799,
        position: 'bottom',
      },
    ]);
1. 크기 계산
배경레이어 이미지또한 컨테이너 크기에 따라 업데이트 되어야 하며 container의 width와 배경이미지의 scale를 계산하여 height를 설정했다.
2. 위치, 충돌
두가지 요소는 바닥에 있지만, 하나의 요소는 중간에 위치한다. 요소들의 위치를 배경이미지의 height를 고려하여 middle, bottom를 받아 위치하게끔 했다.
배경 레이어라는 특성이 있기 때문에 mask: 0x0000이라는 충돌 카테고리 설정을 통해 충돌을 비활성화 할 수 있었다.
충돌 카테고리
mask는 32비트 숫자로, 각 비트가 특정 카테고리를 나타낸다. 기본값(0x0001)
- 0x0001 (0000 0000 0000 0001): 첫 번째 카테고리
- 0x0002 (0000 0000 0000 0010): 두 번째 카테고리
- 0x0004 (0000 0000 0000 0100): 세 번째 카테고리
...- 0x8000 (1000 0000 0000 0000): 열여섯 번째 카테고리
참고: Collision Filter
2-3. 돌 레이어

돌을 표현하는 과정은 충돌을 추가한 배경레이어와 유사했다.
    const addRocks = (
      engine: Matter.Engine,
      width: number,
      height: number,
      texturePaths: { src: string }[],
    ) => {
      // 최대 돌의 개수를 5개로 제한
      const maxRocks = 5;
      const rockCount = Math.min(maxRocks, Math.floor(width / 100)); // 최소 크기 100px로 조정

      const rocks: Matter.Body[] = [];

      for (let i = 0; i < rockCount; i++) {
        const rock = texturePaths[i % texturePaths.length]; // 이미지 반복 사용
        const rockImage = new Image();
        rockImage.src = rock.src;

        rockImage.onload = () => {
          // 이미지의 원본 크기를 가져옴
          const originalWidth = rockImage.naturalWidth;
          const originalHeight = rockImage.naturalHeight;

          // 각 돌의 너비는 컨테이너 너비를 돌 개수로 나눈 값
          const rockWidth = width / rockCount;
          const scale = rockWidth / originalWidth + 0.05; // 비율 유지
          const rockHeight = originalHeight * scale - 10;

          // 돌의 x 좌표는 왼쪽부터 순차적으로 배치
          const x = rockWidth * i + rockWidth / 2; // 돌의 중심 위치
          const y = height - rockHeight / 2; // 바닥에 배치

          const rockBody = Matter.Bodies.rectangle(
            x,
            y,
            rockWidth,
            rockHeight,
            {
              isStatic: true,
              restitution: 0.5,
              render: {
                sprite: {
                  texture: rock.src,
                  xScale: scale,
                  yScale: scale,
                },
              },
            },
          );

          rocks.push(rockBody);
          Matter.World.add(engine.world, rockBody);
        };

        rockImage.onerror = (error) => {
          console.error(`이미지 로드 실패: ${rock.src}`, error);
        };
      }

      return rocks;
    };

...
    addRocks(engine, width, height, [
      { src: `${IMAGE_PATHS.AQUARIUM}/rock-01.png` },
      { src: `${IMAGE_PATHS.AQUARIUM}/rock-03.png` },
      { src: `${IMAGE_PATHS.AQUARIUM}/rock-02.png` },
    ]);
1. 위치, 개수 표현
최대 크기를 고려하여 돌 개수를 5개로 제한하여 x좌표를 증가시키면서 배치했다.
2. 크기 표현
각기 다른 돌 이미지 특성을 고려하여, 해당 원본 이미지 크기를 가져와 새롭게 계산하고 canvas상 크게 증가한 감이 있어 세부적으로 값을 추가하거나 뺏다.
2-4. 해산물
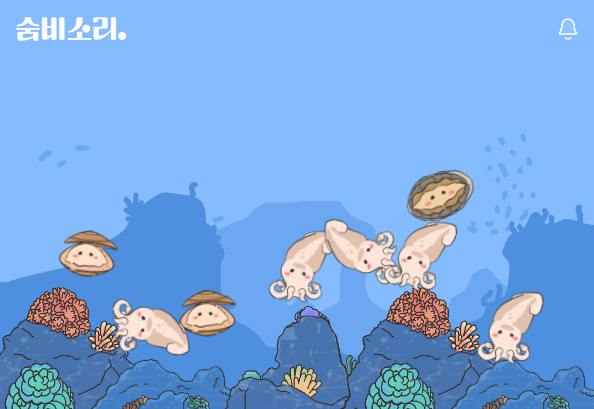
API의 요청을 통해서 저장된 해산물 요소와 count를 가져와 생성했다.
    const addSeafoods = (
      engine: Matter.Engine,
      width: number,
      height: number,
      seafoods: SeafoodCollected[],
    ) => {
      seafoods.forEach((seafood) => {
        const seafoodImage = new Image();
        seafoodImage.src = `${IMAGE_PATHS.SEAFOOD}/${seafood.englishName}.svg`;

        seafoodImage.onload = () => {
          for (let i = 0; i < seafood.count; i++) {
            const body = Matter.Bodies.circle(
              Math.random() * (width - 100) + 50,
              Math.random() * (height - 100) + 50,
              30,
              {
                restitution: 0.3,
                friction: 0.1,
                render: {
                  sprite: {
                    texture: seafoodImage.src,
                    xScale: 0.6,
                    yScale: 0.6,
                  },
                },
              },
            );
            Matter.World.add(engine.world, body);
          }
        };
      });
    };
...
    const bodies = engine.world.bodies;
    Events.on(engine, 'afterUpdate', () => {
      bodies.forEach((body) => {
        const maxSpeed = 3;
        const velocity = body.velocity;

        if (
          Math.abs(velocity.x) > maxSpeed ||
          Math.abs(velocity.y) > maxSpeed
        ) {
          Matter.Body.setVelocity(body, {
            x: Math.sign(velocity.x) * Math.min(Math.abs(velocity.x), maxSpeed),
            y: Math.sign(velocity.y) * Math.min(Math.abs(velocity.y), maxSpeed),
          });
        }
      });
    });
...
    const Mouse = Matter.Mouse;
    const MouseConstraint = Matter.MouseConstraint;
    const mouse = Mouse.create(render.canvas);
    mouse.pixelRatio = pixelRatio;

    const mouseConstraint = MouseConstraint.create(engine, {
      mouse,
      constraint: { stiffness: 0.2, render: { visible: false } },
      collisionFilter: { mask: 0x0001 },
    });

    World.add(engine.world, mouseConstraint);
...
   addSeafoods(engine, width, height, seafoods);
1. 요소 정의
render.sprite.scale 속성을 통해서 해산물 이미지의 크기를 화면에 맞게끔 조절하고 restitution(탄성)과 friction(마찰)을 설정하여 물리적 움직임을 정의했다.
생성 위치는 렌더링 될 때마다 랜덤하게 배치된다.
2. 마우스 상호작용
Mouse 객체를 생성하고, 해상도를 고려해 mouse.pixelRatio를 설정했다. constraint.stiffness로 마우스로 드래그하거나 튕길 수 있도록 했다.
해산물들이 너무 빠르게 움직이는 걸 방지하기 위해 afterUpdate 이벤트에서 maxSpeed=3을 초과하는 경우 속도를 제한했다.
2-5. 다이버
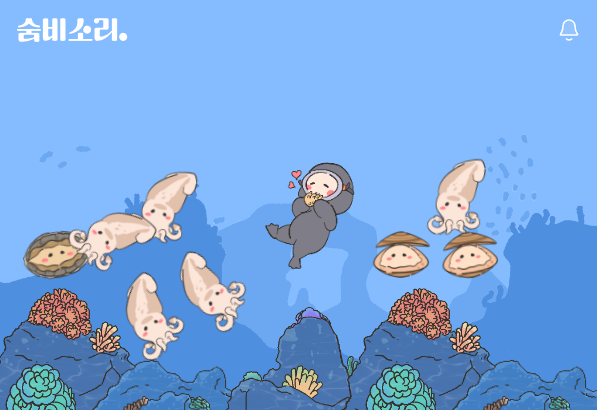
다이버는 충돌이 되지 않아야했고 위아래로 움직이는 모션을 주고 싶었다.
    const addDiver = (
      engine: Matter.Engine,
      width: number,
      height: number,
      texturePath: string,
    ) => {
      const diverImage = new Image();
      diverImage.src = texturePath;

      diverImage.onload = () => {
        const diverBody = Matter.Bodies.rectangle(
          width / 2,
          height / 2,
          50,
          100,
          {
            isStatic: false,
            render: {
              sprite: { texture: diverImage.src, xScale: 0.2, yScale: 0.2 },
            },
            collisionFilter: { category: 0x0002, mask: 0x0000 },
          },
        );

        Matter.World.add(engine.world, diverBody);

        // 수직 방향 움직임 설정
        let direction = 1;
        const minY = height / 2;
        const maxY = height / 2 + 5;

        Matter.Events.on(engine, 'beforeUpdate', () => {
          if (diverBody.position.y >= maxY) {
            direction = -1;
          } else if (diverBody.position.y <= minY) {
            direction = 1;
          }

          Matter.Body.applyForce(diverBody, diverBody.position, {
            x: 0,
            y: direction * 0.0008,
          });
        });
      };
    };
...
    addDiver(engine, width, height, `${IMAGE_PATHS.AQUARIUM}/sumbi.png`);
1. 수직 움직임
다이버는 화면 중앙을 기준으로 제한된 범위 내에서 위아래로 움직인다. 다이버의 현재위치를 기준으로 maxY와 minY를 통해 제한 범위를 설정했다.
2. 충돌 비활성화
배경이미지와 같은 원리로 collisionFilter를 활용한 카테고리 설정으로 충돌을 방지했다.
3. 트러블 슈팅
3-1. 화면 잘림

최초 구현시에 배경이미지를 해산물과 다이버를 제외한 모든 요소들은 하나로 통합되어 제공했었다. 하지만 화면이 작은 경우 배경이미지가 반복되어 화면이 잘리는 현상이 발생했다.
문제를 해결하기 위해 몇가지 개선 사항들을 거쳤다.
- 모든 요소 분리
- 배경 레이어(거품1, 거품2, 거품3)
- 돌 레이어(돌1, 돌2, 돌3)
- 분리된 요소 특성을 고려한 구현
- 분리된 요소들의 특성을 몇가지로 정의했다.
3-2. 화질 저하를 해결한 pixelRatio
pixelRatio는 디스플레이의 물리적 픽셀과 CSS 픽셀의 비율을 나타내는 값으로, 고해상도 디스플레이(예: Retina 디스플레이)에서 그래픽 렌더링의 품질을 개선하는 데 사용된다.
기존에 pixelRatio를 고려하지 않았을 때, 웹화면에서 화질 저하는 없었지만 모바일 기기로 접속했을 때 화질 저하 이슈가 발생했다.
	const pixelRatio = window.devicePixelRatio || 1;

    const render = Render.create({
      element: container,
      engine: engine,
      canvas: canvasRef.current!,
      options: {
        width: width,
        height: height,
        wireframes: false,
        background: `${IMAGE_PATHS.AQUARIUM}/Background-01.png`,
        pixelRatio: pixelRatio,
      },
    });
해당 내용을 추가한 후 모든 화면에서 화질을 개선할 수 있었다.
3-3. 해산물요소와 마우스 클릭
pixelRatio를 추가한 후 해산물 요소들이 전혀 예상치 못하게 클릭됐다.
모바일기기에서 증가된 pixelRatio값 만큼 마우스의 mouse.pixelRatio를 재계산 하여 해결할 수 있었다.
mouse.pixelRatio = pixelRatio;4. 마무리
Matter.js는 canvas 객체를 조작하는 라이브러리이다 보니, 기대했던 동작이 제대로 나오지 않을 때가 종종 있었다. 이번에 사용하면서 몇 가지 새로운 점을 배웠는데, 그중 하나는 window.devicePixelRatio가 어떤 역할하는지 알았다. 해당 속성은 모바일과 웹 화면 간의 크로스 브라우징을 고려할 때 유용할 거 같다.
또 다른 배운 점은 canvas 객체를 반응형으로 다루는 방법이다. 화면 크기 변경에 따라 canvas 크기를 동적으로 조정하고, 렌더링 비율을 유지하기 위해 scale을 사용하는 방법을 배웠다.
Unity처럼 생생하고 정교한 화면을 구현하기는 어렵지만, 간단한 게임이나 2D 물리 엔진을 React로 구현하려는 경우에는 Matter.js를 한 번 사용해보는 것을 추천한다.
5. 최종 코드
참고 링크: