NextJs 공식문서에서 제공하는 React Foundations 과정을 공부하며 번역한 시리즈입니다!
https://nextjs.org/learn/react-foundations/server-and-client-components
To understand how Server and Client Components work, it's helpful to be familiar with two foundational web concepts:
- The environments your application code can be executed in: the server and the client.
- The network boundary that separates server and client code.
서버 및 클라이언트 컴포넌트가 어떻게 작동하는지 이해하기 위해서는 두 가지 기본적인 웹 개념을 알고 있는 것이 도움이 됩니다:
- 애플리케이션 코드가 실행될 수 있는 환경: 서버와 클라이언트.
- 서버와 클라이언트 코드를 분리하는 네트워크 경계.
Server and Client Environments
서버 및 클라이언트 환경
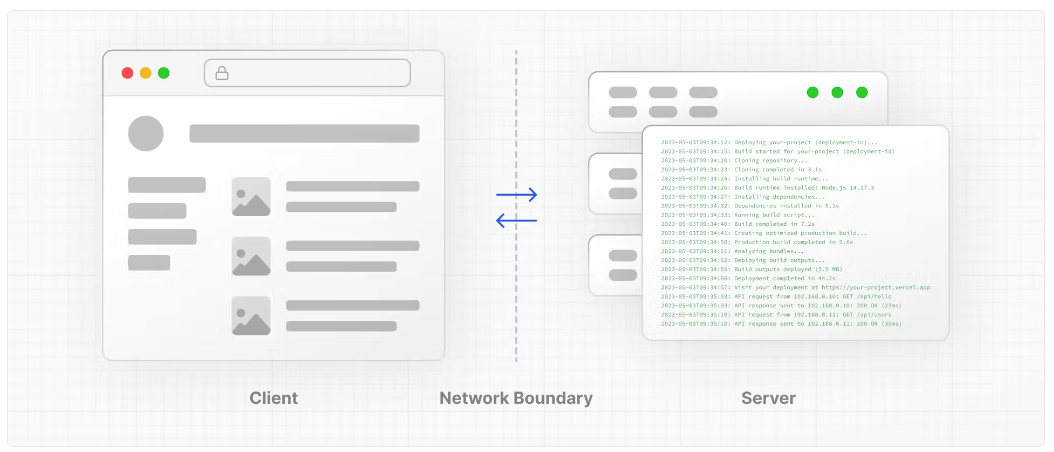
In the context of web applications:
- The client refers to the browser on a user’s device that sends a request to a server for your application code. It then turns the response it receives from the server into an interface the user can interact with.
- The server refers to the computer in a data center that stores your application code, receives requests from a client, does some computation, and sends back an appropriate response.
웹 애플리케이션의 맥락에서:
- 클라이언트는 사용자의 기기에 있는 브라우저로, 애플리케이션 코드를 위해 서버에 요청을 보냅니다. 그런 다음 서버로부터 받은 응답을 사용자가 상호 작용할 수 있는 인터페이스로 변환합니다.
- 서버는 데이터 센터에 있는 컴퓨터로, 귀하의 애플리케이션 코드를 저장하고 클라이언트로부터 요청을 받아 일부 계산을 수행한 후 적절한 응답을 다시 보냅니다.
Each environment has its own set of capabilities and constraints. For example, by moving rendering and data fetching to the server, you can reduce the amount of code sent to the client, which can improve your application's performance. But, as you learned earlier, to make your UI interactive, you need to update the DOM on the client.
각 환경은 자체 기능과 제약을 가지고 있습니다. 예를 들어, 렌더링과 데이터 가져오기를 서버로 옮김으로써 클라이언트로 보내는 코드의 양을 줄일 수 있어 애플리케이션의 성능을 향상시킬 수 있습니다. 그러나 앞서 배운 것처럼 UI를 상호 작용 가능하게 만들기 위해서는 클라이언트에서 DOM을 업데이트해야 합니다.
Therefore, the code you write for the server and the client is not always the same. Certain operations (e.g., data fetching or managing user state) are better suited for one environment over the other.
따라서 서버와 클라이언트를 위해 작성하는 코드는 항상 같지 않습니다. 특정 작업(예: 데이터 가져오기 또는 사용자 상태 관리)은 특정 환경(서버 또는 클라이언트 한 쪽)에 더 적합할 수 있습니다.
Network Boundary | 네트워크 경계
The Network Boundary is a conceptual line that separates the different environments.
네트워크 경계는 다른 환경을 분리하는 개념적인 선입니다.
In React, you choose where to place the network boundary in your component tree. For example, you can fetch data and render a user's posts on the server (using Server Components), then render the interactive LikeButton for each post on the client (using Client Components).
React에서 사용자는 네트워크 경계를 컴포넌트 트리에서 어디에 둘지 선택합니다. 예를 들어 서버 컴포넌트를 사용하여 서버에서 데이터를 fetch하고 게시물을 렌더링할 수도 있고, 또는 클라이언트 컴포넌트를 사용하여 클라이언트에서 각 게시물의 좋아요 버튼을 렌더링 할 수도 있습니다.
Similarly, you can create a Nav component that is rendered on the server and shared across pages, but if you want to show an active state for links, you can render the list of Links on the client.
마찬가지로, 서버에서 렌더링되고 여러 페이지들이 공통으로 사용하는 네비게이션 컴포넌트를 생성할 수 있지만, 링크에 활성화 상태를 표시하려면 클라이언트에서 링크 목록을 렌더링할 수 있습니다.
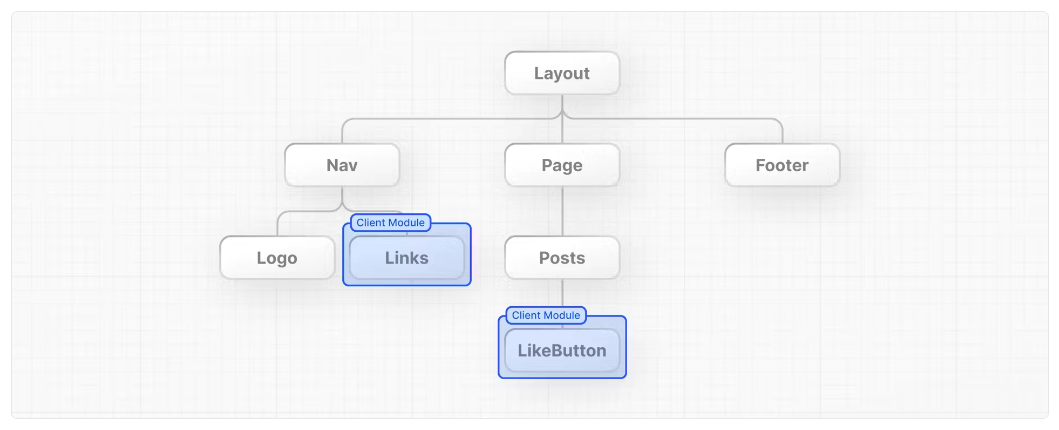
(alt) A component tree showing a layout that has 3 components as its children: Nav, Page, and Footer. The page component has 2 children: Posts and LikeButton. The Posts component is rendered on the server, and the LikeButton component is rendered on the client.
(alt) 위 그림은 세 개의 컴포넌트(Nav, Page, Footer)를 자식으로 하는 레이아웃의 컴포넌트 트리입니다. 페이지 컴포넌트는 두 개의 자식(Posts와 LikeButton)을 가지고 있습니다. Posts 컴포넌트는 서버에서 렌더링되고, LikeButton 컴포넌트는 클라이언트에서 렌더링됩니다.
Behind the scenes, the components are split into two module graphs. The server module graph (or tree) contains all the Server Components that are rendered on the server, and the client module graph (or tree) contains all Client Components.
After Server Components are rendered, a special data format called the React Server Component Payload (RSC) is sent to the client. The RSC payload contains:
뒷단에서 이 컴포넌트들은 두 개의 모듈 그래프로 분리됩니다. 서버 모듈 그래프(트리)는 서버에서 렌더링되는 모든 서버 컴포넌트를 포함하고, 클라이언트 모듈 그래프(트리)는 모든 클라이언트 컴포넌트를 포함합니다.
서버 컴포넌트가 렌더링된 후, React Server Component Payload (RSC)라고 하는 특별한 데이터 형식이 클라이언트로 전송됩니다. RSC 페이로드에는 다음이 포함됩니다:
- The rendered result of Server Components.
- Placeholders (or holes) for where Client Components should be rendered and references to their JavaScript files.
- 서버 컴포넌트의 렌더링 결과.
- 클라이언트 컴포넌트가 렌더링될 위치를 위한 플레이스홀더(또는 구멍)와 그들의 자바스크립트 파일에 대한 참조.
React uses this information to consolidate the Server and Client Components and update the DOM on the client. Let's see how this works.
React는 이 정보를 사용하여 서버와 클라이언트 컴포넌트를 통합하고 클라이언트의 DOM을 업데이트합니다. 이것이 어떻게 작동하는지 살펴봅시다.
Using Client Components
클라이언트 컴포넌트 사용하기
As you learned in the last chapter, Next.js uses Server Components by default - this is to improve your application's performance and means you don't have to take additional steps to adopt them.
지난 장에서 배운 것처럼 Next.js는 기본적으로 서버 컴포넌트를 사용합니다 - 이는 애플리케이션의 성능을 향상시키는 것이며, 추가적인 단계를 거칠 필요가 없다는 것을 의미합니다.
Looking back at the error in your browser, Next.js is warning you that you're trying to useState inside a Server Component. You can fix this by moving the interactive "Like" button to a Client Component.
브라우저에서 발생한 오류를 돌아보면, Next.js는 서버 컴포넌트 내에서 useState를 사용하려고 한다는 경고를 보여줍니다. 상호 작용적인 "좋아요" 버튼을 클라이언트 컴포넌트로 이동시켜 이 문제를 해결할 수 있습니다.
Create a new file called like-button.js inside the app folder that exports a LikeButton component
앱 폴더 안에 LikeButton 컴포넌트를 내보내는 like-button.js라는 새 파일을 만듭니다(/app/like-button.js)
export default function LikeButton() {} Move the button element and the handleClick() function from page.js to your new LikeButton component:
page.js에서 button 요소와 handleClick() 함수를 새로운 LikeButton 컴포넌트로 이동시키세요:
export default function LikeButton() {
  function handleClick() {
    setLikes(likes + 1);
  }

  return <button onClick={handleClick}>Like ({likes})</button>;
}
Next, move the likes state and the import:
다음으로, likes 상태와 가져오기를 이동하세요:
import { useState } from 'react';

export default function LikeButton() {
  const [likes, setLikes] = useState(0);

  function handleClick() {
    setLikes(likes + 1);
  }

  return <button onClick={handleClick}>Like ({likes})</button>;
}
Now, to make the LikeButton a Client Component, add the React 'use client' directive at the top of the file. This tells React to render the component on the client.
이제 LikeButton을 클라이언트 컴포넌트로 만들기 위해 파일 상단에 React의 'use client' 지시문을 추가하세요. 이는 React에게 컴포넌트를 클라이언트에서 렌더링하도록 지시합니다.
'use client';

import { useState } from 'react';

export default function LikeButton() {
  const [likes, setLikes] = useState(0);

  function handleClick() {
    setLikes(likes + 1);
  }

  return <button onClick={handleClick}>Like ({likes})</button>;
}
Back in your page.js file, import the LikeButton component into your page:
page.js 파일로 돌아가서 LikeButton 컴포넌트를 페이지에 가져오세요:
import LikeButton from './like-button';

function Header({ title }) {
  return <h1>{title ? title : 'Default title'}</h1>;
}

export default function HomePage() {
  const names = ['Ada Lovelace', 'Grace Hopper', 'Margaret Hamilton'];

  return (
    <div>
      <Header title="Develop. Preview. Ship." />
      <ul>
        {names.map((name) => (
          <li key={name}>{name}</li>
        ))}
      </ul>
      <LikeButton />
    </div>
  );
}
Save both files and view your app in the browser. Now that there are no errors, once you make changes and save, you should notice the browser automatically updates to reflect the change.
두 파일을 저장하고 브라우저에서 앱을 확인하세요. 이제 오류가 없으므로 변경 사항을 저장하면 브라우저가 자동으로 업데이트되어 변경 사항을 반영하는 것을 확인할 수 있습니다.
This feature is called Fast Refresh. It gives you instantaneous feedback on any edits you make and comes pre-configured with Next.js.
이 기능을 Fast Refresh라고 합니다. 변경 사항에 대해 즉각적인 피드백을 제공하며 Next.js에 사전 구성되어 있습니다.
Summary
To recap, you learned about the server and client environments and when to use each. You also learned that Next.js uses React Server Components by default to improve performance, and how you can opt into Client Components to smaller parts of your UI interactive.
요약하면, 서버와 클라이언트 환경에 대해 배우고 각각을 언제 사용해야 하는지 알게 되었습니다. 또한 Next.js가 기본적으로 React 서버 컴포넌트를 사용하여 성능을 향상시키고, UI의 작은 부분들을 상호작용 가능하게 만들기 위해 클라이언트 컴포넌트를 선택적으로 사용할 수 있는 방법도 배웠습니다.