
오늘은 이미지 저장 로직에 대한 테스트를 진행해 보았다.
사실 TDD 방식으로 백엔드 작업을 진행하여 공부했던 CRUD까지는 테스트가 가능했지만, 로그인 기능 구현, 이미지 파일 저장 기능 구현 등 모르는 것을 배우려다보니 TDD 방식으로 하기 까다로웠다.
그래서 코드를 작성하면서 그때 그때 postman으로 테스트를 진행하는 방식으로 하였다.
사실 아직 공부를 많이 하지 못한 나의 잘못이라고 판단이 된다. 앞으로 공부를 더 열심히 해야겠다는 생각이 코드를 작성하면서 느꼈다.
전날 했던 회원 정보 수정 기능에 대해 postman으로 테스트했다.
진행 순서
개인정보를 수정하기 위해서는 회원정보가 필요하여 회원가입이 먼저 필요했고, 프로필을 저장하기 위해서는 로그인이 필요하다.
그래서 테스트 진행 순서는 이전에 만들었던 회원가입 로직, 그 다음 로그인을 한 후 회원 정보를 수정하는 순서로 진행 하였다.
회원가입 -> 로그인 -> 회원정보 수정
회원가입
Controller
	@PostMapping("/signup")
    public ResponseEntity<UserEntity> signup(UserDto userDto){
        UserEntity user = userService.save(userDto);

        return new ResponseEntity<>(user, HttpStatus.OK);
	}
Service
    public UserEntity save(UserDto userDto) {
        UserEntity entity = userDto.toEntity();
        userRepository.save(entity);

        return entity;
    }
회원 가입에 필요한 데이터들을 form태그를 이용해 데이터를 보낼것이기 때문에 x-www-form-urlencoded 방식으로 데이터를 기입해 보냈다.
반환값은 ResponseEntity를 이용하여 테스트 하였다.
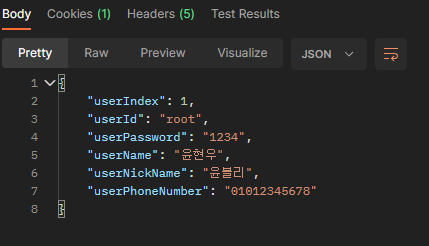
회원가입 완성!
로그인
Controller
    @PostMapping("/login")
    public ResponseEntity<String> login(@RequestParam("userId") String userId,@RequestParam("userPassword") String userPassword, HttpSession session){
        Long userIndex = userService.login(userId, userPassword);
        if(userIndex == null){
            return new ResponseEntity<>("no userData", HttpStatus.BAD_REQUEST);
            // return "redirect:/login";
        }
        session.setAttribute("userIndex", userIndex);
        log.info(session.getAttribute("userIndex").toString());

        return new ResponseEntity<>(userIndex.toString(), HttpStatus.OK);
        // return "redirect:/";
    }
사용자의 아이디와 비밀번호를 받아와 로그인을 한다.
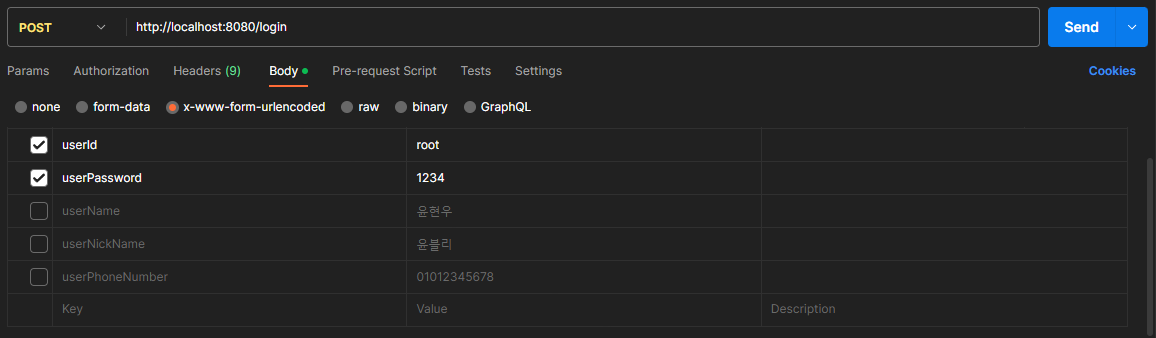
반환값으로 해당 아이디 비밀번호로 로그인 했을 때 세션을 저장하고, 해당 사용자의 index를 반환했다.
지금 회원정보는 1명이기 때문에 1을 반환한다.
회원정보 수정(문제 및 해결)
오늘의 가장 메인 파트이다.
사실 저번에 썼던 코드로 테스트를 진행해 보았는데 파일이 저장이 안되고, 프로필 엔티티도 생성되지 않았다.
맨 처음 테스트를 진행했을 때, 엔티티는 생성되었지만, 파일이 로컬 컴퓨터에 저장이 안되는 것으로 알았다.
그래서 파일 경로를 찾아 보았다.
찾아보던 와중 생각해보니
	public Optional<ProfileEntity> storeFile(MultipartFile multipartFile, Long userIndex) throws IOException {
        if(multipartFile.isEmpty()){
            return null;
        }

        String originFileName = multipartFile.getOriginalFilename();
        String storeFileName = createStoreFileName(originFileName);
        multipartFile.transferTo(new File(getFullPath(storeFileName)));

        ProfileEntity entity = ProfileEntity.builder()
                                    .originFileName(originFileName)
                                    .storeFileName(storeFileName)
                                    .userIndex(userIndex)
                                    .build();

        Optional<ProfileEntity> profileEntity = profileRepository.findByUserIndex(userIndex);

        // 만약 유저 인덱스를 가진 프로필엔티티가 있으면 해당 프로필 엔티티를 수정
        if(profileEntity != null){
            profileEntity.map(p -> {
                profileEntity.get().setOriginFileName(originFileName);
                profileEntity.get().setStoreFileName(storeFileName);
                profileEntity.get().setUserIndex(userIndex);

                return p;
            })
            .map(p -> profileRepository.save(p));

            return profileEntity;
        }
        // 없다면 프로필 엔티티를 생성해서 저장
        else{
            ProfileEntity saved = profileRepository.save(entity);
            Optional<ProfileEntity> find =profileRepository.findById(userIndex);
            return find;
        }
    }
profileEntity는 Optional로 감싼 타입인데, if문에 null값을 넣어 조건문을 만들었던 것이다.
그래서 테스트를 해보며 DB를 확인 했는데 역시나 생성되어있지도 않았다.(애초에 조건문이 성립되지 않았기 때문에 else문도 안되었다.)
    public Optional<ProfileEntity> storeFile(MultipartFile multipartFile, Long userIndex) throws IOException {
        if(multipartFile.isEmpty()){
            return null;
        }

        String originFileName = multipartFile.getOriginalFilename();
        String storeFileName = createStoreFileName(originFileName);

        try{
            multipartFile.transferTo(new File(getFullPath(storeFileName)));
        }catch(Exception e){
            System.out.println("can't upload file");
        }

        ProfileEntity entity = ProfileEntity.builder()
                                    .originFileName(originFileName)
                                    .storeFileName(storeFileName)
                                    .userIndex(userIndex)
                                    .build();

        Optional<ProfileEntity> profileEntity = profileRepository.findByUserIndex(userIndex);

        // 만약 유저 인덱스를 가진 프로필엔티티가 있으면 해당 프로필 엔티티를 수정
        if(!profileEntity.isEmpty()){
            profileEntity.map(p -> {
                profileEntity.get().setOriginFileName(originFileName);
                profileEntity.get().setStoreFileName(storeFileName);
                profileEntity.get().setUserIndex(userIndex);

                return p;
            })
            .map(p -> profileRepository.save(p));

            return profileEntity;
        }
        // 없다면 프로필 엔티티를 생성해서 저장
        else{
            profileRepository.save(entity);
            Optional<ProfileEntity> find =profileRepository.findById(userIndex);
            return find;
        }
    }
그래서 if문을 isEmpty 메서드를 사용하여 "비어있지 않다면" 이라는 조건으로 변경하였다.
변경 후 테스트를 돌려보니 해당 엔티티는 생성이 되었다.
하지만 여전히 파일이 저장은 안되었다.
그래서 FileStore클래스의 모든 코드를 확인해보았다.
하지만 모두 맞는 코드였다.
결국 경로 설정이 잘못되었던 것인가라는 결론이 나왔다.
properties로 경로를 설정하려 했는데 구글에도 잘 나오지 않았던 터라 일단 넘어갔었다.
그래서 구글링을 해본 결과
    // 파일 경로
    @Value("${file.dir}")
    private String fileDir;
경로설정을 위한 어노테이션인 @Value를 사용하기 위해 properties에서 경로를 지정해주어야한다.
나는 file.dir이라는 이름으로 주소를 설정할 것이기 때문에 properties에
file.dir = 파일을 저장할 폴더 위치
이런 식으로 설정을 해야한다.
하지만 주소를 설정할 때 주의해야 할 점은 주소 마지막에 / 를 넣어줘야 한다는 점이다.
그래서 나는 주소를 넣은 뒤에 테스트를 돌려보았다.
file.dir = file.dir = C:\Users\yhw01\talkcoding\src\main\resources\static\upload\
하지만 갑자기 잘되던 서버가 오류가 나버렸다.
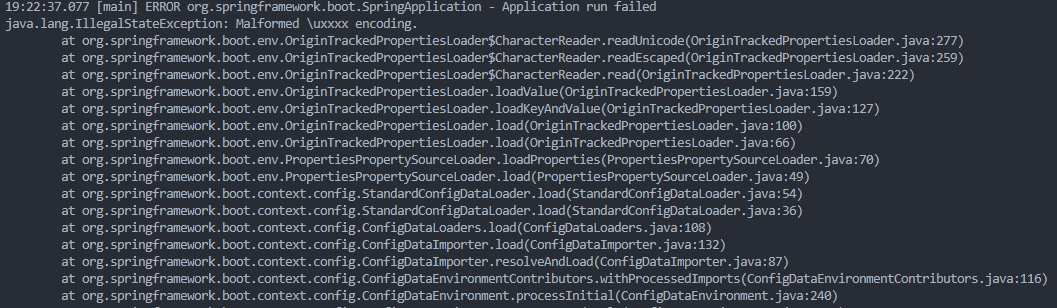
... 갑자기 오류가 나서 멘붕이 왔다.
인코딩이 잘못되었다는 오류인것 같아서 고민을 해보다 파일 저장 경로 이름이 
이 슬래시로 되어있어서 설마하고 반대 슬래시로 고친 후 돌려보았더니 해결이 되었다.
정말 다행이었다.
이렇게 하고 테스트를 진행해 보았다.
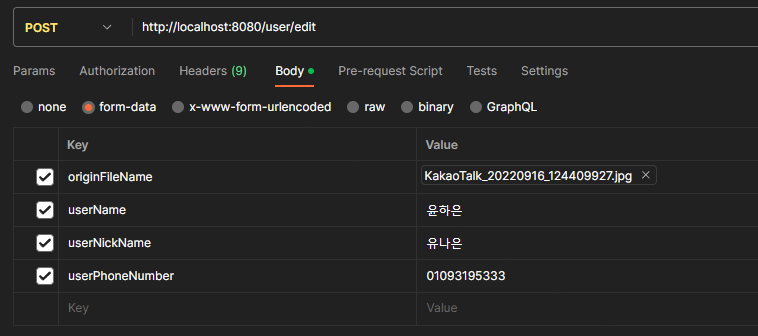
결국 엔티티는 생성이 되었고 내가 원하는 파일도 저장이 된 것을 확인할 수 있었다.

오늘 나는 이 이미지 저장 기능의 구현을 끝마쳐서 너무 행복하다.
오랫동안 고민하며 공부했던 것이기에 성공할 수 있어서 정말 뿌듯한 하루였던 것 같다.
앞으로도 더욱 열심히 해서 프로젝트를 성공적으로 마무리 해야겠다.
내일의 나도 파이팅 하자!!