docker-compose.yaml
x-ariflow-common
- 공통 적용 옵션 선언
services
- 우리가 띄울 도커 컨테이너 지정
- 현재는 postgres, redis, airflow-webserver , airflow-scheduler, airflow-worker, airflow-triggerer,airflow-init 가 존재함
volumes
- data를 이어줄 곳
실습해보기
Postgres DB 추가하기
1) yaml 파일에 postgres 인스턴스 추가해보기
- services 바로 아래에 넣어주기
postgres_custom:
image: postgres:13
environment:
POSTGRES_USER: {원하는거}
POSTGRES_PASSWORD: {원하는거}
POSTGRES_DB: {원하는거}
TZ: Asia/Seoul
volumes:
- postgres-db-volume_custom:/var/lib/postgresql/data
ports:
- 5432:5432
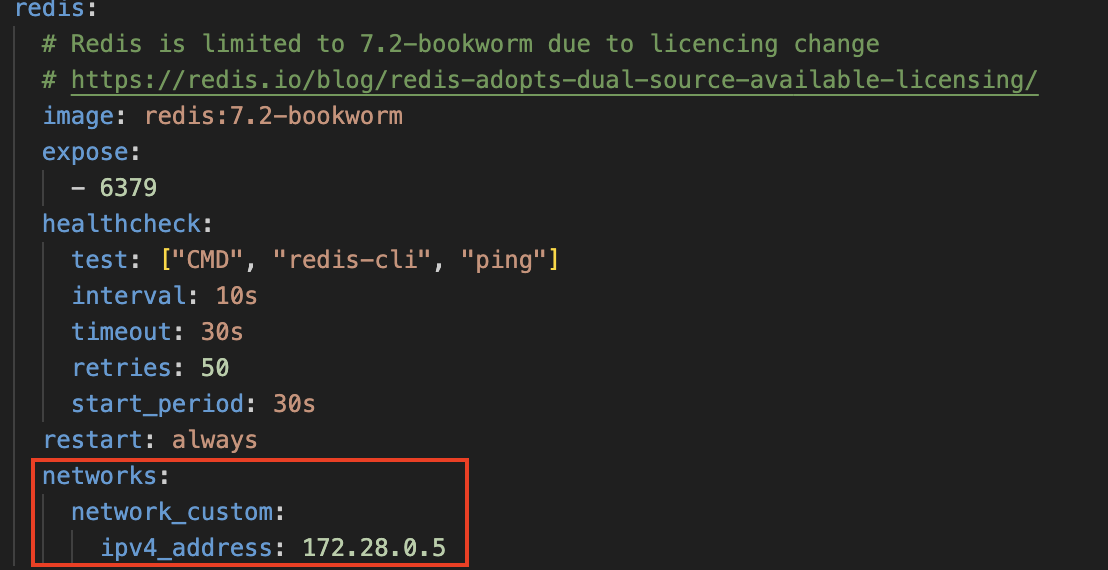
networks:
network_custom:
ipv4_address: 172.28.0.32) 고정 ip 할당하기
-
기본적으로 컨테이너를 유동 IP를 지님 ( 재가동시 IP 변경가능)
-
고정 IP를 할당하려면 신규 networks를 만들어 할당해야함
- default network 대역 확인 :
sudo docker inspect {docker ip} - 여기서 사용하는 대역이 아닌 networks를 만들어야함.
networks: network_custom: driver: bridge ipam: driver: default config: - subnet: 172.28.0.0/16 gateway: 172.28.0.1 - default network 대역 확인 :
-
다른 container들에도 1번에서 설정한 network 넣어주기
- postgres, redis, airflow-webserver , airflow-scheduler, airflow-worker, airflow-triggerer,airflow-init
- 각각 다른 네트워크들을 넣어줘야함 (172.28.0.0 에 맞춰서 하나씩 추가)
postgres redis airflow-webserver |

3) 볼륨 추가
volumes:
  postgres-db-volume_custom: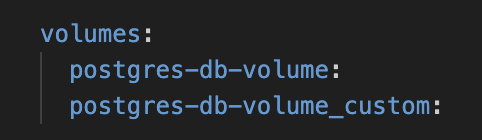
4) ec2 보안그룹 추가
- 열어줬던 5432, 5431 port 열어주기
5) 디비버에 연결 2개해야함
-
디비버 다운로드
-
연결
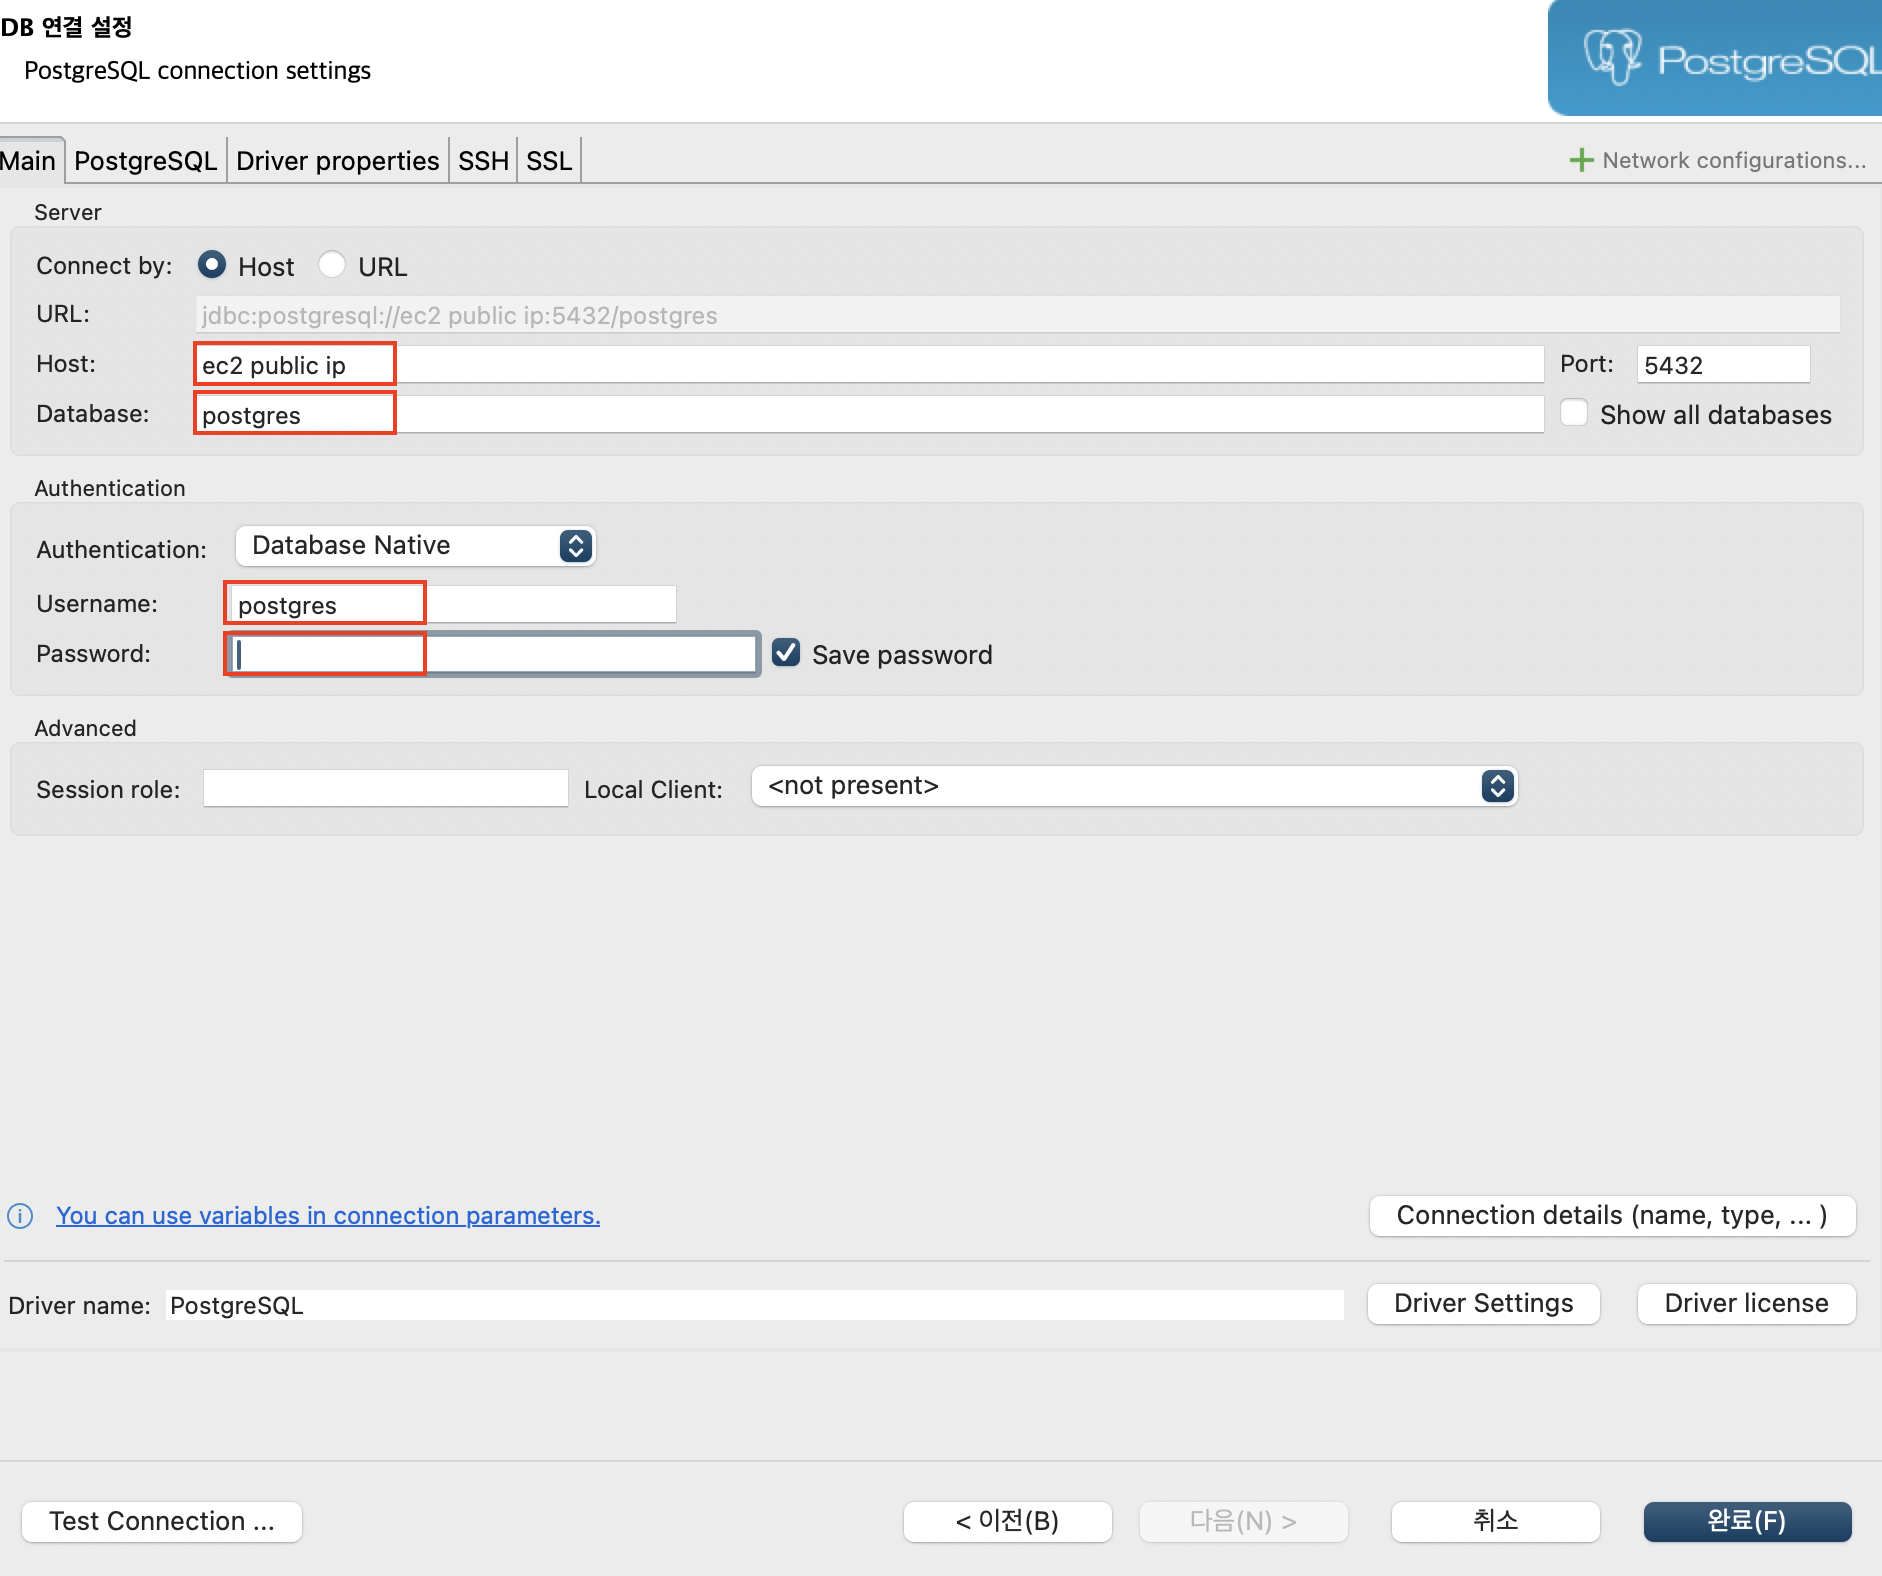
-
1) 번에서 만들어줬던, user, password, db에 맞춰서 값 넣어주기
-
원래 존재했던 airflow, port 번호 5431 로 변경후 연결해주기 ( 왜냐면 우리가 yaml 파일에 그렇게 설정함. )
6) 실습용 db( postgres_custom 으로 만든것 , 1번에서 만든것 ) 에서 테이블 생성
CREATE TABLE py_opr_drct_insrt(
    dag_id varchar(100),
    task_id varchar(100),
    run_id varchar(100),
    msg text
)
;
7) table에 dag을 통해 data insert 하기
- dag 이름 : dags_python_with_postgres.py
from airflow import DAG
import pendulum
from airflow.operators.python import PythonOperator

with DAG(
    dag_id='dags_python_with_postgres',
    start_date=pendulum.datetime(2024,6,16, tz='Asia/Seoul'),
    schedule=None,
    catchup=False
) as dag:

    def insrt_postgres(ip, port, dbname, user, passwd, **kwargs):
        import psycopg2
        from contextlib import closing
        with closing(psycopg2.connect(host=ip, dbname=dbname, user=user, password=passwd, port=int(port))) as conn:
            with closing(conn.cursor()) as cursor:
                dag_id = kwargs.get('ti').dag_id
                task_id = kwargs.get('ti').task_id
                run_id = kwargs.get('ti').run_id
                msg = 'insrt 수행'
                sql = 'insert into py_opr_drct_insrt values (%s,%s,%s,%s);'
                cursor.execute(sql,(dag_id,task_id,run_id,msg))
                conn.commit()

    insrt_postgres = PythonOperator(
        task_id='insrt_postgres',
        python_callable=insrt_postgres,
        op_args=['172.28.0.3', '5432', '{db이름}', '{유저}', '{패스워드}']
    )

    insrt_postgres
8) 7번에서 만든 dag을 airflow에서 실행
- 디비버 내가 만든 table에 값이 들어와있음
hook , connection
앞서 한 방법은 dag 이나 git에 ip, 비밀 번호 정보가 다 노출됨.
이를 해결하기 위해서 Hook 을 이용함
connection
- Airflow UI 화면에서 등록한 커넥션 정보
Hook
- Airflow에서 외부 솔루션에 연결 , 기능을 사용할 수 있도록 미리 구현된 메서드를 가진 클래스
hook의 특징
- connection 정보를 통해 생성되는 객체
- 접속 정보를 connection을 통해 받아오기 때문에 접속 정보가 코드상 노출되지 않음
- 특정 솔루션을 다룰 수 있는 메서드가 구현되어 있음
- 오퍼레이터나 센서와는 달리 Hook은 task를 만들지 못하기 때문에 다른 오퍼레이터 안에서 함께 사용됨.
hook 실습
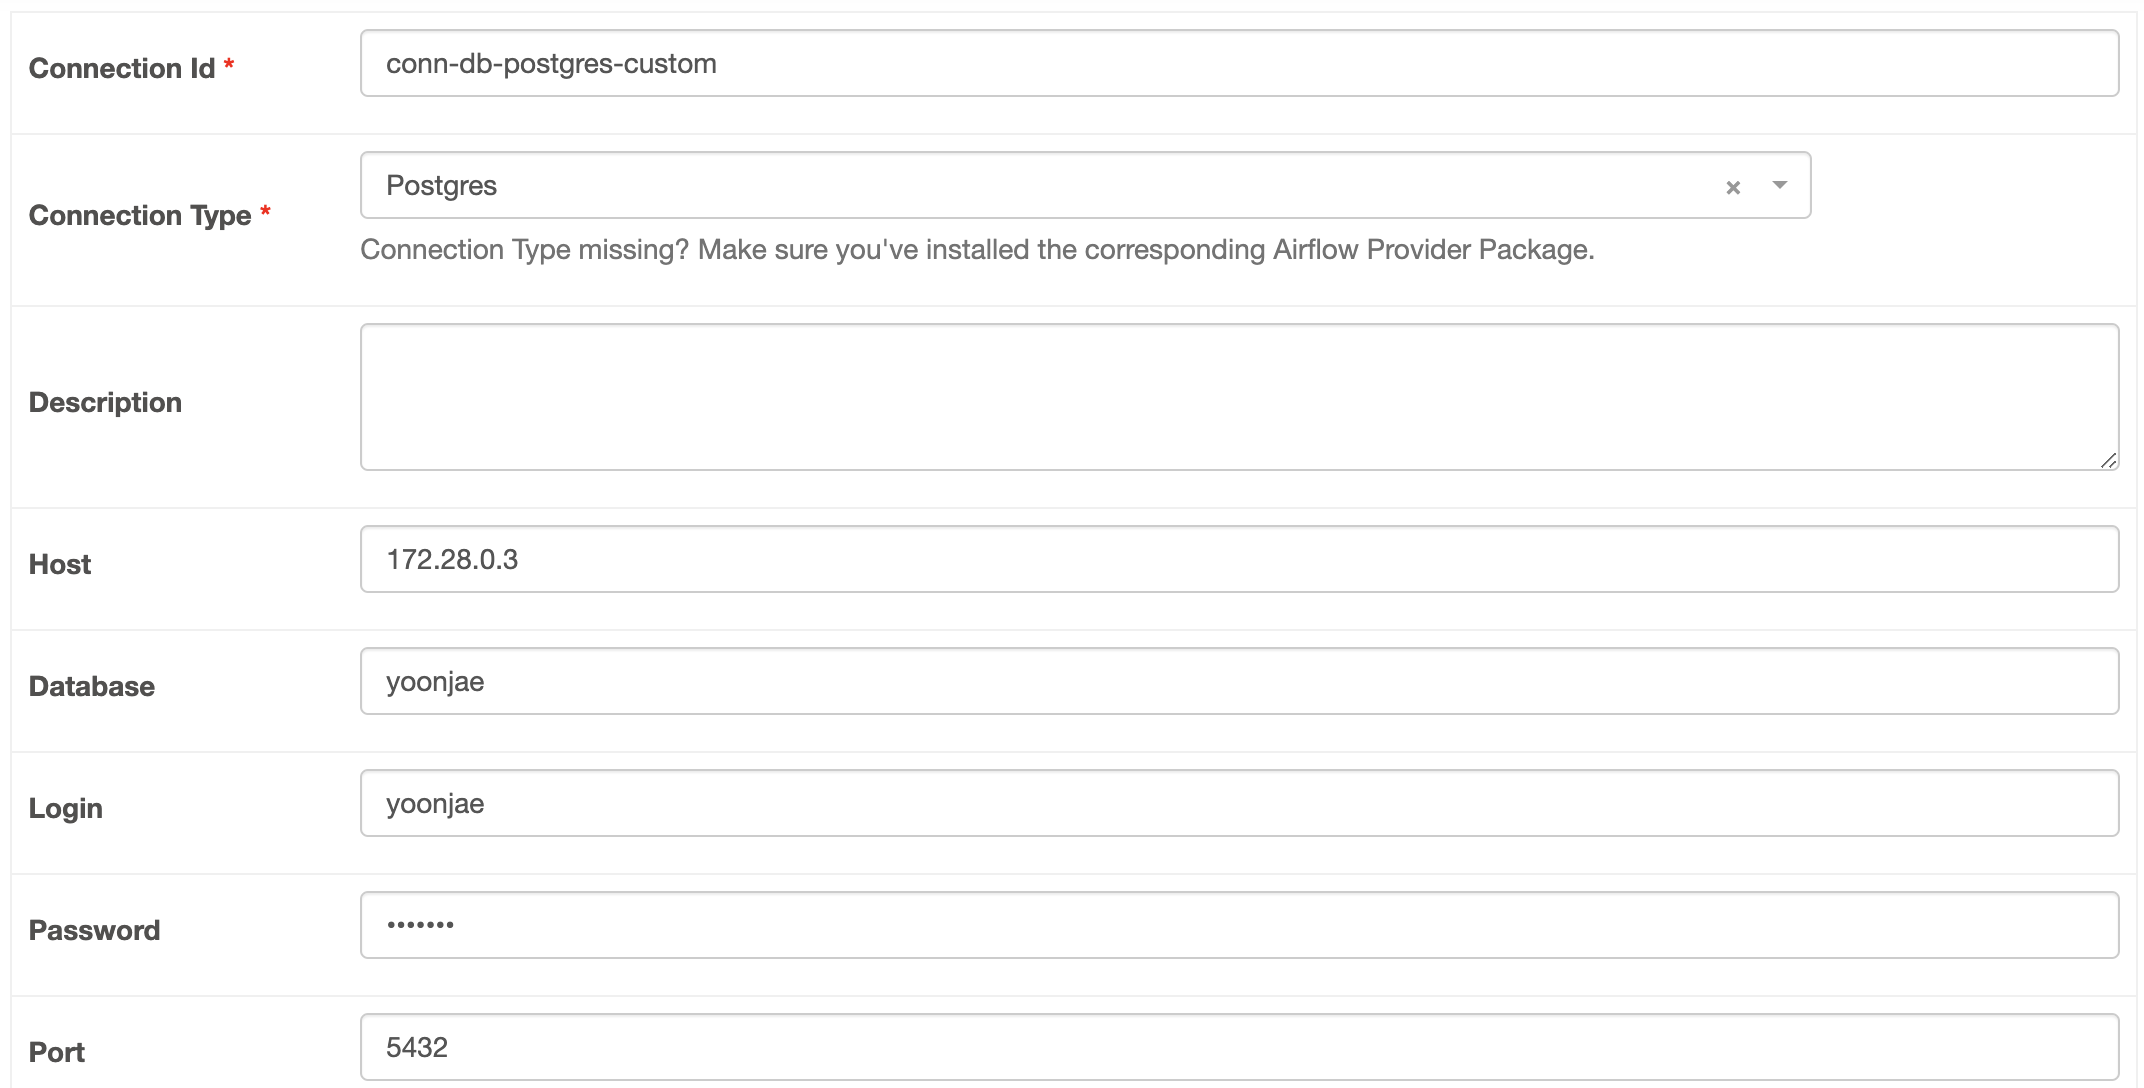
1) connection 등록

2) postgres hook을 이용해 접속 가능
- connection을 등록하면 사용할 수 있음.
from airflow import DAG
import pendulum
from airflow.operators.python import PythonOperator

with DAG(
        dag_id='dags_python_with_postgres_hook',
        start_date=pendulum.datetime(2024, 6, 16, tz='Asia/Seoul'),
        schedule=None,
        catchup=False
) as dag:
    def insrt_postgres(postgres_conn_id, **kwargs):
        from airflow.providers.postgres.hooks.postgres import PostgresHook
        from contextlib import closing

        postgres_hook = PostgresHook(postgres_conn_id)
        # 아래와 같이 접속 정보를 가지고 올 수 있음.
        with closing(postgres_hook.get_conn()) as conn:
            with closing(conn.cursor()) as cursor:
                dag_id = kwargs.get('ti').dag_id
                task_id = kwargs.get('ti').task_id
                run_id = kwargs.get('ti').run_id
                msg = 'hook insrt 수행'
                sql = 'insert into py_opr_drct_insrt values (%s,%s,%s,%s);'
                cursor.execute(sql, (dag_id, task_id, run_id, msg))
                conn.commit()

    insrt_postgres_with_hook = PythonOperator(
        task_id='insrt_postgres_with_hook',
        python_callable=insrt_postgres,
        op_kwargs={'postgres_conn_id':'conn-db-postgres-custom'}
    )
    insrt_postgres_with_hook
3) dags_python_with_postgres_hook dag 파일 실행하기
- db에 저장된것을 볼 수 있음.

4) Hook의 bulk load 이용하기 - 에러버전
- bulk upload 기능을 이용해 csv 파일을 postgres DB로 업로드
from airflow import DAG
import pendulum
from airflow.operators.python import PythonOperator
from airflow.providers.postgres.hooks.postgres import PostgresHook

with DAG(
        dag_id='dags_python_with_postgres_hook_bulk_load',
        start_date=pendulum.datetime(2024, 6, 16, tz='Asia/Seoul'),
        schedule='0 7 * * *',
        catchup=False
) as dag:
    def insrt_postgres(postgres_conn_id, tbl_nm, file_nm, **kwargs):
        postgres_hook = PostgresHook(postgres_conn_id)
        postgres_hook.bulk_load(tbl_nm, file_nm)

    insrt_postgres = PythonOperator(
        task_id='insrt_postgres',
        python_callable=insrt_postgres,
        op_kwargs={'postgres_conn_id': 'conn-db-postgres-custom',
                   'tbl_nm':'seoul_bike_hist',
                   'file_nm':'/opt/airflow/ingest/bikeList/{{data_interval_end.in_timezone("Asia/Seoul") | ds_nodash }}/bikeList.csv'}
)- 단, table을 만들어주고 해야함
CREATE table seoul_bike_hist(
	rackTotCnt int,
	stationName varchar(50),
	parkingBikeTotCnt int,
	shared int,
	stationLatitude numeric,
	stationLongitude numeric,
	stationId varchar(10)
);- 근데 에러 생성
psycopg2.errors.InvalidTextRepresentation: invalid input syntax for type integer: "rackTotCnt,stationName,parkingBikeTotCnt,shared,stationLatitude,stationLongitude,stationId"=> csv에 헤더가 존재하기 때문에 에러 생성
-
헤더 없애주고 다시 실행
-
또 에러생성 : tab으로 delinited가 고정되어있음.
psycopg2.errors.InvalidTextRepresentation: invalid input syntax for type integer: "15,102. 망원역 1번출구 앞,2,13,37.55564880,126.91062927,ST-4"
5) 에러 해결방안
4의 문제점
- 테이블이 없으면 미리 만들어놔야함
- Header까지 포함해서 업로드됨
- Load 가능한 Delimiter는 Tab으로 고정되어있음
해결방안
- csv 파일을 알맞게 만들어주기
- custom hook 만들기
- Delimiter 유형을 입력받기
- Header 여부 선택
- sqlalchemy 이용하여 load, 테이블이 없다면 생성하면서 업로드 하도록 함
custom hook 만들기
- plugins/hooks 폴더 안에 만들기
- custom_postgres_hook.py
- basehook 을 상속받아서 만들기
from airflow.hooks.base import BaseHook
import psycopg2
import pandas as pd


class CustomPostgresHook(BaseHook):

    def __init__(self, postgres_conn_id, **kwargs):
        self.postgres_conn_id = postgres_conn_id

    def get_conn(self):
        airflow_conn = BaseHook.get_connection(self.postgres_conn_id)
        self.host = airflow_conn.host
        self.user = airflow_conn.login
        self.password = airflow_conn.password
        self.dbname = airflow_conn.schema
        self.port = airflow_conn.port

        self.postgres_conn = psycopg2.connect(
            host=self.host, user=self.user, password=self.password, dbname=self.dbname, port=self.port)
        return self.postgres_conn

    def bulk_load(self, table_name, file_name, delimiter: str, is_header: bool, is_replace: bool):
        from sqlalchemy import create_engine

        self.log.info('적재 대상파일:' + file_name)
        self.log.info('테이블 :' + table_name)
        self.get_conn()
        # is_header = True면 0, False면 None
        header = 0 if is_header else None
        # is_replace = True면 replace, False면 append
        if_exists = 'replace' if is_replace else 'append'
        file_df = pd.read_csv(file_name, header=header, delimiter=delimiter)

        for col in file_df.columns:
            try:
                # string 문자열이 아닐 경우 continue
                file_df[col] = file_df[col].str.replace(
                    '\r\n', '')      # 줄넘김 및 ^M 제거
                self.log.info(f'{table_name}.{col}: 개행문자 제거')
            except:
                continue

        self.log.info('적재 건수:' + str(len(file_df)))
        uri = f'postgresql://{self.user}:{self.password}@{self.host}/{self.dbname}'
        engine = create_engine(uri)
        file_df.to_sql(name=table_name,
                       con=engine,
                       schema='public',
                       if_exists=if_exists,
                       index=False
                       )
- dags/dags_python_with_custom_hook_bulk_load.py
from airflow import DAG
import pendulum
from airflow.operators.python import PythonOperator
from hooks.custom_postgres_hook import CustomPostgresHook

with DAG(
        dag_id='dags_python_with_custom_hook_bulk_load',
        start_date=pendulum.datetime(2024, 6, 16, tz='Asia/Seoul'),
        schedule='0 7 * * *',
        catchup=False
) as dag:
    def insrt_postgres(postgres_conn_id, tbl_nm, file_nm, **kwargs):
        custom_postgres_hook = CustomPostgresHook(postgres_conn_id=postgres_conn_id)
        custom_postgres_hook.bulk_load(table_name=tbl_nm, file_name=file_nm, delimiter=',', is_header=True, is_replace=True)

    insrt_postgres = PythonOperator(
        task_id='insrt_postgres',
        python_callable=insrt_postgres,
        op_kwargs={'postgres_conn_id': 'conn-db-postgres-custom',
                   'tbl_nm': 'seoul_bike_hist',
                   'file_nm': '/opt/airflow/ingest/bikeList/{{data_interval_end.in_timezone("Asia/Seoul") | ds_nodash }}/bikeList.csv'}
)- 결과

더 많은 Hook 사용하기
- provider를 설치해야함
- 우리는 Docker를 사용하고 있기 때문에 docker를 다시 올리면 사라져있음.
- 따라서 docker 파일을 생성해서 docker image 를 build할 때 사용할수 있게 해줌.
1) dockerfile 만들기
- 설치도 함께 해주도록 하는 것
- files/dockers/Dockerfile 로 만들기
FROM apache/airflow:2.9.1
USER root
RUN apt-get update \
 && apt-get install -y --no-install-recommends \
  gcc \
  heimdal-dev \
  g++ \
  libsasl2-dev \
 && apt-get autoremove -yqq --purge \
 && apt-get clean \
 && rm -rf /var/lib/apt/lists/*
USER airflow
RUN pip install \
 apache-airflow-providers-apache-hdfs \
 apache-airflow-providers-apache-hive
RUN pip uninstall -y argparse- docker가 아니라면 HDFS 설치 이렇게 설치하면됨.
2) image build 해주기
- ec2에 올린 폴더로 들어가서 ( ~/files/dockers/) 명령어 실행
- docker file을 실행시켜주는것이 build 명령어
- docker image 이름 : airflow_custom
- docker tage (버전) : 2.9.1_HdfsHive
- file : . (현재 경로에 있는 docker file)
sudo docker build -t airflow_custom:2.9.1_HdfsHive .3) docker compose 할때 image 변경해주기
- docker-compose.yaml 수정 -> image 부분
- 위에서 docker build 할때 사용해준 이미지 이름 및 태그로 변경해주기
| before | after |
|---|---|
 |
4) 다시 compose up 해주기
5) 추가된것 확인해보기
- admin -> providers
- 추가해준 hdfs, hive 가 추가 된 것을 확인할 수 있음

- admin -> connection도 확인