📜 사실 노션에서 쓰고 옮긴거라 노션이 더 가독성 좋아요.
https://yopark.notion.site/JS-TIL-54b9cc2355c14c58b5dfd05cd18da388
바닐라 JS로 크롬 앱 만들기 - 노마드 코더 Nomad Coders
💡 기초부터 설명하는 글이 아니라, 필자가 새롭게 배운 내용을 주관적으로 정리한 글입니다.Momentum 클론코딩
위 강의는 Chrome 확장 프로그램인 Momentum을 클론코딩하는 방식으로 진행된다.
위 링크에 들어가면, 필자의 토이 프로젝트 결과물을 볼 수 있다.

구현한 기능
clock: 현재 시각greeting: username을 받아localStorage에 저장하여 인사말 표시- 시간대에 따라, Good Morning, Good Afternoon, Good Evening 으로 변화
background,quote(위 사진에서 중앙 하단) : 랜덤 배경, 랜덤 명언search(좌측 상단) : 구글에 검색하기weather(우측 상단) : OpenWeatherMap API를 이용하여 현재 지역, 날씨, 기온 표시today-focus: 오늘의 가장 큰 TODO 목표를 적어두는 공간pomodoro-timer: 시계 아이콘을 누르면 작동하며, 25분(1뽀모도로) 타이머다.
TODO(우측 하단) :localStorage에 저장되어 새로고침해도 초기화되지 않음.- 모달 창으로 만들었다.
HTML
🥖 코딩 컨벤션
💡 HTML, CSS, JS 모두 문자열은 큰따옴표(”)로 사용하는게 깔끔합니다! 작은따옴표는 C의 char에서만 쓰는 걸로 합시다.NHN Coding Convention
<!DOCTYPE html>
<html lang="en-US">
<head>
<meta charset="UTF-8">
<link rel="stylesheet" href="css/style.css">
<title>Momentum App</title>
</head>
<body>
<header>
<form class="search-form">
	<input type="text" placeholder="Search" required>
</form>
</header>
<section>
<div class="clock">00:00</div>
<form class="login-form hidden">
	<input type="text" placeholder="What is your name?" required maxlength="15">
</form>
</section>
<footer>
<label class="todo-label hidden" for="hiddenToDoBtn">Todo</label>
<input type="checkbox" class="hidden" id="hiddenToDoBtn">
<div class="todo hidden">
	<ul class="todo__list"></ul>
	<form class="todo__form hidden">
		<input type="text" placeholder="Write a To Do" required>
	</form>
</div>
</footer>
</body>
</html>- 굳이 모든 태그에 다 들여쓰기를 할 필요는 없다. 파이썬처럼 들여쓰기에 민감한 언어는 아니니까.
- 특히,
html,head,body의 하위 태그에는 들여쓰기를 하지 않아야 가독성에 좋음.
Google HTML/CSS Style Guide
Avoid unnecessary
idattributes.
Preferclassattributes for styling anddataattributes for scripting.
id는 꼭 필요한 상황이 아니라면, 쓰지 마라.
id는 이건 정말 단 하나밖에 없다. 앞으로도 절대 안 생긴다. 이런 확신이 있을때 씁니다. 만약 이후에 디자인이나 UX가 바뀌면서 뭔가 비슷한 형태가 더 생길 가능성이 있다면, 단 하나의 요소에도class를 줍니다. (위 링크, 신승우님의 답변)
BEM 네이밍 컨벤션
<header>
<form class="search-form">
	<input type="text" placeholder="Search" required>
</form>
<div class="weather">
	<div class="weather__container">
		<img>
		<span class="weather__temp"></span>
	</div>
	<div class="weather__city"></div>
</div>
</header>- 하위 클래스의 하위 클래스는
weather__container__temp처럼 적진 않는다.
시맨틱 태그
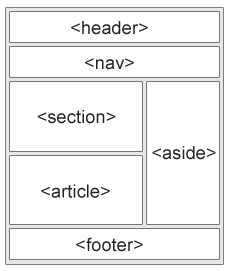
- 사용 이유 : SEO 최적화, 웹 접근성 보장, 코드 가독성을 높여 리팩터링 유리
header,nav,footer를 제외한, 글의 지배적인 영역을 포괄하는 것 :main
🌏 label 태그의 for 속성
<label class="todo-label hidden" for="hiddenToDoBtn">Todo</label>
<input type="checkbox" class="hidden" id="hiddenToDoBtn">
라벨로 checkbox 역할을 대신하고 싶을 때 쓰는 방법.
🐍 <script defer> 사용하기
HTML에 JavaScript를 추가하는 최고의 방법!
<head>
</head>
<body>
<script src="js/todo.js"></script>
</body><head>
<script defer src="js/todo.js"></script>
</head>
<body>
</body>위 방법을 아래 방법으로 고쳐 쓰세요!
defer를 왜 써야 하는가?
body끝에script를 넣으면, HTML을 다 받은 뒤에 JS를 받기 시작하기 때문에,- JS를 받는데 오래 걸리면 JS 없이 그냥 HTML+CSS 부터 화면에 띄운다.
- 만약 페이지가 JS에 의존적이라면? 참사. 그래서
head끝에 넣는 방식이 선호됨.
head끝에 넣는 것 중에async방식이라고도 있는데, HTML 파싱 중이라도 JS 다운로드가 완료되면 파싱 중인 HTML을 Block하고 바로 실행해버리기 때문에,- 만약 그 시점에 HTML DOM 요소가 정의되지 않았다면, 참사. 그래서
defer를 사용한다.
- 만약 그 시점에 HTML DOM 요소가 정의되지 않았다면, 참사. 그래서
defer는 위 두 문제를 모두 해결한다.
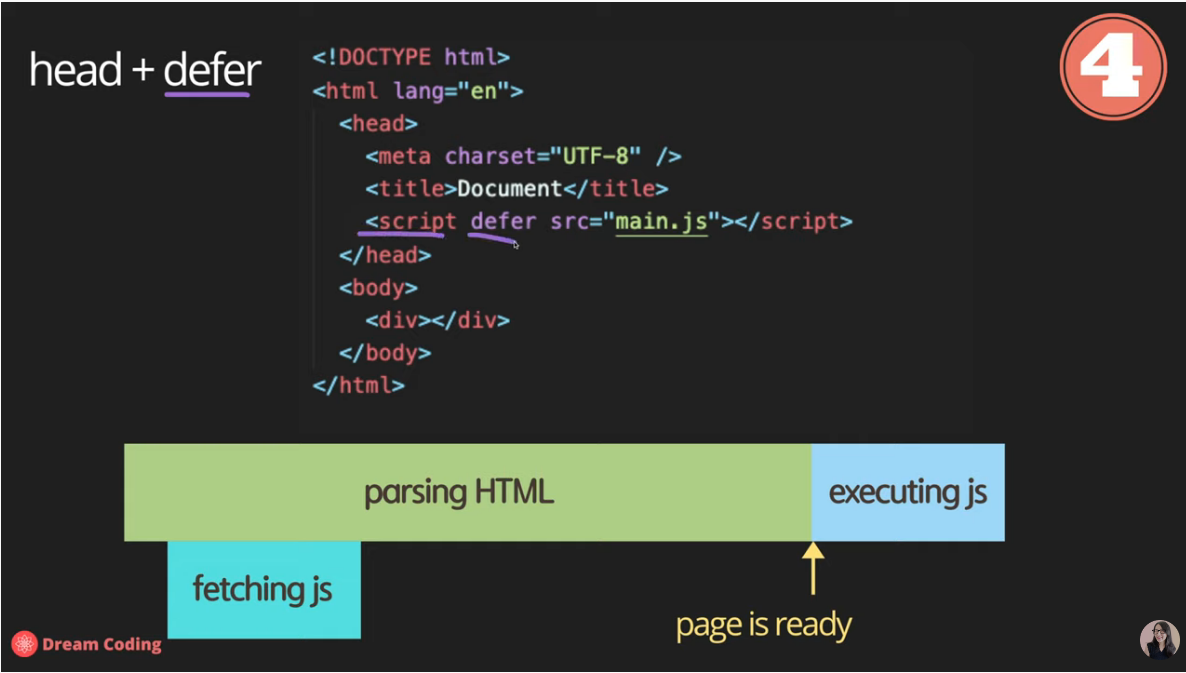
JS를 받는 건 HTML 파싱 중에 진행되지만, 다 다운로드 되었더라도 실행을 지연시킨다.
CSS
🥨 코딩 컨벤션
여러 개의 selector를 콤마로 이을 때
body, html {
	margin: 0;
	height: 100%;
	color: white;
}
body,
html {
margin: 0;
height: 100%;
color: white;
}위를 아래로 바꿔라.
hidden class
.hidden {
	display: none;
}
이렇게 설정해두고,
const HIDDEN_CLASSNAME = "hidden";
loginForm.classList.add(HIDDEN_CLASSNAME);
toDoForm.classList.remove(HIDDEN_CLASSNAME);
이런 식으로 숨기거나, 다시 보이게 하는 것이 클리셰.
🥛 선택자(selector)
div p와 div > p의 차이점
div p:div의 하위에 있는 모든p(하위 선택자)div > p:div의 바로 하위에 있는p만 해당. (자식 선택자)
형제 선택자(sibling selector)
E + F: 같은 부모를 가지고, E 바로 뒤에 오는 F에만 적용. (인접 형태 선택자)E ~ F: 같은 부모를 가지고, E 뒤에 오는 F에 적용. (일반 형태 선택자)
#hiddenToDoBtn:checked + .todo {
	display: block;
	position: absolute;
	bottom: 80px;
	right: 20px;
}
위의 선택자의 뜻은, hiddenToDoBtn이 체크되었을 경우에, 바로 뒤에 오는 todo class를 가진 요소를 display: none 에서 display: block 으로 바꾼다는 의미다.
☘️ 버튼 하나로 열고 닫을 수 있는 모달 창 만들기
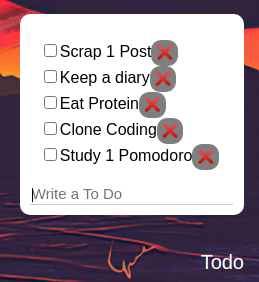
코드는 다음과 같다.
<label class="todo-label hidden" for="hiddenToDoBtn">Todo</label>
<input type="checkbox" class="hidden" id="hiddenToDoBtn">
<div class="todo hidden">
	<ul class="todo__list"></ul>
	<form class="todo__form hidden">
		<input type="text" placeholder="Write a To Do" required>
	</form>
</div>
label for을 이용하고, checkbox를 숨겨서 label이 checkbox의 역할을 대신하게 함.
#hiddenToDoBtn:checked + .todo {
	display: block;
	position: absolute;
	bottom: 80px;
	right: 20px;
}

.todo__list {
	list-style-type: none;
	padding-left: 10px;
	display: flex;
	flex-direction: column;
	align-items: left;
}
.todo 는 default 값이 hidden 이므로, display: none 이다.
하지만 :checked 되었을 때, display: block 으로 바뀌면서 모달 창이 나타나게 된다.
💥padding과 margin
혼동하지 않도록 주의!

- 한 줄에 적을 때 쓰는 순서는 위쪽부터 시계방향이다. (
top→right→bottom→left)
ex) padding: 10px 0 20px 0⇒ padding-top: 10px; padding-bottom: 20px;
👁️display: flex 속성 정리
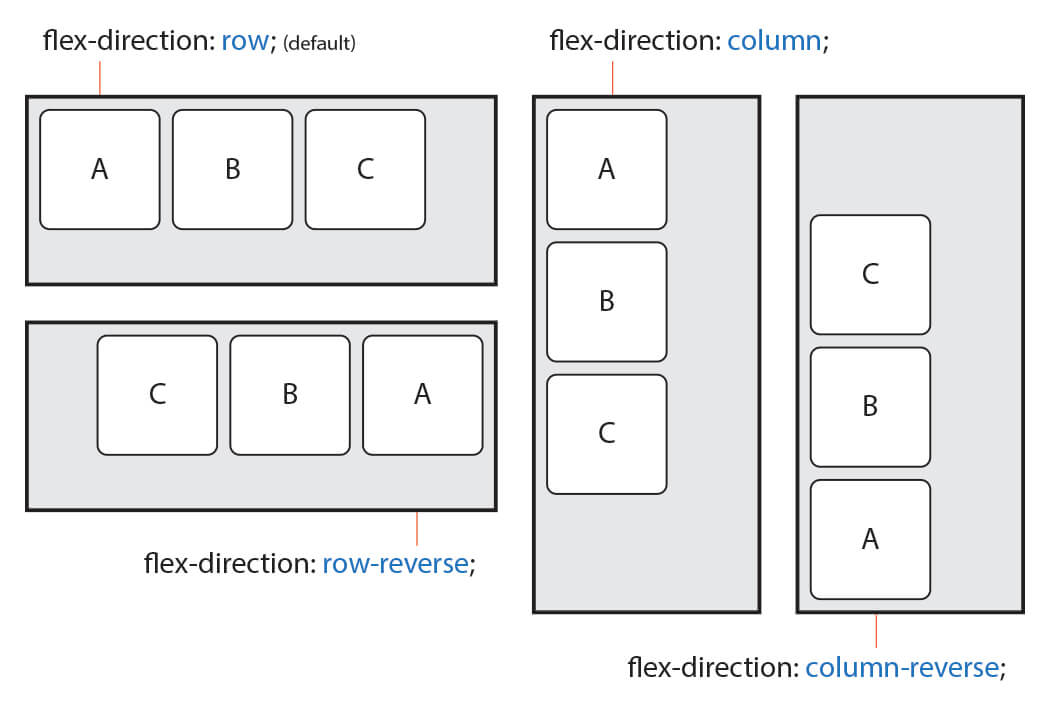
flex-direction: 요소의 방향row,columnrow-reverse,column-reverse
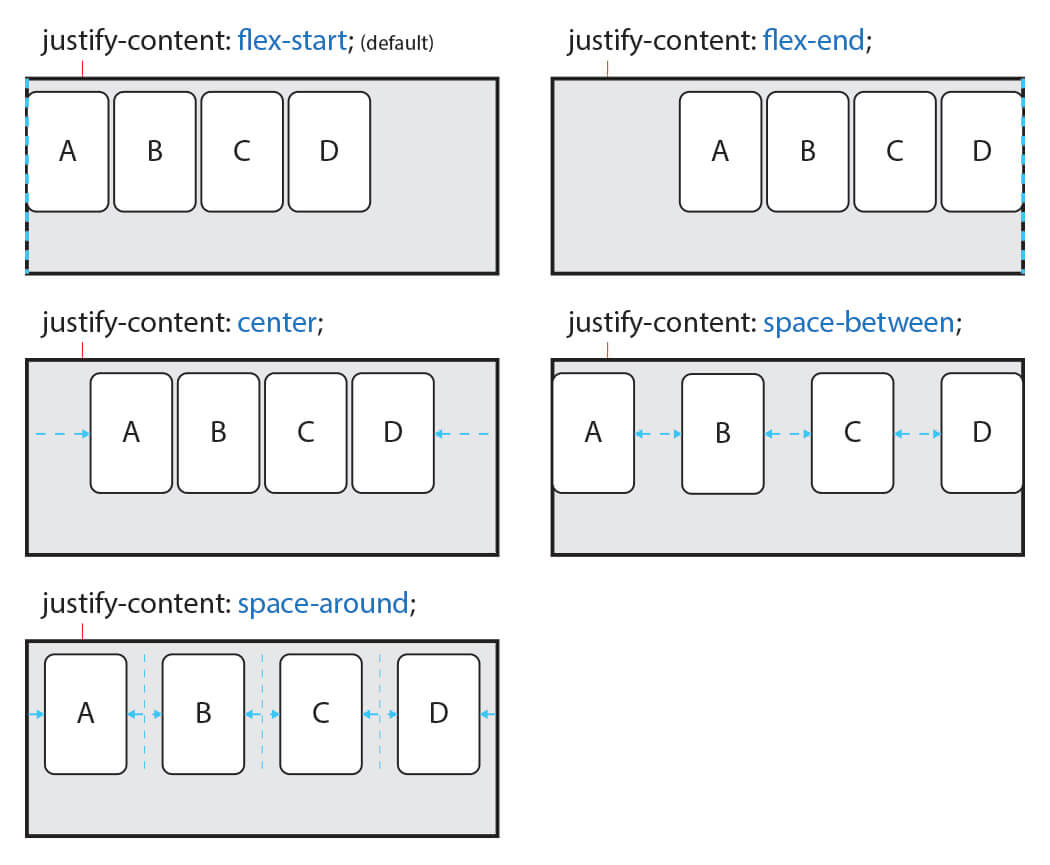
justify-content: (가로 기준) 가로 정렬 방향flex-start,center,flex-endspace-between,space-around
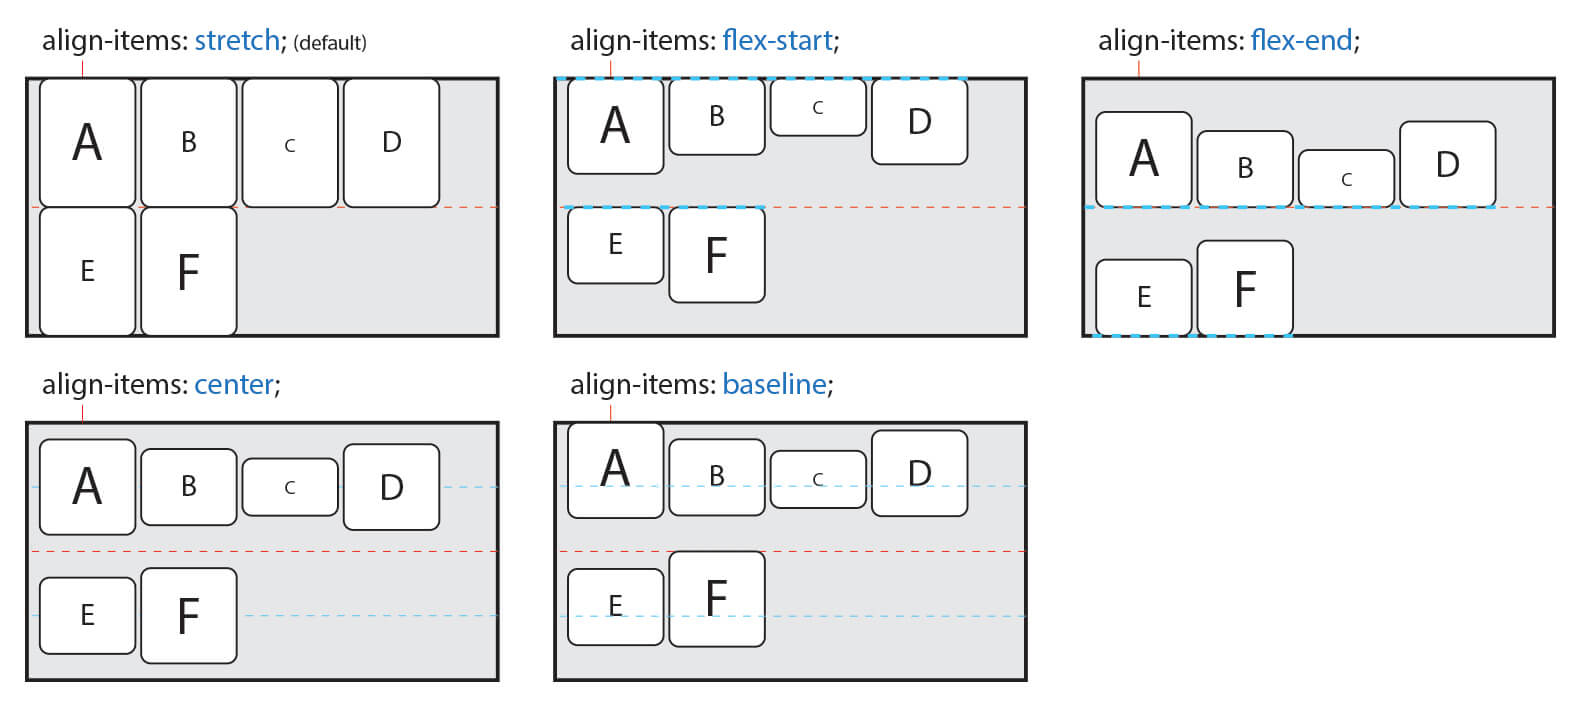
align-items: (가로 기준) 세로 정렬 방향flex-start,center,flex-endbaseline,stretch
💡position
요소는 top, left, bottom, right 속성을 이용하여 위치될 수 있다. 그러나
position: static (기본값)일 때는 작동하지 않는다.
top, left, bottom, right
position: absoulte 기준으로 설명하겠다.
ex) top: 0 ⇒ 요소가 창 상단에 딱 붙어있다.
ex) bottom: 20px; right: 0 ⇒ 요소가 우측 하단에 있지만, 아래로부터는 20px 띄워져 있다.
이런 방식으로 positioning이 가능하다.
position 값 종류
static: 기본값absolute: 일반적으로 창 좌측상단이 기준- 하지만 부모 요소 중에
position: static을 제외한 position 설정이 되어 있다면, 그 부모가 기준이 된다. 예외적인 상황이라 잘 쓰진 않음.
- 하지만 부모 요소 중에
relative: 원래static때 자신이 있어야 할 자리가 기준fixed: 처음에는absolute처럼 배치되는데, 스크롤을 움직여도 그 자리에서 변하지 않음.
JavaScript
🥖 코딩 컨벤션
"use strict";
var의 문제점
- 한번 선언한 변수를 다시 선언할 수 있다.
var n = 1;
var n = 2; // 이게 됨- 호이스팅(변수 선언을 scope 최상단으로 올리는 일) 때문에 생기는 문제.
console.log(n) // 1
var n = 1;
→ var 대신 let, 상수에는 되도록 const 를 써라.
document.querySelector 를 애용하자.
getElementById 도 상관없긴 한데, CSS랑 통일돼서 보기 좋음. 하지만 Element 클래스에는 querySelector는 있어도 getElementById는 없다는 사실을 기억하자.
Document 클래스와 Element 클래스가 다르다는 사실을 기억하자.
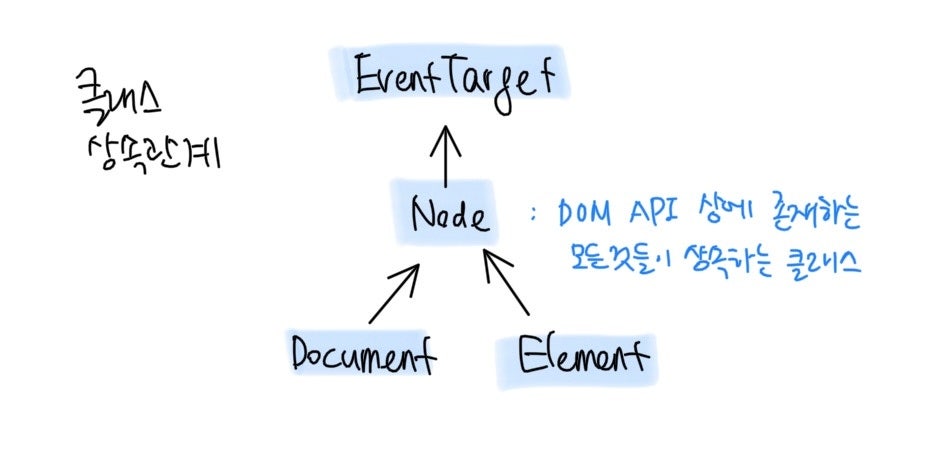
상속 관계다. DOM 트리가 아니다. 혼동하지 말자.
const toDoForm = document.querySelector(".todo__form");이라고 했다면, 앞의document는 Document 클래스이지만 반환값인toDoForm은 Element 클래스이다.- 따라서,
toDoForm.getElementById는 오류다.- 하지만 잠시 생각해보면 없는 이유를 알 수 있다. Id는 document에서 유일한 정보인데, 중간 노드인 Element에서 찾을 이유가 없거니와, 유일한지 알 방법도 없다.
- 그래도 Element 클래스에서는
getElementsByClassName,getElementsByTagName은 제공한다.
💫 ==과 ===의 차이
- C에서 사용하는 통상적인
==은 JS에서===이다.
그럼 == 은 뭐냐?
console.log(1 == "1"); // true
console.log(null == undefined); // true
console.log(true == 1); // true
console.log(0 == ""); // true
이런 느낌이다.
도대체 == 기능을 쓸 일이 있을지 모르겠다.
🗨️ HTMLElement에서 사용되는 프로퍼티
Element.classListadd,remove
EventTarget.addEventListenerHTMLElement.innerTextHTMLElement.styledisplay,textDecoration등 모든 CSS 속성에 접근 가능.
HTMLInputElement.value
💣 기타 기억해두고 싶은 JS 코드
localStorage, JSON
localStorage.setItem(FOCUS_KEY, JSON.stringify(focusObj));

const savedFocus = localStorage.getItem(FOCUS_KEY);
if (savedFocus !== null) {
	const focusObj = JSON.parse(savedFocus);
	paintFocus(focusObj);
}
setInterval, clearInterval
let time = 25*60; // 기본 25분
let timerFunc; // 전역변수로 선언해야 clearInterval이 되네... 왜지

function togglePomodoroTimerBtn() {
	const h2 = document.querySelector(".pomodoro > h2");

	if (pomodoroTimerBtn.value === "NO") {
		pomodoroTimerBtn.value = "YES";
		pomodoroTimerBtn.innerText = "Stop";
		h2.innerText = "Focus";
		timerFunc = setInterval(() => {
			if (time === 0) {
				clearInterval(timerFunc);
				return;
			}
			time--;
			const min = String(Math.floor(time/60)).padStart(2, "0");
			const sec = String(time%60).padStart(2, "0");
			pomodoroTimer.innerText = `${min}:${sec}`;
		}, 1000);
	} else {
		pomodoroTimerBtn.value = "NO";
		pomodoroTimerBtn.innerText = "Start";
		h2.innerText = "Time to focus.";
		clearInterval(timerFunc);
	}
}- checkbox가 아닌, 일반 버튼으로 toggle 하는 방법
String.padStart
API 사용하기, fetch(url)
function onGeoOk(position) {
	const lat = position.coords.latitude;
	const lng = position.coords.longitude;
	const url = `https://api.openweathermap.org/data/2.5/weather?lat=${lat}&lon=${lng}&appid=${API_KEY}&lang=kr&units=metric`

	fetch(url)
		.then(response => response.json())
		.then(data => {
		const iconUrl = `https://openweathermap.org/img/w/${data.weather[0].icon}.png`;
		const weatherImage = document.querySelector(".weather__container > img");
		const temp = document.querySelector(".weather__temp");
		const city = document.querySelector(".weather__city");

		weatherImage.src = iconUrl;
		temp.innerText = `${Math.floor(data.main.temp*10)/10}°`;
		city.innerText = `${data.name}`;
	});
}

function onGeoError() {
	alert("Can't find you. No weather for you.")
}

navigator.geolocation.getCurrentPosition(onGeoOk, onGeoError);Math.round는 반드시 소수 첫째자리에서 반올림하는 기능만 제공한다.- 소수 첫째자리까지 반올림하고 싶으면,
Math.floor(n*10)/10)이라는 말도 안되는 방법을 사용해야 한다…
- 소수 첫째자리까지 반올림하고 싶으면,
- 콜백 지옥 탈출하기!
- Promise에 대해서는 차후 다루겠다.
후기
- 비록 클론코딩이지만, 디자인을 너무 똑같게 해서 창의적이지 않았다.
FAQ › 바닐라 JS - 노마드 코더 Nomad Coders
위 링크를 들어가보면, 같은 기능이지만 얼마나 다양한 디자인이 나올 수 있는지 감탄할 수 있다.
- 팀 개발을 하고 싶지만, 군대라 그럴 수 없어 너무 아쉽다.