들어가며
Hands-On-Guide 6장 내용의 실습 프로젝트를 만들면서 공부하게 된 내용을 다루었다.
Dependency Injection이란?
객체가 필요한 의존 관계를 외부에서 제공(주입)하는 방식
객체 간의 결합도를 낮추고, 코드의 재사용성을 높임
예시 (Hands-on-guide ch6)

전체적인 Hierarchy는 이런식으로 되어있다.
초기 설정
CustomerService.java
package egovframework.ch6.service;

public interface CustomerService {
	 String getCustName(String id);
	 String getCustGrade(String id);
}
XML-based DI
CustomerXMLDAO.java
package egovframework.ch6.service.impl;

public class CustomerXMLDAO {
	 public String getCustName(String id) {
	 return id + " eGovFrame XML";
	 }
	 public String getCustGrade(String id) {
	 return id + " S XML";
	 }
}
CustomerXMLServiceImpl
package egovframework.ch6.service.impl;

import egovframework.ch6.service.CustomerService;

public class CustomerXMLServiceImpl implements CustomerService {
	 private CustomerXMLDAO xmlDAO;
	 public void setCustXMLDAO(CustomerXMLDAO cxmlDAO) {
		 this.xmlDAO = cxmlDAO;
	 }
	 public String getCustName(String id){
		return xmlDAO.getCustName(id);
	 }
	 public String getCustGrade(String id) {
		 return xmlDAO.getCustGrade(id);
	 }
}
CustomerService 인터페이스에 맞는 CustomerServiceImpl 클래스와 거기에 쓸 CustomerXMLDAO 클래스를 준비한다.
context-customer.xml
<?xml version="1.0" encoding="UTF-8"?>
<beans xmlns="http://www.springframework.org/schema/beans"
xmlns:xsi="http://www.w3.org/2001/XMLSchema-instance"
xsi:schemaLocation="http://www.springframework.org/schema/beans
http://www.springframework.org/schema/beans/spring-beans-4.0.xsd">

 	<!-- XML-Based Dependency Injection -->

 	<bean id="customerXML" class="egovframework.ch6.service.impl.CustomerXMLServiceImpl">
 		<property name="custXMLDAO" ref="customerXMLDAO" />
 	</bean>

 	<bean id="customerXMLDAO" class="egovframework.ch6.service.impl.CustomerXMLDAO"/>

</beans>
customerXML 빈은 CustomerXMLServiceImpl 클래스의 인스턴스로 생성되고, customerXMLDAO 빈은 egovframework.ch6.service.impl.CustomerXMLDAO 클래스의 인스턴스가 되도록 context-customer.xml을 작성한다.
Annotation-based DI
CustomerAnnotationDAO.java
package egovframework.ch6.service.impl;

import org.springframework.stereotype.Repository;
import egovframework.ch6.service.CustomerService;

@Repository("customerdao")
public class CustomerAnnotationDAO implements CustomerService {
	public String getCustName(String id) {
		return id+" eGovFrame Annotation";
	}
	public String getCustGrade(String id) {
		return id + " S Annotation";
	}
}
CustomerAnnotationServiceImpl.java
package egovframework.ch6.service.impl;

import javax.annotation.Resource;
import org.springframework.stereotype.Service;
import egovframework.ch6.service.CustomerService;

@Service("customer")
public class CustomerAnnotationServiceImpl implements CustomerService {
	@Resource(name="customerdao")
 	private CustomerAnnotationDAO customerdao;

 	public String getCustName(String id) {
 		return customerdao.getCustName(id);
 	}
 	public String getCustGrade(String id) {
 		return customerdao.getCustGrade(id);
 	}
}
xml 기반 DI와 똑같이 CustomerService 인터페이스에 맞는 CustomerAnnotationServiceImpl 클래스와 거기에 쓸 CustomerAnnotationDAO 클래스를 준비한다.
context-common.xml
<?xml version="1.0" encoding="UTF-8"?>
 <beans xmlns="http://www.springframework.org/schema/beans"
 	xmlns:xsi="http://www.w3.org/2001/XMLSchema-instance"
 	xmlns:context="http://www.springframework.org/schema/context"
 	xsi:schemaLocation="http://www.springframework.org/schema/beans
 	http://www.springframework.org/schema/beans/spring-beans-4.0.xsd
 	http://www.springframework.org/schema/context
 	http://www.springframework.org/schema/context/spring-context-4.0.xsd">

 	<!-- Annotation-Based Dependency Injection -->

 	<context:component-scan base-package="egovframework.ch6"/>

</beans>
context:component-scan을 통해 Annotation 기반 DI를 가능하도록 한다.
이때 패키지 경로를 잘 입력해야한다.
실행시킬 App
CustomerServiceApp.java
package egovframework.ch6.app;

import org.springframework.context.ApplicationContext;
import org.springframework.context.support.ClassPathXmlApplicationContext;

import egovframework.ch6.service.CustomerService;

public class CustomerServiceApp {
	 public static void main(String[] args) {
	 // Configuration file location to be read into Spring Container
	 String configLocation = "classpath*:spring/context-*.xml";

	 // Create an Application Context using the settings file
	 ApplicationContext context = new ClassPathXmlApplicationContext(configLocation);

	 // Search for "customerXML" and create dependence.
	 CustomerService CustomerXML =(CustomerService)context.getBean("customerXML");

	 System.out.println("[XML]");
	 System.out.println("NAME="+CustomerXML.getCustName("1"));
	 System.out.println("GRADE="+CustomerXML.getCustGrade("1"));
	 // Search for "customer" and create dependence.
	 CustomerService CustomerAnnotation = (CustomerService)context.getBean("customer");

	 System.out.println("[Annotation]");
	 System.out.println("NAME="+CustomerAnnotation.getCustName("2"));
	 System.out.println("GRADE="+CustomerAnnotation.getCustGrade("2"));
}
위에서 적용시킨 각 2가지의 방법 (xml기반, annotation기반)을 적용시키는 App 소스 코드이다.
configLocation = "classpath:spring/context-.xml"
여기서 classpath가 정확한지 확인해줘야 한다.
결과
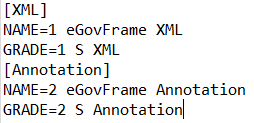
CustomerServiceApp.java를 우클릭 한 뒤 Run As > Java Application하게 되면 위와 같은 결과가 뜨는 것을 볼 수 있다.
만들면서 느낀점
교재에 나와있는 코드를 복붙하고 적용시키는 간단한 작업임에도 불구하고 패키지 경로나 이름, 파일 위치 등 은근 신경써서 적용시켜야 한다는 걸 다시금 깨닫게 되었다...
그리고 적용시킨거와는 별개로 더 공부가 필요할 것 같다...