
접근법
문제를 읽고서 반복문으로 1부터 N까지의 배열을 생성하고 그 배열을 shift 함수와 push로 구현하면 될 것 같다고 생각해서 코드를 짰다.
const filePath = process.platform === 'linux' ? 'dev/stdin' : './input.txt';
const input = require('fs').readFileSync(filePath).toString();

const N = Number(input);
let cards = [];

for (let i = 1; i <= N; i++) {
    cards.push(i);
}

while (true) {
    if (cards.length === 1) {
        break;
    } else {
        cards.shift();
        cards.push(cards.shift());
    }
}
console.log(cards[0]);
결과는...

고민을 해봤지만 어떤식으로 접근해야할지 몰라서 구글링을 좀 했다.
연결리스트 (Linked List)
배열을 사용하는 과정에서 삽입, 삭제 과정이 많아지면 배열의 다른 요소들에 인덱스 번호를 붙이는 과정이 기하급수적으로 늘어나 시간 복잡도가 커질 수 밖에 없는데,
이를 해결하기 위해서는 연결리스트 (Linked List) 자료구조를 이용해야한다는 것을 알게 되었다.
연결리스트 (Linked List) 의 기본적인 개념은 배열의 요소들에 인덱스 번호를 따로 붙이지 않고, 각 노드(연결리스트에서는 데이터를 노드(Node)라고 부름)들을 포인터로 연결하는 자료구조이다.
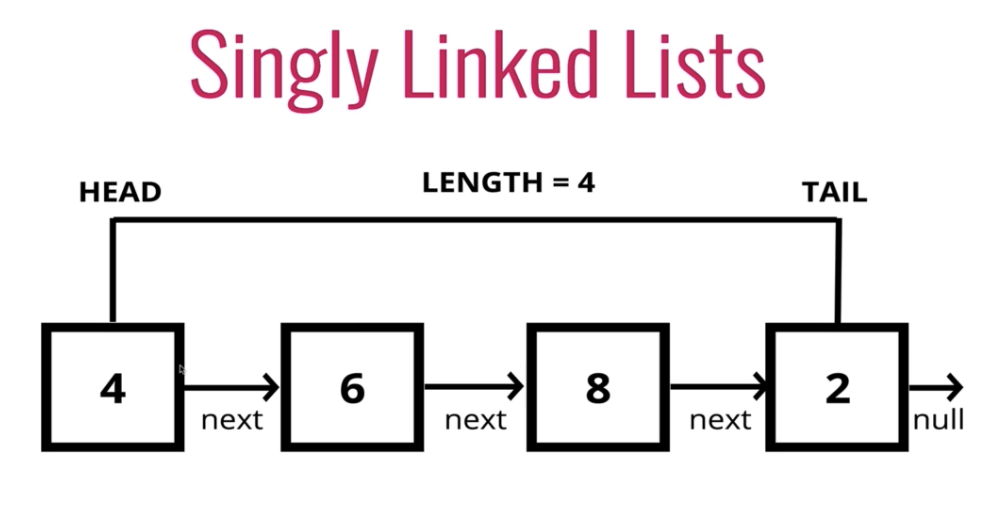
위 그림에서처럼 하나의 연결 리스트는 처음 노드를 가르키는 (HEAD), 마지막 노드를 가르키는 (TAIL), 리스트의 총 길이를 나타내는 (LENGTH) 그리고 각 노드들 사이를 연결하는 포인터를 안내하는 (NEXT) 요소를 가진다.
풀이과정
위에서 배운 연결리스트를 Javascript로 구현하여 다음과 같다.
const filePath = process.platform === 'linux' ? 'dev/stdin' : './input.txt';
const input = require('fs').readFileSync(filePath).toString();

const N = Number(input);

class Node {
    constructor(val) {
        this.val = val;
        this.next = null;
        this.prev = null;
    }
}

// LinkedList 클래스 설정
class LinkedList {
    constructor() {
        this.head = null;
        this.tail = null;
        this.length = 0;
    }

    push(val) {
        const newNode = new Node(val);

        if (!this.head) {
            this.head = newNode;
        } else {
            this.tail.next = newNode;
            newNode.prev = this.tail;
        }

        this.tail = newNode;
        this.length++;

        return newNode;
    }

    getHead() { // 첫 노드(head) 가져오기
        return this.head.val;
    }

    removeHead() { // 첫 노드(head)를 연결리스트에서 지우기
        this.head = this.head.next;
        this.head.prev = null;
        this.length--;
    }

    getLength() { // 연결리스트의 길이 알기
        return this.length;
    }
}

const cards = new LinkedList();

for (let i = 1; i <= N; i++) {
    cards.push(i);
}

while (cards.getLength() !== 1) { // 길이가 0 이 아니라면.
    cards.removeHead(); // 맨 앞 노드를 지우고
    cards.push(cards.getHead()); // 맨 앞 노드를 맨뒤로 붙이고
    cards.removeHead(); // 다시 맨 앞 노드를 지우고
}
console.log(cards.getHead());
매일 새로운 것을 배우고 경험하는 프론트엔드 개발자입니다.