Spring Apache-poi Excel(엑셀) Export(출력) (2/2) - Excel(엑셀) 생성
이전글 Apache-poi Excel(엑셀) Export (1/2) - 어노테이션 정의 에서 구현한 어노테이션 @ExcelHeader, @ExcelBody들을 사용하여 Excel을 출력하기 위해 정의한 Class를 통해 Excel을 출력하는 로직을 다루려고 한다.변명으로 동작만을 위해 구현한 소스로 매우 엄청 전혀 리팩토링이 되어있지 않으며 변수명 또한 하나의 고민도 하지 않고 정의하였다.
우선 필자의 환경은 Spring-Boot를 사용하고 있으며 Excel 출력을 위한 Util 형태의 public static method를 제공할 생각이다.
Excel 출력 메소드의 파라미터는 sheetName(출력 시트명), excelClass(출력 클래스), data(출력 데이터)를 전달 받는다.
public static <T> ResponseEntity<Resource> export(String fileName, Class<T> excelClass, List<T> data)우선 가장 먼저 Excel 파일 및 Sheet 생성을 위해 apache poi의 XSSFWorkbook 을 생성한후 sheet도 생성한다.
XSSFWorkbook workbook = new XSSFWorkbook();
XSSFSheet sheet = workbook.createSheet(fileName);
헤더를 구성하기 위해 전달받은 excelClass(출력 클래스)의 필드로 부터 @ExcelHeader을 가져온다. 헤더의 구성이 하나의 행이 아닌 두 행 이상일 수 있기 때문에 가져온 @ExcelHeader의 리스트를 rowIndex를 Key로 하여 colIndex를 오름차순으로 정렬하여 Map<rowIndex, List<ExcelHeader>>을 구성하도록 하였다.
Map<Integer, List<ExcelHeader>> headerMap = Arrays.stream(excelClass.getDeclaredFields())
        .filter(field -> field.isAnnotationPresent(ExcelHeader.class))
        .map(field -> field.getDeclaredAnnotation(ExcelHeader.class))
        .sorted(Comparator.comparing(ExcelHeader::colIndex))
        .collect(Collectors.groupingBy(ExcelHeader::rowIndex));
위에서 구성한 Map<rowIndex, List<ExcelHeader>>를 통해서 헤더를 출력해야 한다.
우선 이중 반복문을 통해 헤더의 인덱스와 List<ExcelHeader>의 순서대로 출력하도록 하였다.
int index = 0;
for (Integer key : headerMap.keySet()) {
    XSSFRow row = sheet.createRow(index++);
    for (ExcelHeader excelHeader : headerMap.get(key)) {
        XSSFCell cell = row.createCell(excelHeader.colIndex());
        XSSFCellStyle cellStyle = workbook.createCellStyle();
        cell.setCellValue(excelHeader.headerName());
        if (excelHeader.headerName().contains("\n")) {
            cellStyle.setWrapText(true);
        }
        cellStyle.setAlignment(excelHeader.headerStyle().horizontalAlignment());
        cellStyle.setVerticalAlignment(excelHeader.headerStyle().verticalAlignment());
        if (isHex(excelHeader.headerStyle().background().value())) {
            cellStyle.setFillForegroundColor(new XSSFColor(Color.decode(excelHeader.headerStyle().background().value()), new DefaultIndexedColorMap()));
            cellStyle.setFillPattern(FillPatternType.SOLID_FOREGROUND);
        }
        XSSFFont font = workbook.createFont();
        font.setFontHeightInPoints((short) excelHeader.headerStyle().fontSize());
        cellStyle.setFont(font);
        cellStyle.setBorderBottom(BorderStyle.THIN);
        cellStyle.setBorderLeft(BorderStyle.THIN);
        cellStyle.setBorderRight(BorderStyle.THIN);
        cellStyle.setBorderTop(BorderStyle.THIN);
        cell.setCellStyle(cellStyle);
        if (excelHeader.colSpan() > 0 || excelHeader.rowSpan() > 0) {
            CellRangeAddress cellAddresses = new CellRangeAddress(cell.getAddress().getRow(), cell.getAddress().getRow() + excelHeader.rowSpan(), cell.getAddress().getColumn(), cell.getAddress().getColumn() + excelHeader.colSpan());
            sheet.addMergedRegion(cellAddresses);
        }
    }
}
필자의 네이밍과는 다르게 apache poi에서 제공하는 메소드명은 추가적인 설명이 없어도 충분히 이해될 명명으로 구성되어있어 크게 설명할 내용은 없다.
가장 먼저 해당 헤더의 Row를 생성하며 이렇게 생성된 Row에 @ExcelHeader에 정의한 컬럼에 해당하는 속성들의 내용을 적용하여 컬럼을 생성한다. 현재 헤더에 적용되는 스타일은 개행 출력, 수평 정렬, 수직 정렬, 배경, 글씨 크기, 테두리, 행 병합, 열 병합 이며 현재 테두리는 사용자의 정의 없이 무조건 설정된다. 추가적인 스타일은 @ExcelHeader에 추가하여 적용할 예정이다.
자세한 메소드의 내용 및 사용방법은 apache poi 문서를 참고하면 된다.
위와 같이 먼저 헤더를 출력했다면 다음은 excelClass(출력 클래스)의 필드로 부터 @ExcelBody을 가져온다. 데이터의 구성도 헤더와 마찬가지로 하나의 행이 아닌 두 행 이상일 수 있기 때문에 가져온 @ExcelBody의 rowIndex를 Key로 하였으며 헤더와는 다르게 전달 받은 data(출력 데이터)에 대한 필드 값의 접근이 필요하여 @ExcelBody 가 존재하는 필드를 colIndex 오름차순으로 정렬하여 Map<rowIndex, List<Field>>을 구성하도록 하였다.
Map<Integer, List<Field>> fieldMap = Arrays.stream(excelClass.getDeclaredFields())
        .filter(field -> field.isAnnotationPresent(ExcelBody.class))
        .map(field -> {
            field.setAccessible(true);
            return field;
        })
        .sorted(Comparator.comparing(field -> field.getDeclaredAnnotation(ExcelBody.class).colIndex()))
        .collect(Collectors.groupingBy(field -> field.getDeclaredAnnotation(ExcelBody.class).rowIndex()));
위에서 구성한 Map<rowIndex, List<Field>>를 통해서 데이터를 출력해야한다.
헤더 출력과 동일하게 rowIndex와 colIndex의 순서대로 data(출력 데이터)를 출력 하도록 하였다.
for (T t : data) {
    for (Integer key : fieldMap.keySet()) {
        XSSFRow row = sheet.createRow(index++);
        for (Field field : fieldMap.get(key)) {
            ExcelBody excelBody = field.getDeclaredAnnotation(ExcelBody.class);
            Object o = field.get(t);
            XSSFCell cell = row.createCell(excelBody.colIndex());
            XSSFCellStyle cellStyle = workbook.createCellStyle();
            XSSFDataFormat dataFormat = workbook.createDataFormat();

            cellStyle.setAlignment(excelBody.bodyStyle().horizontalAlignment());
            cellStyle.setVerticalAlignment(excelBody.bodyStyle().verticalAlignment());
            if (isHex(excelBody.bodyStyle().background().value())) {
                cellStyle.setFillForegroundColor(new XSSFColor(Color.decode(excelBody.bodyStyle().background().value()), new DefaultIndexedColorMap()));
                cellStyle.setFillPattern(FillPatternType.SOLID_FOREGROUND);
            }
            cellStyle.setBorderBottom(BorderStyle.THIN);
            cellStyle.setBorderLeft(BorderStyle.THIN);
            cellStyle.setBorderRight(BorderStyle.THIN);
            cellStyle.setBorderTop(BorderStyle.THIN);

            if (o instanceof Number) {
                if (StringUtils.isNoneBlank(excelBody.bodyStyle().numberFormat())) {
                    cellStyle.setDataFormat(dataFormat.getFormat(excelBody.bodyStyle().numberFormat()));
                }
                cell.setCellValue(((Number) o).doubleValue());
            } else if (o instanceof String) {
                cell.setCellValue((String) o);
            } else if (o instanceof Date) {
                cellStyle.setDataFormat(dataFormat.getFormat(excelBody.bodyStyle().dateFormat()));
                cell.setCellValue((Date) o);
            } else if (o instanceof LocalDateTime) {
                cellStyle.setDataFormat(dataFormat.getFormat(excelBody.bodyStyle().dateFormat()));
                cell.setCellValue((LocalDateTime) o);
            } else if (o instanceof LocalDate) {
                cellStyle.setDataFormat(dataFormat.getFormat(excelBody.bodyStyle().dateFormat()));
                cell.setCellValue((LocalDate) o);
            }
            cell.setCellStyle(cellStyle);
            if (excelBody.colSpan() > 0 || excelBody.rowSpan() > 0) {
                CellRangeAddress cellAddresses = new CellRangeAddress(cell.getAddress().getRow(), cell.getAddress().getRow() + excelBody.rowSpan(), cell.getAddress().getColumn(), cell.getAddress().getColumn() + excelBody.colSpan());
                sheet.addMergedRegion(cellAddresses);
            }
            if ((excelBody.width() > 0 && excelBody.width() != 8) && sheet.getColumnWidth(excelBody.colIndex()) == 2048) {
                sheet.setColumnWidth(excelBody.colIndex(), excelBody.width() * 256);
            }
        }
    }
}
헤더의 출력때와 같이 data(출력 데이터)를 반복문을 통해 Row를 생성하여 해당 데이터의 필드 @HeaderBody의 속성과 필드의 값을 통해 칼럼을 생성했다. 현재 데이터에 적용되는 스타일은 헤더의 스타일을 포함하며 추가적인 스타일은 출력 형태, 칼럼 넓이을 설정했다.
해당 설정은 레거시의 기능 때문에 구현한 로직으로 해당 기능이 필요 없다면 없어도 되는 로직이다. 이는 특정 칼럼의 이전 행과 현재 행의 값을 비교하여 동적으로 칼럼을 병합하는 기능이다.
우선 해당 기능은 @ExcelBody의 rowGroup 속성으로 해당 설정이 존재한는 필드를 가져온다.
List<Field> groupField = Arrays.stream(excelClass.getDeclaredFields())
        .filter(field -> field.isAnnotationPresent(ExcelBody.class) && field.getDeclaredAnnotation(ExcelBody.class).rowGroup())
        .map(field -> {
            field.setAccessible(true);
            return field;
        })
        .sorted(Comparator.comparing(field -> field.getDeclaredAnnotation(ExcelBody.class).colIndex()))
        .collect(Collectors.toList());
이후 data(출력 데이터)를 반복문을 통해 반복하면서 현재의 행과 다음 행의 해당 칼럼을 비교하면서 값이 다른 인덱스를 탐색한다.
Map<Field, List<Integer>> groupMap = new HashMap<>();
for (Field field : groupField){
    groupMap.put(field, new ArrayList<>());
    for(int i=0; i< data.size(); i++){
        Object o1 = field.get(data.get(i));

        for(int j = i+1;j < data.size(); j++){
            Object o2 = field.get(data.get(j));
            if(!o1.equals(o2)){
                groupMap.get(field).add((j)* headerMap.size()+headerMap.keySet().size()-1);
                i = j-1;
                break;
            }
        }
    }
    groupMap.get(field).add(sheet.getLastRowNum());
}
탐색한 인덱스를 이용하여 데이터행 부터 rowGorup이 설정된 필드의 동일한 값을 갖는 칼럼을 병합한다.
for(Field field: groupMap.keySet()){
    int dataRowIndex = headerMap.keySet().size();
    for(int i=0; i<groupMap.get(field).size(); i++){
        XSSFRow row = sheet.getRow(dataRowIndex);
        XSSFCell cell = row.getCell(field.getDeclaredAnnotation(ExcelBody.class).colIndex());
        if(!(dataRowIndex == groupMap.get(field).get(i))){
            CellRangeAddress cellAddresses = new CellRangeAddress(dataRowIndex, groupMap.get(field).get(i), cell.getColumnIndex(), cell.getColumnIndex());
            sheet.addMergedRegion(cellAddresses);
        }
        dataRowIndex = groupMap.get(field).get(i)+1;

    }
}
이렇게 데이터행 까지 모두 출력을 하며 모든 데이터는 정상적으로 출력되지만 행병합, 열병합 한 칼럼들의 테두리 설정이 변경된다. 이러한 이유로 병합이 이루어진 셀들의 전체 테두리 설정을 다시 설정해야 한다.
List<CellRangeAddress> mergedRegions = sheet.getMergedRegions();
for(CellRangeAddress rangeAddress : mergedRegions) {
    RegionUtil.setBorderBottom(BorderStyle.THIN, rangeAddress, sheet);
    RegionUtil.setBorderLeft(BorderStyle.THIN, rangeAddress, sheet);
    RegionUtil.setBorderRight(BorderStyle.THIN, rangeAddress, sheet);
    RegionUtil.setBorderTop(BorderStyle.THIN, rangeAddress, sheet);
}
이러면 이제 Excel 출력을 위한 모든 작업이 이루어 졌으며 HTTP 요청에 대한 응답으로 해당 OutputStream을 반환하면된다.
ByteArrayOutputStream byteArrayOutputStream = new ByteArrayOutputStream();
workbook.write(byteArrayOutputStream);
return ResponseEntity
.ok()
.header("Content-Transfer-Encoding", "binary")
.header(HttpHeaders.CONTENT_DISPOSITION, "attachment; filename=" + URLEncoder.encode(fileName, "UTF-8")+".xlsx")
.contentType(MediaType.APPLICATION_OCTET_STREAM)
.contentLength(byteArrayOutputStream.size())
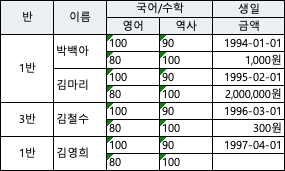
.body(new ByteArrayResource(byteArrayOutputStream.toByteArray()));다음은 해당 메소드를 테스트하기 위한 테스트 로직으로 해당 결과로 만들어진 Excel은 다음과 같다.
public class Test {
    public static void main(String[] args) throws IOException, IllegalAccessException {
        List<Sample1> sample1List = Arrays.asList(
                new Sample1("1반","박백아","100","90", "80", "100", LocalDateTime.of(1994, 1, 1,0,0,0), BigDecimal.valueOf(1000)),
                new Sample1("1반","김마리","100","90", "80", "100", LocalDateTime.of(1995, 2, 1,0,0,0), BigDecimal.valueOf(2000000)),
                new Sample1("3반","김철수","100","90", "80", "100", LocalDateTime.of(1996, 3, 1,0,0,0), BigDecimal.valueOf(300)),
                new Sample1("1반","김영희","100","90", "80", "100", LocalDateTime.of(1997, 4, 1,0,0,0), null)

        );
        ResponseEntity<Resource> responseEntity = ExcelUtil.export("test",Sample1.class, sample1List);
        FileOutputStream fileOutputStream = new FileOutputStream("test.xlsx");
        fileOutputStream.write(((ByteArrayResource)responseEntity.getBody()).getByteArray());
    }
}
이상으로 현재까지 필자가 구현한 apache poi를 활용한 Excel Export 내용을 다루어 보았다.
현재 Excel Export 메소드의 경우 기능 구현을 목적으로 작성하여 하나의 리팩토링도 이루어지지 않은 매우 부끄러운 상태이며 작성하다 알게된 사실로 시트명과 파일명을 정확하게 전달받고 있지 않고 있는등 많은 문제가 있어보인다. 변명으로 프로젝트가 개발기간이 아니기 때문에 해당 모듈에 대한 버그나 추가적인 요구 사항이 없는 상황이라 몰랐다. 하지만 너무 기본적인 것이라 부끄럽다.
다음 작성하는 글로는 간단한 Spring Boot Configuration 또는 QueryDsl를 다루려고 한다.
-소스


감사합니다! 정말 도움 많이 되었습니다.