NestJS Email Module with Bull Queue + Nest Mailer
Message Queue
Producer(생산자)가 Message를 Queue에 넣어두면, Consumer(=Processor)가 Message를 가져와 처리하는 방식. Client와 동기 방식으로 많은 데이터 통신을 하게 되면 서버의 성능이 저하되는데, 이를 방지하기 위해 또 하나의 미들웨어에 Message를 위임하여 순차적으로 일을 처리한다.
Message Queue를 이용해 Email을 큐에 넣어두고
먼저 return을 받는 실습을 진행한다.
Queue를 위해 @nestjs/bull 패키지를 사용하는데 redis 연동이 필요하다.
docker로 redis를 설치한다.
$ docker pull redis
$ docker network create redis-net
$ docker run --name redis -p 6379:6379 --network redis-net -d redis
필요한 패키지들도 아래와 같이 설치한다.
$ yarn add @nestjs/bull bull
$ yarn add @types/bull --dev
$ yarn add @nestjs-modules/mailer
$ yarn add handlebars
src/app.module.ts
import { BullModule } from '@nestjs/bull';
import { Module } from '@nestjs/common';
import { ConfigModule } from '@nestjs/config';
import { AppController } from './app.controller';
import { AppService } from './app.service';
import { AudioModule } from './audio/audio.module';
import { MailModule } from './mail/mail.module';

@Module({
  imports: [
    ConfigModule.forRoot({
      isGlobal: true,
      envFilePath: '.env.dev',
      ignoreEnvFile: process.env.NODE_ENV === 'prod',
    }),
    BullModule.forRoot({
      redis: {
        host: 'localhost',
        port: 6379,
      },
    }),
    AudioModule,
    MailModule,
  ],
  controllers: [AppController],
  providers: [AppService],
})
export class AppModule {}
환경 변수와 BullModule 등록
src/mail/mail.module.ts
nest g module mail로 모듈을 생성한다.
import { MailerModule } from '@nestjs-modules/mailer';
import { Module } from '@nestjs/common';
import { HandlebarsAdapter } from '@nestjs-modules/mailer/dist/adapters/handlebars.adapter';
import { BullModule } from '@nestjs/bull';
import { MailService } from './mail.service';
import { MailController } from './mail.controller';
import * as config from 'config';
import { MailProcessor } from './mail.processor';

@Module({
  imports: [
    MailerModule.forRootAsync({
      useFactory: () => ({
        transport: {
          host: 'smtp.gmail.com',
          secure: false,
          auth: {
            user: process.env.MAIL_USER,
            pass: process.env.MAIL_PASS,
          },
        },
        defaults: {
          from: process.env.MAIL_USER,
        },
        template: {
          // cwd = current working directory
          dir: process.cwd() + '/templates',
          adapter: new HandlebarsAdapter(),
          options: {
            strict: true,
          },
        },
      }),
    }),
    BullModule.registerQueueAsync({
      name: 'mailsend', // mail queue name
      useFactory: () => ({
        redis: {
          host: process.env.REDIS_HOST,
          port: Number(process.env.REDIS_PORT),
        },
      }),
    }),
  ],
  controllers: [MailController],
  providers: [MailService, MailProcessor],
})
export class MailModule {}
MailerModule과BullModule을imports에 추가한다.- 환경 변수는
process.env를 통해 사용한다. MailerModule의transporthost는 발신자로 사용할 메일의 smtp인smtp.gmail.com을 사용한다.BullModule의registerQueuename은MailService에서 사용할@InjectQueue()의 큐 네임과 일치시킨다.
template:HandlebarsAdapter은 HTML과 text formats을 다룰 때 사용하는 것으로 추정... 자세한 내용은 원본 참조
src/mail/mail.service.ts
nest g service mail
import { MailerService } from '@nestjs-modules/mailer';
import { InjectQueue } from '@nestjs/bull';
import { Injectable } from '@nestjs/common';
import { Queue } from 'bull';

export interface User {
  email: string;
}

@Injectable()
export class MailService {
  constructor(
    @InjectQueue('mailsend')
    private mailQueue: Queue,
    private readonly mailerService: MailerService,
  ) {}

  async sendConfirmationEmail(): Promise<boolean> {
    try {
      this.mailQueue.add('confirmation', {});
      return true;
    } catch (err) {
      console.log('Error queueing confirmation email to user.');
      return false;
    }
  }

  public sendMail() {
    this.mailerService
      .sendMail({
        to: 'jwyoon1@test.com',
        from: 'jwy9724@gmail.com',
        subject: 'Testing Nest MailerModule',
        text: 'welcome',
        html: '<b>welcome</b>', // HTML body content
      })
      .then((success) => {
        console.log(success, 'Mail sent successfully.');
        return success;
      })
      .catch((err) => {
        console.log(err);
      });
  }
}@InjectQueue('mailsend')는 위에서도 언급했듯이BullModule의registerQueuename과 일치시킨다.this.mailQueue.add('confirmation', {});: 'confirmation'이란 이름을 가진 작업을 큐에 추가한다.
src/mail/mail.processor.ts
mail.processor.ts 파일을 mail module 폴더에 생성
import {
  OnQueueActive,
  OnQueueCompleted,
  OnQueueFailed,
  Process,
  Processor,
} from '@nestjs/bull';
import { Logger } from '@nestjs/common';
import { Job } from 'bull';
import { MailService } from './mail.service';

@Processor('mailsend')
export class MailProcessor {
  private readonly logger = new Logger(this.constructor.name);

  constructor(private readonly mailService: MailService) {}

  @OnQueueActive()
  onActive(job: Job) {
    console.log(
      `Processor:@OnQueueActive - Processing job ${job.id} of type ${
        job.name
      }. Data: ${JSON.stringify(job.data)}`,
    );
  }

  @OnQueueCompleted()
  onComplete(job: Job) {
    console.log(
      `Processor:@OnQueueCompleted - Completed job ${job.id} of type ${job.name}.`,
    );
  }

  @OnQueueFailed()
  onError(job: Job<any>, error) {
    console.log(
      `Processor:@OnQueueFailed - Failed job ${job.id} of type ${job.name}: ${error.message}`,
      error.stack,
    );
  }

  @Process('confirmation')
  async sendWelcomeEmail(job: Job): Promise<any> {
    console.log('Processor:@Process - Sending confirmation email.');

    try {
      const result = await this.mailService.sendMail();
      return result;
    } catch (error) {
      this.logger.error('Failed to send confirmation email.', error.stack);
      throw error;
    }
  }
}@Processor('mailsend'):BullModule과MailService에 등록했던 Queue 이름(mailsend)와 일치시킨다.- 작업 순서
@Process('confirmation'): 'confirmation'이란 작업을 찾아서 수행@OnQueueActive: queue에 있는 작업 수행@OnQueueCompleted: 수행이 완료된 이후 실행
@OnQueueFailed(): 작업이 실패했을 때 실행
@Process에서this.mailService.sendMail()으로 메일을 발송하는 함수를 실행한다.
MailService : sendMail()
public sendMail() {
    this.mailerService
      .sendMail({
        to: 'jwyoon1@????.co.kr',
        from: 'jwy9724@gmail.com',
        subject: 'Testing Nest MailerModule',
        text: 'welcome',
        html: '<b>welcome</b>', // HTML body content
      })
      .then((success) => {
        console.log(success, 'Mail sent successfully.');
        return success;
      })
      .catch((err) => {
        console.log(err);
      });
  }
}
실행
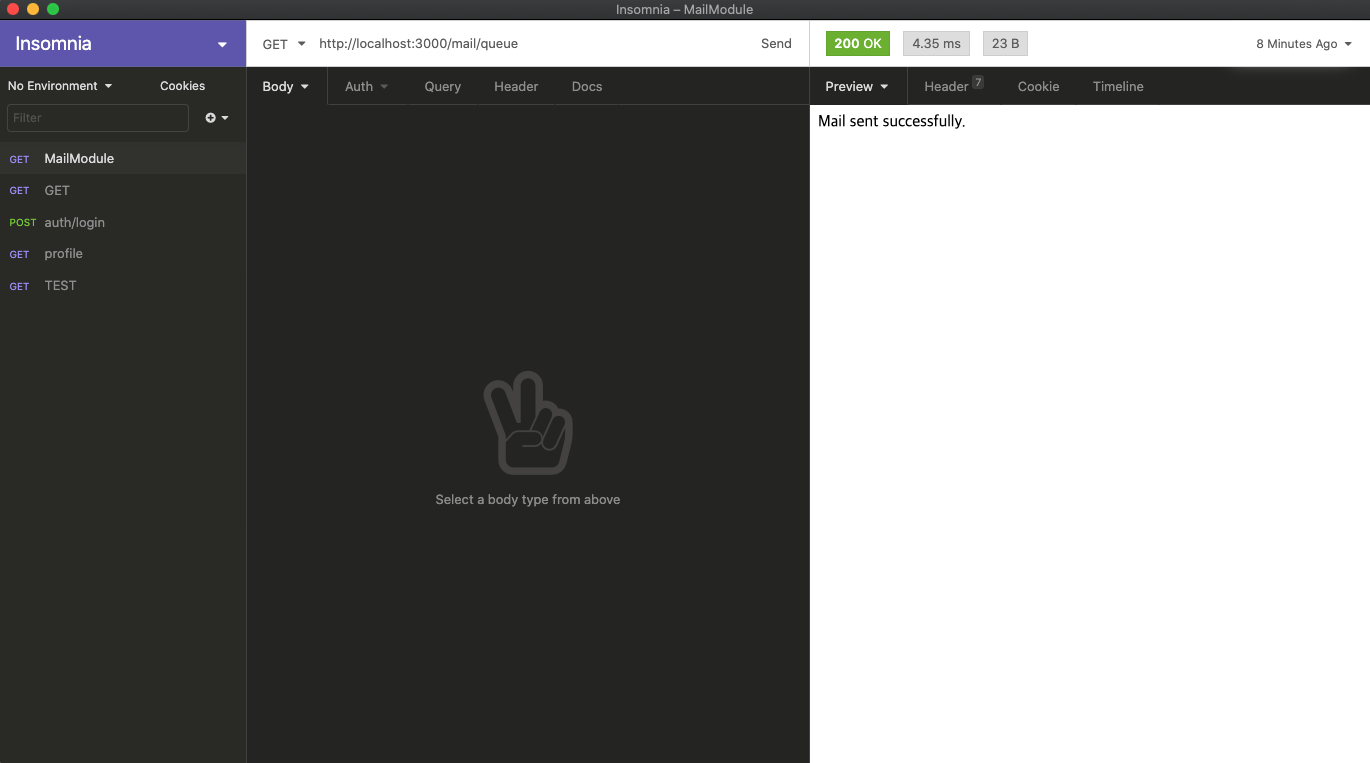
메일 전송 요청이 Queue에 등록된 후, 바로 Controller의 return 값이 반환된다.
이후, Queue에 등록된 작업이 수행되면 메일이 전송된다.
sendMail()의 success값
accepted: [ 'jwyoon1@????.co.kr' ],
  rejected: [],
  envelopeTime: 1274,
  messageTime: 782,
  messageSize: 576,
  response: '250 2.0.0 OK  1614330899 ig12sm8897276pjb.36 - gsmtp',
  envelope: { from: 'jwy9724@gmail.com', to: [ 'jwyoon1@????.co.kr' ] },
  messageId: '<cf17a4ff-15ea-3280-e4df-efdde428aec1@gmail.com>'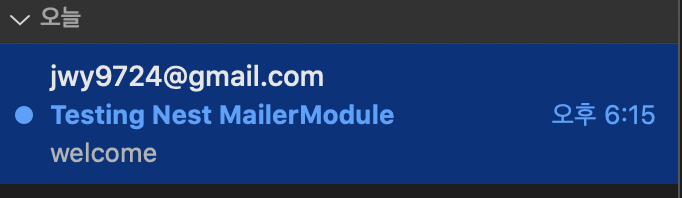
메일 전송 성공 😇
참고 문서 1 : https://firxworx.com/blog/coding/nodejs/email-module-for-nestjs-with-bull-queue-and-the-nest-mailer/
참고 문서 2 : https://velog.io/@peter0618/Nestjs-Queues
