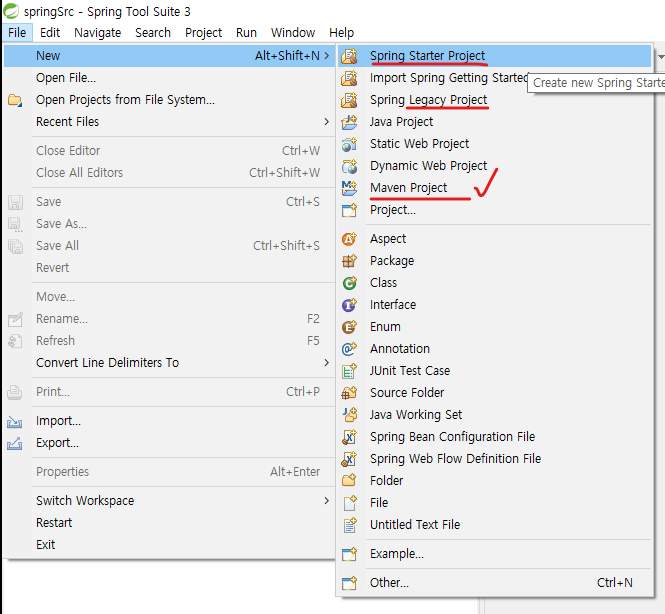
och01_di 만들기
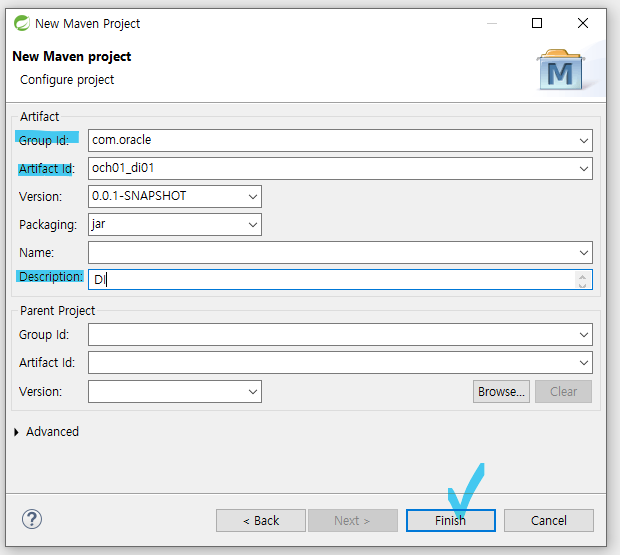
New -> Maven Project >> Create simple~~~ 체크하고 next >> 그룹id, 아티펙id, description

pom .xml
아래부분 작성후 저장 하면 알아서 다운로드 >>> 모듈(.jar)들이 깔린다.
4.1.1. 로 깔았는데 버전 올린 후 저장하면 그 버전을 다운로드 한다.
  <dependencies>
  	<dependency>
  		<groupId>org.springframework</groupId>
  		<artifactId>spring-context</artifactId>
  		<version>4.1.1.RELEASE</version>
  	</dependency>
</dependencies><project xmlns="http://maven.apache.org/POM/4.0.0" xmlns:xsi="http://www.w3.org/2001/XMLSchema-instance" xsi:schemaLocation="http://maven.apache.org/POM/4.0.0 https://maven.apache.org/xsd/maven-4.0.0.xsd">
<modelVersion>4.0.0</modelVersion>
<groupId>com.oracle</groupId>
<artifactId>och01_di01</artifactId>
<version>0.0.1-SNAPSHOT</version>
<description>DI</description>
<dependencies>
<dependency>
<groupId>org.springframework</groupId>
<artifactId>spring-context</artifactId>
<version>4.1.1.RELEASE</version>
</dependency>
</dependencies>
</project>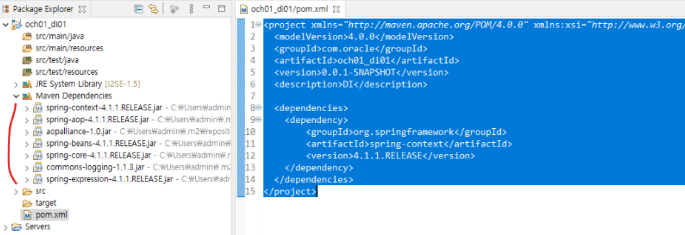
bean 파일 만들때
bean03
DI(Dependency Injection) 값을 외부에서 주입하는 방법
vehicle .java
package sam06;

public interface vehicle {
	void ride();
}
VehicleImpl .java
package sam06;

public class VehicleImpl implements vehicle {
	private String name;
	private String rider;
	private int    speed;

	public VehicleImpl (String name) {
		this.name = name;
	}

	public void setRider(String rider) {
		this.rider = rider;
	}

	public void setSpeed(int speed) {
		this.speed = speed;
	}

	public void ride() {
		System.out.println(name + " 님은(는) " + rider + "를 이용 " + speed + "km 속도로 탄다");
	}

}
Ex06 .java
package sam06;

import org.springframework.context.ApplicationContext;
import org.springframework.context.support.ClassPathXmlApplicationContext;

public class Ex06 {

	public static void main(String[] args) {
		ApplicationContext ac = new ClassPathXmlApplicationContext("bean06.xml");
		vehicle vh = (vehicle) ac.getBean("vh6");
		vh.ride();
	}

}
bean06 .xml
<?xml version="1.0" encoding="UTF-8"?>
<beans xmlns="http://www.springframework.org/schema/beans"
	xmlns:xsi="http://www.w3.org/2001/XMLSchema-instance"
	xsi:schemaLocation="http://www.springframework.org/schema/beans http://www.springframework.org/schema/beans/spring-beans.xsd">

	<bean id="vh6" class="sam06.VehicleImpl">
		<constructor-arg value="한의정"></constructor-arg>
		<property name="rider" value="벤츠"></property>
		<property name="speed"><value>300</value></property>
	</bean>

</beans>
sam07
setter방식. ==>> property 사용
객체가 주거니받거니 상호작용. >>> *** 07장이 제일 헷갈릴것
MessageBean .java
인터페이스로 생성
package sam07;

public interface MessageBean {
	void sayHello();
}
Outputter .java
인터페이스로 생성
package sam07;

public interface Outputter {
	void output(String msg);
}
MessageBeanImpl .java
name, greet, outer를 setter
String msg = name + "님!! " + greet;
msg 만든걸 output(msg) 에 넣음
if(outputter != null) outputter.output(msg);
private Outputter outputter; 맵핑
package sam07;

public class MessageBeanImpl implements MessageBean {
	private String name;
	private String greet;
	private Outputter outputter;

	public void setName(String name) {
		this.name = name;
	}
	public void setGreet(String greet) {
		this.greet = greet;
	}
	public void setOutputter(Outputter outputter) {
		this.outputter = outputter;
	}

	public void sayHello() {
		String msg = name + "님!! " + greet;
		System.out.println(msg);
		if(outputter != null) outputter.output(msg);
	}
}
FileOutputter .java
파일 생성시 Interface - ADD >> Outputter
package sam07;

import java.io.File;
import java.io.FileWriter;
import java.io.IOException;

public class FileOutputter implements Outputter {
	private String fileName;

	public void setFileName(String fileName) {
		this.fileName = fileName;
	}
//				   	최혜선님!! 클래식
	public void output(String msg) {
		try {
			System.out.println("fileName:" + fileName);
			FileWriter fw = new FileWriter(new File(fileName));
			fw.write(msg);
			fw.close();
		} catch (IOException e) {
			e.printStackTrace();
		}
	}
}
HelloApp .java
절대Path 로 지정
new ClassPathXmlApplicationContext("/sam07/bean07.xml");
package sam07;

import org.springframework.context.ApplicationContext;
import org.springframework.context.support.ClassPathXmlApplicationContext;

public class HelloApp {

	public static void main(String[] args) {				//절대 path >> 직접주는 것
		ApplicationContext ac = new ClassPathXmlApplicationContext("/sam07/bean07.xml");
		MessageBean mb = (MessageBean) ac.getBean("mb7");
		mb.sayHello();
	}

}
bean07 .xml
source 말고 그냥 위치에 만듬
.FileOutputter 가 참조되어짐
<bean id="outputter" class="sam07.FileOutputter">

<property name="fileName" value="C:/log/msg1.txt"></property>

</bean>
자바 : 객체가 넘어가면 >> 주소값으로 선언
스프링 : DI 방식으로 객체선언 >>> 주소값을 넘겨줘야 하기 때문에. 레퍼런스 방식으로 선언
id="outputter" id, bean 이름 같아야 한다.
가져온걸 / 참조시키겠다
MessageBeanImpl 으로 이동 >>msg를 갖고 FileOutputter로 이동. >> FileWriter fw 실행
<?xml version="1.0" encoding="UTF-8"?>
<beans xmlns="http://www.springframework.org/schema/beans"
	xmlns:xsi="http://www.w3.org/2001/XMLSchema-instance"
	xsi:schemaLocation="http://www.springframework.org/schema/beans http://www.springframework.org/schema/beans/spring-beans.xsd">

	<bean id="outputter" class="sam07.FileOutputter">
		<property name="fileName" value="C:/log/msg1.txt"></property>
	</bean>
	<bean id="mb7" class="sam07.MessageBeanImpl">
		<property name="name" value="최혜선"></property>
		<property name="greet"><value>클래식</value></property>
		<property name="outputter"><ref bean="outputter"></ref></property>
	</bean>
</beans>
och03_di03 만들기
Calculator .java
사칙연산
package DI01;

public class Calculator {
	public void addition(int f, int s) {
		System.out.println("addition()");
		int result = f + s;
		System.out.println(f + " + " + s + " = " + result);
	}
	public void subtraction(int f, int s) {
		System.out.println("subtraction()");
		int result = f - s;
		System.out.println(f + " - " + s + " = " + result);
	}
	public void multiplication(int f, int s) {
		System.out.println("multiplication()");
		int result = f * s;
		System.out.println(f + " * " + s + " = " + result);
	}
	public void division(int f, int s) {
		System.out.println("division()");
		int result = f / s;
		System.out.println(f + " / " + s + " = " + result);
	}
}
MyCalculator .java
package DI01;

public class MyCalculator {
	Calculator calculator;
	private int firstNum;
	private int secondNum;

	public MyCalculator( ) {

	}

	public void add( ) {
		calculator.addition(firstNum, secondNum);
	}
	public void sub( ) {
		calculator.subtraction(firstNum, secondNum);
	}
	public void mul( ) {
		calculator.multiplication(firstNum, secondNum);
	}
	public void div( ) {
		calculator.division(firstNum, secondNum);
	}


	public void setCalculator(Calculator calculator) {
		this.calculator = calculator;
	}
	public void setFirstNum(int firstNum) {
		this.firstNum = firstNum;
	}
	public void setSecondNum(int secondNum) {
		this.secondNum = secondNum;
	}
}
MainClass01 .java
아래 치기전에 pom .xml 만들어야한다! >> maven 만들어짐
Ex05 .java
ApplicationContext ac = new ClassPathXmlApplicationContext("bean05.xml");

		MessageBean mb = (MessageBean) ac.getBean("mb5");
AbstractApplicationContext ctx = new GenericXmlApplicationContext(configLocation); // getBean 캐스팅을 안해도 됨. MyCalculator myCalculator = ctx.getBean("myCalculator", MyCalculator.class)
package DI01;
import org.springframework.context.support.AbstractApplicationContext;
import org.springframework.context.support.GenericXmlApplicationContext;
public class MainClass01 {
public static void main(String[] args) {
String configLocation = "classpath:applicationCTX01.xml";
// 패스: Ex05와 비교
AbstractApplicationContext ctx = new GenericXmlApplicationContext(configLocation);
// getBean 캐스팅을 안해도 됨.
MyCalculator myCalculator = ctx.getBean("myCalculator", MyCalculator.class);
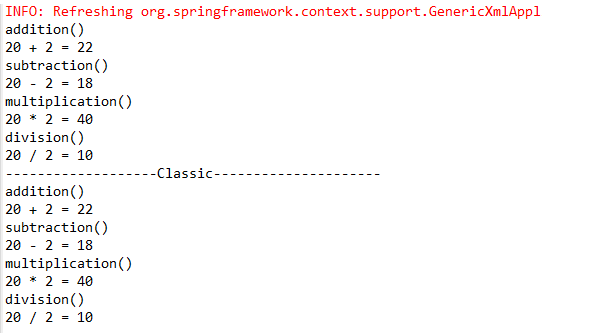
myCalculator.add();
myCalculator.sub();
myCalculator.mul();
myCalculator.div();
System.out.println("-------------------Classic---------------------");
// Classic ===> 옛날방식. 요즘은 위방식으로 쓴다.
MyCalculator myCalculator03 = new MyCalculator();
Calculator calculator03 = new Calculator(); // >> <ref bean = "calculator">
myCalculator03.setCalculator(calculator03);
myCalculator03.setFirstNum(20);
myCalculator03.setSecondNum(2);
myCalculator03.add();
myCalculator03.sub();
myCalculator03.mul();
myCalculator03.div();
}
}결과 :
applicationCTX01 .xml
MyCalculator myCalculator = ctx.getBean("**myCalculator**", MyCalculator.class)
bean id="myCalculator" class="DI01.MyCalculator"
이름 맞춰줘야한다!
<?xml version="1.0" encoding="UTF-8"?>
<beans xmlns="http://www.springframework.org/schema/beans"
	xmlns:xsi="http://www.w3.org/2001/XMLSchema-instance"
	xsi:schemaLocation="http://www.springframework.org/schema/beans http://www.springframework.org/schema/beans/spring-beans.xsd">

	<bean id="calculator" class="DI01.Calculator"></bean>
	<bean id="myCalculator" class="DI01.MyCalculator">
		<property name="firstNum" value="20"/>
		<property name="secondNum" value="2"></property>
		<property name="calculator"><ref bean="calculator"/></property>
	</bean>

</beans>
BMICalculator .java
package DI02;

public class BMICalculator {
	private double lowWeight;
	private double normal;
	private double overWeight; // 과체중
	private double obesity;	   // 비만

	public void bmicalculation(double weight, double height) {

		double h = height * 0.01;
		double result = weight / (h*h);

		System.out.println("BMI 지수 : " + (int)result);

		if(result > obesity) {
			System.out.println("비만 .");
		} else if(result > overWeight) {
			System.out.println("과체중.");
		} else if(result > normal) {
			System.out.println("정상 .");
		} else {
			System.out.println("저체중 .");
		}
	}

	// setter
	public void setLowWeight(double lowWeight) {
		this.lowWeight = lowWeight;
	}
	public void setNormal(double normal) {
		this.normal = normal;
	}
	public void setOverWeight(double overWeight) {
		this.overWeight = overWeight;
	}
	public void setObesity(double obesity) {
		this.obesity = obesity;
	}

}
MyInfo .java
setter 만 generate
property는 setter
package DI02;

import java.util.ArrayList;

public class MyInfo {
	private String name;
	private double height;
	private double weight;
	private ArrayList<String> hobbys;
	private BMICalculator bmiCalculator;

	public void bmiCalculator() {
		bmiCalculator.bmicalculation(weight, height);
	}

	public void getInfo() {
		System.out.println("이름 : " + name);
		System.out.println("키 : " + height);
		System.out.println("몸무게 : " + weight);
		System.out.println("취미 : " + hobbys);
		bmiCalculator();
	}

	public void setName(String name) {
		this.name = name;
	}
	public void setHeight(double height) {
		this.height = height;
	}
	public void setWeight(double weight) {
		this.weight = weight;
	}
	public void setHobbys(ArrayList<String> hobbys) {
		this.hobbys = hobbys;
	}
	public void setBmiCalculator(BMICalculator bmiCalculator) {
		this.bmiCalculator = bmiCalculator;
	}

}
MyInfo .java
setter 만 generate
private ArrayList hobbys; >> ArrayList 배열
package DI02;

import java.util.ArrayList;

public class MyInfo {
	private String name;
	private double height;
	private double weight;
	private ArrayList<String> hobbys;
	private BMICalculator bmiCalculator;

	public void bmiCalculator() {
		bmiCalculator.bmicalculation(weight, height);
	}

	public void getInfo() {
		System.out.println("이름 : " + name);
		System.out.println("키 : " + height);
		System.out.println("몸무게 : " + weight);
		System.out.println("취미 : " + hobbys);
		bmiCalculator();
	}

	public void setName(String name) {
		this.name = name;
	}
	public void setHeight(double height) {
		this.height = height;
	}
	public void setWeight(double weight) {
		this.weight = weight;
	}
	public void setHobbys(ArrayList<String> hobbys) {
		this.hobbys = hobbys;
	}
	public void setBmiCalculator(BMICalculator bmiCalculator) {
		this.bmiCalculator = bmiCalculator;
	}
}
MainClass02 .java
package DI02;

import org.springframework.context.support.AbstractApplicationContext;
import org.springframework.context.support.GenericXmlApplicationContext;

public class MainClass02 {

	public static void main(String[] args) {
		String configLocation 			= "classpath:applicationCTX02.xml";
		AbstractApplicationContext ctx	= new GenericXmlApplicationContext(configLocation);
		MyInfo myInfo 					= ctx.getBean("myInfo", MyInfo.class);
		myInfo.getInfo();
		ctx.close();

	}
}
결과 :
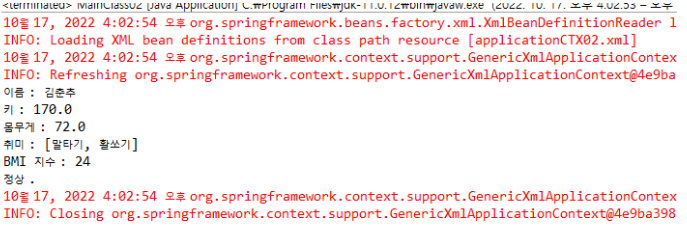
applicationCTX02 .xml
처음에 myInfo 만 값을 세팅하는줄 알았는데 결과값을 보니 bmiCalculator 도 세팅해야 했다.
hobbys / bmiCalculator 선언하는 방법 알아두기!
<?xml version="1.0" encoding="UTF-8"?>
<beans xmlns="http://www.springframework.org/schema/beans"
	xmlns:xsi="http://www.w3.org/2001/XMLSchema-instance"
	xsi:schemaLocation="http://www.springframework.org/schema/beans http://www.springframework.org/schema/beans/spring-beans.xsd">
									<!-- 패키지.클래스 -->
	<bean id="bmiCalculator" class="DI02.BMICalculator">
		<property name="lowWeight" value="18.5"></property>
		<property name="normal" value="23"></property>
		<property name="overWeight" value="25"></property>
		<property name="obesity" value="30"></property>

	</bean>

	<bean id="myInfo" class="DI02.MyInfo">
		<property name="name" value="김춘추"/>
		<property name="height" value="170"/>
		<property name="weight" value="72"></property>
		<property name="hobbys">
			<list>
				<value>말타기</value>
				<value>활쏘기</value>
			</list>
		</property>
		<property name="bmiCalculator">
			<ref bean="bmiCalculator"/>
		</property>
	</bean>

</beans>
>> ArrayList 에 값을 세팅할때 list 사용