
자바의 예외 처리에 대해 정리합니다.
학습할 내용은 다음과 같습니다.
- 자바에서 예외 처리 방법 (try, catch, throw, throws, finally)
- 자바가 제공하는 예외 계층 구조
- Exception과 Error의 차이는?
- RuntimeException과 RE가 아닌 것의 차이는?
- 커스텀한 예외 만드는 방법
Reference
- Oracle Java Document
- Exceptions in Java
- Chained Exceptions in Java
- Create a Custom Exception in Java
- Difference between RuntimeException and checked Exception in Java
- Built-in Exceptions in Java with examples
1. 자바에서 예외 처리 방법 (try, catch, throw, throws, finally)
Exception Handler의 Component로 try, catch, finally가 있습니다. 그리고 자바 7에서 들어온 try-with-resources statement가 있습니다.
이것들을 설명하기 위해서 ListOfNumbers class 예시를 사용하겠습니다.
import java.io.*;
import java.util.List;
import java.util.ArrayList;

public class ListOfNumbers {

    private List<Integer> list;
    private static final int SIZE = 10;

    public ListOfNumbers () {
        list = new ArrayList<Integer>(SIZE);
        for (int i = 0; i < SIZE; i++) {
            list.add(new Integer(i));
        }
    }

    public void writeList() {
	// The FileWriter constructor throws IOException, which must be caught.
        PrintWriter out = new PrintWriter(new FileWriter("OutFile.txt"));

        for (int i = 0; i < SIZE; i++) {
            // The get(int) method throws IndexOutOfBoundsException, which must be caught.
            out.println("Value at: " + i + " = " + list.get(i));
        }
        out.close();
    }
}
여기서 발생할 수 있는 예외는 두 군데 있습니다.
PrintWriter out = new PrintWriter(new FileWriter("OutFile.txt"));
이 부분에서 OutFile.txt 파일을 성공적으로 열지 못한다면 IOException이 발생할 것입니다.
그리고 두번째 부분은 ArrayList에서 get Method를 통해 값을 가지고 오려고 할 때 해당 인덱스 값이 없다면 IndexOutOfBoundsException이 발생할 수 있습니다.
out.println("Value at: " + i + " = " + list.get(i));
The try block
try Block은 예외가 발생할 수 있는 코드를 넣는 곳입니다. 여기서 발생한 예외는 Catch Block을 통해 전달됩니다.
문법은 다음과 같습니다.
try {
    code
}
catch and finally blocks . . .
위의 예제에 적용해보면 다음과 같습니다.
public void writeList() {
    PrintWriter out = null;
    try {
        System.out.println("Entered try statement");
        out = new PrintWriter(new FileWriter("OutFile.txt"));
        for (int i = 0; i < SIZE; i++) {
            out.println("Value at: " + i + " = " + list.get(i));
        }
    }
    catch and finally blocks  . . .
}
The catch block
Catch Block은 try 블록에서 발생한 예외 코드나 예외 객체를 Arguement로 전달받아 그 처리를 담당합니다.
문법은 다음과 같습니다.
try {

} catch (ExceptionType name) {

} catch (ExceptionType name) {

}
여기에 있는 ExceptionType은 자바에 있는 Exception과 Error의 superClass인 Throwable을 상속한 클래스 중 하나여야 합니다.
Catch Block을 실제적인 예외를 처리하는 부분으로 간단하게 에러 메시지를 출력하는 것 뿐 아니라 에러가 났을때 복구 작업을 하거나 Chained exception을 통해 High level handler에게 에러를 전파할 수 있습니다.
try Block에 있는 예제에 Catch Block을 추가하면 다음과 같습니다.
public void writeList() {
    PrintWriter out = null;
    try {
        System.out.println("Entered try statement");
        out = new PrintWriter(new FileWriter("OutFile.txt"));
        for (int i = 0; i < SIZE; i++) {
            out.println("Value at: " + i + " = " + list.get(i));
        }
    }catch (IndexOutOfBoundsException e) {
    	System.err.println("IndexOutOfBoundsException: " + e.getMessage());
    }catch (IOException e) {
    	System.err.println("Caught IOException: " + e.getMessage());
    }
}
Java 7 이후 부터는 하나의 Catch Block에서 하나 이상의 Exception Type을 전파할 수 있습니다.
예시는 다음과 같습니다.
catch (IOException | SQLException ex) {
    logger.log(ex);
    throw ex;
}
이걸 통해 코드의 중복을 줄이거나 광범위한 예외를 처리하지 않아도 됩니다.
그리고 하나 이상의 ExceptionType을 처리하는 경우 Catch parameter는 내재적으로 final이 됩니다. 그러므로 ex는 다른 값으로 할당할 수 없습니다.
The finally block
finally block은 try block이 끝난 후 또는 예상치 못한 에러가 발생 했을때도 실행을 보장합니다.
하지만 만약에 JVM이 try catch block을 실행 중에 종료된다면 finally block은 실행되지 않습니다.
마찬가지로 Thread가 try catch block을 실행 중에 interrupt 당하거나 kill 당한다면 finally block은 실행되지 않습니다.
finally block은 cleanup code를 넣어서 resource leak을 막을 용도로 사용하는게 좋습니다.
예시는 계속 사용하던 ListOfNumbers class 통해 설명하겠습니다.
public void writeList() {
    PrintWriter out = null;
    try {
        System.out.println("Entered try statement");
        out = new PrintWriter(new FileWriter("OutFile.txt"));
        for (int i = 0; i < SIZE; i++) {
            out.println("Value at: " + i + " = " + list.get(i));
        }
    }catch (IndexOutOfBoundsException e) {
    	System.err.println("IndexOutOfBoundsException: " + e.getMessage());
    }catch (IOException e) {
    	System.err.println("Caught IOException: " + e.getMessage());
    }finally {
    if (out != null) {
        System.out.println("Closing PrintWriter");
        out.close();
    } else {
        System.out.println("PrintWriter not open");
    }
}

}
try block에 있는 writeList method에는 파일을 읽기 위해 PrintWriter 라는 리소스를 사용합니다.
그러므로 writeList method를 종료할 땐 PrintWriter 리소스를 반환하기 위해 close 해줘야 합니다.
이 경우 finally block에 cleanup code를 넣어줌으로써 정상적으로 try block이 종료되든 예외가 일어나서 흐름이 바뀌든 상관없이
PrintWriter 리소스를 반환합니다.
The try-with-resources Statement
try-with-resource는 Java 7에서 들어온 기능으로 try block에서 사용할 resource를 선언하는 식으로 사용됩니다.
finally block 대신에 resource를 자동으로 반환하기 위해 사용합니다.
여기서 말하는 리소스는 java.lang.AutoClosable 이나 java.io.Closable을 구현한 오브젝트를 말하며 반드시 close 되야하는 리소스 입니다.
예시는 다음과 같습니다.
// Java 7 이후 try-with-resources
static String readFirstLineFromFile(String path) throws IOException {
    try (BufferedReader br =
                   new BufferedReader(new FileReader(path))) {
        return br.readLine();
    }
}

// Java 7 이전
static String readFirstLineFromFileWithFinallyBlock(String path)
                                                     throws IOException {
    BufferedReader br = new BufferedReader(new FileReader(path));
    try {
        return br.readLine();
    } finally {
        if (br != null) br.close();
    }
}
Specifying the Exceptions Thrown by a Method
catch block을 통해 예외를 처리하는 것도 좋은 방법이지만 때로는 현재 메소드에서 예외를 처리하는 것보다 Call Stack에 있는 상위 메소드에서
예외를 처리하게 두는 것이 좋을 때가 있습니다.
이 경우 catch block이 없으므로 메소드에서 throw keyword를 통해 예외가 발생함을 알려줘야 합니다.
예시는 다음과 같습니다.
public void writeList() throws IOException, IndexOutOfBoundsException {
    PrintWriter out = new PrintWriter(new FileWriter("OutFile.txt"));
    for (int i = 0; i < SIZE; i++) {
        out.println("Value at: " + i + " = " + list.get(i));
    }
    out.close();
}
여기서 IndexOutOfBoundsException은 RuntimeException의 하위 클래스인 Unchekced Exception이므로 복구할 방법이 없으므로 지우는게 좋습니다.
The throw Statement
때로는 예외를 발생시켜야 할 때가 있습니다. 그건 throw keyword를 통해 가능합니다.
이런 발생시킬 수 있는 예외는 Exception의 최상위 클래스인 Throwable class의 하위 클래스라면 모두 가능합니다.
그러므로 Throwable class를 상속받은 사용자 정의 클래스를 구현해서 예외를 발생시킬 수 있습니다.
예제는 다음과 같습니다.
public Object pop() {
    Object obj;

    if (size == 0) {
        throw new EmptyStackException();
    }

    obj = objectAt(size - 1);
    setObjectAt(size - 1, null);
    size--;
    return obj;
}
Chained Exceptions
이렇게 예외를 발생시켜서 Chained Exceptions을 만들 수도 있습니다.
Chained Exceptions은 예외에 대한 응답으로 다른 예외를 발생시키는 걸 말합니다. 한 예외로 인해 다른 예외가 발생함을 아는게 때로는 유용한 정보가 될 수 있습니다.
예를들면 0으로 나눠서 발생하는 ArithmeticException이 일어났다고 생각해봅시다. 이때 근본적 원인은 I/O error 때문에 0으로 나눈 상황이였습니다. 하지만 이 경우 실제적인 예외의 원인을 알 수 없고 발생하는 예외는 ArithmeticException 입니다. 이런 문제를 Chained Exceptions을 통해 해결할 수 있습니다.
예시는 다음과 같습니다.
public class MyChainedException {

    public void main(String[] args) {
        try {
            throw new ArithmeticException("Top Level Exception.")
              .initCause(new IOException("IO cause."));
        } catch(ArithmeticException ae) {
            System.out.println("Caught : " + ae);
            System.out.println("Actual cause: "+ ae.getCause());
        }
    }
}
initCause() method를 통해 현재 발생한 예외에 원인 에외를 넣을 수 있습니다.
getCause() method를 통해 실제 예외의 원인을 볼 수 있습니다.
Advantages of Exceptions
Exception을 사용했을 때 프로그램에서의 이점을 다양한 예를 통해 보겠습니다.
Advantage 1: Separating Error-Handling Code from "Regular" Code
파일을 읽는 프로그램을 만든다고 생각해보겠습니다. 실행 흐름은 다음과 같습니다.
readFile {
    open the file;
    determine its size;
    allocate that much memory;
    read the file into memory;
    close the file;
}
traditional programming에서 코드를 짜는데 error detection과 reporting, handling 이런 코드가 main logic이랑 섞여 있으면 프로그램 실행 흐름을 알기 어렵습니다.
아래와 같이 코드가 만들어 질 것입니다.
errorCodeType readFile {
    initialize errorCode = 0;

    open the file;
    if (theFileIsOpen) {
        determine the length of the file;
        if (gotTheFileLength) {
            allocate that much memory;
            if (gotEnoughMemory) {
                read the file into memory;
                if (readFailed) {
                    errorCode = -1;
                }
            } else {
                errorCode = -2;
            }
        } else {
            errorCode = -3;
        }
        close the file;
        if (theFileDidntClose && errorCode == 0) {
            errorCode = -4;
        } else {
            errorCode = errorCode and -4;
        }
    } else {
        errorCode = -5;
    }
    return errorCode;
}
하지만 Exception을 쓰면 이런 흐름들을 뺄 수 있습니다.
readFile {
    try {
        open the file;
        determine its size;
        allocate that much memory;
        read the file into memory;
        close the file;
    } catch (fileOpenFailed) {
       doSomething;
    } catch (sizeDeterminationFailed) {
        doSomething;
    } catch (memoryAllocationFailed) {
        doSomething;
    } catch (readFailed) {
        doSomething;
    } catch (fileCloseFailed) {
        doSomething;
    }
}
Advantage 2: Propagating Errors Up the Call Stack
Exception의 두번째 특징은 발생한 예외를 현재에서 처리하지 않고 Method Call Stack으로 전파할 수 있다는 것입니다.
Main Program에 다음과 같은 메소드를 호출한다고 생각해봅시다.
method1 {
    call method2;
}

method2 {
    call method3;
}

method3 {
    call readFile;
}
Traditional error-notification techniques에서는 런타임 시스템을 이용해 Exception Handler를 찾지 않고 에러 코드를 리턴해 예외를 처리합니다.
method1 {
    errorCodeType error;
    error = call method2;
    if (error)
        doErrorProcessing;
    else
        proceed;
}

errorCodeType method2 {
    errorCodeType error;
    error = call method3;
    if (error)
        return error;
    else
        proceed;
}

errorCodeType method3 {
    errorCodeType error;
    error = call readFile;
    if (error)
        return error;
    else
        proceed;
}
하지만 자바에서는 현재 예외를 처리할 수 있는 Exception Handler가 없다면 특정 예외를 처리할 수 있는 Handler를 찾기 위해 Call Stack을 역방향으로 검색합니다. 따라서 예외를 처리할 메소드만 정확히 예외를 감지하고 처리하면 됩니다.
method1 {
    try {
        call method2;
    } catch (exception e) {
        doErrorProcessing;
    }
}

method2 throws exception {
    call method3;
}

method3 throws exception {
    call readFile;
}
Advantage 3: Grouping and Differentiating Error Types
프로그램 내에서 발생하는 모든 예외는 Object입니다. 그러므로 예외를 그룹화하거나 분류할 수 있습니다.
예를들면 Java.io에서 정의한 IOException과 그 하위 클래스가 있습니다.
IOException은 I/O를 수행할 때 일어날 수 있는 모든 예외를 말하며 그 하위 클래스들은 좀 더 구체적인 내용을 말합니다.
IOException의 하위 클래스인 FileNotFoundException은 디스크에서 파일을 찾을 수 없을 때 발생합니다.
이를 이용해 catch statement에 아주 구체적인 예외 클래스를 처리하도록 할 수 있지만 예외 슈퍼 클래스를 지정해 그룹 단위로 예외를 처리하게 할 수 있습니다.
catch (IOException e) {
    // Output goes to System.err.
    e.printStackTrace();
    // Send trace to stdout.
    e.printStackTrace(System.out);
}
이 catch statement은 FileNotFoundException부터 EOFException 등 모든 IOException을 다 처리할 수 있습니다.
2. 자바가 제공하는 예외 계층 구조
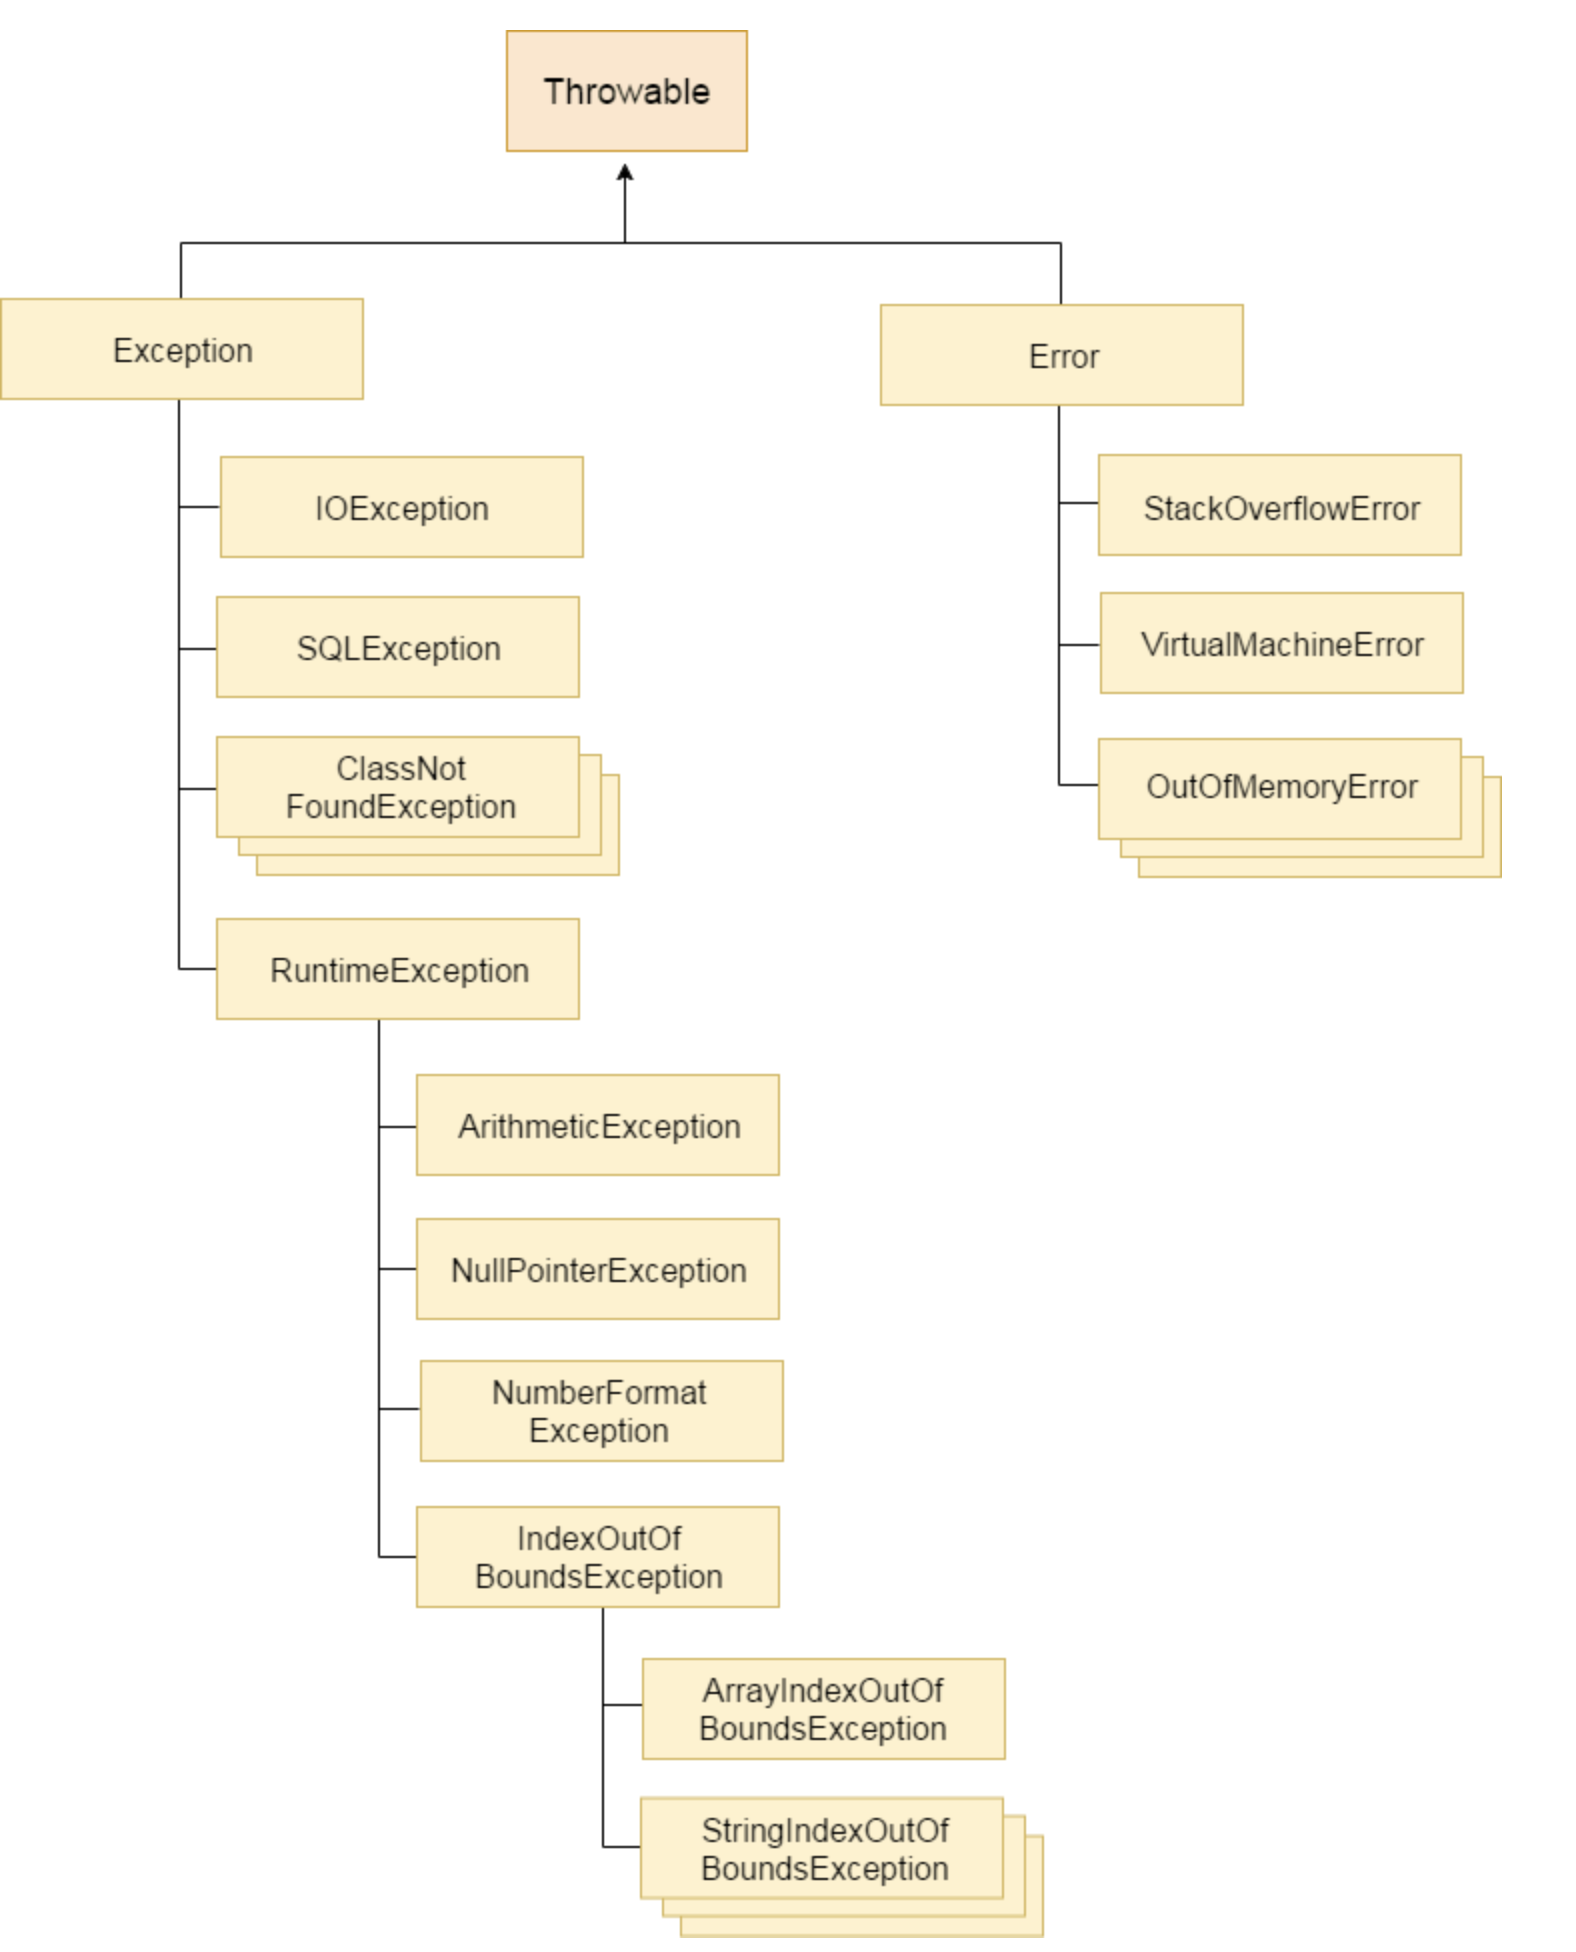
java.lang.Throwable class가 Java Exception의 root Class 입니다. hierarchy은 크게 두개로 나뉘는데 Exception과 Error로 나뉩니다.
이런 Exception도 Checked Exception과 Unchecked Exception으로 나뉩니다.
이 예외 계층을 아는 것은 catching exceptions 할 때 유용합니다.
예를들면 catch(IOException e)를 한다면 자식 클래스인 FileNotFoundException도 catch 할 것입니다.
Types of Java Exceptions
-
Unchecked Exception
- Unchecked Exception은 RuntimeException을 상속받은 Exception을 말합니다. 일반적으로 발생을 예측할 수 없고 복구할 수 없는 예외를 말합니다. 주로 programming errors나 외부 API 사용 때문에 일어납니다.
-
Checked Exception
- Exception의 하위 클래스 중 RuntimeException을 제외한 Exception을 상속받은 Exception을 말합니다. 이런 예외는 예상할 수 있고 복구할 수 있습니다.
-
Error
- Error 클래스의 하위 클래스들이 Error에 속합니다. Error는 예상할 수 없고 복구할 수도 없습니다.
Built-in Exceptions in Java with examples
Java libraries에서 제공하는 기본 Exception 들을 다양한 예와 함께 살펴보겠습니다.
1. Arithmetic exception
산술 연산에서 예외 조건이 발생했을 때 발생합니다.
class ArithmeticException_Demo {
public static void main(String args[])
    {
        try {
            int a = 30, b = 0;
            int c = a / b; // cannot divide by zero
            System.out.println("Result = " + c);
        }
        catch (ArithmeticException e) {
            System.out.println("Can't divide a number by 0"); // expected output
        }
    }
}
2. ArrayIndexOutOfBounds Exception
잘못된 인덱스로 Array에 액세스했을 때 발생합니다. 인덱스가 음수이거나 배열 크기보다 크거나 같을 때 입니다.
class ArrayIndexOutOfBound_Demo {
public static void main(String args[])
    {
        try {
            int a[] = new int[5];
            a[6] = 9; // accessing 7th element in an array of
            // size 5
        }
        catch (ArrayIndexOutOfBoundsException e) {
            System.out.println("Array Index is Out Of Bounds"); // expected output
        }
    }
}
3. ClassNotFoundException
정의한 클래스를 찾을 수 없을 때 발생하는 예외입니다.
public static void main(String[] args)
    {
        Object o = class.forName(args[0]).newInstance();
        System.out.println("Class created for" + o.getClass().getName());
    }
}
4. FileNotFoundException
이 예외는 파일에 액세스할 수 없거나 열리지 않을 때 발생합니다.
public static void main(String args[])
    {
        try {

            // Following file does not exist
            File file = new File("E:// file.txt");

            FileReader fr = new FileReader(file);
        }
        catch (FileNotFoundException e) {
            System.out.println("File does not exist");
        }
    }
}
5. IOException
입출력 작업이 실패하거나 중단될 때 발생합니다.
public static void main(String args[])
    {
        FileInputStream f = null;
        f = new FileInputStream("abc.txt");
        int i;
        while ((i = f.read()) != -1) {
            System.out.print((char)i);
        }
        f.close();
    }
}
6. InterruptedException
Thread가 waiting, sleeping 또는 어떤 처리를 하고 있을 때 interrupt가 되면 발생하는 예외입니다.
static class TestInterruptingThread extends Thread{
    public void run(){
        try{
            Thread.sleep(1000);
            System.out.println("task");
        }catch(InterruptedException e){
            System.out.println("Exception handled "+e);
        }
        System.out.println("thread is running...");
    }
}

public static void main(String[] args) {
        TestInterruptingThread t1= new TestInterruptingThread();
        t1.start();
        t1.interrupt();
}
7. NoSuchMethodException
찾을 수 없는 메서드에 액세스할 때 이 예외가 발생합니다.
public static void main(String[] args) throws ClassNotFoundException, NoSuchMethodException {
     Class c = Class.forName("NoSuchMethodExceptionTest");

     c.getDeclaredMethod("test");
}
8. NullPointerException
이 예외는 null 객체의 멤버를 참조할 때 발생합니다.
public static void main(String args[])
    {
        try {
            String a = null; // null value
            System.out.println(a.charAt(0));
        }
        catch (NullPointerException e) {
            System.out.println("NullPointerException..");
        }
    }
}
9. NumberFormatException
메서드가 문자열을 숫자 형식으로 변환할 수 없는 경우 이 예외가 발생합니다.
public static void main(String args[])
    {
        try {
            // "test" is not a number
            int num = Integer.parseInt("test");

            System.out.println(num);
        }
        catch (NumberFormatException e) {
            System.out.println("Number format exception");
        }
    }
}
10. StringIndexOutOfBoundsException
문자열에 엑세스 하는 인덱스가 문자열보다 큰 경우거나 음수일 때 발생하는 예외입니다.
public static void main(String args[])
    {
        try {
            String a = "This is like chipping "; // length is 22
            char c = a.charAt(24); // accessing 25th element
            System.out.println(c);
        }
        catch (StringIndexOutOfBoundsException e) {
            System.out.println("StringIndexOutOfBoundsException");
        }
    }
}
3. Exception과 Error의 차이는?
What Is an Exception?
오라클에서는 Exception을 Event라고 합니다. 무슨 Event냐면 프로그램의 정상적인 흐름을 방해시키는 이벤트 입니다.
이런 이벤트가 발생하면 메소드에서 에러 정보가 담긴 Exception Object를 만들고 런타임 시스템에 전달합니다.
그러면 런타임 시스템은 이 Exception Object를 처리할 수 있는 Exception Handler를 찾으려고 합니다.
이 Exception Handler를 찾으려는 집합은 메소드를 호출한 집합인 Method Call Stack 입니다. 먼저 에러가 발생한 메소드부터 찾고 거기서 찾지 못하면 이 메소드를 호출한 메소드에서 찾는식으로 진행합니다.
이렇게해서 찾으면 런타잉 시스템은 Exception Object를 Exception Handler에게 전달합니다.
Exception Handler는 Exception Object를 보고 자신이 처리할 수 있는 타입인지 판단하고 처리합니다.
이 Exception Handler가 Catch Code Block 입니다.
만약 Exception Handler를 찾지 못한다면 런타임 시스템은 종료됩니다.
Difference between Exception and Error
Exception과 Error 모두 최상위 예외 클래스인 Throwable 클래스의 하위 클래스 입니다.
Error는 주로 시스템 리소스 부족으로 인해 발생하는 문제를 나타내며, 이러한 유형의 문제는 어플리케이션 외부의 문제로 잡을 수 없습니다.
예로는 시스템 충돌 오류나 메모리 부족 오류가 있습니다.
Error는 주로 확인되지 않은 유형에 속하며 런타임 시점 때 확인되고 컴파일 시점에는 알 수 없습니다.
Exception은 어플리케이션 내부 문제로 확인할 수 있습니다.
Exception은 컴파일 시점과 런타임 시점 모두에서 발생할 수 있습니다. Exception은 그리고 Checked Excetpion과 Unchecked Exception으로 나뉩니다.
4. RuntimeException과 RE가 아닌 것의 차이는?
자바에서 RuntimeException은 Unchecked Exception으로 RuntimeException이 아닌것은 Checked Exception으로 분류됩니다.
둘의 가장 큰 차이는 Checked Exception의 경우 예외를 예측하고 복구할 수 있기 때문에 예외를 처리하는 Exception Handler가 강제됩니다.
즉 try-catch-finally block을 만들어야 합니다. 하지만 RuntimeException은 그렇지 않습니다.
또 둘의 차이는 사용자 정읠를 만들 때 차이가 발생합니다.
아래에서 다루겠지만 Checked Exception 종류의 사용자 정의 예외 클래스를 만들려면 java.lang.Exception 클래스를 상속받으면 되고
Unchecked Exception 종류의 사용자 정의 예외 클래스를 만들려면 java.lang.RuntimeException 클래스를 상속받으면 됩니다.
5. 커스텀한 예외 만드는 방법
Java platform에서는 자신만의 예외 클래스를 만들 수 있습니다.
다음의 조건에 부합된다면 예외 클래스를 만들어서 사용하고 그렇지 않다면 기존의 자바에서 제공하는 예외를 사용하면 됩니다.
-
Do you need an exception type that isn't represented by those in the Java platform?
-
if they could differentiate your exceptions from those thrown by classes written by other vendors?
-
Does your code throw more than one related exception?
-
If you use someone else's exceptions, will users have access to those exceptions?
Custom Checked Exception
다음 예제를 통해 보겠습니다.
try (Scanner file = new Scanner(new File(fileName))) {
    if (file.hasNextLine()) return file.nextLine();
} catch(FileNotFoundException e) {
    // Logging, etc
}
FileNotFoundException 같은 경우는 정확한 예외의 원인을 알 수 없습니다. 파일으 이름이 유효하지 않을 수 있고 파일이 존재하지 않을 수도 있습니다.
이 경우 java.lang.Exception class를 상속받은 커스텀 클래스를 만들어서 해결할 수 있습니다.
public class IncorrectFileNameException extends Exception {
    public IncorrectFileNameException(String errorMessage) {
        super(errorMessage);
    }

    public IncorrectFileNameException(String errorMessage, Throwable err) {
    	super(errorMessage, err);
    }
}
에러 메시지를 담을 생성자와, 근본 원인을 담을 생성자를 추가해서 예외를 만들 수 있습니다.
이 커스텀 예외를 사용해 정확한 원인을 알 수 있습니다.
try (Scanner file = new Scanner(new File(fileName))) {
    if (file.hasNextLine()) {
        return file.nextLine();
    }
} catch (FileNotFoundException err) {
    if (!isCorrectFileName(fileName)) {
        throw new IncorrectFileNameException(
          "Incorrect filename : " + fileName , err);
    }
    // ...
}
Custom Unchecked Exception
동일한 예제에서 파일 이름에 확장자가 없는 경우에 대해 생각해보겠습니다.
이 경우 오류는 런타임에서 감지되므로 Unchecked Exception이며 사용자 정의 예외가 필요합니다.
Unchecked Exception 에서 커스텀 예외를 만들기 위해선 java.lang.RuntimeException class를 상속받아야 합니다.
public class IncorrectFileExtensionException
  extends RuntimeException {
    public IncorrectFileExtensionException(String errorMessage, Throwable err) {
        super(errorMessage, err);
    }
}
이 예외를 통해 다음과 같이 해결할 수 있습니다.
try (Scanner file = new Scanner(new File(fileName))) {
    if (file.hasNextLine()) {
        return file.nextLine();
    } else {
        throw new IllegalArgumentException("Non readable file");
    }
} catch (FileNotFoundException err) {
    if (!isCorrectFileName(fileName)) {
        throw new IncorrectFileNameException(
          "Incorrect filename : " + fileName , err);
    }

    //...
} catch(IllegalArgumentException err) {
    if(!containsExtension(fileName)) {
        throw new IncorrectFileExtensionException(
          "Filename does not contain extension : " + fileName, err);
    }
    //...
}