이 글을 쓰게 된 이유
동작과정편에서 설명했던 것처럼 이번 글은 로그인 과정에 대해서 알아보고 활용하는 것까지 예시를 통해 알아보자. 이 글을 완벽하게 이해하기 위해서는 앞선 동작 과정편을 보고 오는 것을 추천한다.
1. 로그인 인증 구조
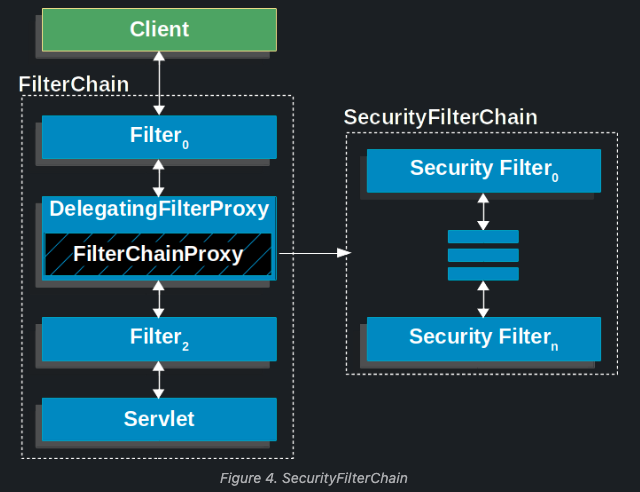
동작과정편에서 설명한 것처럼 인증은 filter에 의해서 진행되고 DelegatingFilterProxy로 등록된 FilterChainProxy 빈을 이용한 SecurityFilterChain으로 진행되게 된다. 아래 그림과 같다.
1.1 AbstractAuthenticationProcessingFilter
SecurityFilterChain 안에는 spring security에서 제공하는 여러가지 filter들이 있다고 했었다. 이때 Authentication(로그인)을 담당하는 필터는 AbstractAuthenticationProcessingFilter이다. 이 필터는 추상 클래스로 로그인에 필요한 공통적인 로직을 가지고 있는 필터이다. 대충 보면 아래와 같은 로직들을 가지고 있다고 생각하면 된다.
AbstractAuthenticationProcessingFilter는 추상 클래스이기 때문에 SecurityFilterChain안에 직접 들어갈 수 없고 이를 상속 받은 filter들이 속해 있다. 이 글에서는 username과 password를 form태그로 전달해서 로그인을 하는 UsernamePasswordAuthenticationFilter를 가지고 로그인 과정을 살펴볼 것이다. UsernamePasswordAuthenticationFilter는 AbstractAuthenticationProcessingFilter를 상속 받은 클래스이고 SecurityFilterChain안에 들어있다.
AbstractAuthenticationProcessingFilter의 구체적인 설명은 UsernamePasswordAuthenticationFilter가 구동하는 것을 보며 하겠다.
1.2 UsernamePasswordAuthenticationFilter
위에서 언급했듯이 UsernamePasswordAuthenticationFilter는 AbstractAuthenticationProcessingFilter를 상속 받은 클래스이다. AbstractAuthenticationProcessingFilter에서 username과 password를 form 태그 기반으로 받는 로직과 UsernamePasswordAuthenticationToken을 발행하는 로직이 추가되어서 상속 받았다고 생각하면 된다.
이제 UsernamePasswordAuthenticationFilter가 구동하는 전체적인 과정에 대해 살펴보자.
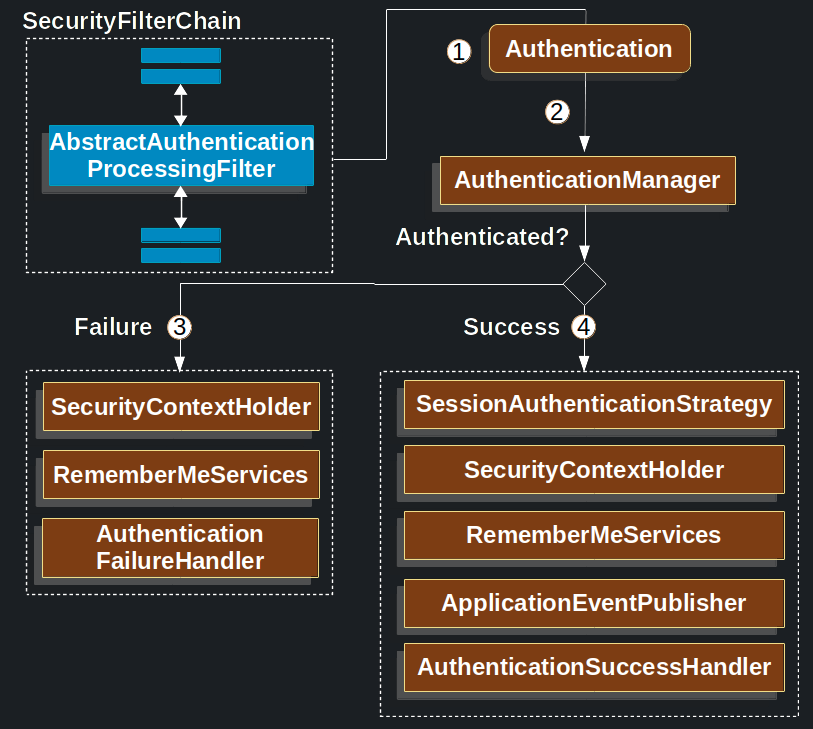
1.2.1 UsernamePasswordAuthenticationFilter 구동 과정
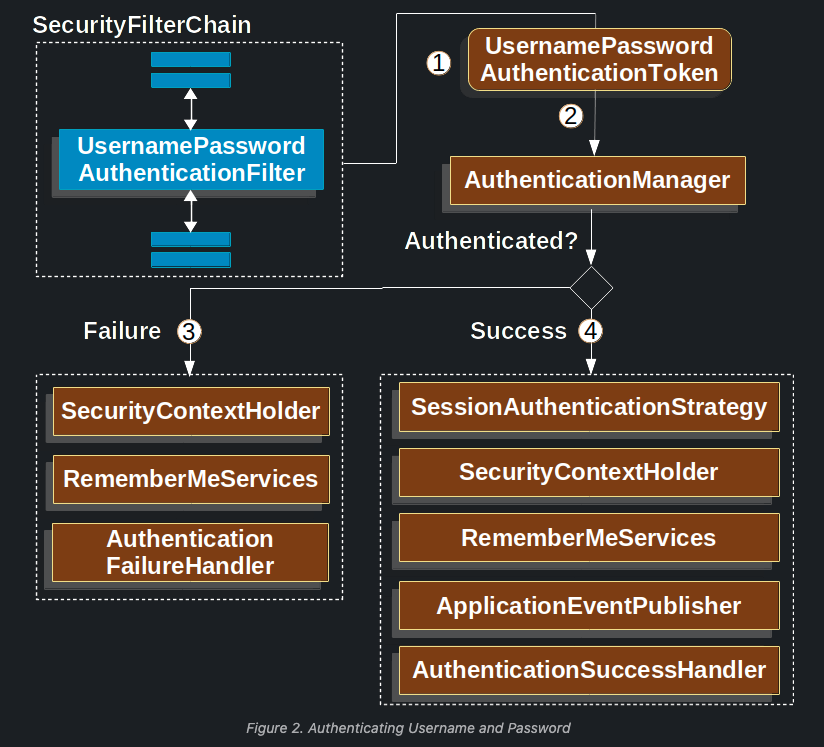
위 그림은 spring 공식문서에서UsernamePasswordAuthenticationFilter가 구동하는 과정을 간단하게 표현한 그림이다. 그림에 나온 번호 순대로 진행이되고 나도 그 순서에 맞게 설명을 진행하겠다.
- username과 password를 담고있는 form태그가 HttpServletRequest로 들어오면 이 정보를 담고있는 UsernamePasswordAuthenticationToken을 생성한다. 이때 UsernamePasswordAuthenticationToken의 타입은 Autentication이다.
- 그 다음, UsernamePasswordAuthenticationToken은 AuthenticationManager로 전달이되어 인증 과정을 거친다. AuthenticationManager의 구체적인 과정은 아래에서 설명함.
- 만약 인증에 실패했을 경우이다.
- SecurityContextHolder(인증된 사용자의 정보를 담는 곳, 아래에서 구체적으로 설명)이 비워지게 된다.
- RememberMeServices(로그인 유지하는 기능)에 실패 로직이 발동된다. 물론 이 기능을 설정을 해놨을 때만 발동.
- AuthenticationFailureHandler가 발동된다.
- 인증에 성공했을 경우이다. 여기서는 간단하게 설명하고 아래에서 자세하게 설명하겠다.
- SessionAuthenticationStrategy를 통해 새로운 session을 만든다.
- SecurityContextHolder(인증된 사용자의 정보를 담는 곳, 아래에서 구체적으로 설명)에 Authentication(사용자 정보가 들어있음.) 객체를 집어넣는다.
- RememberMeServices(로그인 유지하는 기능)에 성공 로직이 발동된다. 물론 이 기능을 설정을 해놨을 때만 발동.
- ApplicationEventPublisher에서 InteractiveAuthenticationSuccessEvent를 발행한다.
- AuthenticationSuccessHandler가 발동된다. 보통 이거는 SimpleUrlAuthenticationSuccessHandler이다. (로그인 성공 시 커스텀 로직을 넣는 것은 이 핸들러를 커스터마이징 하면 됨. 예를 들어 최근 로그인 날짜를 DB에 집어넣는 로직 등)
위에서는 전체적인 로그인 과정을 봤다. 이제 구체적으로 어떻게 진행되는지 살펴보자.
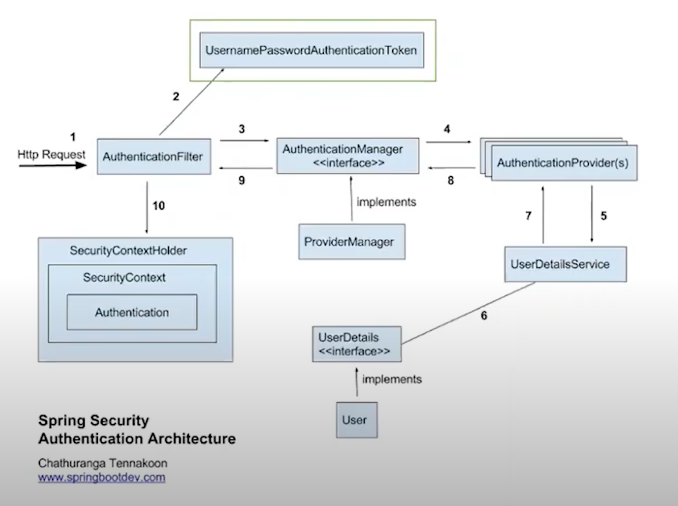
1.2.2 UsernamePasswordAuthenticationFilter의 구체적인 인증 과정
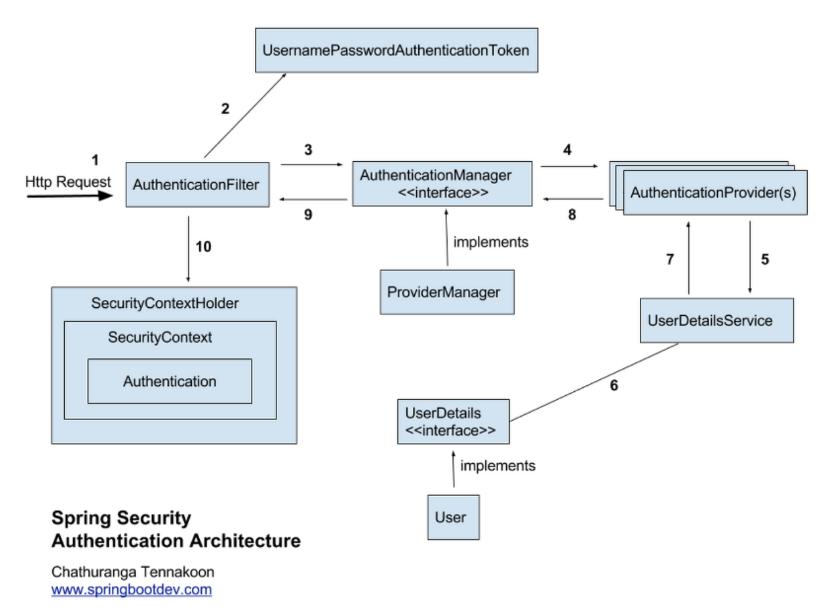
위 그림은 UsernamePasswordAuthenticationFilter가 구동하는 과정에 활용되는 class들을 보여주는 그림이다. 번호가 있으니 번호 순서대로 설명하겠다.
- HttpServletRequest가 들어옴.
- UsernamePasswordAuthenticationToken(username과 password를 담고있는)를 발급함.
- UsernamePasswordAuthenticationToken을 AuthenticationManager로 전달.(보통 AuthenticationManager의 구현체로 ProviderManager 사용)
- AuthenticationManager.authenticate가 호출되며 AuthenticationProvider안에 있는 authenticate 로직이 호출 됨. (AuthenticationProvider는 여러개 있을 수 있음.)
이때 실제 인증이 실행됨. 아래는 AuthenticationProvider를 구현한 구현체임.
@Component
public class CustomAuthenticationProvider implements AuthenticationProvider {
    private final CustomUserDetailsService userDetailsService;
    private final SamplePasswordEncoder passwordEncoder;

    public CustomAuthenticationProvider(CustomUserDetailsService userDetailsService, SamplePasswordEncoder passwordEncoder) {
        this.userDetailsService = userDetailsService;
        this.passwordEncoder = passwordEncoder;
    }

    @Override
    public Authentication authenticate(Authentication authentication) throws AuthenticationException {
        String username = authentication.getName();
        String password = (String) authentication.getCredentials();

        UserDetails user = userDetailsService.loadUserByUsername(username);
        if (user == null) {
            throw new BadCredentialsException("username is not found. username=" + username);
        }

        if (!this.passwordEncoder.matches(password, user.getPassword())) {
            throw new BadCredentialsException("password is not matched");
        }

        return new CustomAuthenticationToken(username, password, user.getAuthorities());
    }

    @Override
    public boolean supports(Class<?> authentication) {
        return CustomAuthenticationToken.class.isAssignableFrom(authentication);
    }
}
이 코드에서 중요한 포인트는 userDetailsService라는 서비스 객체를 주입 받음.
private final CustomUserDetailsService userDetailsService;이는 실제 인증이 실행되는 authenticate 메서드에서 UserDetail 객체를 뽑아오는데에 활용 됨.
UserDetails user = userDetailsService.loadUserByUsername(username);그 후 UserDetails객체를 활용해서 인증을 진행하는 것을 볼 수 있음.
- 그렇다면 userDetailsService.loadUserByUsername의 구현은 어떻게 되어있을까? 정답은 개발자가 직접 해야한다는 것이다. 왜냐하면 서비스마다 unique로 설정되어있는 컬럼이 다르고, 스피링은 어떤 컬럼이 기준이되어 DB에서 찾아올지 모르기 때문이다.
그래서 userDetailsService를 상속받아 직접 구현해야한다.
@Service
@Transactional(readOnly = true)
@RequiredArgsConstructor
public class MemberServiceImpl implements UserDetailsService {

    private final MemberRepository memberRepository;

    @Override
    @Transactional
    public UserDetails loadUserByUsername(String email) throws UsernameNotFoundException {
        Optional<Member> memberOptional = memberRepository.findByEmail(email);
        if (memberOptional.isPresent()) {
            return new PrincipalDetails(memberOptional.get());
        } else {
            throw new UsernameNotFoundException(email);
        }
    }

}
인증이 성공되면 sessionAuthenticationStrategy.onAuthentication가 실행되며 새로운 session이 생기게 된다.
그리고 위 그림의 10번처럼 반환된 정보가 모두 채워져서 반환된 Authentication 객체를 SecurityContext에 감싸고 또 SecurityContextHolder로 감싼다.
그럼 Spring Security는 SecurityContextHolder에 값이 있으면 인증된 유저로 인식하고 Set-Cookie 헤더에 JSESSINID를 넣어서 응답을 한다.
최초 인증이 끝난 유저가 JSESSINID를 Cookie 헤더에 넣어서 요청을 보내면 서버에서는 JSESSINID가 세션에 있는지 확인하여 인증을 진행한다.
여기까지가 전체적인 인증 흐름이다.
여기서 조금 더 나아가서 설명이 부족했던 인증된 객체를 감싸는SecurityContextHolder, SecurityContext와 인증 정보를 가지고 있는 Authentication 객체에 대해서 알아보자.
1.3 SecurityContextHolder
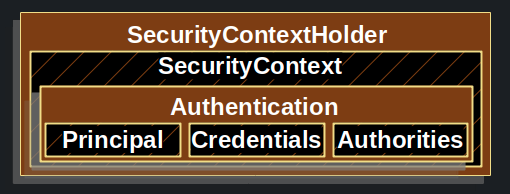
인증된 객체는 위와 같은 구조로 감싸져 있다. 가장 바깥에 있는 SecurityContextHolder부터 알아보자.
1.3.1 SecurityContextHolder
At the heart of Spring Security’s authentication model is the SecurityContextHolder. It contains the SecurityContext.
-Spring 공식문서-
공식문서에서 SecurityContextHolder를 설명한 글이다. 간단하게 얘기하면 SecurityContextHolder는 SecurityContext를 감싸고 있고 spring security의 인증에 핵심 모델이라는 뜻이다.
SecurityContextHolder는 인증된 유저에 대한 정보를 저장하고 있는 객체이다. 특이하게 SecurityContextHolder가 값을 가지고만 있어도 spring security에서는 인증된 유저라고 가정한다.
1.3.2 SecurityContext
SecurityContext는 그냥 SecurityContextHolder와 Authentication 객체를 이어주는 역할이라고 보면 된다.
1.3.3 Authentication
Authentication는 크게 두가지 목적을 가지고 있는 객체이다.
1. AuthenticationManager에 들어가기 위함이다.
2. 현재 입증된 유저를 대표하는 객체이다.
Authentication는 다음과 같은 구성요소를 가진다.
- principal - 사용자를 식별하는 역할. username/password로 인증할때 이 요소는 UserDetail의 인스턴스이다.
- credentials - 암호가 들어가는 역할. 대부분의 경우 유출 방지를 위해 인증한 후 삭제됨.
- authorities - 유저의 역할을 나타냄. 예를 들어 일반 유저, 관리자 등등
2. WebSecurityConfigurerAdapter
spring security는 WebSecurityConfigurerAdapter를 상속 받아 관련 설정을 관리할 수 있다.
package peermarket.peershop.config;

import lombok.RequiredArgsConstructor;
import org.springframework.context.annotation.Bean;
import org.springframework.context.annotation.Configuration;
import org.springframework.security.config.annotation.method.configuration.EnableGlobalMethodSecurity;
import org.springframework.security.config.annotation.web.builders.HttpSecurity;
import org.springframework.security.config.annotation.web.configuration.EnableWebSecurity;
import org.springframework.security.config.annotation.web.configuration.WebSecurityConfigurerAdapter;
import org.springframework.security.crypto.bcrypt.BCryptPasswordEncoder;
import peermarket.peershop.security.LoginSuccessHandler;

@Configuration
@EnableWebSecurity // 스프링 시큐리티 필터가 스프링 필터체인에 등록됨
@EnableGlobalMethodSecurity(securedEnabled = true, prePostEnabled = true) // secured 어노테이션 활성화, preAuthorize 어노테이션 활성화
@RequiredArgsConstructor
public class SecurityConfig extends WebSecurityConfigurerAdapter {

    private final LoginSuccessHandler loginSuccessHandler;

    //해당 메서드의 리턴되는 오브젝트를 ioc로 등록해줌.
    @Bean
    public BCryptPasswordEncoder passwordEncoder() {
        return new BCryptPasswordEncoder();
    }

    @Override
    protected void configure(HttpSecurity http) throws Exception {
        http.authorizeRequests()
//            .antMatchers("/user/**").authenticated()
            .antMatchers("/admin/**").access("hasRole('ROLE_ADMIN')")
            .anyRequest().permitAll()
        .and()
            .formLogin()
            .loginPage("/member/loginForm")
            .usernameParameter("email")
            .loginProcessingUrl(
                "/member/login") // /login 주소가 호출이 되면 시큐리티가 낚아채서 대신 로그인을 진행해줌. -> Controller에 로그인을 안만들어됨.
            .defaultSuccessUrl("/")
            .successHandler(loginSuccessHandler)
        .and()
            .sessionManagement()
            .maximumSessions(1)
            .expiredUrl("/member/loginForm");

    }

}
configure를 오버라이딩해서 여러가지 설정을 할 수 있다.
너무 많은 설정을 할 수 있으므로 검색해보시기를 추천한다.
정리
지금까지 spring security에 대해서 공부해봤다. 기본적인 내용만 다룬다고 했지만 이것만해도 어려운 내용이 많았다. 그래도 기초는 다졌으니까 다른 내용도 비교적 쉽게 들어올 것 같다! 다음에 spring security를 이용한 jwt 구현과 oauth구현을 할 때도 포스팅을 해야겠다.
긴 글 읽어주셔서 감사합니다 :)


잘 읽었습니다~ 덕분에 spring security에 대해 감을 잡은 것 같아요