목표 : Transaction, Account를 이해하고, Program을 직접 짜보고 실행해본다.
주요 키워드 : Transaction, Account, Program, Anchor
1. Overview
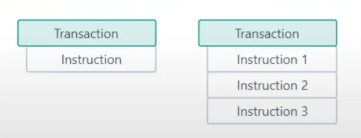
- App은 Network에 하나 이상의 Instruction이 담긴 Transaction으로 상호작용한다.
- Instructions는 Programs에서 실행된다.
- 차례대로, 원자적으로 실행된다. 무효면 전체가 Revert 된다.
즉, 솔라나 트랜잭션 안에는 구체적인 명령들인 Instructions들이 있고,
이 Instructions들은 Program에서 실행된다.
Program이 이더리움의 스마트 컨트랙트와 같은 말이다.
대신, 사용자들이 배포한 거 말고, 시스템 내부적으로도 Program들이 존재하나보다.
예를 들어 단순히 SOL Transfer 트랜잭션 내에도 Instructions들이 있는데,
이걸 실행한다는건 기본적인 기능들이 담긴 Program이 있단 소리 아니겠냐.
2. Program
- 노드에 배포되고 실행되는 코드 조각
- Rust binaries와 유사
- Stateless : 변수 저장안 됨. (함수만 저장, 데이터는 따로)
- Accounts 안에 저장 (program 위한 거 따로, data 위한 거 따로)
이더리움도 마찬가지다.
각 컨트랙트에 주소가 부여된다.
다만 이더리움은 코드와 데이터가 한 Account에 엮여 있지만,
여긴 아예 코드를 위한 주소 따로, 데이터를 위한 주소 따로 만든다.
3. Account
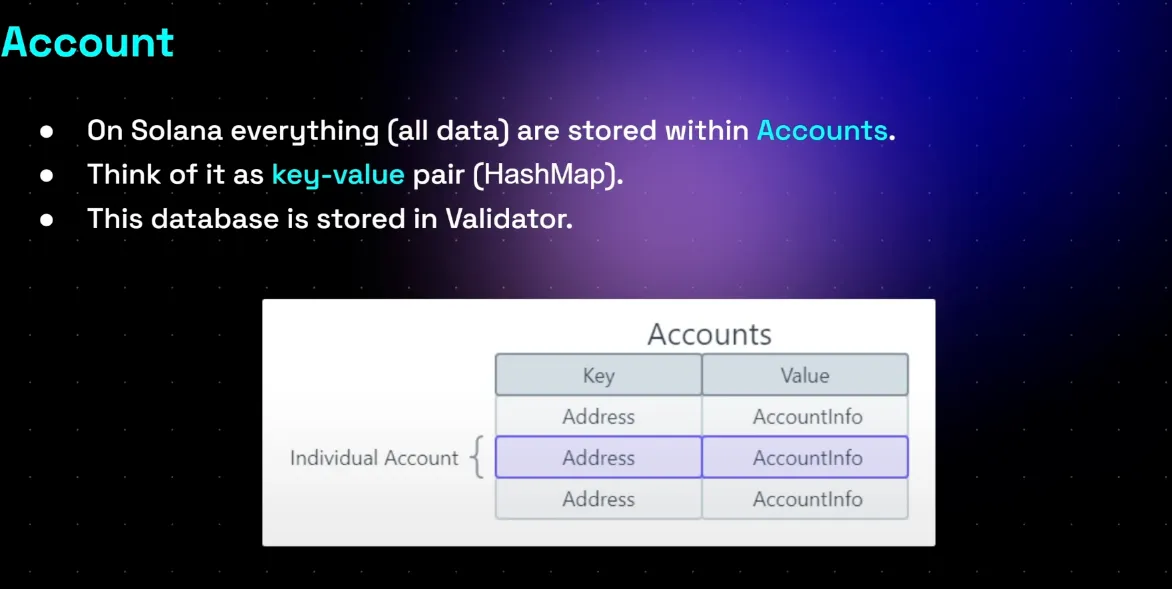
- 모든 것은 Accounts 안에 저장
- Key-value
- Validator DB에 저장된다.
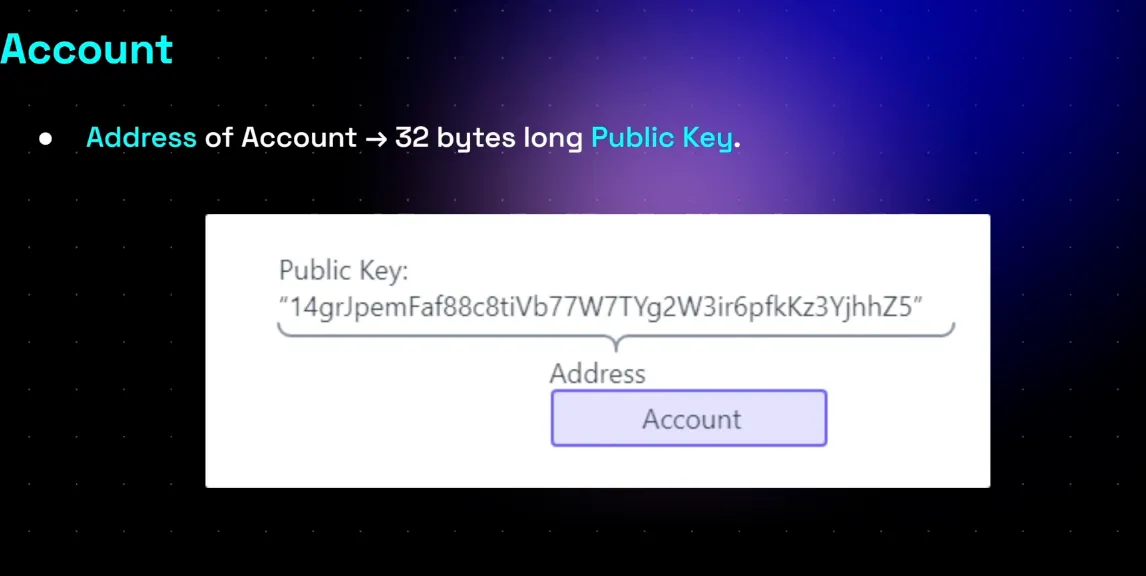
공개키가 그대로 주소다.
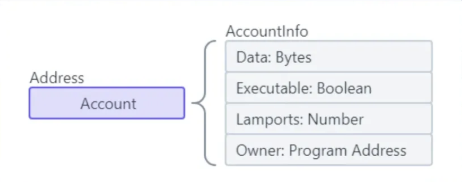
AccountInfo는 4가지 필드로 구성되며,
- Data : 프로그램일경우 코드,
- Executable : 프로그램일경우 true,
- Lamport : 잔액
- Owner : 프로그램일 경우 배포한 프로그램(사용자x), 데이터일 경우 프로그램
주소는 최대 10mb까지 저장할 수 있고,
데이터 저장양에 따라 rent fee를 지불해야 된다.
만약 주소 닫으면 돌려 받는다.

Data Account는 Program으로부터 생성된다.
BPF Loader는 프로그램을 배포하고 실행할 수 있게 해주는 시스템 프로그램이다.
4. Transactions
앞서 말했듯 하나의 트랜잭션 안엔 여러 Instructions가 있을 수 있는데,
순서대로, 원자적으로 동작해야 한다.
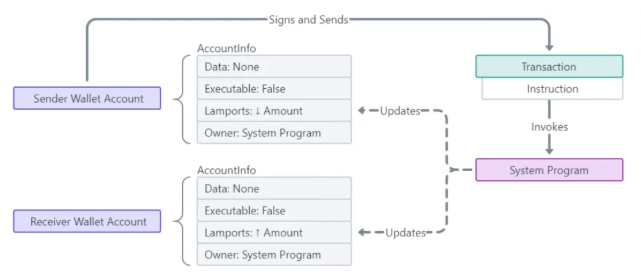
SOL 전송 트랜잭션이라면, Instructions에 어떤 동작이 필요할까?
보내는 애는 잔액 줄이고, 받는 애는 늘리는 거 아니겠는가?
Anchor : Program 코드, 테스트 작성
1. 프로젝트 구조

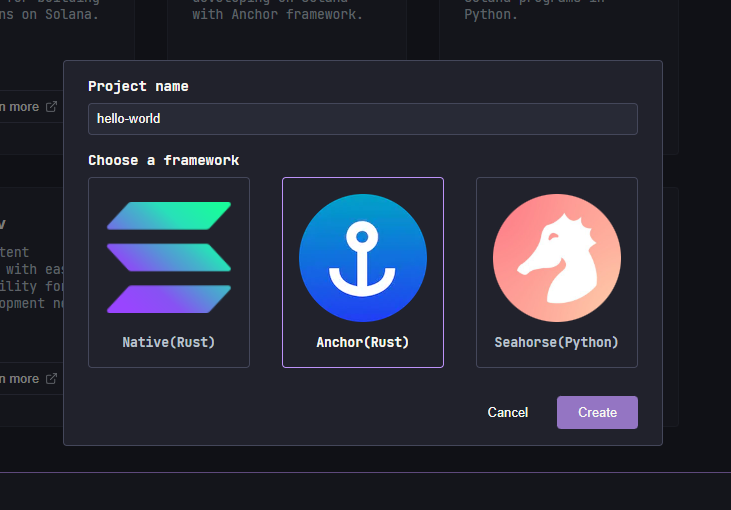
이더리움에 Foundry,Hardhat이 있다면 솔라나는 Anchor가 대표적이다.
프로그램 개발을 위한 프레임워크, 툴이다.
anchor init hello-world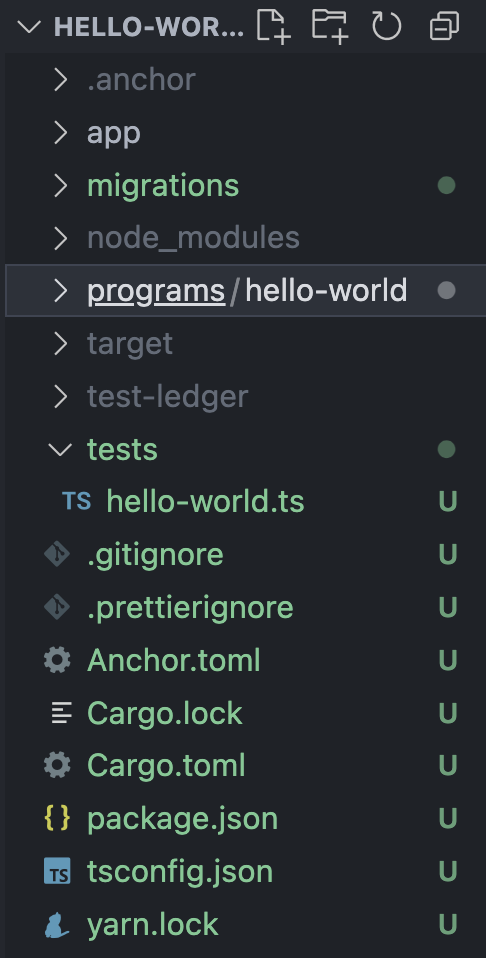
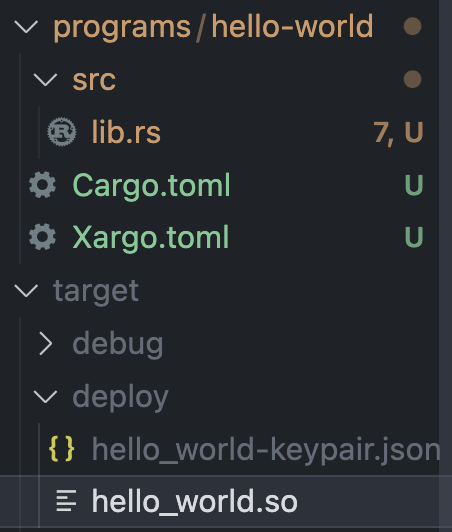
아래와 같은 프로젝트가 생성된다.
anchor build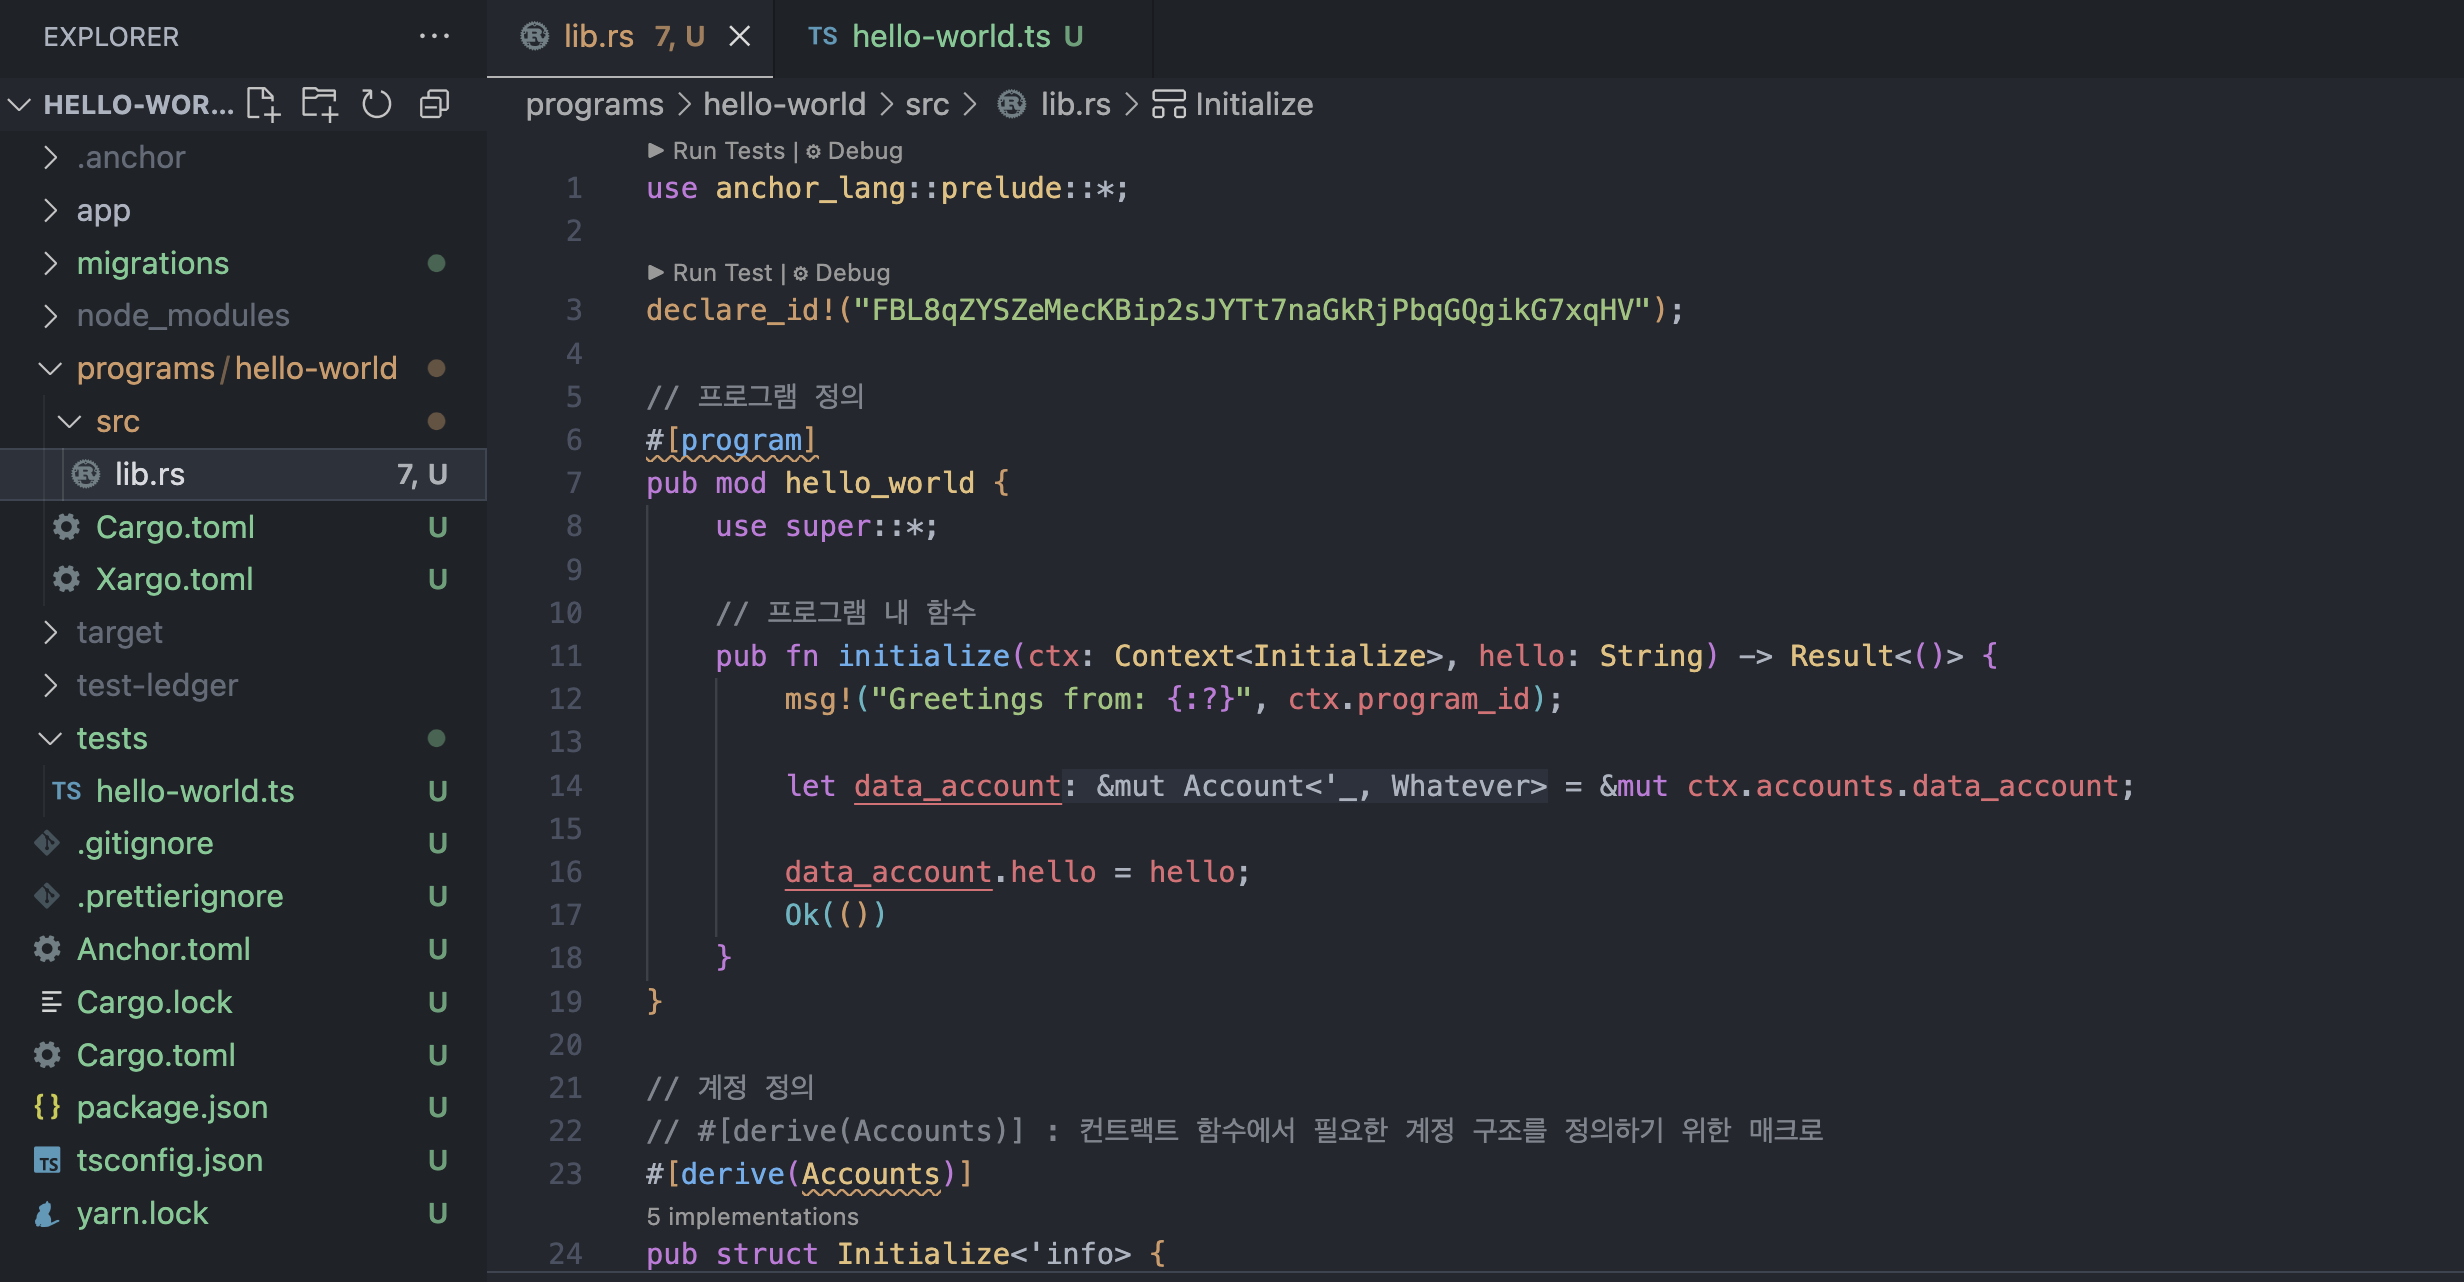
programs/hello-wolrd/src/lib.rs
파일을 컴파일하면 target/deploy에 hello_world.so 바이너리 파일이 생성된다.
이것이 이더리움의 바이트코드고, 이게 블록체인에 저장되는 것이다.
anchor test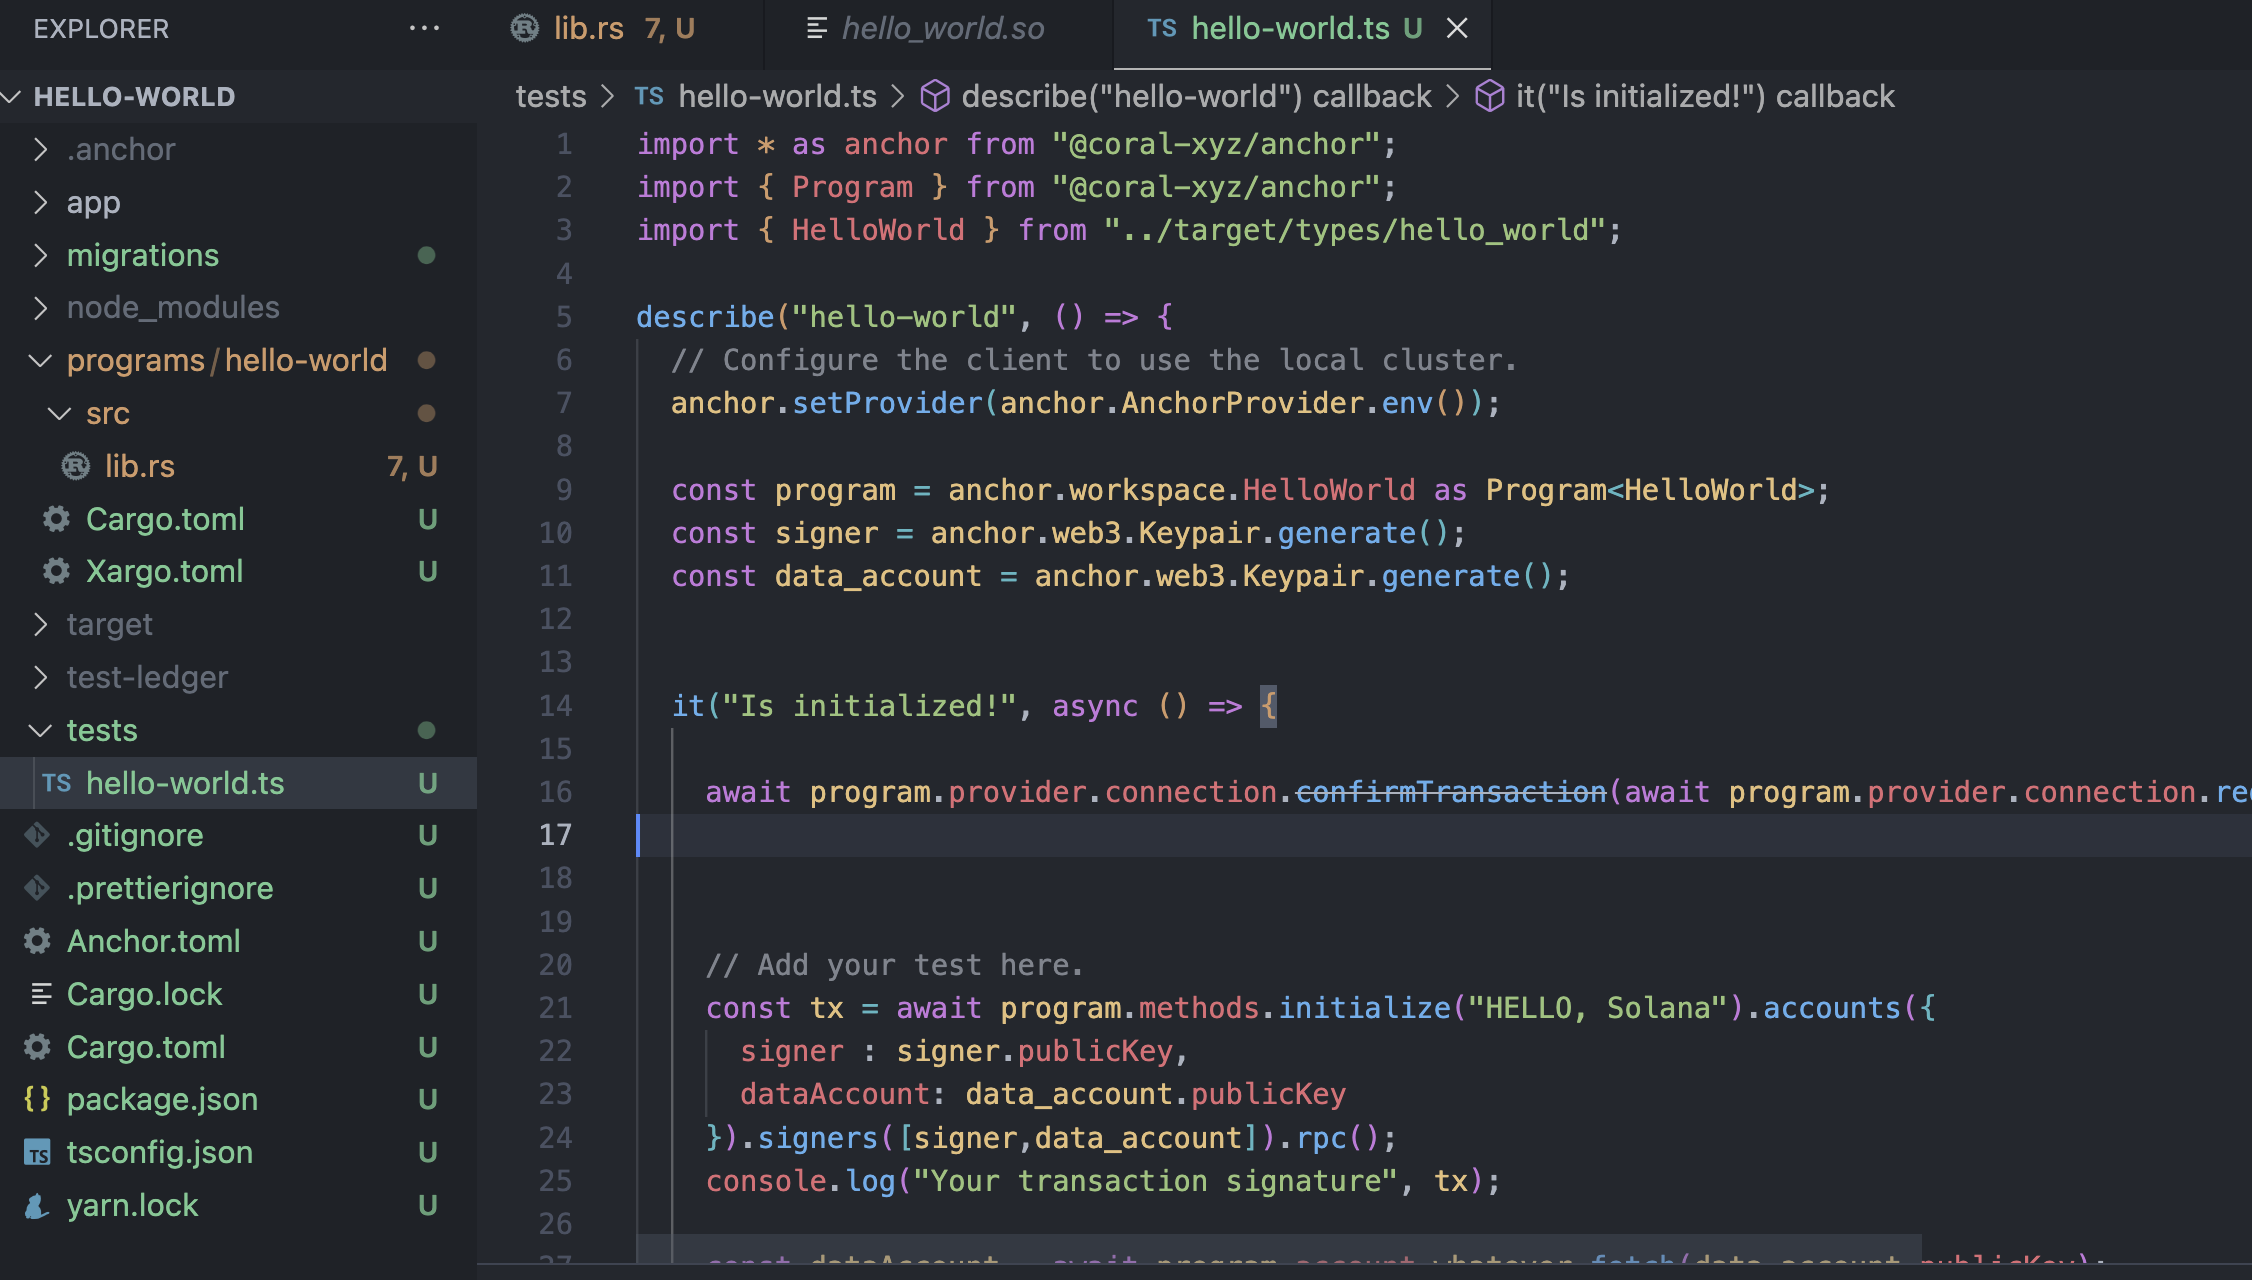
tests/hello-world.ts 를 보고 테스트를 한다.
이 때 로컬 노드에 실행을 하고, .anchor 폴더 안에 기록이 저장된다.
추후에 .anchor로 이동을 해서
solana-test-validator로컬 밸리데이터 노드를 돌릴 수 있고, 이를 통해 Explorer에서 노드 실행전에 테스트를 한 결과인 트랜잭션 등이 검색이 가능하다.
2. 프로그램 작성
Anchor를 사용해 프로그램을 작성할 땐 lib.rs를 작성하는 것이다.
Rust에는 2가지 Crate가 있다고 했다.
- lib.rs(라이브러리 크레이트)
- main.rs(바이너리 크레이트)
둘은 작성하는 방식이 다르다. 이전에 본 main()이 바이너리고,
라이브러리는 훨씬 복잡하다.
이럴거면 이전강의에 라이브러리 작성하는걸 가르쳐야지 뭣하러 바이너리를
최대한 간단한 프로그램을 작성해보자.
전체 코드
use anchor_lang::prelude::*;

declare_id!("FBL8qZYSZeMecKBip2sJYTt7naGkRjPbqGQgikG7xqHV");

// 프로그램 정의
#[program]
pub mod hello_world {
    use super::*;

    // 프로그램 내 함수
    pub fn initialize(ctx: Context<Initialize>, hello: String) -> Result<()> {
        msg!("Greetings from: {:?}", ctx.program_id);

        let data_account = &mut ctx.accounts.data_account;

        data_account.hello = hello;
        Ok(())
    }
}

// 계정 정의
// #[derive(Accounts)] : 컨트랙트 함수에서 필요한 계정 구조를 정의하기 위한 매크로
#[derive(Accounts)]
pub struct Initialize<'info> {
    #[account(mut)]
    pub signer: Signer<'info>,
    #[account(init, payer = signer, space = 200)] // 아래 data_account 초기화 알려주는 지시문
    pub data_account: Account<'info, Whatever>,
    pub system_program: Program<'info, System>,
}

// 계정 데이터 구조 정의
#[account]
pub struct Whatever {
    pub hello: String,
}
잘라서 보자.
1. use, program ID
use anchor_lang::prelude::*;

declare_id!("FBL8qZYSZeMecKBip2sJYTt7naGkRjPbqGQgikG7xqHV");
use : 필요한 도구들을 import, 아래에서 account,program 등 사용 가능
declare_id! : anchor init할 때 이미 박혀있는, 프로그램 고유 ID, 즉 주소다.
2. #[program]
#[program]
pub mod hello_world {
    use super::*;

    // 프로그램 내 함수
    pub fn initialize(ctx: Context<Initialize>, hello: String) -> Result<()> {
        msg!("Greetings from: {:?}", ctx.program_id);

        let data_account = &mut ctx.accounts.data_account;

        data_account.hello = hello;
        Ok(())
    }
}
#[program] : Anchor에서 제공하는, 바로 아래 pub mod hello_world 안에 정의한 함수들이 블록체인에서 실행이 될 것.
pub mod a : mod는 모듈이다. pub이면 외부에서 쓸 수 있다.
pub fn initialize는 아래와 연관된게 많다.
일단, 이 프로그램은 initialize라는 함수 1개 뿐이라는 것만 기억하고 내려가자.
3. #[derive(Accounts)], #[accounts]
// 계정 정의
// #[derive(Accounts)] : 컨트랙트 함수에서 필요한 계정 구조를 정의하기 위한 매크로
#[derive(Accounts)]
pub struct Initialize<'info> {
    #[account(mut)]
    pub signer: Signer<'info>,
    #[account(init, payer = signer, space = 200)] // 아래 data_account 초기화 알려주는 지시문
    pub data_account: Account<'info, Whatever>,
    pub system_program: Program<'info, System>,
}
프로시저 매크로인 #[derive(Accounts)]를 먼저 알고 가자.
앞서 #[program], 아래는 #[account] 가 나온다.
프로시저 매크로는 Rust에서 코드를 자동으로 생성하고 변환하는 도구다.
컴파일러가 코드를 읽을 때, 매크로를 만나면 새로운 코드를 만나거나 생성해준다.
// 계정 데이터 구조 정의
#[account]
pub struct Whatever {
    pub hello: String,
}
Whatever 라는 구조체는 이렇게 생겼는데, 이건 블록체인 데이터 계정으로 바꿔주는 것이다.
다시 돌아와서,
// 계정 정의
// #[derive(Accounts)] : 컨트랙트 함수에서 필요한 계정 구조를 정의하기 위한 매크로
#[derive(Accounts)]
pub struct Initialize<'info> {
    #[account(mut)]
    pub signer: Signer<'info>,
    #[account(init, payer = signer, space = 200)] // 아래 data_account 초기화 알려주는 지시문
    pub data_account: Account<'info, Whatever>,
    pub system_program: Program<'info, System>,
}
(라이프타임은 그러려니 하고 스킵하고)
derive는 특정 Traits을 자동으로 만들어준다.
위에는 구조체를 정의했는데, Accounts 기능들을 내장할 수 있는 것이다.
#[account(mut)]
pub signer: Signer<'info>,
signer 구조체는 기본적으로 읽기 전용인데, 위에 #[account(mut)]
덕분에 수정할 수 있는 것이다.
왜 수정해야할까? 돈을 보낼 때 해당 계정 안의 balance를 줄여야 하니까.
#[account(init, payer = signer, space = 200)] // 아래 data_account 초기화 알려주는 지시문
pub data_account: Account<'info, Whatever>,
data_account는 Account이긴 한데,
위의 account(init, payer = signer, space = 200)을 포함하며,
아래 Whatever라는 구조체를 포함한다는 의미다.
space : 주소의 데이터 공간이 200
payer : 비용은 signer가
init : 새로운 계정을 블록체인에 생성
전체를 보면서 다시 설명하자면
use anchor_lang::prelude::*;

declare_id!("FBL8qZYSZeMecKBip2sJYTt7naGkRjPbqGQgikG7xqHV");

// 프로그램 정의
#[program]
pub mod hello_world {
    use super::*;

    // 프로그램 내 함수
    pub fn initialize(ctx: Context<Initialize>, hello: String) -> Result<()> {
        msg!("Greetings from: {:?}", ctx.program_id);

        let data_account = &mut ctx.accounts.data_account;

        data_account.hello = hello;
        Ok(())
    }
}

// 계정 정의
// #[derive(Accounts)] : 컨트랙트 함수에서 필요한 계정 구조를 정의하기 위한 매크로
#[derive(Accounts)]
pub struct Initialize<'info> {
    #[account(mut)]
    pub signer: Signer<'info>,
    #[account(init, payer = signer, space = 200)] // 아래 data_account 초기화 알려주는 지시문
    pub data_account: Account<'info, Whatever>,
    pub system_program: Program<'info, System>,
}

// 계정 데이터 구조 정의
#[account]
pub struct Whatever {
    pub hello: String,
}
이 프로그램은 initialize 함수 1개만 있고, 4개의 인자를 받는다.
signer,data_account,system_program, hello.
내부 동작은 인자로 받은 data_account를 새로 만들고,
그 계정 구조체 내부에 data_account.hello 데이터를 파라미터로 받은 hello에 넣는다.
3. 테스트 작성
import * as anchor from "@coral-xyz/anchor";
import { Program } from "@coral-xyz/anchor";
import { HelloWorld } from "../target/types/hello_world";

describe("hello-world", () => {
  // Configure the client to use the local cluster.
  anchor.setProvider(anchor.AnchorProvider.env());

  const program = anchor.workspace.HelloWorld as Program<HelloWorld>;
  const signer = anchor.web3.Keypair.generate();
  const data_account = anchor.web3.Keypair.generate();


  it("Is initialized!", async () => {

    await program.provider.connection.confirmTransaction(await program.provider.connection.requestAirdrop(signer.publicKey, 100 * anchor.web3.LAMPORTS_PER_SOL), "confirmed");


    // Add your test here.
    const tx = await program.methods.initialize("HELLO, Solana").accounts({
      signer : signer.publicKey,
      dataAccount: data_account.publicKey
    }).signers([signer,data_account]).rpc();
    console.log("Your transaction signature", tx);

    const dataAccount = await program.account.whatever.fetch(data_account.publicKey);
    console.log("dataAccount", dataAccount);

  });
});
TS, mocha, web3.js 사용하는 Hardhat과 매우 유사하다.
프로그램 객체를 생성하고,
계정을 생성하고,
트랜잭션을 배포하고,
함수를 실행한다.
ancher test하면 로컬에 배포가 된다고 했다. 이후
cd .anchor/
solana-test-validator
실행하고 Explorer에 가보자.

1번은 Signer, tx 제출자.
2번은 data_account (초기화)
3번은 data_account (데이터 저장된)
4번은 System Program
5번 : Program ID
우리는 인자로 3개의 주소값을 넣었다.
나머지 두개는 내가 넣은게 아니지만, 필요한 정보다.
느낀점
와 러스트 정말 어렵고 복잡하다 시발.
2탄에서 더 복잡하고 어려운 프로그램을 다루겠지 ㄷㄷ.