Nextjs14 & NextAuthV5 의 시리즈 중 마지막으로 구글 로그인 구현까지 다뤄보려고 한다. 처음 글을 썼을때는 개인 기록용으로 시작했는데 어쩌다보니 강의를 하고 있는 것 같다... 아무쪼록 여러 사람들에게 도움이 됐으면 좋겠다!
준비
[Next.js14] NextAuth v5로 인증 구현하기 (1) - 로그인/로그아웃 에서 코드를 추가로 얹을 예정이기 때문에 1편을 먼저 보고오자. 2편에서 다룬 세션 업데이트와는 연관이 없으니 구글 로그인만 구현할 생각이라면 2편은 스킵해도 무방하다.
이번에 폴더 구조에는 변화가 크게 없고 코드도 크게 추가되는 것은 없다. 하지만 https://console.cloud.google.com/apis 에서 구글 로그인 설정이 필요하다
- 구글 클라우드 설정
우선 https://console.cloud.google.com/apis 에 접속한다.
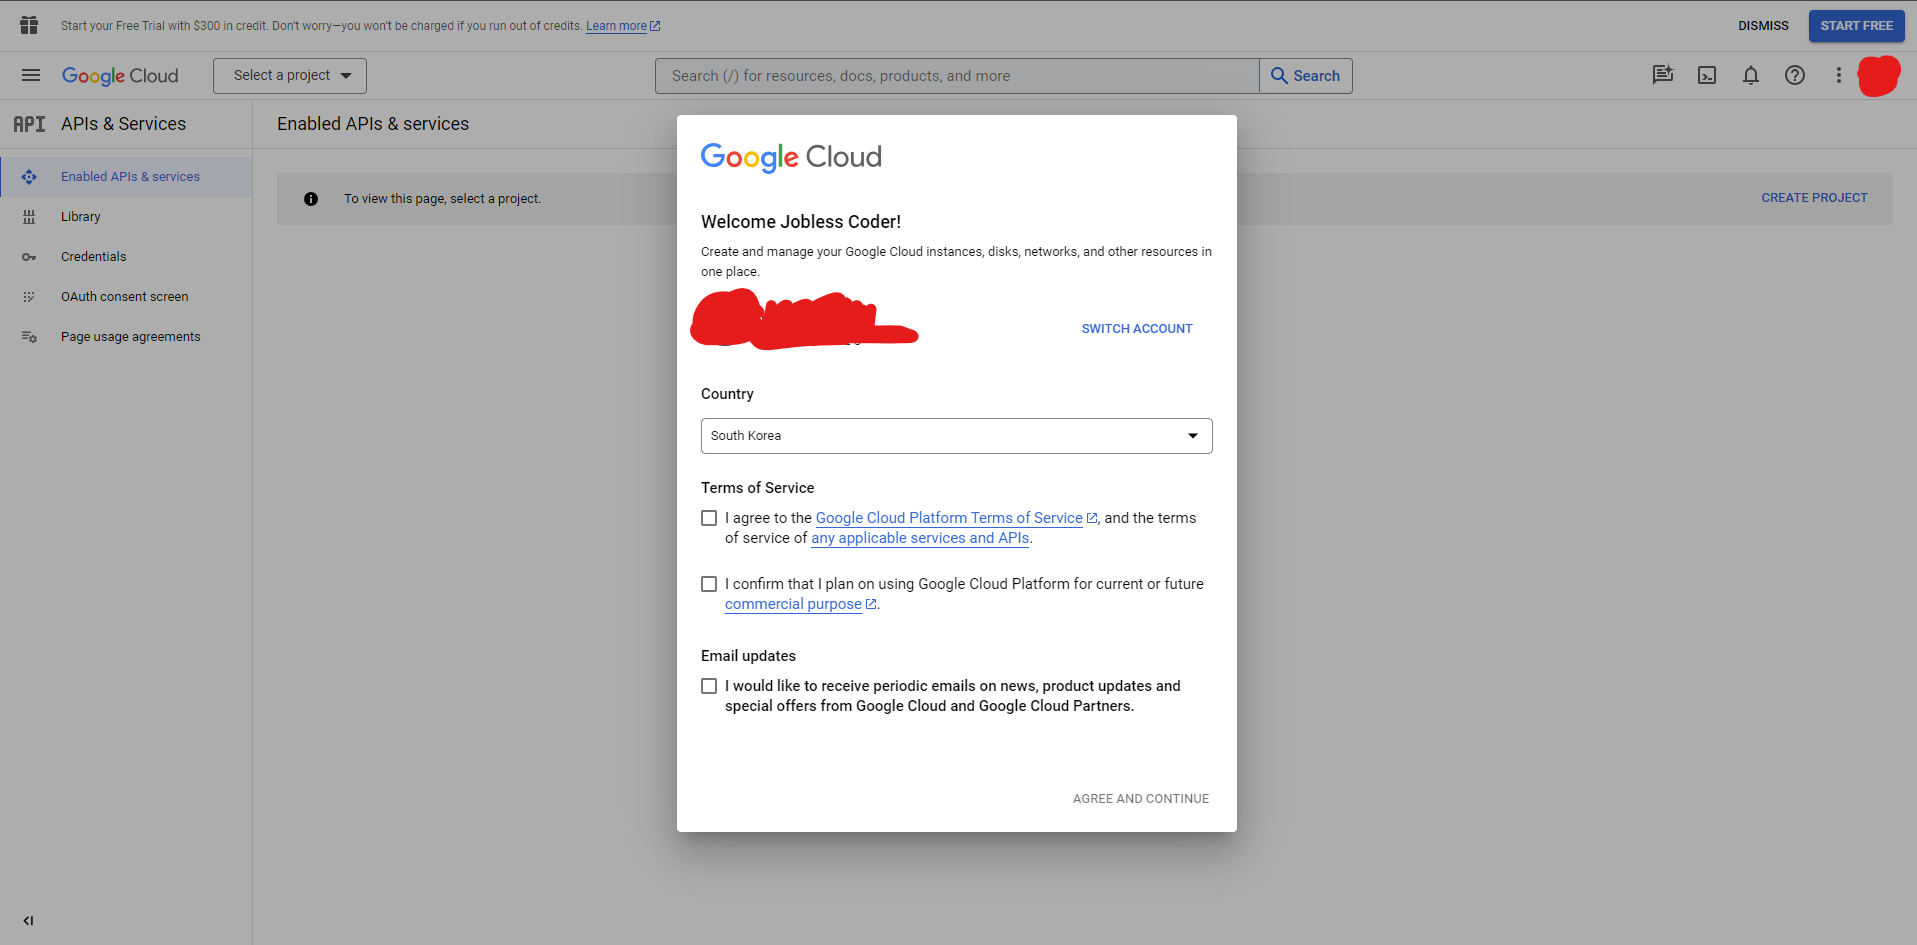 구글 클라우드를 처음 설정하면 나오는 화면이다 이용약관을 체크하고 넘어가도록 하자
다음을 따라 쭉 페이지를 넘어가다
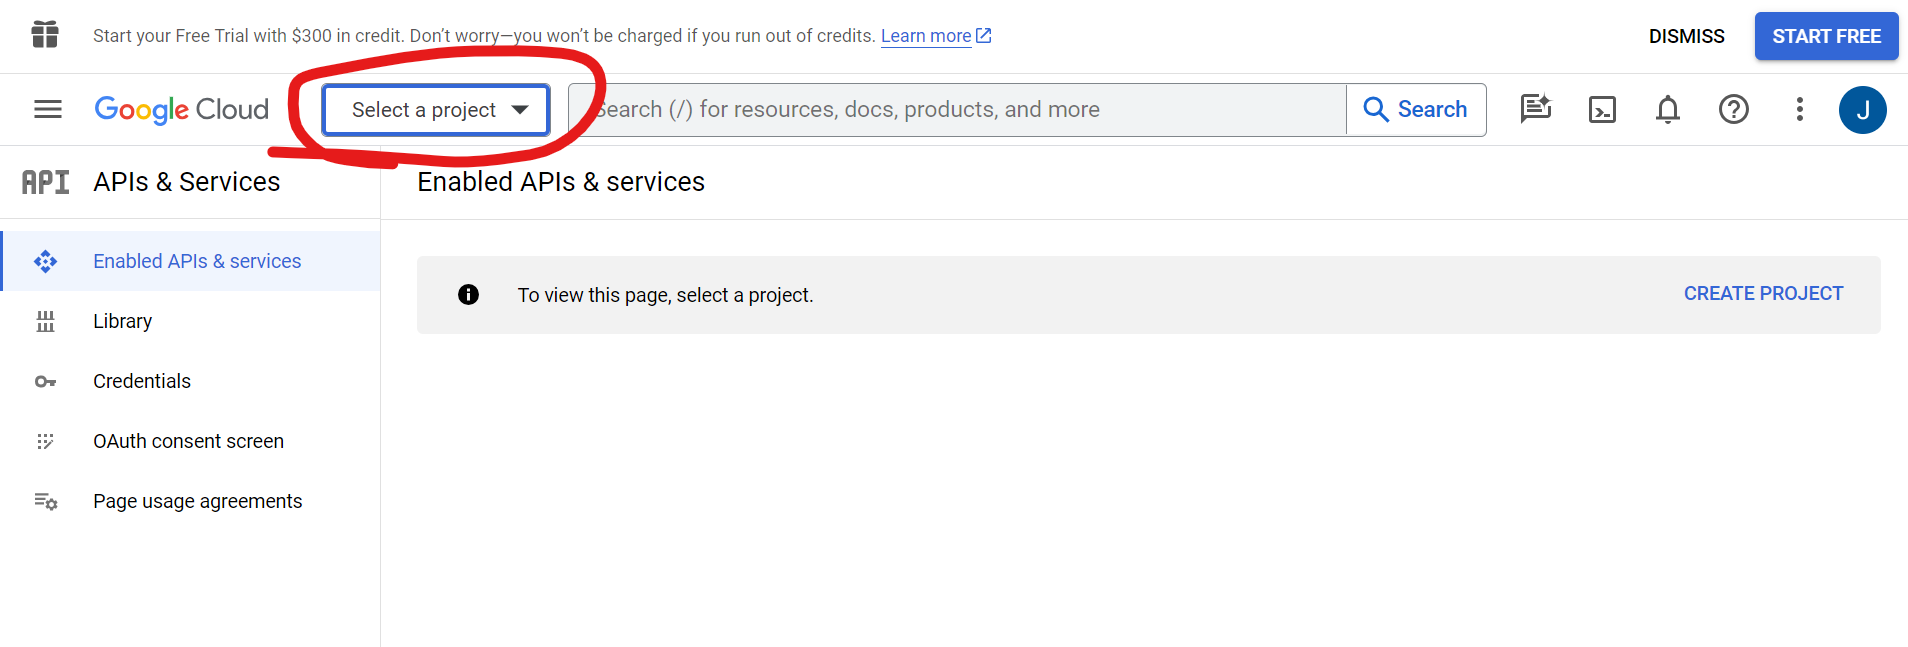
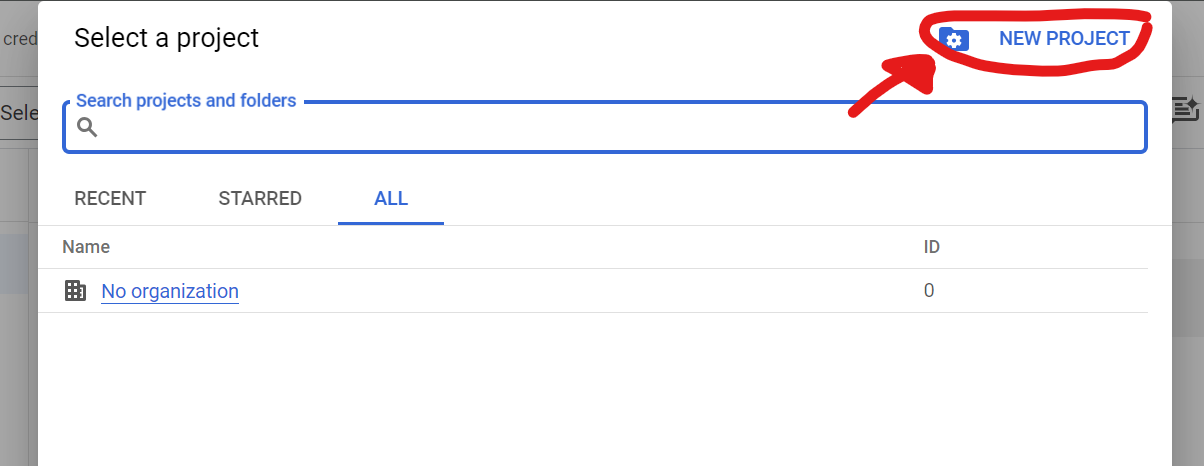
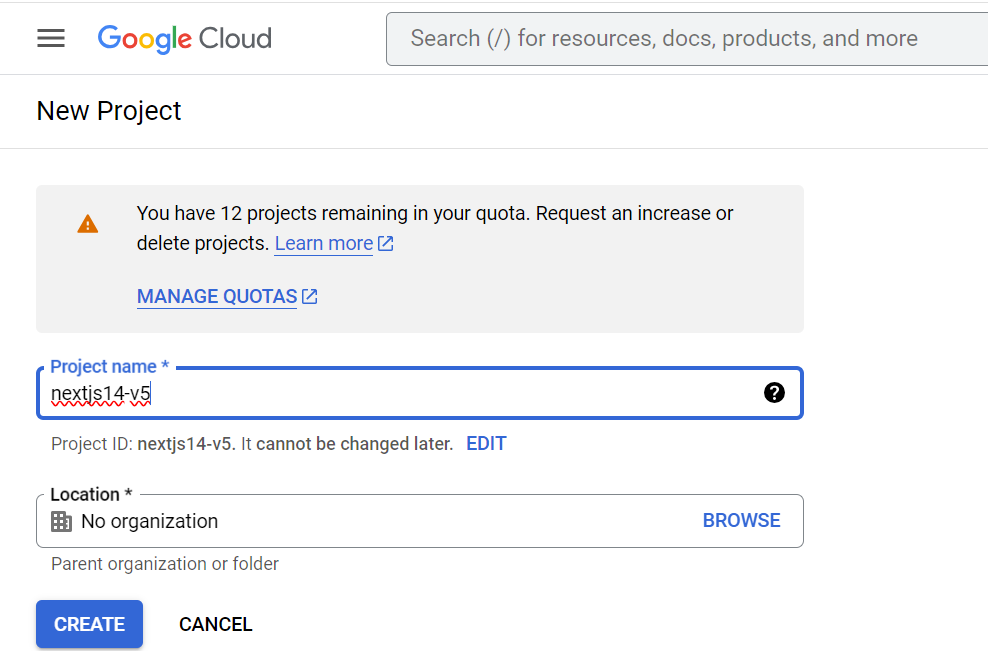
프로젝트 이름을 설정해주고 'CREATE'를 누르면
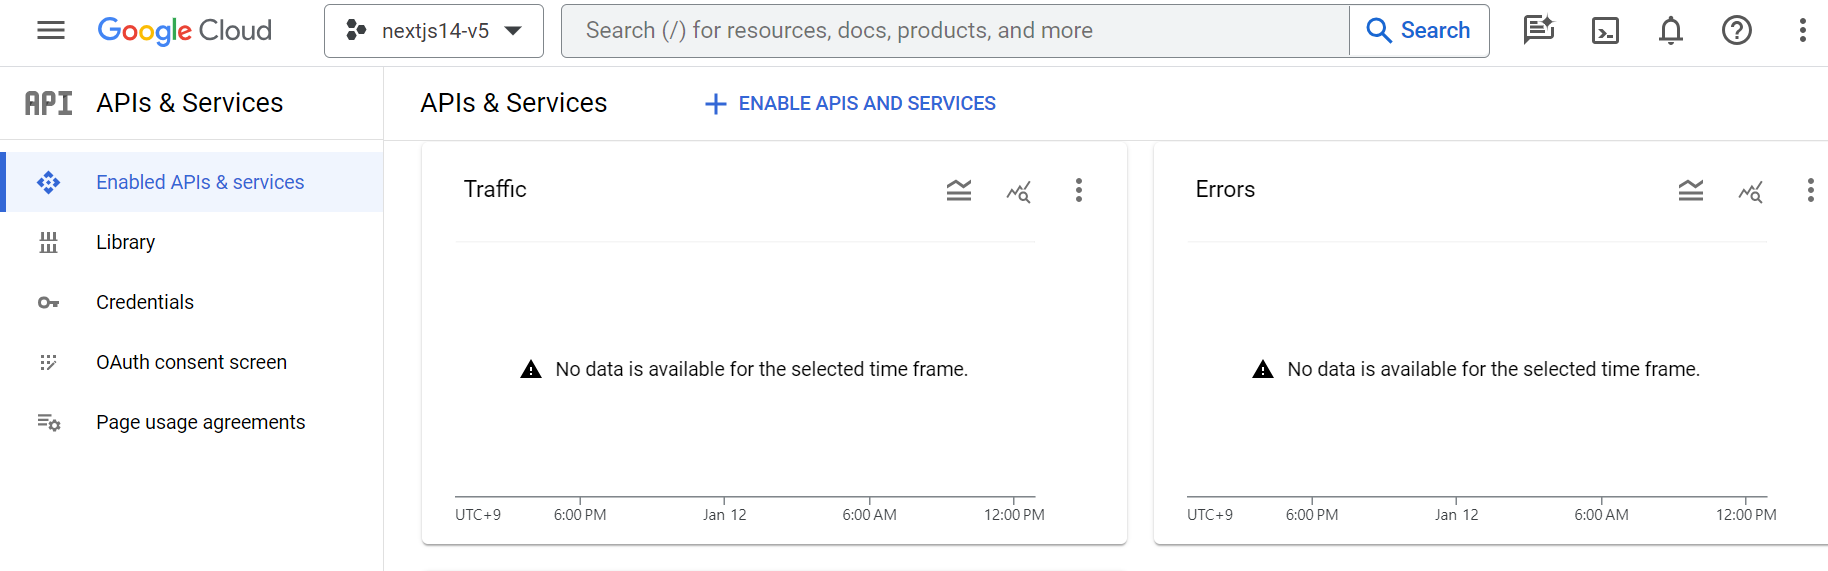
잠시 뒤에 이런 화면이 뜰 것이다!
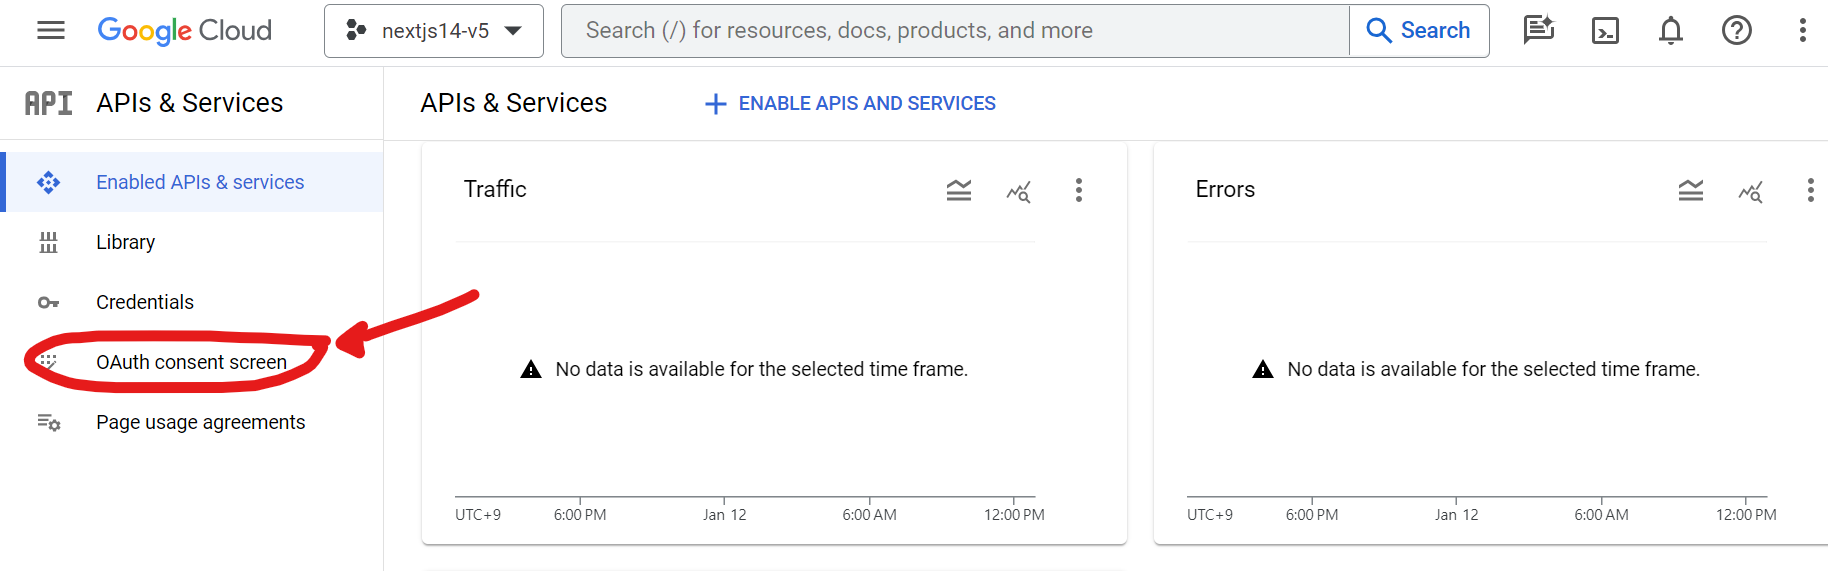
-- OAuth Conest Screen
먼저 OAuth consent screen 설정을 해주겠다!
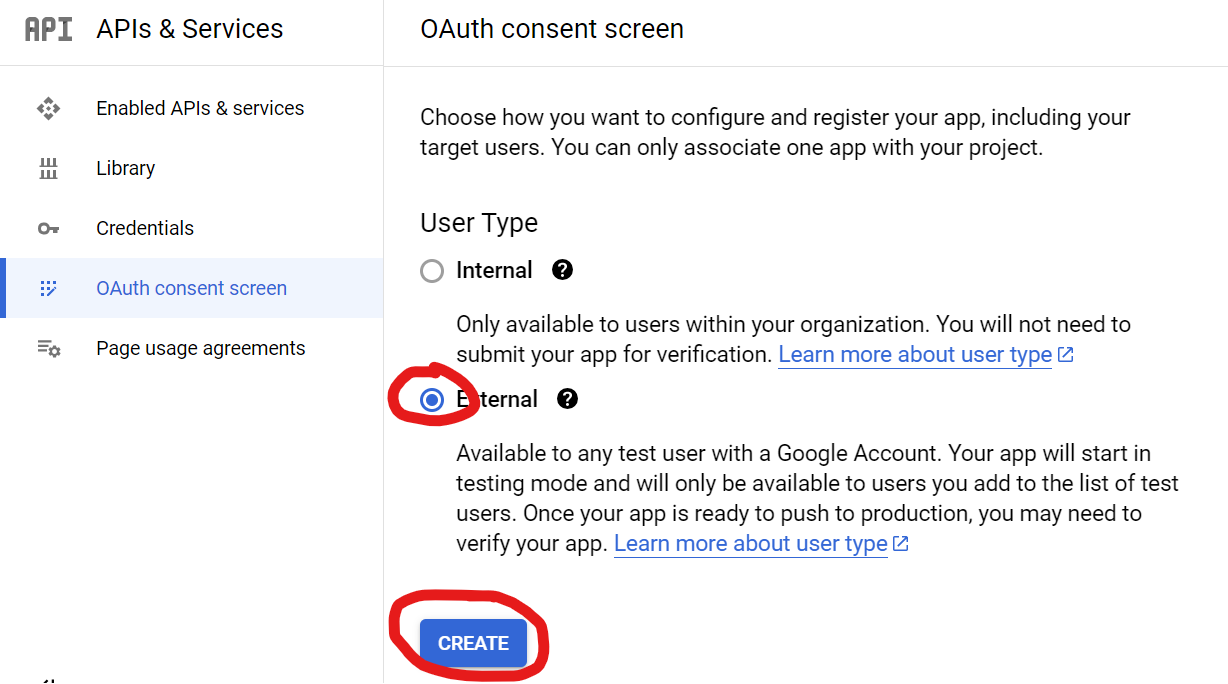
Organization 내에 지정한 테스터가 있다면 Internal 을 체크해주면 된다. 무슨 뜻인지 잘 모르겠다면 External을 체크하고 넘어가도록 하자
App name과 User support email을 설정해주고
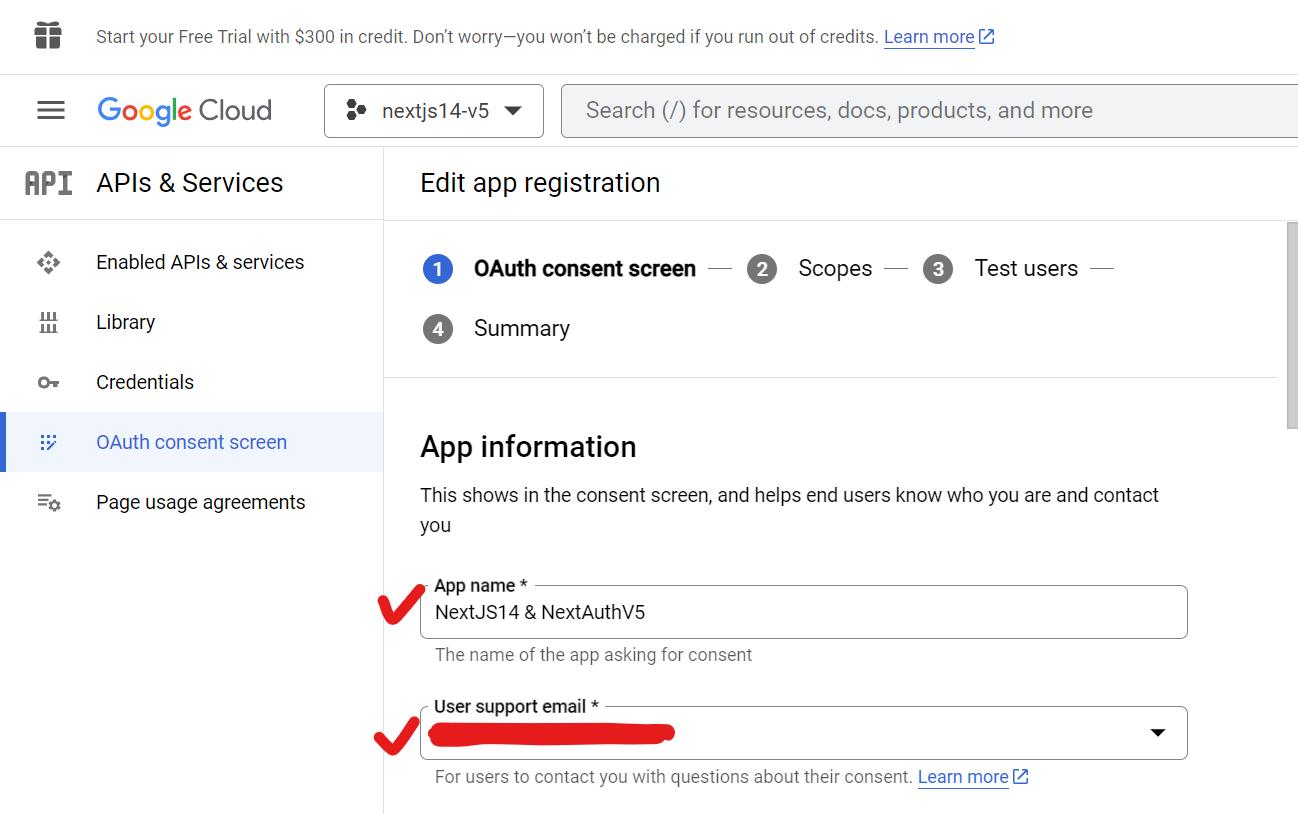
같은 페이지의 맨 밑으로 스크롤하여 Developer contact information까지 채워주고 "SAVE AND CONTINUE"를 눌러 넘어간다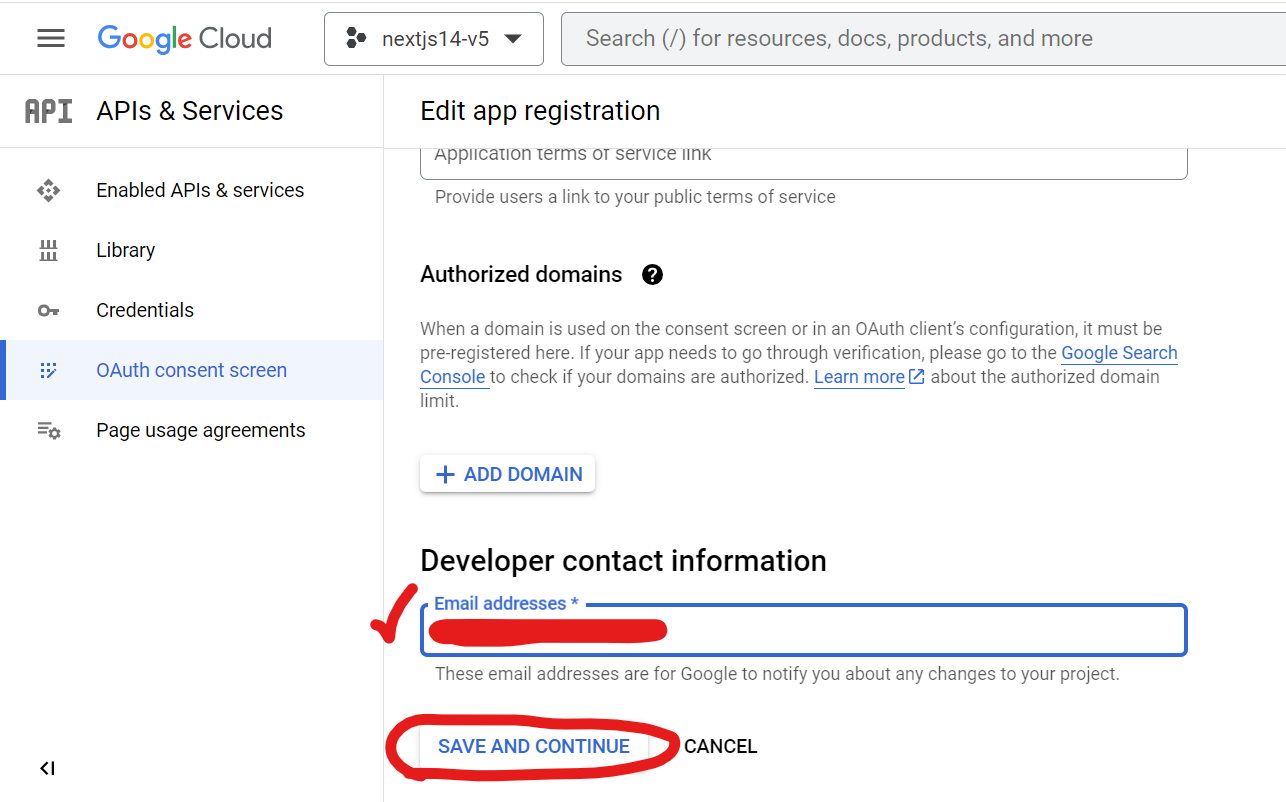
그 다음 스텝인 Scopes, Test users, Summary는 전부 "SAVE AND CONTINUE"를 눌러 넘어가면 된다
-- Credentials
다음으로 credentials 설정으로 넘어가도록 하겠다. 다음 순서로 페이지를 넘어가자
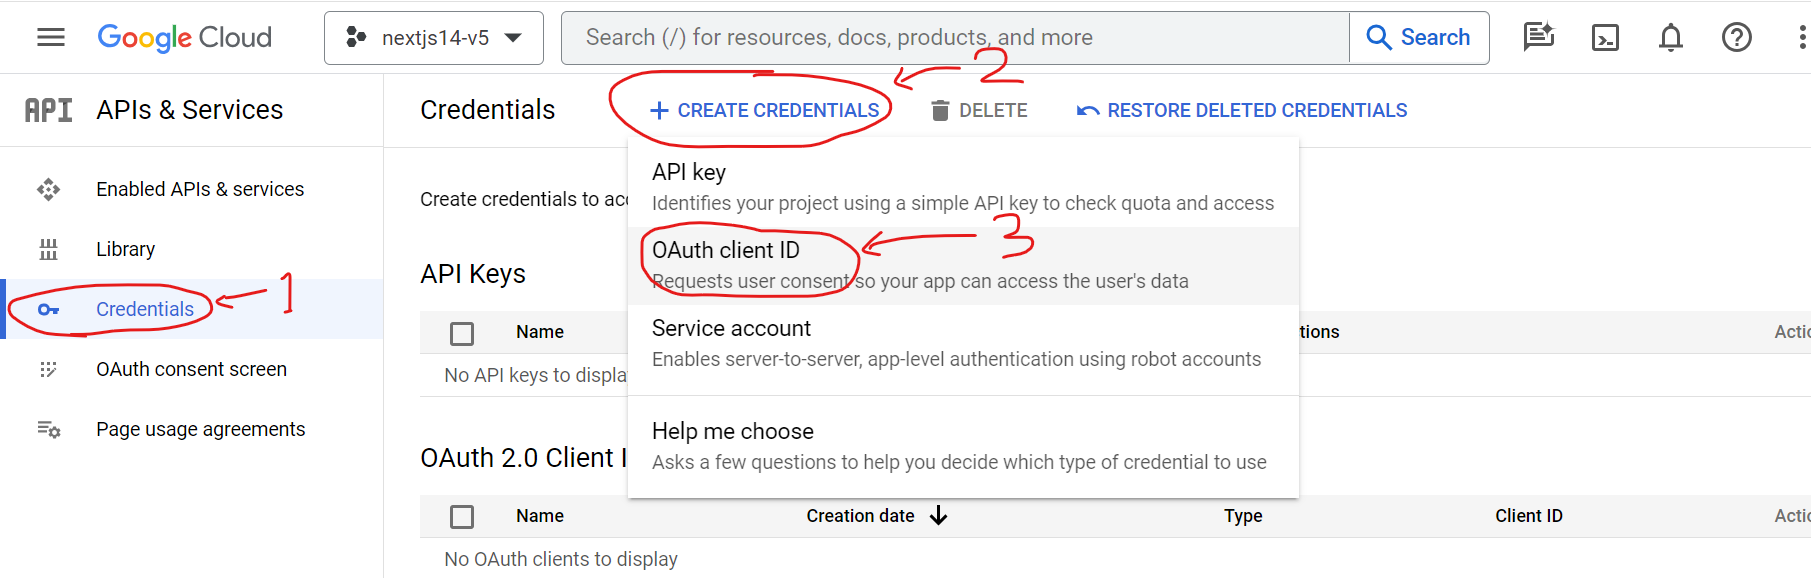
다음 페이지에서 Apllication type으로 Web application을 선택한다. 그 다음 Name을 설정 해주고 Authrized redirection URIs -> ADD URI 를 클릭해준다
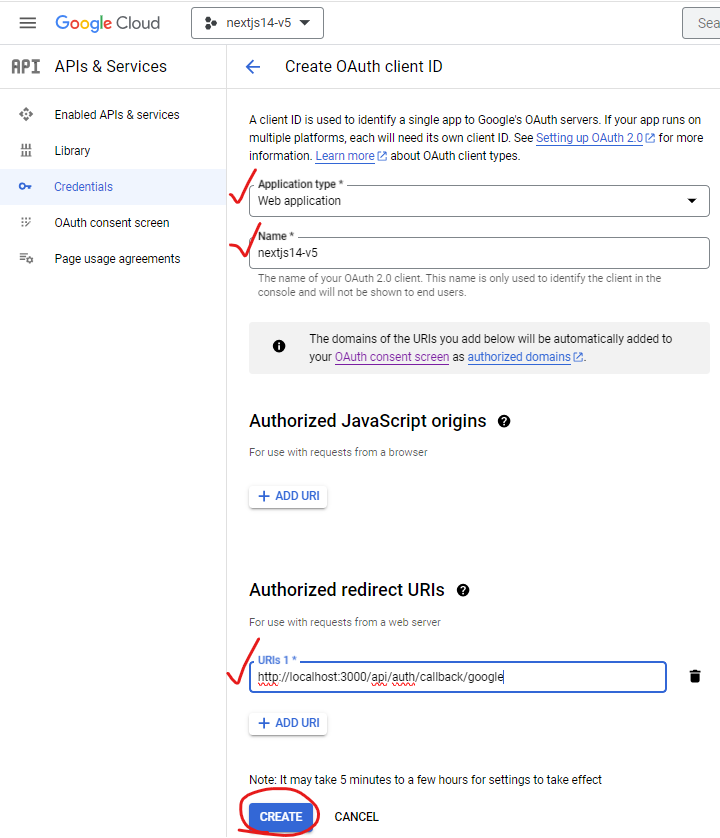 URI에
URI에 http://localhost:3000/api/auth/callback/google 를 추가하고 CREATE 버튼을 누른다
--- 🔴주의사항🔴
서버에 배포 시 URI를 https://${서버 도메인}/api/auth/callback/google 로 수정해주어야 배포된 웹에서 정상적으로 구글 로그인을 수행할 수 있다!
이제 잠시만 기다리면 OAuth Client가 생성되었다는 메세지를 받아볼 수 있고 'Client ID'와 'Client secret'을 조회 및 복사할 수 있다
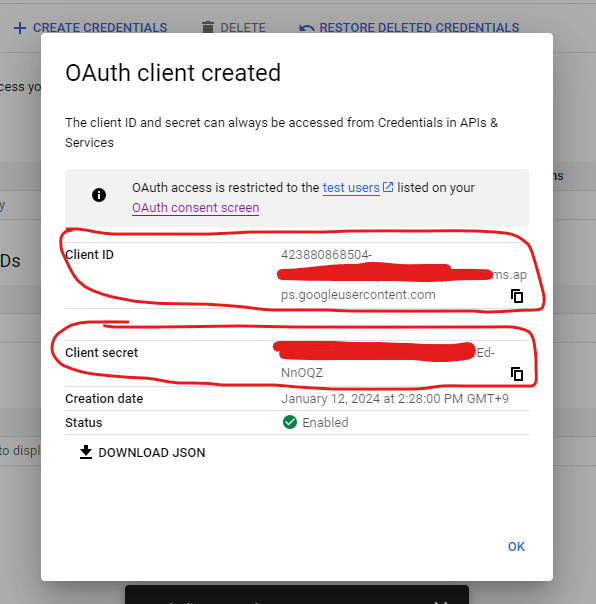
마지막으로 Client ID와 Client secret을 프로젝트 내의 .env 파일에 다음과 같이 붙혀 넣어주면 준비 완료!
GOOGLE_CLIENT_ID = ...
GOOGLE_CLIENT_SECRET = ...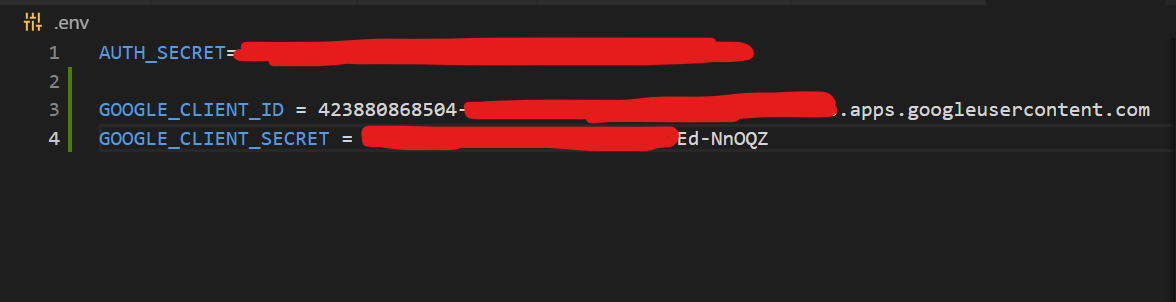
코드
우선 src/auth.ts에 google provider를 추가해준다.
// src/auth.ts
import NextAuth from 'next-auth';
import { authConfig } from './auth.config';
import Credentials from 'next-auth/providers/credentials';
import { User } from '@/lib/definitions';
import google from 'next-auth/providers/google'; // import 추가

export const { handlers: { GET, POST }, auth, signIn, signOut, update } = NextAuth({
  ...authConfig,
  providers: [
    // **************************************************************
    // 추가된 provider
    google({
      clientId: process.env.GOOGLE_CLIENT_ID ?? '',
      clientSecret: process.env.GOOGLE_CLIENT_SECRET ?? '',
    }),
    // **************************************************************
    Credentials({
      async authorize(credentials) {
        if (credentials.id && credentials.password) {
          // 백엔드에서 로그인 처리
          let loginRes = {
            success : true,
            data : {
              user: {
                ID: "user1",
                NAME: "홍길동",
                EMAIL: "email@email.email",
              },
            }
          }

          if (!loginRes.success) return null;
          const user = {
            id: loginRes.data.user.ID ?? '',
            name: loginRes.data.user.NAME ?? '',
            email: loginRes.data.user.EMAIL ?? '',
          } as User;
          return user;
        }
        return null;
      },
    })
  ],
  callbacks: {
    async session({ session, token }) {
      session.user = token.user as User
      return session;
    },
    async jwt({ token, user, trigger, session }) {
      if (user) {
        token.user = user;
      }
      if (trigger === "update" && session) {
        token = {...token, user : session}
        return token;
      };
      return token;
    },
  },
});
그리고 클라이언트에서 호출할 구글 로그인 메소드를 src/lib/actions.ts에 생성한다.
// src/lib/actions.ts
"use server"

import { signIn, update } from "@/auth";
import { AuthError } from "next-auth";
...
export async function googleAuthenticate(
  prevState: string | undefined,
  formData: FormData,
) {
  try {
    await signIn('google');
  } catch (error) {
    if (error instanceof AuthError) {
      return '구글 로그인 실패'
    }
    throw error;
  }
}
그리고 src/app/api/auth/[...nextauth]/route.ts 가 있는지 다시 한번 확인한다
// src/app/api/auth/[...nextauth]/route.ts
export { GET, POST } from "@/auth"
export const runtime = "edge"
마지막으로 src/app/login/page.tsx 에 구글 로그인을 수행하는 버튼을 만든다
"use client"

import { authenticate, googleAuthenticate } from "@/lib/actions" //googleAuthenticate 추가
import { useFormState } from "react-dom"

export default function Page() {
    const [errorMsg, dispatch] = useFormState(authenticate, undefined)
    const [errorMsgGoogle, dispatchGoogle] = useFormState(googleAuthenticate, undefined) //googleAuthenticate 관련 hook 추가
    return (
      <div>
        <h1>로그인 페이지</h1>
        <form className="flex flex-col" action={dispatch}>
            <input className="bg-blue-300 text-black" name="id"></input>
            <input className="bg-yellow-300 text-black" name="password" type="password"></input>
            <button>
                로그인
            </button>
            <p>{errorMsg}</p>
        </form>
        {/* 구글 로그인 버튼 추가 */}
        <br />
        <form className="flex flex-col" action={dispatchGoogle}>
            <button>
                구글 로그인
            </button>
            <p>{errorMsgGoogle}</p>
        </form>
        {/* 구글 로그인 버튼 추가 */}
      </div>
    )
  }
이제 npx next dev 또는 npm run dev를 통해 Next앱을 실행하고 http://localhost:3000/login 에서 '구글 로그인' 버튼을 누르면

홈페이지로 이동하면서 터미널에 구글 계정 정보가 찍혀있는 것을 확인할 수 있다!
마치는 글
이 글을 마무리로 Nextjs14과 NextAuthV5로 웹을 개발하며 배운점을 정리 했다. 추후에 Nextjs14와 NextAuthV5가 더 널리 퍼지면 다른 개발자 분의 삽질을 최소화할 수 있는 글이 됐으면 좋겠다!

소중한 경험 나눠주셔서 감사합니다. 많은 도움이 되었습니다