1. 프론트엔드 코드를 리팩토링하게 된 이유
현재 우리 팀은 나까지 백엔드 개발자 두 명에 프론트 개발자 한 명으로 이루어진 팀이었다. 프론트 개발은 다른 친구가 혼자서 진행을 하고 있었는데 프로덕트 단계까지 개발을 진행하게 된 것은 처음인 친구였다.
처음에 깃을 사용하고 어느정도 구조화 시켜서 지속가능한 코드를 짜야한다 이야기를 하기는 했었는데 아무래도 빠르게 프로덕트를 내고 싶다는 욕심도 있었고 어느 정도 시기까지는 그 친구가 혼자서 개발을 진행하게 되지 않을까 하는 생각에 그 친구가 빠르게 코드를 짜는 것에 집중한다는 의견에 어느정도 동의를 하고 진행하였다. 하지만 개발속도가 아무래도 좀 늦어졌고 서비스 운영중 문제가 생겼을때 혼자서 빠른 대응은 어렵겠다는 생각에 나와 다른 백엔드 개발자도 프론트 개발에 참여해야 할 것 같다고 의견을 제안했고 그렇게 협업을 하기로 결정했다.
하지만 지금까지 혼자서 개발을 하다보니 규칙없이 코드가 작성되고 있었다. 프론트 스크린 파일 안에 axios를 호출하고 스테이트를 선언하고 로직과 view가 모두 들어있었고 코드가 기본 800줄 이상이었다. 이대로는 안 되겠다는 생각에 출시 전 구조화를 제안하였고 이후 우리의 상황에 적절한 아키텍쳐를 찾아보았다.
2. 새롭게 적용하게 된 아키텍쳐
https://velog.io/@youngsupchoi/프론트엔드-아키텍쳐-탐색기
그래서 결국 우리는 위 게시물에서 언급한 이유로 기존 MVVM을 조금 변형한 아래와 같은 아키텍쳐를 활용하게 되었다.
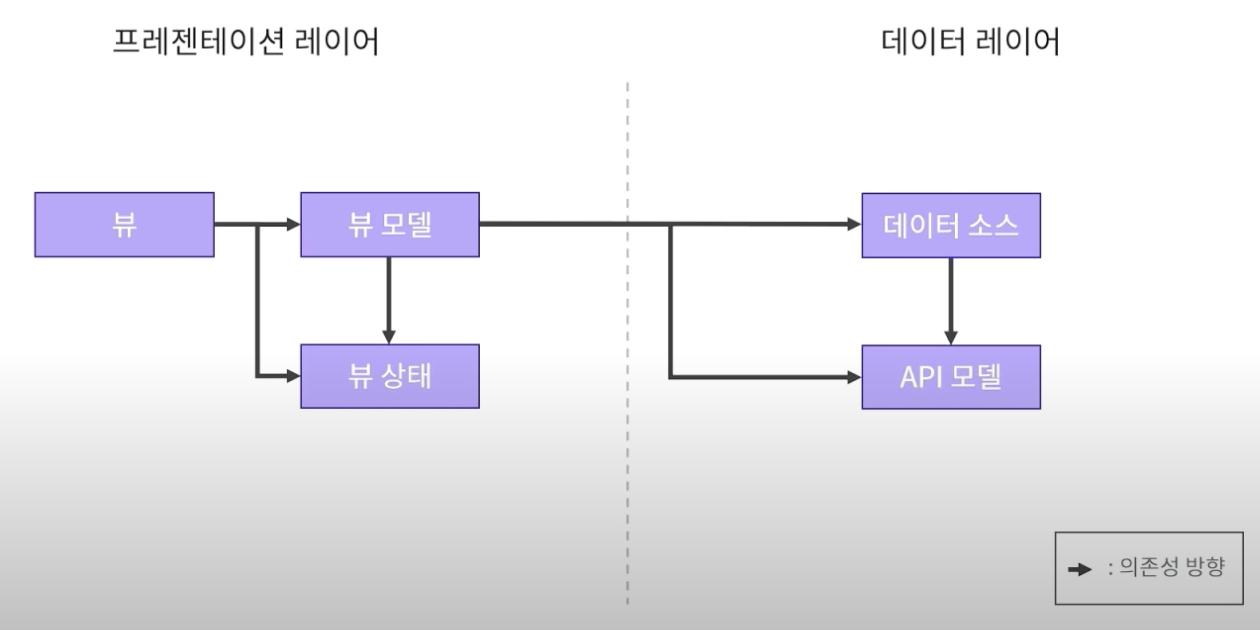
3. 디렉토리 구조
위 아키텍쳐에서 뷰는 기본적으로 스크린 기반으로 구분을 하는게 자연스럽고 API모델과 이에 밀접한 데이터 소스는 기능을 중심으로 구분을 하는게 자연스럽다 생각했다.
그렇다면 여기서 뷰모델과 뷰 상태는 어느쪽을 기반으로 구분이 되어야 자연스러운가하는 의문이 들었는데 지금까지의 코드가 뷰 안에 뷰모델부터 API모델까지의 코드가 전부 들어있는 상황이기도 하고 뷰는 결국에 뷰모델에 의존성을 가지기에 뷰 모델은 스크린 기반으로 분리하는게 자연스럽다고 생각했다.
그렇게 구성한 파일 구조는 아래와 같다.
전체 src 디렉토리 구조
**➜  src git:(main) ✗ tree -L 2
.
├── assets
│   ├── animations
│   ├── fonts
│   ├── icons
│   ├── images
│   └── loader
├── dataLayer
│   ├── APIModel
│   └── DataSource
└── presentationLayer
    ├── view
    ├── viewModel
    └── viewState**
4. 코드 템플릿
1) viewState 템플릿 코드
import {createContext, useContext, useState, useRef} from 'react';

// 1. Context 이름 변경하기, 작명규치 - view이름 + Context
const CustomViewContext = createContext();

// 2. Hook 이름 변경하기, 작명 규칙- use + view이름 + State
export const useCustomViewState = () => {
  const context = useContext(CustomViewContext);
  if (!context) {
    throw new Error(
      'useCustomViewState must be used within a CustomViewStateProvider',
    );
  }
  return context;
};
//provider작명규칙 - view이름 + Provider
export const CustomViewStateProvider = ({children}) => {
  // 3. 필요한 상태 추가하기
  const [exampleState, setExampleState] = useState(null);
  // ... 다른 상태들

  const state = {
    exampleState,
    // ... 다른 상태들
  };

  const actions = {
    setExampleState,
    // ... 다른 상태 설정 함수들
  };

  return (
    <CustomViewContext.Provider value={{state, actions}}>
      {children}
    </CustomViewContext.Provider>
  );
};
2) modelView 템플릿코드
import {useState} from 'react';

// 1. 필요한 뷰 스테이트 가져오기 (작명규칙: use + view이름 + State)
import {useCustomViewState} from './viewState';

// 2. 데이터 소스 또는 API 가져오기
import {fetchExampleData} from '../dataLayer/dataSource';

// 3. 뷰 모델 hook 이름 변경하기 (작명규칙: use + view이름 + ViewModel)
export const useCustomViewModel = () => {
  // 뷰 스테이트의 상태와 액션 가져오기
  const {state, actions} = useCustomViewState();

  // 4. 뷰 모델에서만 사용되는 상태 선언하기 (예: products)
  const [exampleData, setExampleData] = useState([]);

  // 5. 필요한 로직 작성하기 (예: 데이터 검색)
  const fetchExample = async () => {
    actions.setExampleState(true);
    try {
      const result = await fetchExampleData();
      setExampleData(result);
    } catch (e) {
      actions.setExampleError(e.message);
    }
    actions.setExampleState(false);
  };

  return {
    state: {
      ...state,
      exampleData: exampleData,
    },
    actions: {
      ...actions,
      fetchExample,
    },
  };
};
5. 실제 적용된 코드 예시
before
export default function SignUpScreen4({route}) {
  const navigation = useNavigation();
  const {firstName, lastName, name, phoneNumber} = route.params; // Get the name data from navigation parameters

  const backPress = () => {
    navigation.goBack();
  };
  const buttonPress = () => {
    navigation.navigate('signup5', {
      phoneNumber: phoneNumber,
      firstName: firstName,
      lastName: lastName,
      name: name,
      gender: formattedGender,
    });
  };
  const [gender, setGender] = useState('');
  const [formattedGender, setFormattedGender] = useState('');
  useEffect(() => {
    if (gender === '남성') {
      setFormattedGender('male');
    } else if (gender === '여성') {
      setFormattedGender('female');
    } else if (gender === '기타') {
      setFormattedGender('others');
    }
  }, [gender]);
  return (
    <View style={styles.signupContainer}>
      <View style={styles.signUpHeader}>
        <AnimatedButton
          onPress={() => {
            backPress();
          }}
          style={styles.backButton}>
          <BackIcon
            width={24}
            height={24}
            stroke={COLOR_BLACK}
            strokeWidth={1}
          />
          {console.log(firstName, lastName, name, gender)}
        </AnimatedButton>
        <View style={styles.paginationContainer}>
          <View style={styles.pagination} />
          <View style={styles.selectedPagination} />
          <View style={styles.pagination} />
          <View style={styles.pagination} />
        </View>

        <View style={{width: 44}} />
      </View>

      <View style={styles.instructionContainer}>
        <B28>당신의 성별은 무엇인가요?</B28>
      </View>

      <View style={styles.inputContainer}>
        <AnimatedButton
          onPress={() => {
            setGender('남성');
          }}
          style={[
            styles.button,
            {
              backgroundColor:
                gender === '남성' ? COLOR_BLACK : backgroundColor,
            },
          ]}>
          <B20
            customStyle={{
              color: gender === '남성' ? backgroundColor : COLOR_BLACK,
            }}>
            남성
          </B20>
        </AnimatedButton>
        <AnimatedButton
          onPress={() => {
            setGender('여성');
          }}
          style={[
            styles.button,
            {
              backgroundColor:
                gender === '여성' ? COLOR_BLACK : backgroundColor,
            },
          ]}>
          <B20
            customStyle={{
              color: gender === '여성' ? backgroundColor : COLOR_BLACK,
            }}>
            여성
          </B20>
        </AnimatedButton>
        <AnimatedButton
          onPress={() => {
            setGender('기타');
          }}
          style={[
            styles.button,
            {
              backgroundColor:
                gender === '기타' ? COLOR_BLACK : backgroundColor,
            },
          ]}>
          <B20
            customStyle={{
              color: gender === '기타' ? backgroundColor : COLOR_BLACK,
            }}>
            기타
          </B20>
        </AnimatedButton>
      </View>

      <View style={styles.nextButtonContainer}>
        <AnimatedButton
          onPress={() => buttonPress()}
          style={[
            styles.nextButton,
            gender === '' ? styles.inactiveButton : {},
          ]}
          disabled={gender === ''} // Disable the button if gender is an empty string
        >
          <B15 customStyle={{color: COLOR_WHITE}}>다음</B15>
        </AnimatedButton>
      </View>
    </View>
  );
}
after
export default function SignUpScreen4({route}) {
  const {ref, state, actions} = useStartViewModel();

  useEffect(() => {
    if (state.gender === '남성') {
      actions.setFormattedGender('male');
    } else if (state.gender === '여성') {
      actions.setFormattedGender('female');
    } else if (state.gender === '기타') {
      actions.setFormattedGender('others');
    }
  }, [state.gender]);
  return (
    <View style={styles.signupContainer}>
      <SignUpHeader />
      <View style={styles.instructionContainer}>
        <B28>당신의 성별은 무엇인가요?</B28>
      </View>
      <GenderInput />
      <GenderSubmit />
    </View>
  );
}
리팩터링을 진행하면서 정말 마음이 편안해지는 것을 느꼈다....