1월 11일 오늘의 일기

오늘은 요즘 어플에서도 자주 쓰이는 포토 스티커에 대해서 익스플로레이션 노드를 작성했다.
import os
import cv2
import matplotlib.pyplot as plt
import numpy as np
import dlib


my_image_path = os.getenv('HOME')+'/aiffel/camera_sticker/images/원규사진123.png'
img_bgr = cv2.imread(my_image_path)
img_show = img_bgr.copy()
plt.imshow(img_bgr)
plt.show()
먼저 내가 저장한 폴더에서 사진을 불러오는 작업을 하기 위해 위와 같은 명령어를 입력했다.
하지만 이미지가 출력되고 결과를 보면 사진 색이 푸른색으로 되어있다.
이러한 사진의 색상을 바꿔주기 위해 원래의 RGB 이미지로 바꿔줘야 한다.
img_rgb = cv2.cvtColor(img_bgr, cv2.COLOR_BGR2RGB)
plt.imshow(img_rgb)
plt.show()
COLOR_BGR2RGB가 원래의 색상을 찾는데 쓰이는 명령어이다.
그래서 위와 같은 명령어를 입력하게 되면 밑의 사진처럼 출력이 된다.

그리고 원래의 주제로 돌아오면 사진에 스티커를 붙이기 위해 먼저 얼굴이 있는 영역을 인식해야 할 필요가 있다.
print(dlib_rects)
for dlib_rect in dlib_rects:
l = dlib_rect.left()
t = dlib_rect.top()
r = dlib_rect.right()
b = dlib_rect.bottom()
cv2.rectangle(img_show, (l,t), (r,b), (0,255,0), 2, lineType=cv2.LINE_AA)
img_show_rgb = cv2.cvtColor(img_show, cv2.COLOR_BGR2RGB)
plt.imshow(img_show_rgb)
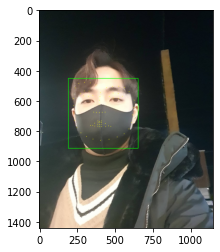
plt.show()이 명령어를 작성하게 되면 사진에 얼굴영역을 인식하는 박스를 생성할 수 있다.
영역의 크기도 같이 출력해준다.
rectangles[[(194, 451) (656, 913)]]

그 다음 얼굴을 인식하면 그 다음에는 얼굴의 이목구비 위치를 알 수 있어야 한다.
그렇기에 얼굴 랜드마크라는 기술에서 객체의 내부의 점을 찾아내는 알고리즘을 이용해야 한다.
model_path = os.getenv('HOME')+'/aiffel/camera_sticker/models/shape_predictor_68_face_landmarks.dat'
landmark_predictor = dlib.shape_predictor(model_path)
먼저 내 사진에 Face Landmark를 설정해두고
list_landmarks = []

for dlib_rect in dlib_rects:
    points = landmark_predictor(img_rgb, dlib_rect)
    # face landmark 좌표를 저장해둡니다
    list_points = list(map(lambda p: (p.x, p.y), points.parts()))
    list_landmarks.append(list_points)

print(len(list_landmarks[0]))
사진 속 랜드마크 부분들에 좌표를 생성하여 저장해 둔다.
그렇게 결과 값을 보면68개의 랜드마크 점이 생성된다.
 for landmark in list_landmarks:
for point in landmark:
    cv2.circle(img_show, point, 2, (0, 255, 255), -1)

 img_show_rgb = cv2.cvtColor(img_show, cv2.COLOR_BGR2RGB)
 plt.imshow(img_show_rgb)
 plt.show()
랜드마크 점을 생성한 후 사진을 확인해 보면 얼굴 영역 부분에 작게 노란 점이 생성된 것들을 볼 수 있다.
이 점들이 얼굴에 다 퍼져있는게 아닌 코나 입, 턱 같이 입체적인 부분에 분포되어 있는 것을 볼 수 있다.
 for dlib_rect, landmark in zip(dlib_rects, list_landmarks):
     print (landmark[30]) # 코의 index는 30 입니다
     x = landmark[30][0]
     y = landmark[30][1] - dlib_rect.height()//2
     w = h = dlib_rect.width()
     print ('(x,y) : (%d,%d)'%(x,y))
     print ('(w,h) : (%d,%d)'%(w,h))
(397, 622)
(x,y) : (397,391)
(w,h) : (463,463)
랜드마크가 생성된 사진을 가지고 사진의 크기와 (x,y) 좌표를 구한다.
 sticker_path = os.getenv('HOME')+'/aiffel/camera_sticker/images/24674.png'
 img_sticker = cv2.imread(sticker_path) # 스티커 이미지를 불러옵니다
 img_sticker = cv2.resize(img_sticker, (w,h))
 print (img_sticker.shape)
(463, 463, 3)<- 이건 크기와 색상을 표시
그 다음 스티커의 이미지를 불러온다.
 refined_x = (x - w // 2)+15
 refined_y = y - h
 print ('(x,y) : (%d,%d)'%(refined_x, refined_y))
(x,y) : (181,-72)
이 명령어는 스티커가 원래 사진에 부착하고 싶은 위치를 정할 때 쓰는 명령어이다.
구하면 위와 같이 y가 -가 나올 수 있는데 이렇게 되면 사진에서 스티커가 짤리는 현상이 나타난다.
이와 같은 방법을 해결하기 위해
 if refined_x  < 0:
     img_sticker = img_sticker[:, -refined_x:]
     refined_x = 0
 if refined_y < 0:
     img_sticker = img_sticker[-refined_y:, :]
     refined_y = 540

 print ('(x,y) : (%d,%d)'%(refined_x, refined_y))
위의 명령어를 작성하게 되면 y범위가 0이하가 되지 못하게 방지 할 수 있다.
위에 y = 540은 내 얼굴에 맞추기 위해 임의로 넣은 값이므로 신경 쓰지 않아도 된다.
그렇게 해서 -값을 해결하면
sticker_area = img_show[refined_y:refined_y+img_sticker.shape[0],     refined_x:refined_x+img_sticker.shape[1]]
img_show[refined_y:refined_y+img_sticker.shape[0], refined_x:refined_x+img_sticker.shape[1]] = \
np.where(img_sticker==255,sticker_area,img_sticker).astype(np.uint8)
이 명령어는 스티커의 모양이나 색상을 정해주는 명령어인데, 여기에서 쓰인건 마지막 줄에
img_sticker==255이 부분이다.
만약 255 대신 0을 쓰면 스티커 이미지의 배경화면까지 같이 나와 사진을 망칠 수 있기 때문에 255를 넣어 투명하게 한다.
plt.imshow(cv2.cvtColor(img_show, cv2.COLOR_BGR2RGB))
plt.show()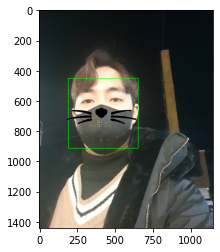
얼굴에 스티커가 원하는 위치에 부착되어 있지만, 랜드마크 점들이 지워지지 않았다.
sticker_area = img_bgr[refined_y:refined_y +img_sticker.shape[0], refined_x:refined_x+img_sticker.shape[1]]
img_bgr[refined_y:refined_y +img_sticker.shape[0], refined_x:refined_x+img_sticker.shape[1]] = \
    np.where(img_sticker==255,sticker_area,img_sticker).astype(np.uint8)
plt.imshow(cv2.cvtColor(img_bgr, cv2.COLOR_BGR2RGB))
plt.show()
마지막으로 이 명령어를 작성해주면?

이렇게 랜드마크 점들이 없어진 깔끔한 사진이 생성된다.