K8S에서의 MetalLB
2022년 1월부터 약 8주간 진행했던 KANS 스터디의 최종 졸업과제로 작성했습니다.
가시다님을 포함한 CloudNet팀의 도움으로 짧은시간동안 k8s에 많은 배움을 얻었습니다.(감사합니다__)
1. MetalLB란?
- MetalLB 는 온프레미스 환경(IDC)에서 사용할 수 있는 서비스(로드밸런서 타입)입니다.
- MetalLB는 BareMetalLoadBalancer 약자!
- 서비스(로드 밸런서)의 'External IP' 전파를 위해서 표준 프로토콜인 ARP(IPv4)/NDP(IPv6), BGP 를 사용합니다.
- 데몬셋으로 speaker 파드를 생성하여 'External IP'를 전파합니다.
우리가 일반적으로 이야기하는 Loadbalancer(LB)로, k8s에서의 동일한 애플리케이션의 다수 Pod를 부하분산을 할 수 있습니다.
1.1. MetalLB L2 모드
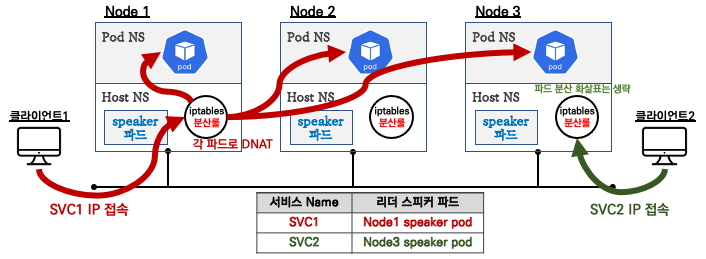
- Speaker 파드 중 1개가 리더로 선출되고, 리더는 ARP(GARP, Gratuitous APR)를 이용하여 서비스 External IP 광고합니다.
- 위 그림과 같이 iptables 분산룰을 이용하여 Traffic을 전달합니다.
1.2. MetalLB BGP 모드
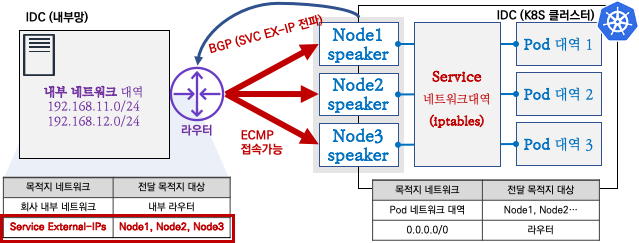
- 일반적으로 서버상단에는 L3 스위치가 구성되며, Speaker와 BGP Neighbor를 맺으며, 서비스 External IP를 32bit로 광고합니다.
- Aggregation-length로 네트워크 Summary로 가능하지만, 좀 더 디테일한 서비스를 위해서라면 32bit로 광고하는걸 권장합니다. 현시점 DataCenter 스위치는 144k이상의 ipv4 Host Routes를 갖고 있습니다.
- BGP Community와 localpref 등 BGP 설정을 할수 있습니다.
1.3. MetalLB를 구성하기 위한 요구사항
- A Kubernetes cluster, running Kubernetes 1.13.0 or later
- A cluster network configuration that can coexist with MetalLB.
- Some IPv4 addresses for MetalLB to hand out.
- When using the BGP operating mode, you will need one or more routers capable of speaking BGP.
- When using the L2 operating mode, traffic on port 7946 (TCP & UDP, other port can be configured) must be allowed between nodes, as required by memberlist.
2. 다양한 위치에 배포되는 MetalLB
2.1 Ingress front
인그레스 컨트롤러 Expose시, NodePort Type보다 좀 더 많은 기능을 제공하여 MetalLB 방식으로 배치를 권장합니다.

2.2 Ingress backend
아래와 같이 Ingress에서 트래픽을 처리할때 MetalLB로 전달하는 방법도 가능함
다양한 Nginx 인그레스 컨트롤러 인입 방법 : MetalLB 사용, Via the host network 사용, Using a self-provisioned edge 사용, External IPs 사용 - 링크
3. MetalLB BGP모드 테스트
3.1 실습환경 배포
# vagrant 파일 다운로드
curl -O https://raw.githubusercontent.com/gasida/KANS/main/5/Vagrantfile
# 배포
vagrant up
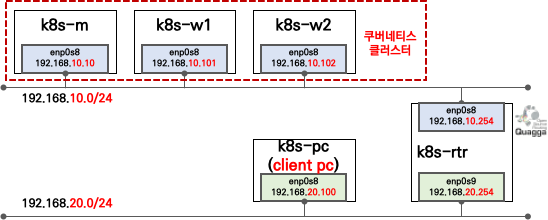
# 배포 확인 : k8s-rtr, k8s-m, k8s-w1, k8s-w2, k8s-pc
vagrant status
# 마스터노드 접속
vagrant ssh k8s-m
# 마스터노드에서 Calico 확인 (VXLAN mode)
calicoctl get ippool -o wide3.2 마스터노드에서 MetalLB 설치
# 생성
# metallb-system 네임스페이스 생성, 파드(컨트롤러, 스피커) 생성, RBAC(서비스/파드/컨피그맵 조회 등등 권한들) 생성
kubectl apply -f https://raw.githubusercontent.com/metallb/metallb/v0.12.1/manifests/namespace.yaml
kubectl apply -f https://raw.githubusercontent.com/metallb/metallb/v0.12.1/manifests/metallb.yaml

# 확인 : 데몬셋으로 배포되는 metallb 스피커 파드의 IP는 네트워크가 host 모드이므로 노드의 IP를 그대로 사용
kubectl get all -n metallb-system
kubectl get pod -n metallb-system -o wide
3.3 MetalLB ConfigMap 생성
avoid-buggy-ips: true는 Network Subnet의 0,255를 제외하고 External IP를 생성합니다. 최신의 Datacenter 스위치에서는 0과 255도 IP로 이해할수 있지만, 오래된 장비에서는 해당 패킷을 보안공격으로 오탐하고 차단했습니다.
IP 2개 더 사용하기 위해 설정을 지워야 한다면, 상단에 구성된 장비와의 호환성 테스트 및 아키텍쳐로 피할수 있는지도 확인이 필요합니다.(네트워크대역을 Summary(축약)해서 지원안되는 장비에서 x.x.x.0/32 또는 x.x.x.255/32 IP를 x.x.x.0/24로 보게 할수도 있음)
아래와 같이 ConfigMap 적용

cat <<EOF | kubectl create -f -
apiVersion: v1
kind: ConfigMap
metadata:
  namespace: metallb-system
  name: config
data:
  config: |
    peers:
    - peer-address: 192.168.10.254
      peer-asn: 64513
      my-asn: 64512
    address-pools:
    - name: default
      protocol: bgp
      avoid-buggy-ips: true
      addresses:
      - 172.20.1.0/24
EOF

============ MetalLB 배포 확인

(🍊 |Service-DNS-k8s:default) root@k8s-m:~# kubectl get pod -n metallb-system
NAME                          READY   STATUS    RESTARTS   AGE
controller-66445f859d-hvdh4   1/1     Running   0          6m3s
speaker-dmk7w                 1/1     Running   0          6m3s
speaker-tqffj                 1/1     Running   0          6m3s
speaker-vdtvs                 1/1     Running   0          6m3s


(🍊 |Service-DNS-k8s:default) root@k8s-m:~# kubectl logs -n metallb-system speaker-dmk7w -c speaker

============ Qugga에서 Routing 정보 확인

root@k8s-rtr:~# vtysh -c "show ip bgp summary"
BGP router identifier 192.168.10.254, local AS number 64513
RIB entries 3, using 336 bytes of memory
Peers 4, using 36 KiB of memory

Neighbor        V         AS MsgRcvd MsgSent   TblVer  InQ OutQ Up/Down  State/PfxRcd
192.168.10.10   4 64512      15      16        0    0    0 00:05:39        0
192.168.10.101  4 64512      15      19        0    0    0 00:05:50        0
192.168.10.102  4 64512      15      18        0    0    0 00:05:49        0
192.168.20.100  4 64514      13      18        0    0    0 00:10:54        1

Total number of neighbors 4

Total num. Established sessions 4
Total num. of routes received     1
3.4 Pod 배포
아래와 같이 Pod 배포

cat <<EOF | kubectl create -f -
apiVersion: v1
kind: Pod
metadata:
  name: webpod1
  labels:
    app: webpod
spec:
  #nodeName: k8s-w1
  containers:
  - name: container
    image: traefik/whoami
  terminationGracePeriodSeconds: 0
---
apiVersion: v1
kind: Pod
metadata:
  name: webpod2
  labels:
    app: webpod
spec:
  #nodeName: k8s-w2
  containers:
  - name: container
    image: traefik/whoami
  terminationGracePeriodSeconds: 0
---
apiVersion: v1
kind: Pod
metadata:
  name: webpod3
  labels:
    app: webpod
spec:
  #nodeName: k8s-w3
  containers:
  - name: container
    image: traefik/whoami
  terminationGracePeriodSeconds: 0
EOF

============ 배포된 web Pod 확인

(🍊 |Service-DNS-k8s:default) root@k8s-m:~# kubectl get pod  -o wide
NAME      READY   STATUS    RESTARTS   AGE   IP              NODE     NOMINATED NODE   READINESS GATES
webpod1   1/1     Running   0          48s   172.16.158.28   k8s-w1   <none>           <none>
webpod2   1/1     Running   0          48s   172.16.184.14   k8s-w2   <none>           <none>
webpod3   1/1     Running   0          48s   172.16.158.29   k8s-w1   <none>           <none>
3.5 서비스(LoadBalncer) 배포
cat <<EOF | kubectl create -f -
apiVersion: v1
kind: Service
metadata:
  name: svc1
spec:
  ports:
    - name: svc1-webport
      port: 80
      targetPort: 80
  selector:
    app: webpod
  type: LoadBalancer
  #externalTrafficPolicy: Local
---
apiVersion: v1
kind: Service
metadata:
  name: svc2
spec:
  ports:
    - name: svc2-webport
      port: 80
      targetPort: 80
  selector:
    app: webpod
  type: LoadBalancer
  #externalTrafficPolicy: Local
EOF


============ 배포된 서비스 확인

(🍊 |Service-DNS-k8s:default) root@k8s-m:~# kubectl get service
NAME         TYPE           CLUSTER-IP       EXTERNAL-IP   PORT(S)        AGE
kubernetes   ClusterIP      10.96.0.1        <none>        443/TCP        10m
svc1         LoadBalancer   10.110.174.90    172.20.1.1    80:30196/TCP   4m16s
svc2         LoadBalancer   10.104.134.200   172.20.1.2    80:30180/TCP   4m16s


============ MetalLB Log 확인

배포하자마자 External-IP된 정보가 Announced 되는것을 볼수 있다.
(🍊 |Service-DNS-k8s:default) root@k8s-m:~# kubectl logs -n metallb-system speaker-dmk7w -c speaker -f
W0320 14:17:19.882661       1 warnings.go:70] discovery.k8s.io/v1beta1 EndpointSlice is deprecated in v1.21+, unavailable in v1.25+; use discovery.k8s.io/v1 EndpointSlice
{"caller":"level.go:63","event":"updatedAdvertisements","ips":["172.20.1.1"],"level":"info","msg":"making advertisements using BGP","numAds":1,"pool":"default","protocol":"bgp","service":"default/svc1","ts":"2022-03-20T14:18:35.817379101Z"}
{"caller":"level.go:63","event":"serviceAnnounced","ips":["172.20.1.1"],"level":"info","msg":"service has IP, announcing","pool":"default","protocol":"bgp","service":"default/svc1","ts":"2022-03-20T14:18:35.818862148Z"}
{"caller":"level.go:63","event":"updatedAdvertisements","ips":["172.20.1.2"],"level":"info","msg":"making advertisements using BGP","numAds":1,"pool":"default","protocol":"bgp","service":"default/svc2","ts":"2022-03-20T14:18:35.867759944Z"}
{"caller":"level.go:63","event":"serviceAnnounced","ips":["172.20.1.2"],"level":"info","msg":"service has IP, announcing","pool":"default","protocol":"bgp","service":"default/svc2","ts":"2022-03-20T14:18:35.872329618Z"}
^C

============ Qugga에서 BGP Summary 확인

root@k8s-rtr:~# vtysh -c "show ip bgp summary"
BGP router identifier 192.168.10.254, local AS number 64513
RIB entries 7, using 784 bytes of memory
Peers 4, using 36 KiB of memory

Neighbor        V         AS MsgRcvd MsgSent   TblVer  InQ OutQ Up/Down  State/PfxRcd
192.168.10.10   4 64512      28      27        0    0    0 00:11:21        2
192.168.10.101  4 64512      29      32        0    0    0 00:11:32        2
192.168.10.102  4 64512      29      31        0    0    0 00:11:31        2
192.168.20.100  4 64514      19      25        0    0    0 00:16:36        1

Total number of neighbors 4

Total num. Established sessions 4
Total num. of routes received     7


============ Qugga에서 Routing Table 확인
해당 서비스에 대해 모든 Node로 Nexthop을 바라보고 있다.

root@k8s-rtr:~# vtysh -c "show ip route"
Codes: K - kernel route, C - connected, S - static, R - RIP,
       O - OSPF, I - IS-IS, B - BGP, P - PIM, A - Babel, N - NHRP,
       > - selected route, * - FIB route

K * 0.0.0.0/0 via 10.0.2.2, enp0s3 inactive, src 10.0.2.15
C>* 10.0.2.0/24 is directly connected, enp0s3
K>* 10.0.2.2/32 is directly connected, enp0s3
B>* 10.1.2.0/24 [20/0] via 192.168.20.100, enp0s9, 00:16:47
C>* 127.0.0.0/8 is directly connected, lo
B>* 172.20.1.1/32 [20/0] via 192.168.10.10, enp0s8, 00:01:23
  *                      via 192.168.10.101, enp0s8, 00:01:23
  *                      via 192.168.10.102, enp0s8, 00:01:23
B>* 172.20.1.2/32 [20/0] via 192.168.10.10, enp0s8, 00:01:22
  *                      via 192.168.10.101, enp0s8, 00:01:22
  *                      via 192.168.10.102, enp0s8, 00:01:22
C>* 192.168.10.0/24 is directly connected, enp0s8
C>* 192.168.20.0/24 is directly connected, enp0s9
3.6 Speaker에서 BGP 확인
============ 현재 SVC EXTERNAL-IP를 변수에 지정
SVC1EXIP=$(kubectl get svc svc1 -o jsonpath='{.status.loadBalancer.ingress[0].ip}')
echo $SVC1EXIP
SVC2EXIP=$(kubectl get svc svc2 -o jsonpath='{.status.loadBalancer.ingress[0].ip}')
echo $SVC2EXIP

============ TCP 179 포트로 BGP 정보 전파(speaker)
ss -tunp | egrep 'Netid|speaker'
Netid State Recv-Q Send-Q          Local Address:Port              Peer Address:Port           Process
tcp   ESTAB 0      0               192.168.10.10:54523           192.168.10.254:179             users:(("speaker",pid=13586,fd=27))


============ Ngrep을 활용하여 노드에서 BGP 패킷 캡쳐 확인
(🍊 |Service-DNS-k8s:default) root@k8s-m:~# ngrep -tW byline -d enp0s8 '' 'tcp port 179'
interface: enp0s8 (192.168.10.0/255.255.255.0)
filter: ( tcp port 179 ) and ((ip || ip6) || (vlan && (ip || ip6)))
#
T 2022/03/20 14:24:45.295161 192.168.10.101:48393 -> 192.168.10.254:179 [AP] #1
...................
#
T 2022/03/20 14:24:45.313528 192.168.10.254:179 -> 192.168.10.101:48393 [AP] #2
...................
##
T 2022/03/20 14:24:46.111319 192.168.10.254:179 -> 192.168.10.102:58403 [AP] #4
...................
##
T 2022/03/20 14:24:46.111788 192.168.10.102:58403 -> 192.168.10.254:179 [AP] #6
...................
#^Cexit
7 received, 4 matched
3.7 k8s-pc에서 서비스 확인
============ 라우팅 테이블 정보 확인
root@k8s-pc:~# ip -c route | grep zebra
10.1.1.0/24 via 192.168.20.254 dev enp0s8 proto zebra metric 20
172.20.1.1 via 192.168.20.254 dev enp0s8 proto zebra metric 20
172.20.1.2 via 192.168.20.254 dev enp0s8 proto zebra metric 20

============ 현재 SVC EXTERNAL-IP를 변수에 지정
SVC1EXIP=$(kubectl get svc svc1 -o jsonpath='{.status.loadBalancer.ingress[0].ip}')
echo $SVC1EXIP
SVC2EXIP=$(kubectl get svc svc2 -o jsonpath='{.status.loadBalancer.ingress[0].ip}')
echo $SVC2EXIP

============ 접속 테스트
root@k8s-pc:~# curl -s --interface 192.168.20.100 $SVC1EXIP | grep Hostname
Hostname: webpod2
root@k8s-pc:~# curl -s --interface 192.168.20.100 $SVC2EXIP | grep Hostname
Hostname: webpod3


============ 접속테스트가 안된다면 각 Node에서 192.168.20.0/24에 대한 Routing 추가
(🍊 |Service-DNS-k8s:default) root@k8s-m:~# route add -net 192.168.20.0/24 gw 192.168.10.254
root@k8s-w1:~#  route add -net 192.168.20.0/24 gw 192.168.10.254
root@k8s-w2:~#  route add -net 192.168.20.0/24 gw 192.168.10.254


============ RemoteAddr 주소 확인
root@k8s-pc:~# curl -s --interface 192.168.20.100 $SVC1EXIP | egrep 'Hostname|RemoteAddr|Host:'
Hostname: webpod3
RemoteAddr: 172.16.184.0:31659
Host: 172.20.1.1

============ 부하분산 접속확인
root@k8s-pc:~# for i in {1..100}; do curl -s --interface 192.168.20.100 $SVC1EXIP | grep Hostname; done | sort | uniq -c | sort -nr
     38 Hostname: webpod2
     36 Hostname: webpod1
     26 Hostname: webpod3
클라이언트의 IP는 192.168.20.100으로 시도했지만, 인입한 노드의 IP(172.16.184.0 또는 172.16.116.0)로 SNAT 되어 목적지 파드로 접속되는것을 볼수 있다.

3.9 externalTrafficPolicy: Local 변경
============ externalTrafficPolicy: Local 설정

(🍊 |Service-DNS-k8s:default) root@k8s-m:~# kubectl patch svc svc1 -p '{"spec":{"externalTrafficPolicy": "Local"}}'
service/svc1 patched
(🍊 |Service-DNS-k8s:default) root@k8s-m:~# kubectl patch svc svc2 -p '{"spec":{"externalTrafficPolicy": "Local"}}'
service/svc2 patched


============ Pod가 존재하는 노드만 Nexthop에서 확인

root@k8s-rtr:~# vtysh -c "show ip route"
Codes: K - kernel route, C - connected, S - static, R - RIP,
       O - OSPF, I - IS-IS, B - BGP, P - PIM, A - Babel, N - NHRP,
       > - selected route, * - FIB route

K * 0.0.0.0/0 via 10.0.2.2, enp0s3 inactive, src 10.0.2.15
C>* 10.0.2.0/24 is directly connected, enp0s3
K>* 10.0.2.2/32 is directly connected, enp0s3
B>* 10.1.2.0/24 [20/0] via 192.168.20.100, enp0s9, 00:34:16
C>* 127.0.0.0/8 is directly connected, lo
B>* 172.20.1.1/32 [20/0] via 192.168.10.101, enp0s8, 00:00:38
  *                      via 192.168.10.102, enp0s8, 00:00:38
B>* 172.20.1.2/32 [20/0] via 192.168.10.102, enp0s8, 00:00:38
  *                      via 192.168.10.101, enp0s8, 00:00:38
C>* 192.168.10.0/24 is directly connected, enp0s8
C>* 192.168.20.0/24 is directly connected, enp0s9


============ PC에서 다시 한번더 접속 확인

root@k8s-pc:~# curl -s --interface 192.168.20.100 $SVC1EXIP | egrep 'Hostname|RemoteAddr|Host:'
Hostname: webpod2
RemoteAddr: 192.168.20.100:37005
Host: 172.20.1.1
externalTrafficPolicy: Local 변경후에는 SNAT가 안되고 출발지 IP로 정상 통신되는것을 확인할수 있다.

해당 부분까지는 KANS 1기 Study에서 진행했었음
====================================
4. 특정 서비스에 원하는 IP Pool을 배포
4.1 IP Pool을 2개 설정한 ConfigMap으로 변경
cat <<EOF | kubectl replace --force -f -
apiVersion: v1
kind: ConfigMap
metadata:
  namespace: metallb-system
  name: config
data:
  config: |
    peers:
    - peer-address: 192.168.10.254
      peer-asn: 64513
      my-asn: 64512
    address-pools:
    - name: IPPool-A
      protocol: bgp
      avoid-buggy-ips: true
      addresses:
      - 172.20.1.0/24
    - name: IPPool-B
      protocol: bgp
      avoid-buggy-ips: true
      addresses:
      - 172.20.2.0/24
      auto-assign: false
EOF
4.2 서비스 배포
cat <<EOF | kubectl create -f -
apiVersion: v1
kind: Service
metadata:
  name: websvc1
spec:
  ports:
    - name: websvc1-webport
      port: 80
      targetPort: 80
  selector:
    app: webpod
  type: LoadBalancer
  externalTrafficPolicy: Local
---
apiVersion: v1
kind: Service
metadata:
  name: websvc2
  annotations:
    metallb.universe.tf/address-pool: IPPool-B
spec:
  ports:
    - name: websvc2-webport
      port: 80
      targetPort: 80
  selector:
    app: webpod
  type: LoadBalancer
  externalTrafficPolicy: Local
EOF
4.3 서비스 배포 확인
============  rtr에서 라우팅 테이블 확인
root@k8s-rtr:~# vtysh -c "show ip route"
Codes: K - kernel route, C - connected, S - static, R - RIP,
       O - OSPF, I - IS-IS, B - BGP, P - PIM, A - Babel, N - NHRP,
       > - selected route, * - FIB route

K * 0.0.0.0/0 via 10.0.2.2, enp0s3 inactive, src 10.0.2.15
C>* 10.0.2.0/24 is directly connected, enp0s3
K>* 10.0.2.2/32 is directly connected, enp0s3
B>* 10.1.2.0/24 [20/0] via 192.168.20.100, enp0s9, 00:45:21
C>* 127.0.0.0/8 is directly connected, lo
B>* 172.20.1.1/32 [20/0] via 192.168.10.101, enp0s8, 00:11:43
  *                      via 192.168.10.102, enp0s8, 00:11:43
B>* 172.20.1.2/32 [20/0] via 192.168.10.102, enp0s8, 00:11:43
  *                      via 192.168.10.101, enp0s8, 00:11:43
B>* 172.20.1.3/32 [20/0] via 192.168.10.102, enp0s8, 00:00:02
  *                      via 192.168.10.101, enp0s8, 00:00:02
B>* 172.20.2.1/32 [20/0] via 192.168.10.102, enp0s8, 00:00:02
  *                      via 192.168.10.101, enp0s8, 00:00:02
C>* 192.168.10.0/24 is directly connected, enp0s8
C>* 192.168.20.0/24 is directly connected, enp0s9

============  서비스 확인
(🍊 |Service-DNS-k8s:default) root@k8s-m:~# kubectl get service -o wide
NAME         TYPE           CLUSTER-IP       EXTERNAL-IP   PORT(S)        AGE   SELECTOR
kubernetes   ClusterIP      10.96.0.1        <none>        443/TCP        37m   <none>
svc1         LoadBalancer   10.110.174.90    172.20.1.1    80:30196/TCP   30m   app=webpod
svc2         LoadBalancer   10.104.134.200   172.20.1.2    80:30180/TCP   30m   app=webpod
websvc1      LoadBalancer   10.102.48.187    172.20.1.3    80:32723/TCP   39s   app=webpod
websvc2      LoadBalancer   10.105.33.36     172.20.2.1    80:30632/TCP   39s   app=webpod

============ Speaker Log 확인
(🍊 |Service-DNS-k8s:default) root@k8s-m:~# kubectl logs -n metallb-system speaker-dmk7w -c speaker -f
{"caller":"level.go:63","level":"info","msg":"triggering discovery","op":"memberDiscovery","ts":"2022-03-20T14:47:22.229331463Z"}
{"caller":"level.go:63","event":"updatedAdvertisements","ips":["172.20.1.3"],"level":"info","msg":"making advertisements using BGP","numAds":1,"pool":"IPPool-A","protocol":"bgp","service":"default/websvc1","ts":"2022-03-20T14:48:31.040313975Z"}
{"caller":"level.go:63","event":"serviceAnnounced","ips":["172.20.1.3"],"level":"info","msg":"service has IP, announcing","pool":"IPPool-A","protocol":"bgp","service":"default/websvc1","ts":"2022-03-20T14:48:31.040512675Z"}
{"caller":"level.go:63","event":"updatedAdvertisements","ips":["172.20.2.1"],"level":"info","msg":"making advertisements using BGP","numAds":1,"pool":"IPPool-B","protocol":"bgp","service":"default/websvc2","ts":"2022-03-20T14:48:31.085795955Z"}
{"caller":"level.go:63","event":"serviceAnnounced","ips":["172.20.2.1"],"level":"info","msg":"service has IP, announcing","pool":"IPPool-B","protocol":"bgp","service":"default/websvc2","ts":"2022-03-20T14:48:31.088709191Z"}

위에 테스트한바와 같이 IP Pool을 이용하여 자동할당이 가능한 네트웍 대역과 더 세심한 관리가 필요한 네트웍 대역을 구분해서 구성할수 있다.
5. 동일한 LB IP에 서로 다른 서비스 사용시
5.1 Pod 배포
cat <<EOF | kubectl create -f -
apiVersion: v1
kind: Pod
metadata:
  name: dnspod1
  labels:
    app: dns
spec:
  containers:
  - name: container
    image: traefik/whoami
  terminationGracePeriodSeconds: 0
---
apiVersion: v1
kind: Pod
metadata:
  name: dnspod2
  labels:
    app: dns
spec:
  containers:
  - name: container
    image: traefik/whoami
  terminationGracePeriodSeconds: 0
EOF
5.2 동일한 IP를 사용하는 서비스 2개 배포
cat <<EOF | kubectl create -f -
apiVersion: v1
kind: Service
metadata:
  name: dns-service-tcp-53
  namespace: default
  annotations:
    metallb.universe.tf/allow-shared-ip: "key-to-share-172.20.1.10"
spec:
  type: LoadBalancer
  loadBalancerIP: 172.20.1.10
  ports:
    - name: dnstcp
      protocol: TCP
      port: 53
      targetPort: 53
  selector:
    app: dns
---
apiVersion: v1
kind: Service
metadata:
  name: dns-service-udp
  namespace: default
  annotations:
    metallb.universe.tf/allow-shared-ip: "key-to-share-172.20.1.10"
spec:
  type: LoadBalancer
  loadBalancerIP: 172.20.1.10
  ports:
    - name: dnsudp
      protocol: UDP
      port: 53
      targetPort: 53
  selector:
    app: dns
EOF
5.3 서비스 배포 확인
============ 서비스 확인(동일한 External-IP에 서로다른 타입의 Port가 할당된 것을 확인할수 있습니다.)
(🍊 |Service-DNS-k8s:default) root@k8s-m:~# kubectl get service
NAME              TYPE           CLUSTER-IP       EXTERNAL-IP   PORT(S)        AGE
dns-service-tcp   LoadBalancer   10.108.131.184   172.20.1.10   53:32610/TCP   69s
dns-service-udp   LoadBalancer   10.97.137.122    172.20.1.10   53:32103/UDP   69s
5.4 TCP에 두개의 Port도 할당이 가능할까?
============ 서비스 추가 배포(TCP 63)
cat <<EOF | kubectl create -f -
apiVersion: v1
kind: Service
metadata:
  name: dns-service-tcp-63
  namespace: default
  annotations:
    metallb.universe.tf/allow-shared-ip: "key-to-share-172.20.1.10"
spec:
  type: LoadBalancer
  loadBalancerIP: 172.20.1.10
  ports:
    - name: dnstcp
      protocol: TCP
      port: 63
      targetPort: 63
  selector:
    app: dns
EOF

============ 동일한 IP에 여러개의 TCP Port를 Mapping도 가능합니다.
(🍊 |Service-DNS-k8s:default) root@k8s-m:~# kubectl get service
NAME                 TYPE           CLUSTER-IP       EXTERNAL-IP   PORT(S)        AGE
dns-service-tcp      LoadBalancer   10.108.131.184   172.20.1.10   53:32610/TCP   3m32s
dns-service-tcp-63   LoadBalancer   10.106.202.105   172.20.1.10   63:30285/TCP   3s
dns-service-udp      LoadBalancer   10.97.137.122    172.20.1.10   53:32103/UDP   3m32s
5.5 모든 서비스 및 POD 삭제
============ 서비스,Pod 삭제
kubectl delete pod,svc --all -n default

============ MetalLB 삭제
kubectl delete -f https://raw.githubusercontent.com/metallb/metallb/v0.12.1/manifests/metallb.yaml
kubectl delete -f https://raw.githubusercontent.com/metallb/metallb/v0.12.1/manifests/namespace.yaml
6. FRR을 활용한 Advanced Routing
주로 사용하는 네트워크 벤더장비는 BGP Keepalive interval은 60, Hold Time은 180초입니다. BGP interval을 조절하여 Failover 시간(Second)을 줄여줄수 있지만, BFD를 이용한다면 Interval보다 빠른 시간(Millisecond)의 Detection과 Failover가 가능합니다.
MetalLB 기본 모드에서는 BFD가 동작하지 않지만, MetalLB 0.12.0 버전부터 FRR Mode가 지원되며 FRR에서는 BFD가 동작합니다.
FRR이란?
Linux Foundation의 프로젝트로 FRRouting(FRR)은 Linux 및 Unix 플랫폼을 위한 무료 오픈 소스 인터넷 라우팅 프로토콜을 실행하기 위한 소프트웨어로 Qugga기반으로 만들어졌습니다. - 링크
Qugga에서 지원하지 않는 기능들을 주로 개선한 것으로 보이며, 아래와 같은 기능을 지원합니다.
- BGP, OSPF, RIP, IS-IS
- PIM, LDP
- BFD, Babel
- PBR, OpenFabric, VRRP, with alpha support for EIGRP and NHRP.
그 외에도 Bird와 같은 Routing Daemon 프로젝트가 있습니다. - 링크
Next Plan
- MetalLB FRR 구성 테스트(v0.12.1)
-- Manifest: 설치후 무한 Loop가 돌면서 아래와 같이 Controller와 Speak가 동작하지 않습니다. describe으로 확인해보면 Secret에 Memberlist가 없다고 나옵니다.
-- Github에서 Issues에는 해당 Image와 Tag가 잘못되었다고, Helm이나 수동으로 설치하는것을 Workaround 제시 - 링크

-- Helm: 현재 FRR으로 구성이 가능하지만, CM으로 설정하면 BGP가 정상동작이 안되는것으로 확인됨 - 링크
============ Helm 설치
curl -s https://raw.githubusercontent.com/helm/helm/master/scripts/get-helm-3 | bash >/dev/null 2>&1

============ MetalLB Repo 추가
helm repo add metallb https://metallb.github.io/metallb

============ MetalLB Repo 확인
helm repo list

============ MetalLB를 위한 Namespace 생성
kubectl apply -f https://raw.githubusercontent.com/metallb/metallb/v0.12.1/manifests/namespace.yaml

============ Namespace 확인
kubectl get namespace

============ FRR 설정을 위해 MetalLB Pull & 압축 해제
helm pull metallb/metallb
tar xf metallb-0.12.1.tgz

============ value.yaml에서 아래와 같이 변경하여 FRR 활성화
vi metallb/value.yaml
  namespace: "metallb-system"
  frr:
    enabled: true

============ MetalLB 설치
helm install metallb ./metallb -n metallb-system

============ MetalLB CM 적용
cat <<EOF | kubectl create -f -
apiVersion: v1
kind: ConfigMap
metadata:
  namespace: metallb-system
  name: config
data:
  config: |
    peers:
    - peer-address: 192.168.10.254
      peer-asn: 64513
      my-asn: 64512
      bfd-profile: full1
    address-pools:
    - name: default
      protocol: bgp
      avoid-buggy-ips: true
      addresses:
      - 172.20.1.0/24
    bfd-profiles:
    - name: full1
      receive-interval: 300
      transmit-interval: 300
      passive-mode: false
      minimum-ttl: 254
EOF- MetalLB Operator 설치 및 동작 - 링크
-- Config를 Profile을 활용하여, 더 Simple하게 관리할수 있도록 구성되어 있음
-- AddressPool Validation으로 기존에 정의된 IP Range를 거부하여 문제를 피할수 있음