
🤔 리팩토링을 결심하게 된 이유
개발 중인 서비스 코드당은 client page와 admin page로 나누어져 있습니다. admin page에서는 online judge에 필요한 problem과 contest를 관리합니다.
그 중, react-hook-form의 useForm을 사용하여 폼의 제출을 관리하는 페이지는 다음과 같습니다.
- create problem
- edit problem
- create contest
- edit contest
...
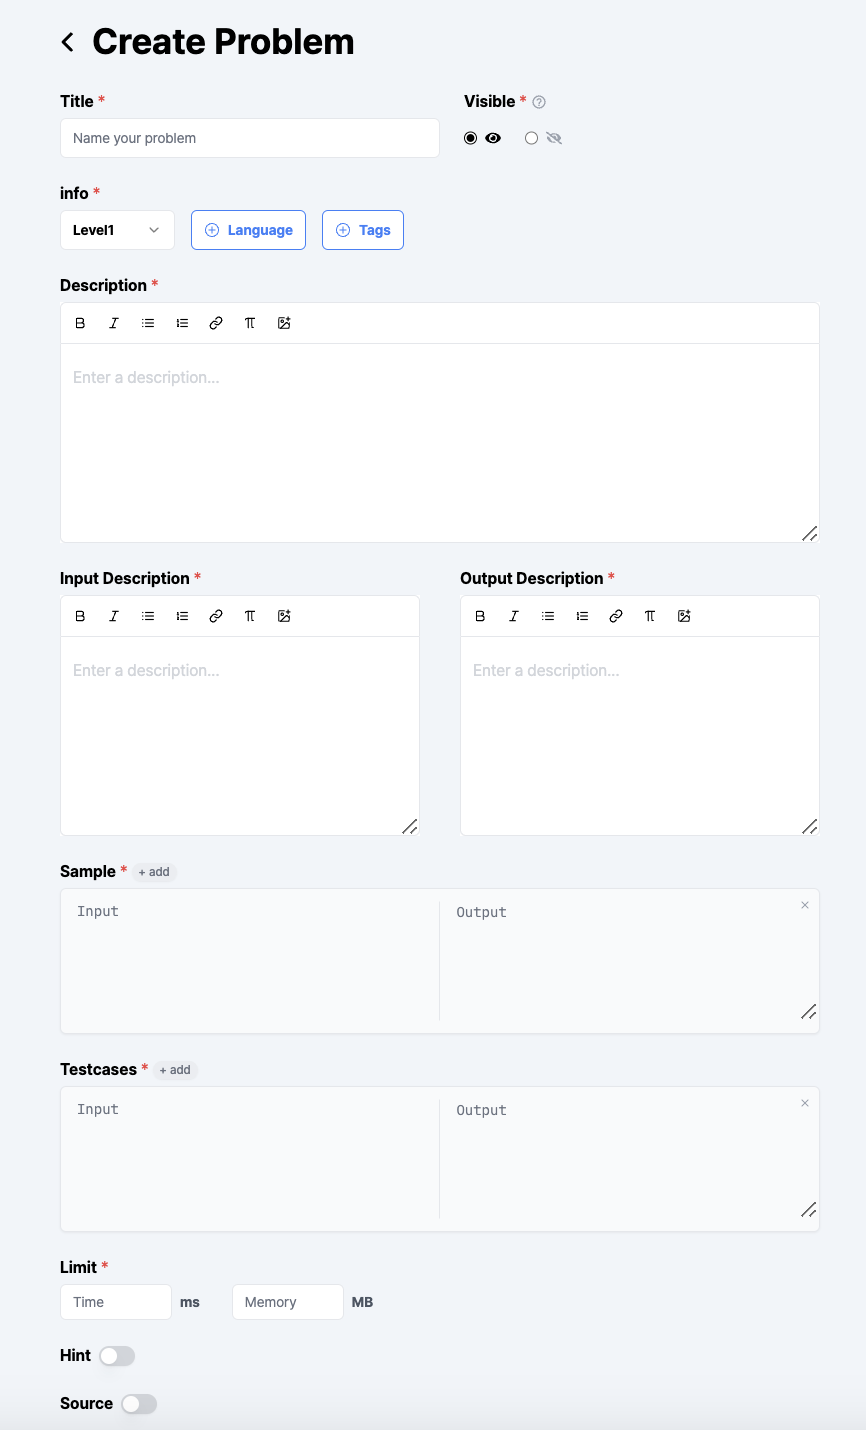
그 중 create problem page는 다음과 같이 구성되어 있습니다.
또한 edit problem page는 다음과 같습니다

각 페이지마다 여러 개의 폼이 있는 것을 확인하셨나요? title은 input으로, visible은 toggle로, info는 dropdown으로, description은 tiptap으로... 각기 다른 form 형식으로 관리되고 있습니다.
그리고, 각각의 유사한 컴포넌트가 두 페이지에 중복되어 사용되고 있습니다. 그러나 이전 코드에서는 컴포넌트화가 이루어지지 않고, 각 페이지마다 필요한 form을 하나하나 직접 사용했습니다.
기획 명세가 바뀌고, gql에 수정 사항이 생길 때마다 유지/보수 및 업데이트에 어려움을 겪었습니다.
1. 코드가 너무 길다.
- 한 페이지 당 약 600줄이 넘는 코드였습니다. 긴 코드는 가독성을 떨어뜨립니다. 따라서 수정 시에 타겟팅하는 코드를 찾는 것이 힘들었습니다.
2. 같은 코드가 많이 반복된다.
- 이 또한 가독성을 떨어뜨리며, 하나의 수정 사항이 생기면 여러 코드를 동시에 수정해야 했습니다.
리팩토링 전 코드
...
<div className="flex gap-6">
<div className="flex flex-col gap-1">
<Label>Title</Label>
<Input
id="title"
type="text"
placeholder="Name your problem"
className={cn(inputStyle, 'w-[380px]')}
{...register('title')}
/>
{errors.title && (
<div className="flex items-center gap-1 text-xs text-red-500">
<PiWarningBold />
{getValues('title').length === 0
? 'required'
: errors.title.message}
</div>
)}
</div>
<div className="flex flex-col gap-4">
<div className="flex items-center gap-2">
<Label>Visible</Label>
<Popover>
<PopoverTrigger asChild>
<button>
<MdHelpOutline className="text-gray-400 hover:text-gray-700" />
</button>
</PopoverTrigger>
<PopoverContent side="top" className="mb-2 px-4 py-3">
<ul className="text-sm font-normal leading-none">
<li>For contest, 'hidden' is recommended.</li>
<li>You can edit these settings later.</li>
</ul>
</PopoverContent>
</Popover>
</div>
<div className="flex items-center gap-2">
<Controller
control={control}
name="isVisible"
render={({ field: { onChange, value } }) => (
<div className="flex gap-6">
<label className="flex gap-2">
<input
type="radio"
onChange={() => onChange(true)}
checked={value}
className="accent-black"
/>
<FaEye
className={
value === true ? 'text-black' : 'text-gray-400'
}
/>
</label>
<label className="flex gap-2">
<input
type="radio"
onChange={() => onChange(false)}
checked={value === false}
className="accent-black"
/>
<FaEyeSlash
className={
value === false ? 'text-black' : 'text-gray-400'
}
/>
</label>
</div>
)}
/>
... create problem page 코드의 일부분입니다. 또한 아래는 edit problem page 코드의 일부분입니다.
<div className="flex gap-6">
<div className="flex flex-col gap-1">
<Label>Title</Label>
<Input
id="title"
type="text"
placeholder="Name your problem"
className={cn(inputStyle, 'w-[380px]')}
{...register('title')}
/>
{errors.title && (
<div className="flex items-center gap-1 text-xs text-red-500">
<PiWarningBold />
{getValues('title')?.length === 0
? 'required'
: errors.title.message?.toString()}
</div>
)}
</div>
<div className="flex flex-col gap-4">
<div className="flex items-center gap-2">
<Label>Visible</Label>
<Popover>
<PopoverTrigger asChild>
<button>
<MdHelpOutline className="text-gray-400 hover:text-gray-700" />
</button>
</PopoverTrigger>
<PopoverContent side="top" className="mb-2 px-4 py-3">
<ul className="text-sm font-normal leading-none">
<li>For contest, 'hidden' is recommended.</li>
<li>You can edit these settings later.</li>
</ul>
</PopoverContent>
</Popover>
</div>
<div className="flex items-center gap-2">
<Controller
control={control}
name="isVisible"
render={({ field: { onChange, onBlur, value } }) => (
<div className="flex gap-6">
<label className="flex gap-2">
<input
type="radio"
onBlur={onBlur}
onChange={() => onChange(true)}
checked={value === true}
className="accent-black"
/>
<FaEye
className={
value === true ? 'text-black' : 'text-gray-400'
}
/>
</label>
<label className="flex gap-2">
<input
type="radio"
onBlur={onBlur}
onChange={() => onChange(false)}
checked={value === false}
className="accent-black"
/>
<FaEyeSlash
className={
value === false ? 'text-black' : 'text-gray-400'
}
/>
</label>
</div>
)}
/>
</div>
{errors.isVisible && (
<div className="flex items-center gap-1 text-xs text-red-500">
<PiWarningBold />
required
</div>
)}
</div>
</div> 위 코드들의 문제점을 간단히 살펴보자면 ...
1. 같은 form 형식이 create와 edit에서 동일하게 쓰입니다.
2. 같은 error message가 여러번 등장합니다.
3. 가독성이 좋지 않습니다. 어디서부터 form section이 시작인지 알기 힘듭니다.
😊 리팩토링!
각 페이지의 600줄의 코드를 -> 150줄의 코드로
export default function Page() {
  const { data: tagsData } = useQuery(GET_TAGS)
  const tags =
    tagsData?.getTags.map(({ id, name }) => ({ id: Number(id), name })) ?? []

  const [isCreating, setIsCreating] = useState(false)

  const router = useRouter()

  const methods = useForm<CreateProblemInput>({
    resolver: zodResolver(createSchema),
    defaultValues: {
      difficulty: Level.Level1,
      tagIds: [],
      samples: [{ input: '', output: '' }],
      testcases: [{ input: '', output: '' }],
      hint: '',
      source: '',
      template: [],
      isVisible: true
    }
  })

  const { handleSubmit, setValue, getValues } = methods

  const [createProblem, { error }] = useMutation(CREATE_PROBLEM)
  const onSubmit = async (input: CreateProblemInput) => {
    setIsCreating(true)
    await createProblem({
      variables: {
        groupId: 1,
        input
      }
    })
    if (error) {
      toast.error('Failed to create problem')
      setIsCreating(false)
      return
    }
    toast.success('Problem created successfully')
    router.push('/admin/problem')
    router.refresh()
  }

  const addExample = (type: 'samples' | 'testcases') => {
    setValue(type, [...getValues(type), { input: '', output: '' }])
  }

  return (
    <ScrollArea className="shrink-0">
      <main className="flex flex-col gap-6 px-20 py-16">
        <div className="flex items-center gap-4">
          <Link href="/admin/problem">
            <FaAngleLeft className="h-12 hover:text-gray-700/80" />
          </Link>
          <span className="text-4xl font-bold">Create Problem</span>
        </div>

        <form
          onSubmit={handleSubmit(onSubmit)}
          className="flex w-[760px] flex-col gap-6"
        >
          <FormProvider {...methods}>
            <div className="flex gap-6">
              <FormSection title="Title">
                <TitleForm placeholder="Name your problem" />
              </FormSection>

              <FormSection title="Visible">
                <PopoverVisibleInfo />
                <VisibleForm />
              </FormSection>
            </div>

            <FormSection title="info">
              <InfoForm tags={tags} tagName="tagIds" />
            </FormSection>

            <FormSection title="Description">
              <DescriptionForm name="description" />
            </FormSection>

            <div className="flex justify-between">
              <div className="w-[360px]">
                <FormSection title="Input Description">
                  <DescriptionForm name="inputDescription" />
                </FormSection>
              </div>
              <div className="w-[360px]">
                <FormSection title="Output Description">
                  <DescriptionForm name="outputDescription" />
                </FormSection>
              </div>
            </div>

            <FormSection title="Sample">
              <AddBadge onClick={() => addExample('samples')} />
              <AddableForm<Sample>
                type="samples"
                fieldName="samples"
                minimumRequired={1}
              />
            </FormSection>

            <FormSection title="Testcases">
              <AddBadge onClick={() => addExample('testcases')} />
              <AddableForm<Testcase>
                type="testcases"
                fieldName="testcases"
                minimumRequired={1}
              />
            </FormSection>

            <FormSection title="Limit">
              <LimitForm />
            </FormSection>

            <SwitchField name="hint" title="Hint" placeholder="Enter a hint" />
            <SwitchField
              name="source"
              title="Source"
              placeholder="Enter a source"
            />

            <TemplateField />

            <Button
              type="submit"
              className="flex h-[36px] w-[100px] items-center gap-2 px-0"
              disabled={isCreating}
            >
              <IoMdCheckmarkCircleOutline fontSize={20} />
              <div className="mb-[2px] text-base">Create</div>
            </Button>
          </FormProvider>
        </form>
      </main>
      <ScrollBar orientation="horizontal" />
    </ScrollArea>
  )
}
react-hook-form의 useForm의 FormProvider를 사용하였습니다. FormProvider와 useFormContext를 이용하면 useForm에서 사용되는 method들을 props drilling 없이 자식 컴포넌트에서 사용할 수 있습니다.
각 form들은 모두 제목-(badge)-content 형태로 이루어져 있습니다. 따라서 FormSection으로 감싸주었습니다.
export default function FormSection({
  children,
  title,
  isLabled = true
}: {
  children: React.ReactNode | React.ReactNode[]
  title: string
  isLabled?: boolean
}) {
  const isChildrenArray = Array.isArray(children)
  const [badge, content] = isChildrenArray ? children : [null, children]

  return (
    <div className="flex flex-col gap-1">
      <div className="flex items-center gap-1">
        <span className="font-bold">{title}</span>
        {isLabled && <span className="text-red-500">*</span>}
        {badge}
      </div>
      {content}
    </div>
  )
}
form들은 크게 register가 바로 가능한 form과 control을 사용해야 하는 form으로 나뉩니다.
Register가 바로 가능한 form 중 titleForm입니다.
export default function TitleForm({ placeholder }: { placeholder: string }) {
  const {
    register,
    formState: { errors }
  } = useFormContext()
  return (
    <>
      <Input
        id="title"
        type="text"
        placeholder={placeholder}
        className={cn(inputStyle, 'w-[380px]')}
        {...register('title', {
          required: true
        })}
      />
      {errors.title &&
        (errors.title?.type === 'required' ? (
          <ErrorMessage />
        ) : (
          <ErrorMessage message={errors.title.message?.toString()} />
        ))}
    </>
  )
}useFormContext를 통해 props drilling없이 register와 formState를 가져옵니다. 또한 중복되어 사용되는 에러 메시지 또한 ErrorMessage 컴포넌트로 분리하였습니다.
UI Component library, Custom UI 등에서 사용되는 form은 직접 register가 불가능하며 controller를 사용해야 합니다. 이 또한 react-hook-form의 useController를 사용하여 props drilling 없이 부모 컴포넌트의 컨트롤러를 사용 가능합니다.
저희는 description Form을 tiptap을 이용하여 구현하였습니다. 직접 만든 TextEditor이므로 controller로 form을 감지합니다.
DescriptionForm.tsx는 다음과 같습니다
export default function DescriptionForm({ name }: { name: string }) {
  const {
    control,
    formState: { errors }
  } = useFormContext()

  const { field } = useController({
    name,
    control
  })

  return (
    <div className="flex flex-col gap-1">
      <TextEditor
        placeholder="Enter a description..."
        onChange={field.onChange}
        defaultValue={field.value as string}
      />
      {errors[name] && <ErrorMessage />}
    </div>
  )
}
😀 마치며
form들을 컴포넌트화하는 리팩토링 이후 코드가 확실히 가벼워졌음을 체감하였습니다. 또한 자잘한 오류 사항이나 수정 사항이 생겼을 때도 각 컴포넌트만 수정하면 되므로 일관성을 유지하면서도 유지보수가 훨씬 쉬워졌습니다. 이렇게 컴포넌트 기반으로 개발하면 코드의 재사용성이 높아집니다.
무엇보다 협업 시에 효율적으로 작업을 분담하고, 코드를 이해하기 쉬워졌습니다!
해당 포스트에서 소개하지는 못했지만, 저희의 admin page에서는 Apollo GraphQL과 zod schema를 사용하고 있습니다. zod schema 또한 리팩토링하여 굉장히 유용하게 사용하는 중인데요, 다음 포스트에서 알아보도록 하겠습니다!
