☕️ 공식문서
이제 모든 세팅과정을 마치고 본격적으로 FCM 메시지를 받는 것을 해보려고 한다.
메시징 사용
FCM의 메시지는 물리적인 안드로이드/iOS 디바이스와 안드로이드 에뮬레이터에서만 받을 수 있다. (iOS 시뮬레이터는 APNs를 거쳐야하기 때문에 메시지를 받지 못한다.)
기본적으로 메시지는 데이터의 payload이며, 다음 세가지의 경우를 사용할 수 있다.
1. 알림 보여주기
2. AsyncStorage를 사용해 메시지 데이터를 디바이스에 연동하기
3. 앱의 UI를 업데이트하기
디바이스의 상태
FCM 메시지를 받을 때 가장 중요한 것은 디바이스의 상태이다.
디바이스의 상태에 따라 들어오는 메시지는 다르게 다뤄진다.
이를 위해 디바이스의 상태에 대해서 다루고자 한다.
Foreground: 앱이 열려있고, 화면을 차지하고 있다.Background:- 앱은 열려있지만, 뒷단에서 동작하고 있다.
- 보통 사용자가 홈버튼을 누르거나 멀티태스킹으로 넘어갔을 때를 말한다.
Quit:- 디바이스가 잠금상태이거나 앱이 활성화가 되어있지 않을 때
- 멀티태스킹 모드에서 앱을 날려서 앱을 닫은 경우이다.
메시지를 받기 위해서는 사용자가 앱을 꼭 열어야 한다.
Message Handlers
디바이스의 상태에 따라 다른 메시지 핸들러를 사용하게 된다.

- 만약 메시지의 종류가
data-only이며 디바이스가 "background" 또는 "quit" 상태일 때, 안드로이드와 iOS는 메시지를 낮은 우선순위로 분류하고 이를 무시한다.- 그러나
priority=high(for android) 또는content-available=true(for iOS) 로 설정하면, 우선순위를 높일 수 있다. - iOS의 경우
data-only메시지와 디바이스가 "background" 또는 "quit" 상태일 때,setBackgroundMessageHandler가 등록될 때까지 메시지를 연기시킨다.
- 그러나
Notifications
디바이스의 상태와 메시지 내용에 따라 알림을 보여줄지 말지를 결정한다.
여기서 "Foreground"일 때 의외로 알림을 보여주지 않는데, 이미 화면이 켜져있기 때문인 것으로 보인다.

Foreground state messages
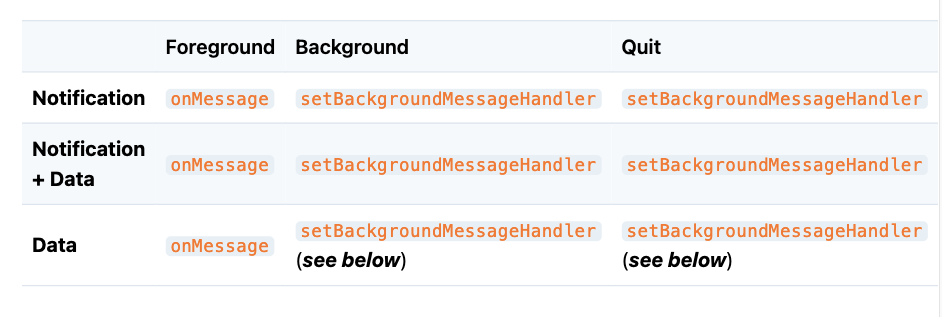
"Foreground" 상태에서 메시지를 받기 위해서는 onMessage 메소드를 사용한다.
import React, { useEffect } from 'react';
import { Alert } from 'react-native';
import messaging from '@react-native-firebase/messaging';

function App() {
  useEffect(() => {
    const unsubscribe = messaging().onMessage(async remoteMessage => {
      Alert.alert('A new FCM message arrived!', JSON.stringify(remoteMessage));
    });

    return unsubscribe;
  }, []);
}-
onMessage메소드는unsubscribe으로 저장되며, App 컴포넌트가 마운트될 때 생성된다. -
또한, React의 state을 변경하거나 UI를 변경할 수 있다.
-
remoteMessage는 FCM으로부터 온 모든 정보를 담고 있다.data: any custom datanotification: Notification 인터페이스
-
"Foreground" 상태일 때는
RemoteMessage가notification특성을 가지고 있다고 하더라도 알림을 띄우지 않는다.- 대신에 "local notification"을 쓰면 가능하다.
Background & Quit state messages
"Background" 또는 "Quit" 상태일 때는 메시지가 와도 onMessage 핸들러가 동작하지 않는다.
대신에 백그라운드 콜백 핸들러인 setBackgroundMessageHandler 메소드를 정의한다.
백그라운드 핸들러를 정의하기 위해서는, setBackgroundMessageHandler 메소드를 최대한 빨리 불러야 한다.
// index.js
import { AppRegistry } from 'react-native';
import messaging from '@react-native-firebase/messaging';
import App from './App';

// Register background handler
messaging().setBackgroundMessageHandler(async remoteMessage => {
  console.log('Message handled in the background!', remoteMessage);
});

AppRegistry.registerComponent('app', () => App);index.js에서 정의한다.- 따라서, React state을 변경할 수 없다.
- 대신 네트워크 요청이나 local storage는 업데이트 가능하다.
Data-only messages
만약 RemoteMessage에 notification 특성이 없는 data-only 메시지일 경우에는, 안드로이드와 iOS 모두 가장 낮은 우선순위를 부여한다.
이는 앱을 깨우는 것을 방지하기 위함이다.
data-only 메시지가 백그라운드 핸들러를 작동시키기 위해서는, priority=high (for android) 또는 content-available=true (for iOS)를 포함하여 메시지를 보낸다.
admin.messaging().sendToDevice(
  [], // device fcm tokens...
  {
    data: {
      owner: JSON.stringify(owner),
      user: JSON.stringify(user),
      picture: JSON.stringify(picture),
    },
  },
  {
    // Required for background/quit data-only messages on iOS
    contentAvailable: true,
    // Required for background/quit data-only messages on Android
    priority: 'high',
  },
);
위는 Node.js 기반의 firebase-admin 인 경우의 예제이다.
(이거는 메시지를 보내는 쪽에서 설정되어야 한다.)
iOS 디바이스의 data-only 메시지의 경우, 올바른 APNs headers를 추가해주어야 한다.
admin.messaging().send({
  data: {
    //some data
  },
  apns: {
    payload: {
      aps: {
        contentAvailable: true,
      },
    },
    headers: {
      'apns-push-type': 'background',
      'apns-priority': '5',
      'apns-topic': '', // your app bundle identifier
    },
  },
  //must include token, topic, or condition
  //token: //device token
  //topic: //notification topic
  //condition: //notification condition
});
Background Application State
안드로이드와 iOS는 서로 백그라운드 상태를 관리하는 방식에 차이가 있다.
안드로이드
안드로이드는 Headless JS 테스크가 만들어진다.
이는 React 컴포넌트와는 별개로 동작하며, 루트 컴포넌트없이 백그라운드 핸들러 코드가 동작하도록 한다.
iOS
반대로 iOS는 메시지를 받으면 조용하게 앱을 백그라운드 상태로 실행시킨다.
이때 백그라운드 핸들러 setBackgroundMessageHandler 메소드가 작동하며 React 컴포넌트도 마운트시킨다.
때문에 어떤 경우에는(useEffect, analytics) 등이 함께 동작하며 문제가 될 수도 있다.
이러한 문제는 AppDelegate.m을 수정하면서 해결할 수 있다.
백그라운드 상태에서 앱이 실행되면 render null 하도록 하는 것이다.
// index.js
import { AppRegistry } from 'react-native';
import messaging from '@react-native-firebase/messaging';

messaging().setBackgroundMessageHandler(async remoteMessage => {
  console.log('Message handled in the background!', remoteMessage);
});

function HeadlessCheck({ isHeadless }) {
  if (isHeadless) {
    return null;
  }

  return <App />;
}

function App() {
  ...
}

AppRegistry.registerComponent('app', () => HeadlessCheck);- App 컴포넌트를 HeadlessCheck 컴포넌트 안에 포함시키고, HeadlessCheck 컴포넌트를 루트 컴포넌트로 등록시킨다.
//AppDelegate.m 최상단에 추가한다.
#import "RNFBMessagingModule.h"

// "(BOOL)application:(UIApplication *)application didFinishLaunchingWithOptions:(NSDictionary *)launchOptions" 메소드에 아래 코드를 추가한다.
//addCustomPropsToUserProps를 앱이 초기화될 때 props로 전달한다.
//또는 nil을 전달한다.
//withLaunchOptions에는 launchOptions 객체를 전달한다.

NSDictionary *appProperties = [RNFBMessagingModule addCustomPropsToUserProps:nil withLaunchOptions:launchOptions];

// RCTRootView 객체를 찾아서  initialProperties를  appProperties로 업데이트한다.
RCTRootView *rootView = [[RCTRootView alloc] initWithBridge:bridge
                                             moduleName:@"앱의 이름"
                                             initialProperties:appProperties];
만약 react-native-navigation을 사용하거나 lanuchProperties를 건드리고 싶지 않다면, getIsHeadless 메소드를 사용한다.
messaging()
  .getIsHeadless()
  .then(isHeadless => {
    // do sth with isHeadless
  });
안드로이드에서는 isHeadless prop이 존재하지 않는다.
다음 포스팅에서는 React Native 앱으로 FCM을 보내는 과정을 다뤄볼 것이다.
👉 [FCM: 5편]메시지 보내기
