Redux
1. Redux필요성
- useState의 불편함(Local state) : 리덕스를 이용하면 State를 공유하고자 할 때 부-모 관계가 아니어도 되고, 중간에 의미없이 컴포넌트를 거치지 않아도 됨.
- 중앙 State관리소에서 State를 생성하고(Global state, 만약 어떤 컴포넌트에서 State가 필요하다면 컴포넌트가 어디에 위치하고 있든 상관없이 State를 불러와서 사용할 수 있음. => 전역 상태 관리
=> 리덕스!! "중앙 state 관리소"를 사용할 수 있께 도와주는 패키지(라이브러리)
2. Redux-설정
(1) 설치
yarn add redux react-redux

아래와 같은 의미
yarn add redux
yarn add react-redux
(2)폴더 구조 생성하기
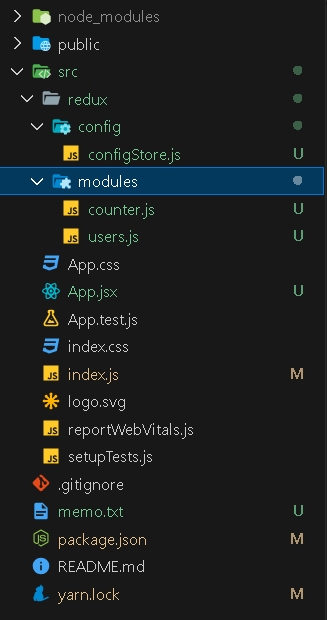
redux : 리덕스와 관련된 코드를 모두 모아 놓을 폴더
config : 리덕스 설정과 관련된 파일들을 놓을 폴더
configStore : “중앙 state 관리소" 인 Store를 만드는 설정 코드들이 있는 파일
modules : 우리가 만들 State들의 그룹이라고 생각. 예를 들어 투두리스트를 만든다고 한다면, 투두리스트에 필요한 state들이 모두 모여있을 todos.js를 생성하게 될텐데 이 todos.js 파일이 곧 하나의 모듈이 됨
(3)설정 코드 작성
- src/configStore.js
import { createStore } from "redux";
import { combineReducers } from "redux";

/*
1. createStore()
리덕스의 가장 핵심이 되는 스토어를 만드는 메소드(함수).
리덕스는 단일 스토어로 모든 상태 트리를 관리
리덕스를 사용할 시 creatorStore를 호출할 일은 한 번밖에 없음.
*/

/*
2. combineReducers()
리덕스는 action —> dispatch —> reducer 순으로 동작.
이때 애플리케이션이 복잡해지게 되면 reducer 부분을 여러 개로 나눠야 하는 경우가 발생.
combineReducers은 여러 개의 독립적인 reducer의 반환 값을 하나의 상태 객체로 만들어 줌.
*/

const rootReducer = combineReducers({});
const store = createStore(rootReducer);

export default store; - index.js
// 원래부터 있던 코드
import React from "react";
import ReactDOM from "react-dom/client";
import App from "./App";
import reportWebVitals from "./reportWebVitals";

// 추가할 코드
import store from "./redux/config/configStore";
import { Provider } from "react-redux";

const root = ReactDOM.createRoot(document.getElementById("root"));
root.render(

	//App을 Provider로 감싸주고, configStore에서 export default 한 store를 넣어줌.
  <Provider store={store}>
    <App />
  </Provider>
);

// If you want to start measuring performance in your app, pass a function
// to log results (for example: reportWebVitals(console.log))
// or send to an analytics endpoint. Learn more: https://bit.ly/CRA-vitals
reportWebVitals();
3. Redux-카운터 프로그램만들기
(1)모듈 만들기
- modules 폴더에 counter.js파일 생성
// src/redux/modules/counter.js

// 초기 상태값
const initialState = {
  number: 0,
};

// 리듀서
const counter = (state = initialState, action) => {
  switch (action.type) {
    default:
      return state;
  }
};

// 모듈파일에서는 리듀서를 export default 함.
export default counter;
(2)모듈의 구성요소
- Reducer === 변화를 일으키는 함수 함수다!!!
// src/redux/modules/counter.js


// counter 리듀서
const counter = (state = initialState, action) => {
  switch (action.type) {
    default:
      return state;
  }
};

export default counter; // 여기
state에 initialState를 할당해줘야함!
- configStore.js에 코드추가
// src/redux/config/configStore.js


// 원래 있던 코드
import { createStore } from "redux";
import { combineReducers } from "redux";

// 새롭게 추가한 부분
import counter from "../modules/counter";

const rootReducer = combineReducers({
  counter: counter, // <-- 새롭게 추가한 부분
});
const store = createStore(rootReducer);

export default store;
=> 스토어와 모듈이 연결됨!
(3)스토어와 모듈 연결 확인하기
- useSelector = 스토어 조회
// 1. store에서 꺼낸 값을 할당 할 변수를 선언
const number =

// 2. useSelector()를 변수에 할당해줌
const number = useSelector()

// 3. useSelector의 인자에 화살표 함수를 넣어줌
const number = useSelector( ()=>{} )

// 4. 화살표 함수의 인자에서 값을 꺼내 return 함
// useSelector를 처음 사용해보는 것이니, state가 어떤 것인지 콘솔로 확인해보기
const number = useSelector((state) => {
	console.log(state)
	return state
});- app.js 기존에 있던 코드 지우고, 아래코드 입력
// src/App.js

import React from "react";
import { useSelector } from "react-redux"; // import 해주세요.

const App = () => {
  const counterStore = useSelector((state) => state); // 추가해주세요.
  console.log(counterStore); // 스토어를 조회해볼까요?

  return <div></div>;
}

export default App;
=> 화살표함수에서 꺼낸 state라는 인자는 현재 프로젝트에 존재하는 모든 리덕스 모듈의 state!
=> 만약 컴포넌트에서 number라는 값을 사용하고자 한다면
const number = useSelector(state => state.counter.number); // 0(4) counter.js 모듈의 state 수정 기능 만들기(+1 기능 구현)
- 리듀서에게 보낼 "명령" 만들기(리덕스에서는 그 명령을 Action이라 함)
행동을 코드로 나타내면 객체로 만듦! (액션객체)
액션 객체는 반드시 type이라는 key를 가짐. => 우리가 이 액션 객체를 리듀서에게 보냈을 때 리듀서는 객체 안에서 type이라는 key를 보기 때문.
// 예시 코드
//number에 +1 을 하는 액션 객체

{ type : "PLUS_ONE" };
=> 리더스 모듈에 있는 state를 변경하기 위해서는 그에 해당하는 액션 객체 모두를 만들어줘야 함.
- "명령"(액션 객체)보내기
액션객체를 리듀서로 보내기 위해서는useDispatch사용
useDispatch를 사용하기 위해 컴포넌트 안에 변수 생성
// src/App.js


import React from "react";
import { useDispatch } from "react-redux"; // import 해주세요.

const App = () => {
  const dispatch = useDispatch(); // dispatch 생성
  return (
    <div>
      <button>+ 1</button> {/* 버튼을 하나 추가해주세요. */}
    </div>
  );
};

export default App;
그리고 dispatch를 사용할 때 ()안에 액션객체를 넣어주면 됨.
// src/App.js

import React from "react";
import { useDispatch } from "react-redux"; // import 해주기!

const App = () => {
  const dispatch = useDispatch(); // dispatch 생성
  return (
    <div>
      <button
				// 이벤트 핸들러 추가
        onClick={() => {
					// 마우스를 클릭했을 때 dispatch가 실행되고, ()안에 있는 액션객체가 리듀서로 전달됨.
          dispatch({ type: "PLUS_ONE" });
        }}
      >
				+ 1
      </button>
    </div>
  );
};

export default App;- 액션객체받기(dispatch를 통해서 보낸 액션객체가 리듀서로 잘 들어가는지 확인!)
counter.js
// src/redux/modules/counter.js

// 초기 상태값
const initialState = {
  number: 0,
};

// 리듀서
const counter = (state = initialState, action) => {
	console.log(action); // 여기에 console.log(action) 추가
  switch (action.type) {
    default:
      return state;
  }
};

// 모듈파일에서는 리듀서를 export default
export default counter;- 액션객체 명령대로 리듀서가 state값을 변경하는 코드 구현
리듀서가 액션객체를 받아 상태를 바꾸는 원리
=> 1. 컴포넌트로부터 dispatch를 통해 액션객체를 전달받음
=> 2. action 안에 있는 type을 스위치문을 통해 하나씩 검사해서, 일치하는 case를 찾음.
=> 3. type과 case가 일치하는 경우에, 해당 코드가 실행되고 새로운 state를 반환(return).
=> 4. 리듀서가 새로운 state를 반환하면, 그게 새로운 모듈의 state가 됨.
// src/modules/counter.js

// 초기 상태값
const initialState = {
  number: 0,
};

// 리듀서
const counter = (state = initialState, action) => {
  console.log(action);
  switch (action.type) {
		// PLUS_ONE이라는 case를 추가.
		// 여기서 말하는 case란, action.type을 의미.
		// dispatch로부터 전달받은 action의 type이 "PLUS_ONE" 일 때
		// 아래 return 절이 실행.
    case "PLUS_ONE":
      return {
				// 기존 state에 있던 number에 +1을 더함.
        number: state.number + 1,
      };

    default:
      return state;
  }
};

// 모듈파일에서는 리듀서를 export default
export default counter;- useSelector로 변경된 state값 확인하기
// src/App.js

import React from "react";
import { useDispatch, useSelector } from "react-redux";

const App = () => {
  const dispatch = useDispatch();

	// 👇 코드 추가
  const number = useSelector((state) => state.counter.number);

  console.log(number); // 콘솔 추가
  return (
    <div>
			{/* 👇 코드 추가 */}
      {number}
      <button
        onClick={() => {
          dispatch({ type: "PLUS_ONE" });
        }}
      >
        + 1
      </button>
    </div>
  );
};

export default App;
코린이 탈출을 기원하는 코린이
:)