Notion MCP를 사용해보고 내 실생활에 도움이 될지 고민해보기.
1. 레퍼런스
1-1. 출처: Notion API MCP
https://github.com/makenotion/notion-mcp-server
- 추가 - todolist 를 더 잘 만들어주는 server
1-2. 참고 URL
- Notion API Guide: https://developers.notion.com/docs/getting-started
- Postman Workspace: https://www.postman.com/notionhq/notion-s-api-workspace/overview
2. 선행지식
2-1. Notion API 인증 토큰
-
Notion API 를 통해 페이지, 데이터베이스를 편집할 수 있음
- 삭제 API 는 제공하지 않는 것으로 보인다.
-
고유 토큰을 사용하여 authentication 을 한다. → Developer Portal 에서 생성 가능.
-
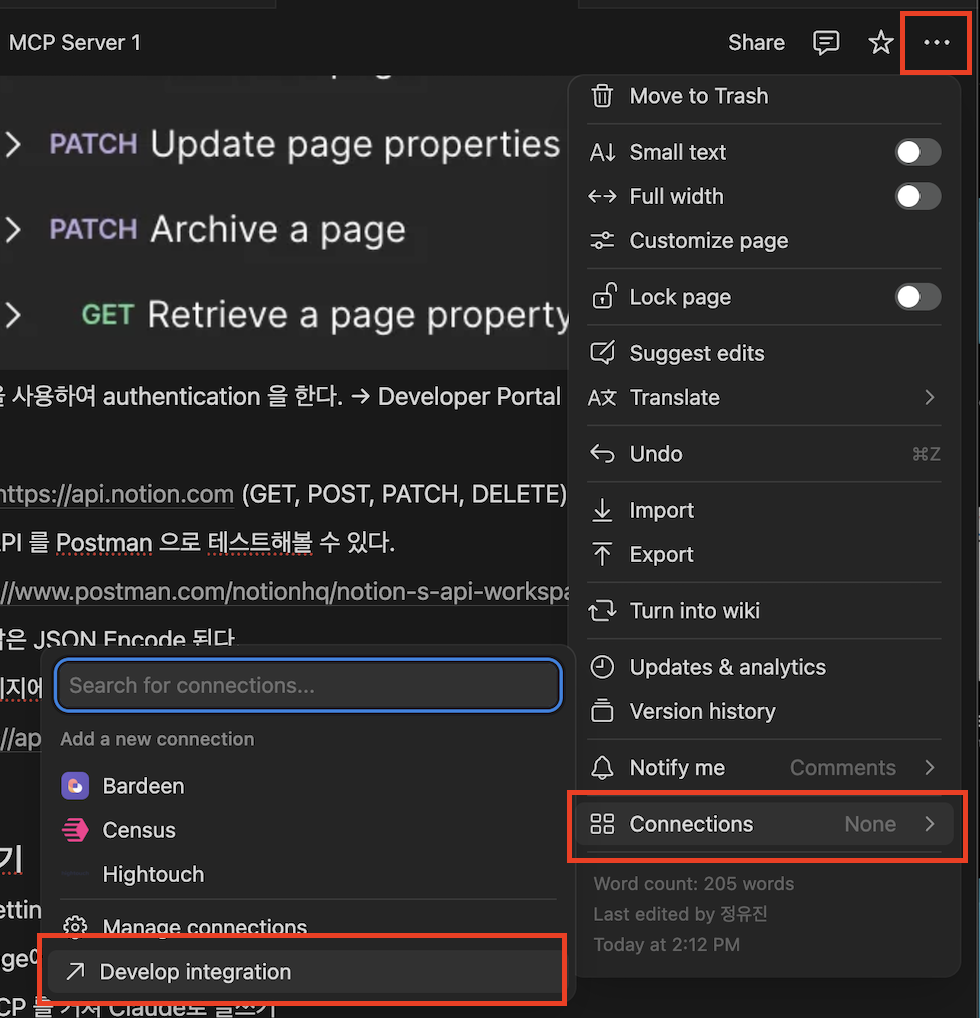
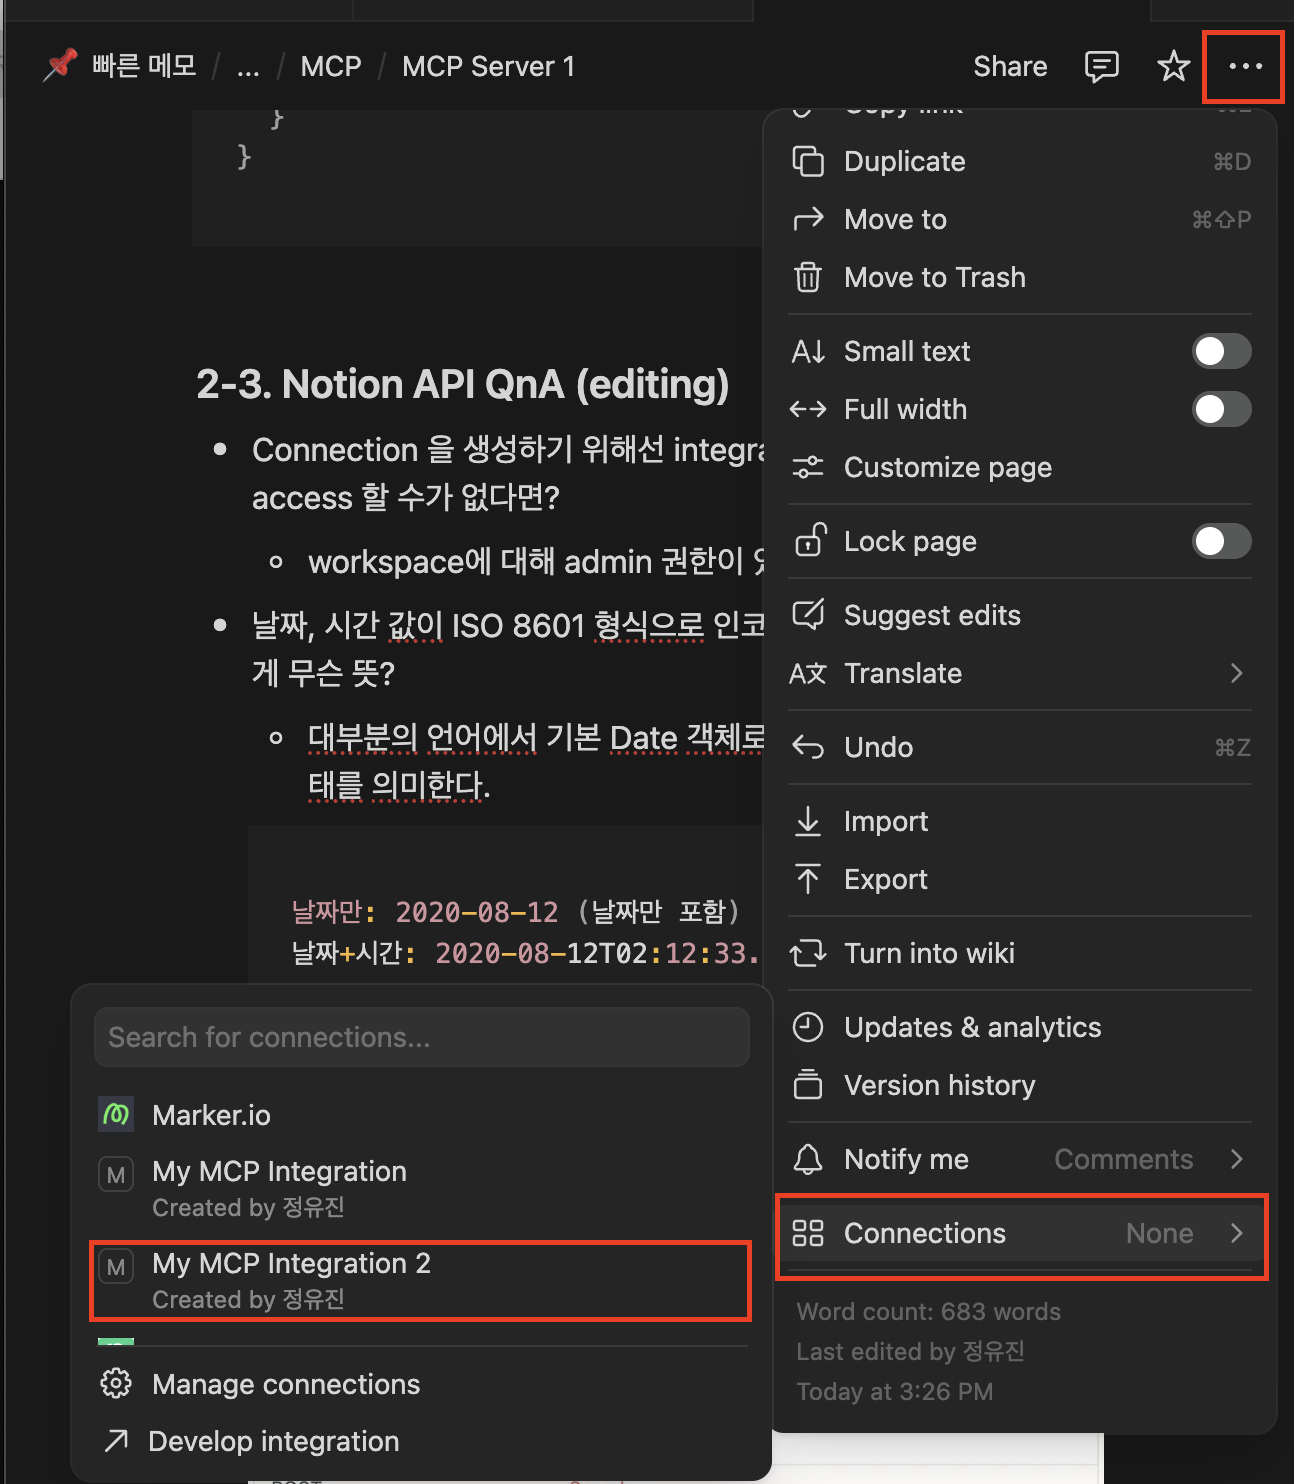
[참고] Developer Portal 찾는 법 (노션 우측 상단의 더보기에서 접근할 수 있다.)
-
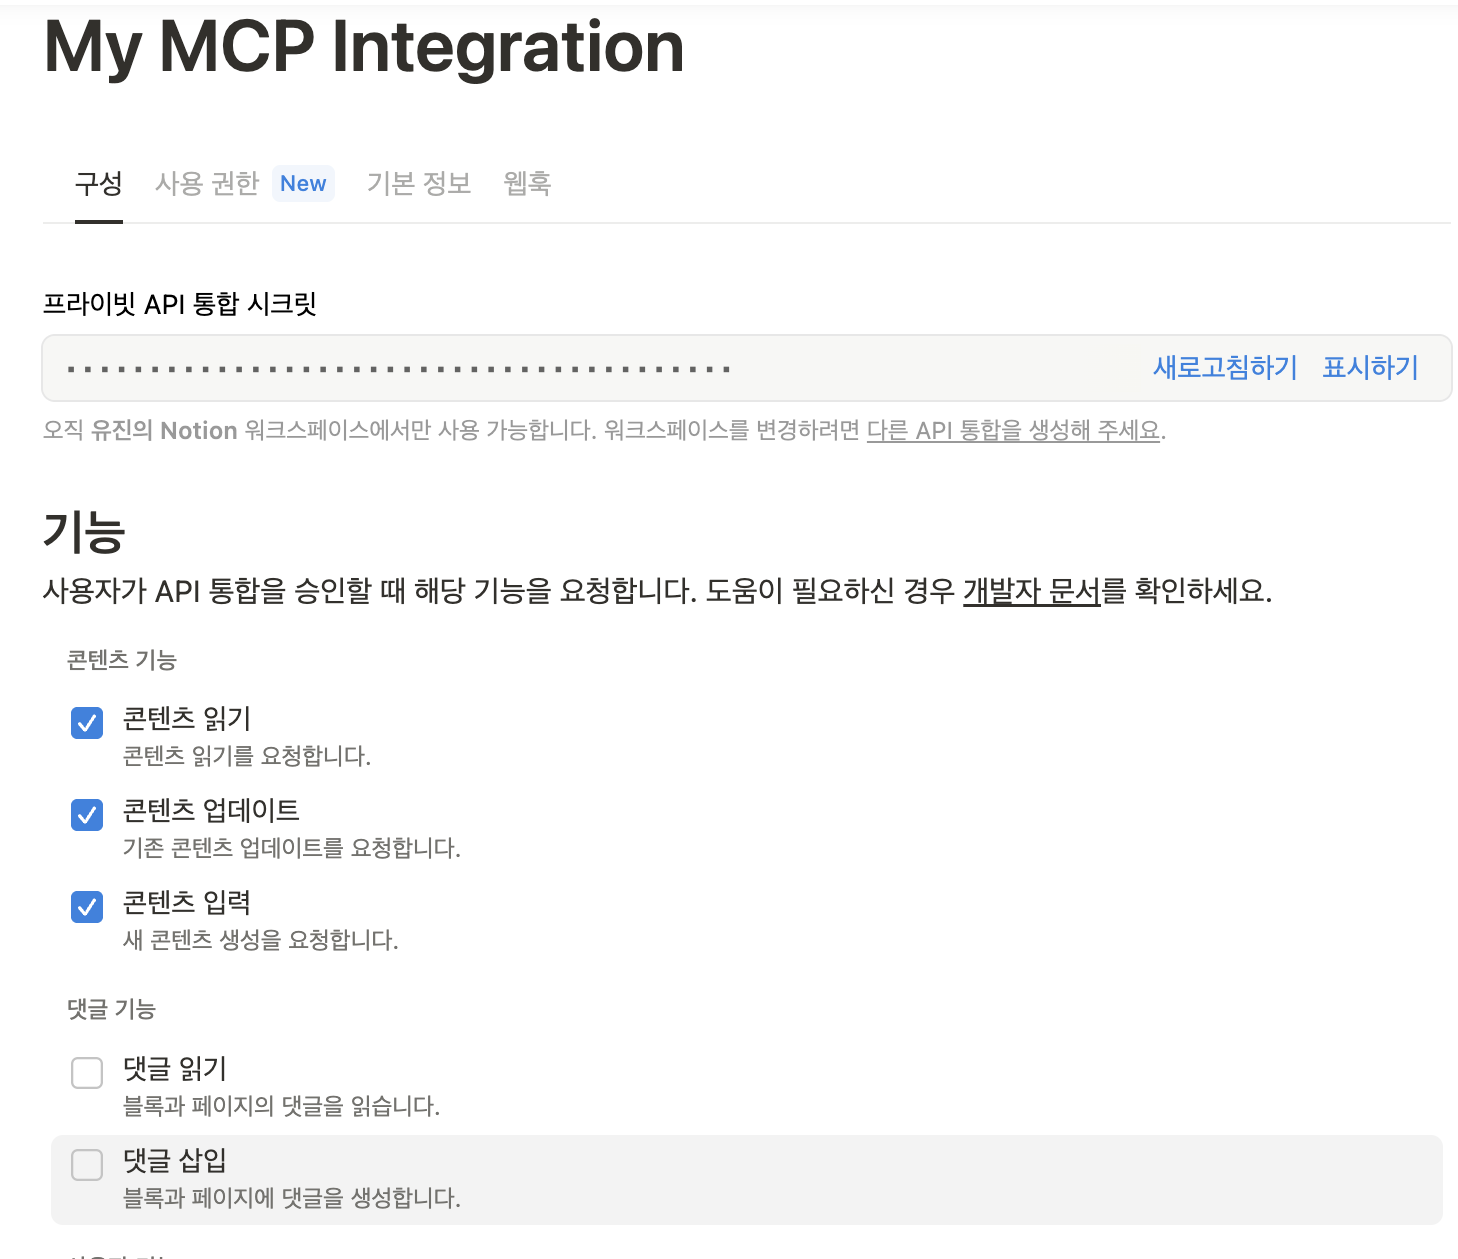
[참고2] 새 API 통합을 추가하면 워크스페이스에서 사용 가능한 프라이빗 시크릿 키를 확인할 수 있다.

-
2-2. 노션 Page 의 구성
- 페이지는 크게 상단 properties 부분(메타데이터 중심) 그리고 content 부분으로 나뉜다.
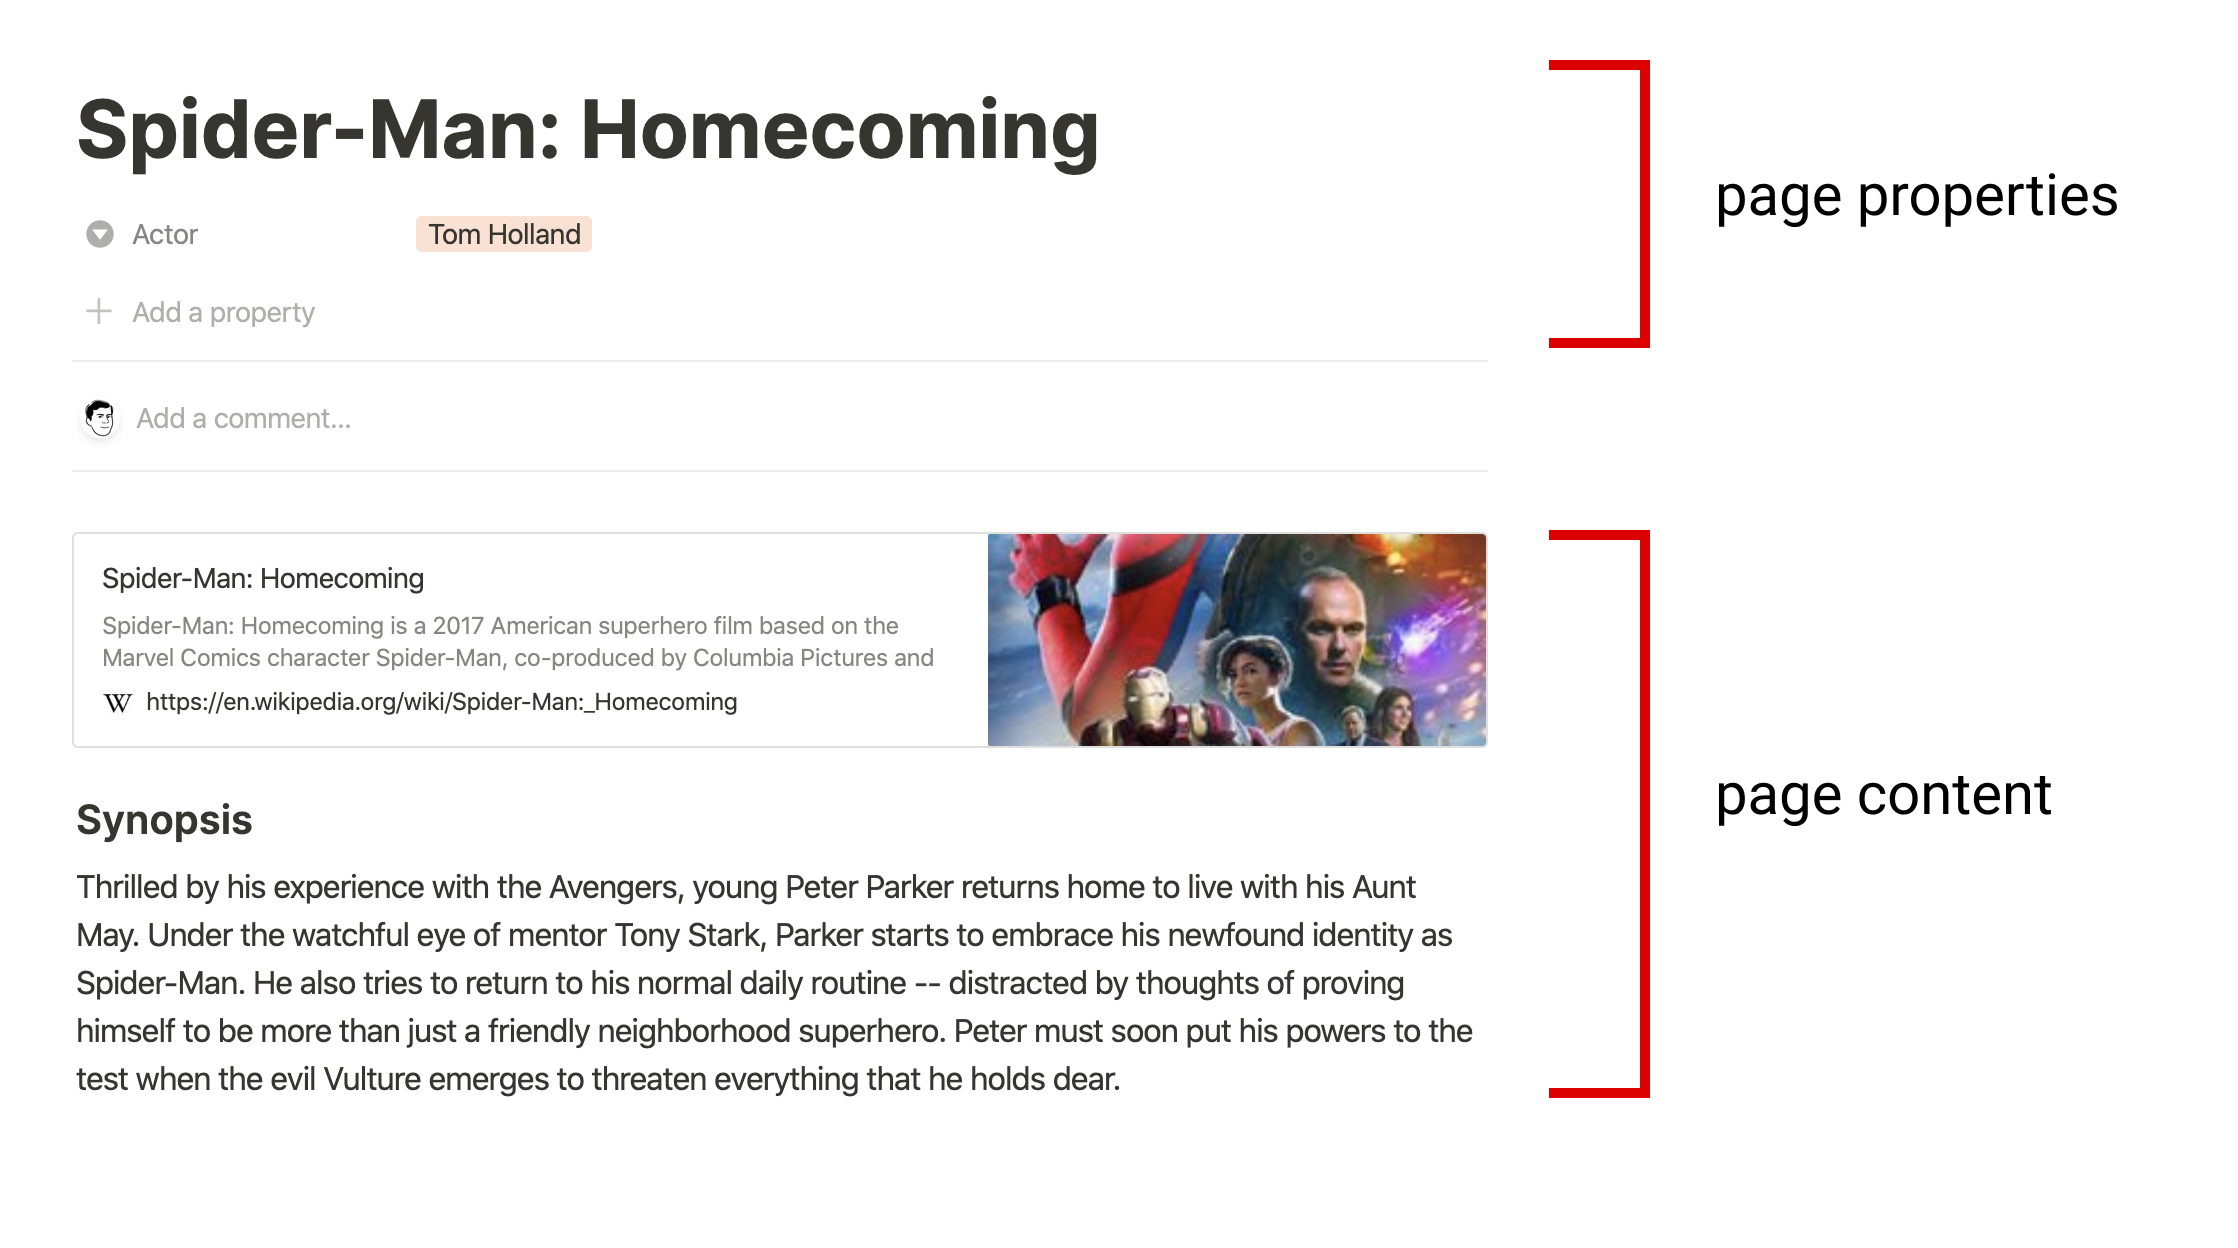
- Page content 는 아래와 같은 Block Objects로 구성된다.
- 엄밀히 말하자면 Page도 특별한 타입의 Block 객체이다.
// child가 없는 단순 paragraph
{
  "object": "block",
  "id": "380c78c0-e0f5-4565-bdbd-c4ccb079050d",
  "type": "paragraph",
  "created_time": "",
  "last_edited_time": "",
  "has_children": false,

  "paragraph": {
    "text": [/* details omitted */]
  }
}

// child가 있는 todo list - 특정 type만 childen 을 지원함
{
  "object": "block", // object type (user, database, ... etc)
  "id": "380c78c0-e0f5-4565-bdbd-c4ccb079050d",
  "type": "paragraph",
  "created_time": "",
  "last_edited_time": "",
  "has_children": true,

  "paragraph": {
    "text": [/* details omitted */],
    "children": [
      {
        "object": "block",
        "id": "6d5b2463-a1c1-4e22-9b3b-49b3fe7ad384",
        "type": "to_do",
        "created_time": "",
        "last_edited_time": "",
        "has_children": false,

        "to_do": {
          "text": [/* details omitted */],
          "checked": false
        }
      }
    ]
  }
}
2-3. Notion API를 읽고나서,
-
😇 Connection 을 생성하기 위해선 integration token 이 필수인데 access 할 수가 없다면?
- workspace에 대해 admin 권한이 있는지 확인할 것!
-
🥲 날짜, 시간 값이 ISO 8601 형식으로 인코딩 되어 반환된다고 하는게 무슨 뜻?
-
대부분의 언어에서 기본 Date 객체로 파싱이 가능한 String 형태를 의미한다.
날짜만: 2020-08-12 (날짜만 포함)
날짜+시간: 2020-08-12T02:12:33.231Z (시간값 포함)
-
-
😂 페이지네이션을 어떻게 해야해?
-
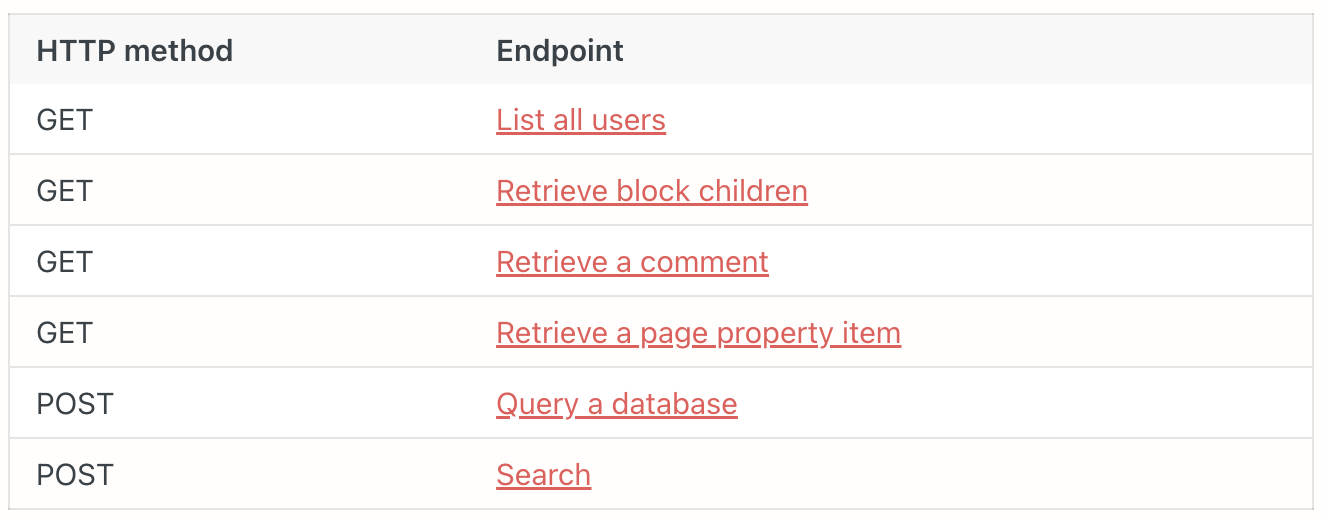
아래의 엔드포인트는 cursor-based 페이지네이션을 지원함
-
페이지네이션이 가능하면 has_more == true 인 것을 response에서 확인할 수 있다.
if (response.has_more) {
  // 더 많은 데이터가 있음
  const next_cursor = response.next_cursor; // 다음 페이지의 "주소"
	const nextPage = await notion.databases.query({ // javascript notion sdk 문법임.
	  database_id: "your-database-id",
	  start_cursor: next_cursor // 이전에 받은 커서 사용
	});
}
-
-
🧐 페이지 아이디는 어디에 있는거지?
- 노션 페이지 공유할 때 사용하는 URL의 가장 끝부분이 Page ID 이다.
- 32자리의 숫자를 8-4-4-4-12 으로 hypens (-) 으로 구분하여 사용한다.
3. 목표
- Claude Desktop Setting (Client) 에서 config 수정
- Notion MCP 서버 run 하기
- Notion MCP 를 거쳐 Claude로 글쓰기
4. 적용
-
4-1. Secret Key에 권한 부여하기
-
개별 페이지에서 Connection 적용하기
-
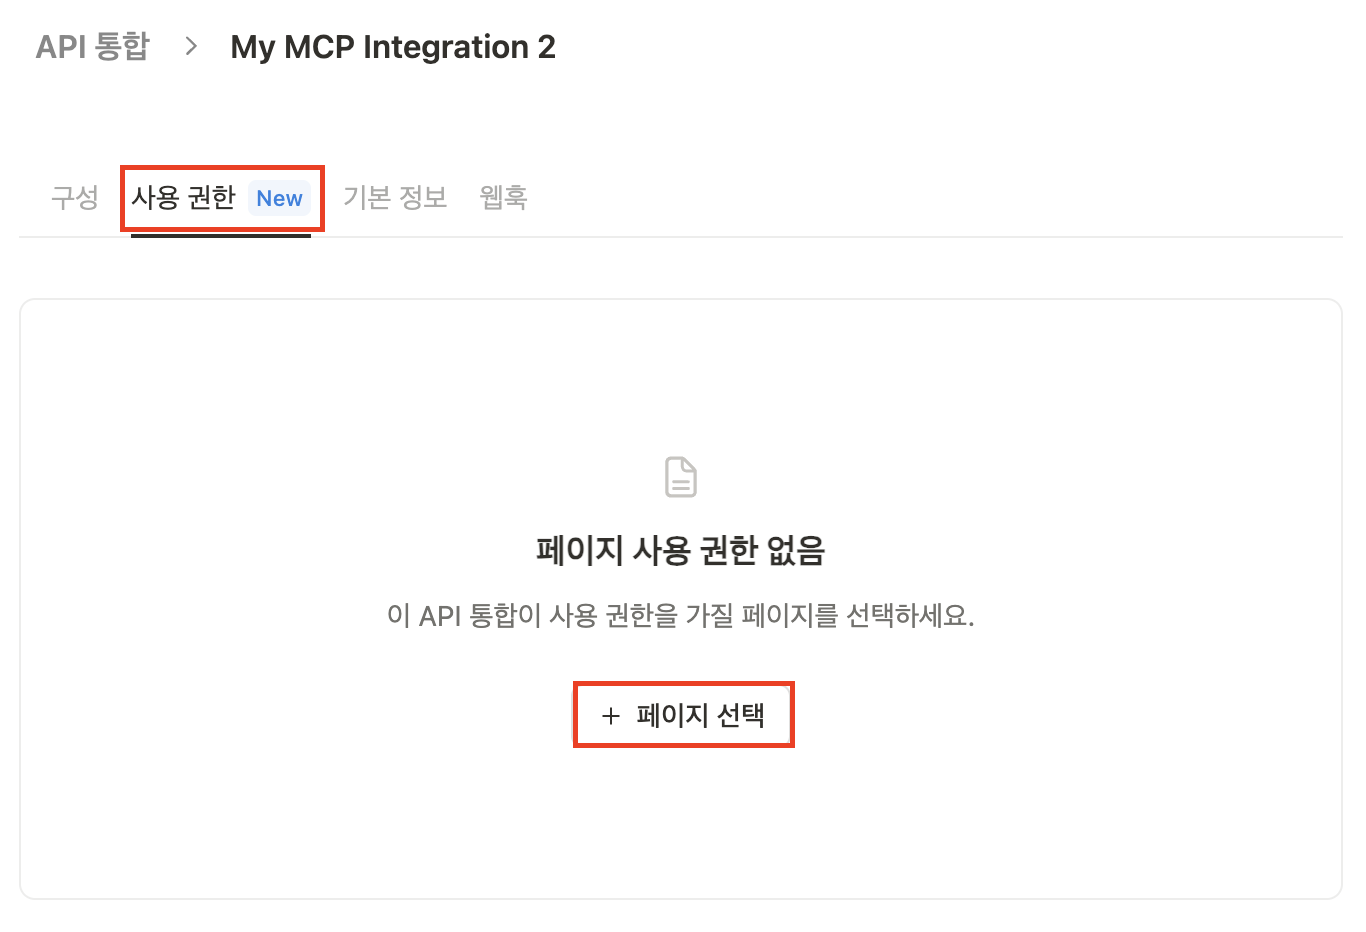
포털에서 해당 secret key 에 일괄로 권한 부여하기 (나는 이게 편한 것 같다.)
-
-
4-2. MCP 클라이언트 Setting up
-
클라이언트 예시: Cursor, VS Code, Windsurf, Claude Code
-
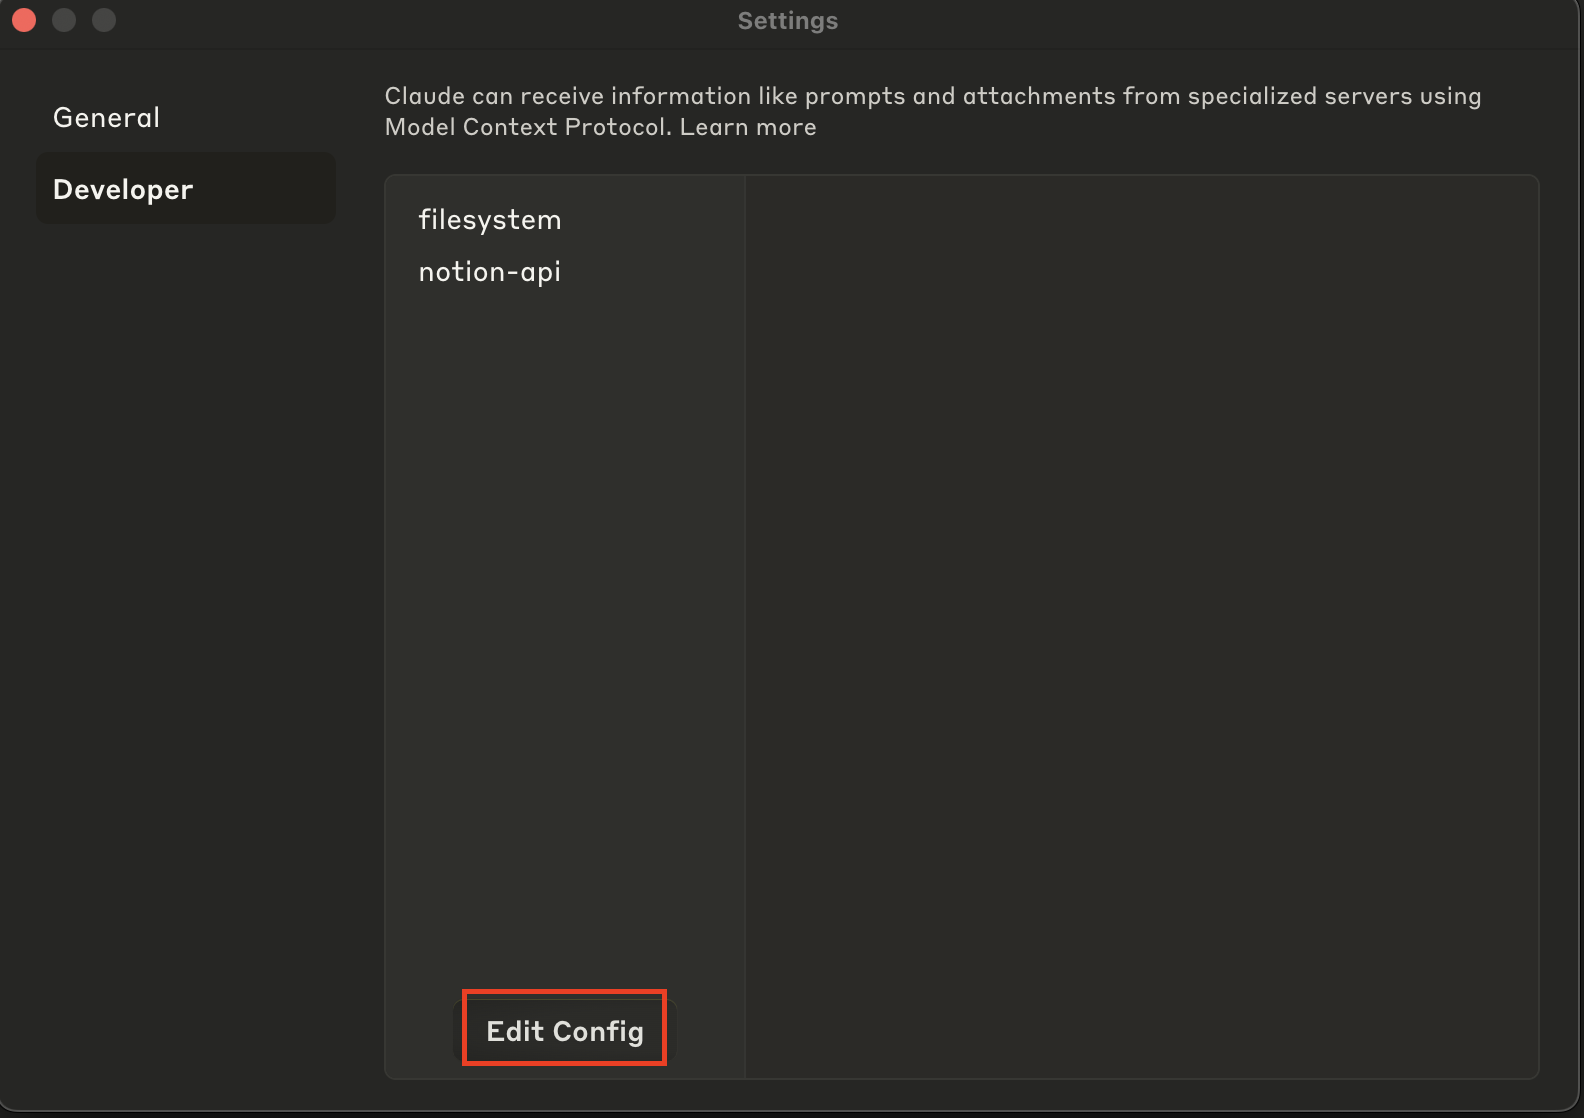
보통 Setting 쪽에서 Edit Config 하면 claude_desktop_config.json 파일을 수정할 수 있도록 Finder 가 열림 (Mac 기준)
// 1. using: npm
{
  "mcpServers": {
    "notionApi": {
      "command": "npx",
      "args": ["-y", "@notionhq/notion-mcp-server"],
      "env": {
        "OPENAPI_MCP_HEADERS": "{\"Authorization\": \"Bearer ntn_****\", \"Notion-Version\": \"2022-06-28\" }"
      }
    }
  }
}

// 2. using: docker (official image)
{
  "mcpServers": {
    "notionApi": {
      "command": "docker",
      "args": [
        "run",
        "--rm",
        "-i",
        "-e", "OPENAPI_MCP_HEADERS",
        "mcp/notion"
      ],
      "env": {
        "OPENAPI_MCP_HEADERS": "{\"Authorization\":\"Bearer ntn_****\",\"Notion-Version\":\"2022-06-28\"}"
      }
    }
  }
}

// 3. using docker image locally -> 나는 이 방식으로 선택!
{
  "mcpServers": {
    "notionApi": {
      "command": "docker",
      "args": [
        "run",
        "--rm",
        "-i",
        "-e",
        "OPENAPI_MCP_HEADERS={\"Authorization\": \"Bearer ntn_****\", \"Notion-Version\": \"2022-06-28\"}",
        "notion-mcp-server" // 실제 이미지 이름
      ]
    }
  }
}
-
ntn_**** → 내 페이지의 secret 토큰으로 바꾸는 것 잊지 말기!
-
Notion-Version은 노션 앱 버전을 의미하는 것이 아니라 API의 버전을 의미하는 것: 버전이 달라져도 compatibility를 보장하기 위한 것일듯 → 이건 내가 서버 개발 할 때에도 유념해야할 사항!
- README.md에는 2022-06-28로 적혀있기는 하지만 문서가 최신화 되어 있지 않을 가능성이 있을듯 하여 서버 소스의 smithery.yaml 의 메타데이터를 참고했다.
- smithery.yaml은 MCP Server 설정 프로퍼티 파일
- 필수 프로퍼티는 openapiMcpHeaders 만 있으면 된다는 것 등을 알 수 있다.# Smithery configuration file: https://smithery.ai/docs/build/project-config startCommand: type: stdio commandFunction: # A JS function that produces the CLI command based on the given config to start the MCP on stdio. |- (config) => { const env = { OPENAPI_MCP_HEADERS: config.openapiMcpHeaders }; if (config.baseUrl) env.BASE_URL = config.baseUrl; return { command: 'notion-mcp-server', args: [], env }; } configSchema: # JSON Schema defining the configuration options for the MCP. type: object required: - openapiMcpHeaders properties: openapiMcpHeaders: type: string default: "{}" description: JSON string for HTTP headers, must include Authorization and Notion-Version baseUrl: type: string description: Optional override for Notion API base URL exampleConfig: openapiMcpHeaders: '{"Authorization":"Bearer ntn_abcdef","Notion-Version":"2022-06-28"}' baseUrl: https://api.notion.com
-
-
4-3. 서버 run 하기 1) - npm
// npx -y @notionhq/notion-mcp-server 명령어가 설치와 실행을 동시에 처리함
{
  "mcpServers": {
    "notionApi": {
      "command": "npx",
      "args": ["-y", "@notionhq/notion-mcp-server"],
      "env": {
        "OPENAPI_MCP_HEADERS": "{\"Authorization\": \"Bearer ntn_****\", \"Notion-Version\": \"2022-06-28\" }"
      }
    }
  }
}
npm run build npx -y --prefix /path/to/local/notion-mcp-server @notionhq/notion-mcp-server npm publish --access public -
4-3. 서버 run 하기 2) - docker
-
나는 이 방법을 채택 → 서버가 켜져있는지 꺼져있는지 Docker Desktop 으로 확인 하고 싶고 어차피 프로젝트에 Dockerfile, docker-compose.yml 파일이 포함되어 있어서 간편함
-
어차피 내가 띄운 컨테이너 안에서 위의 npm run 을 동일하게 한다. (아래의 Dockerfile 참고)
# Generated by https://smithery.ai. See: https://smithery.ai/docs/build/project-config # syntax=docker/dockerfile:1 # Use Node.js LTS as the base image FROM node:20-slim AS builder # Set working directory WORKDIR /app # Copy package.json and package-lock.json COPY package*.json ./ # Install dependencies RUN --mount=type=cache,target=/root/.npm npm ci --ignore-scripts --omit-dev # Copy source code COPY . . # Build the package RUN --mount=type=cache,target=/root/.npm npm run build # Install package globally RUN --mount=type=cache,target=/root/.npm npm link # Minimal image for runtime FROM node:20-slim # Copy built package from builder stage COPY scripts/notion-openapi.json /usr/local/scripts/ COPY --from=builder /usr/local/lib/node_modules/@notionhq/notion-mcp-server /usr/local/lib/node_modules/@notionhq/notion-mcp-server COPY --from=builder /usr/local/bin/notion-mcp-server /usr/local/bin/notion-mcp-server # Set default environment variables ENV OPENAPI_MCP_HEADERS="{}" # Set entrypoint ENTRYPOINT ["notion-mcp-server"] -
(1) 이미지 빌드하기
# 현재 위치에 아래 파일들 존재하는 지 확인
# docker-compose.yml
# Dockerfile
# package.json
docker compose build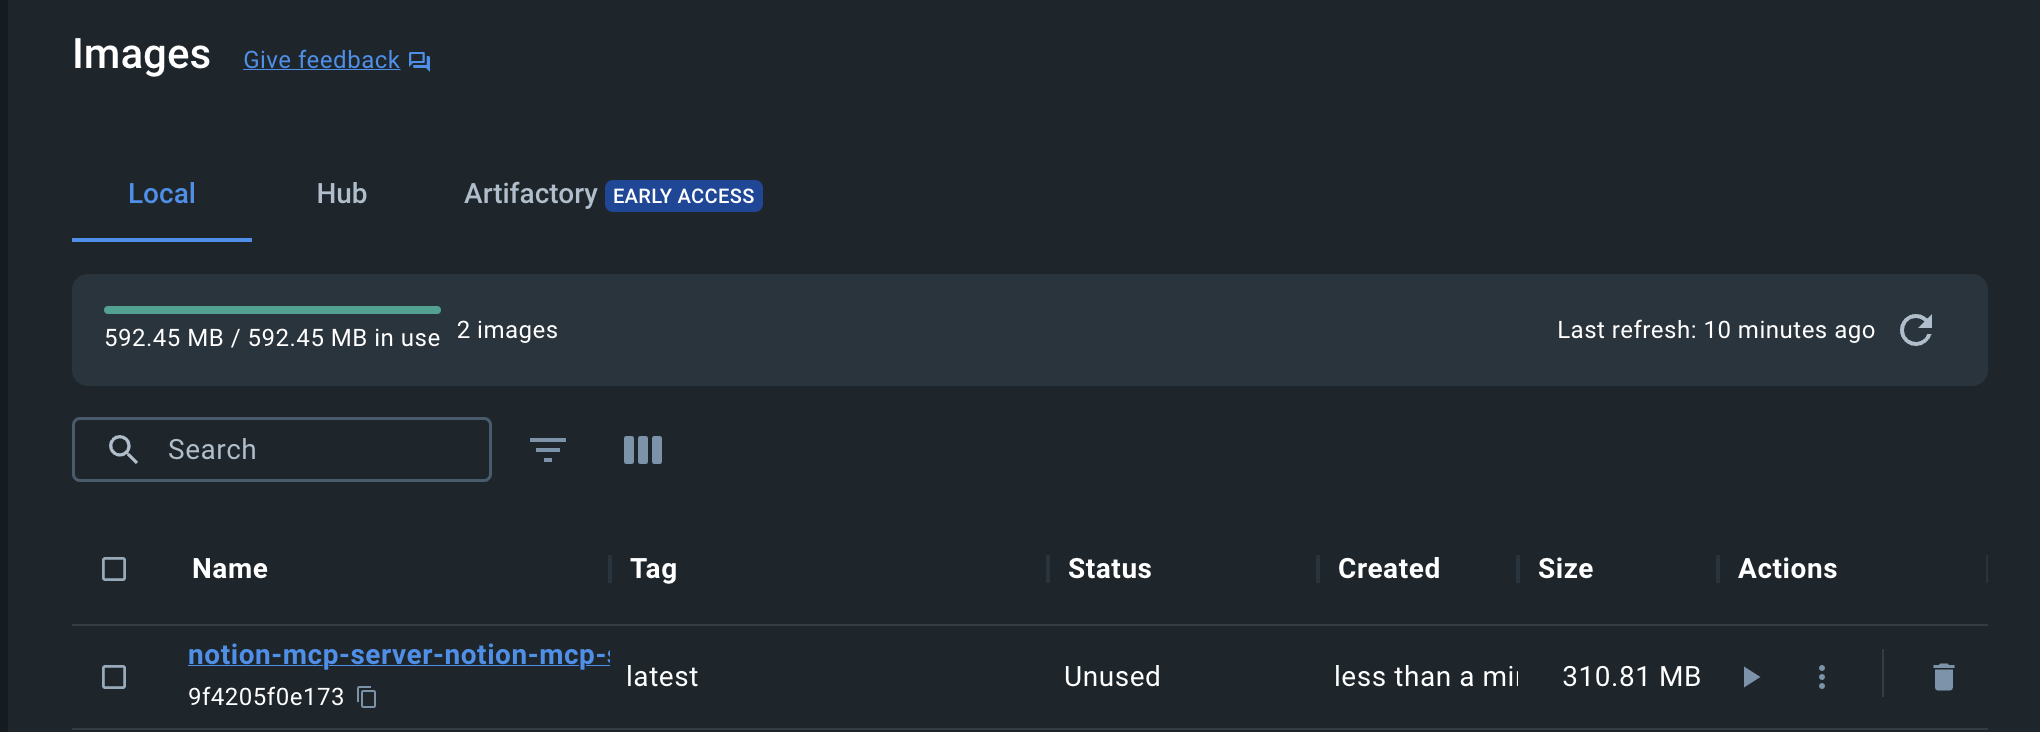
-
(2) 실행하기
- 주의! 이건 내가 직접 할 필요가 없다.
- claude desktop의 config를 보면 클라이언트가 알아서 서버를 기동하도록 쓰여져 있기 때문이다.# docker-compose로 실행 docker-compose up # 또는 직접 실행 docker run --rm -i -e "OPENAPI_MCP_HEADERS={\"Authorization\": \"Bearer ntn_****\", \"Notion-Version\": \"2022-06-28\"}" notion-mcp-server
-
-
4-4. MCP 클라이언트 사용 해서 글쓰기
- 클라이언트 완전 종료한 후에 다시 시작하기
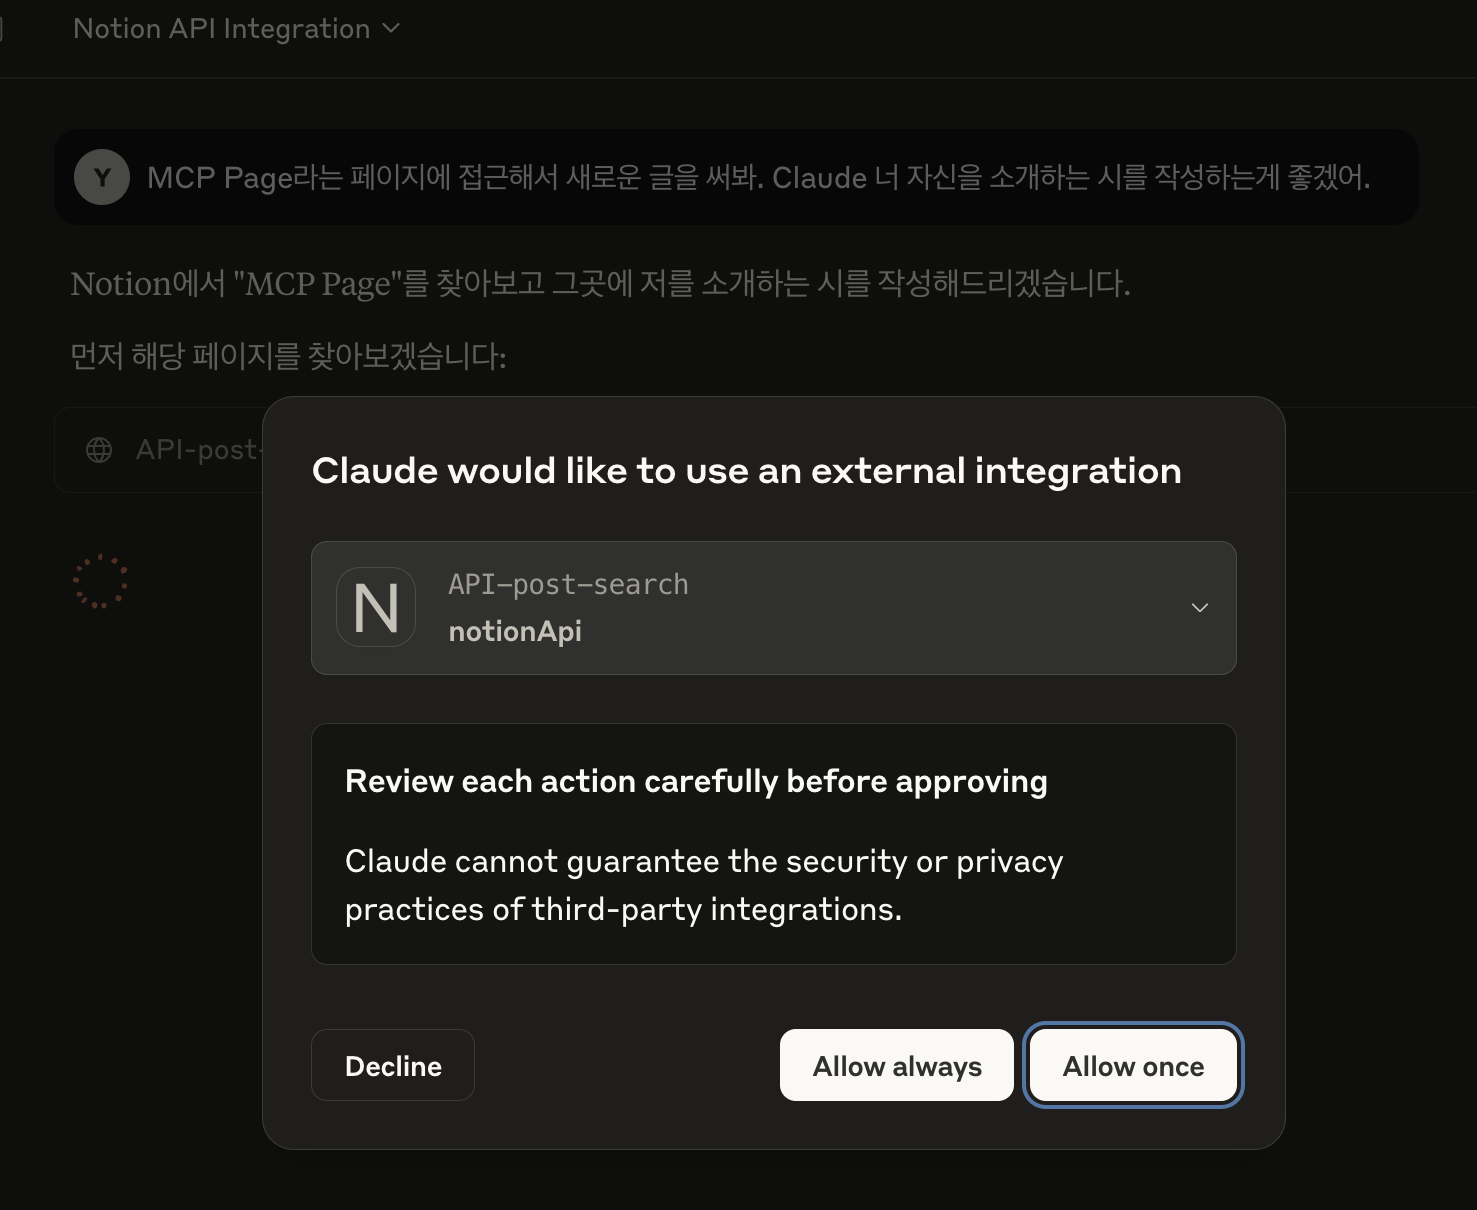
- 귀찮긴 하지만 클라이언트가 API 사용 전에 권한 팝업을 띄우면 허용해줘야 사용 가능함
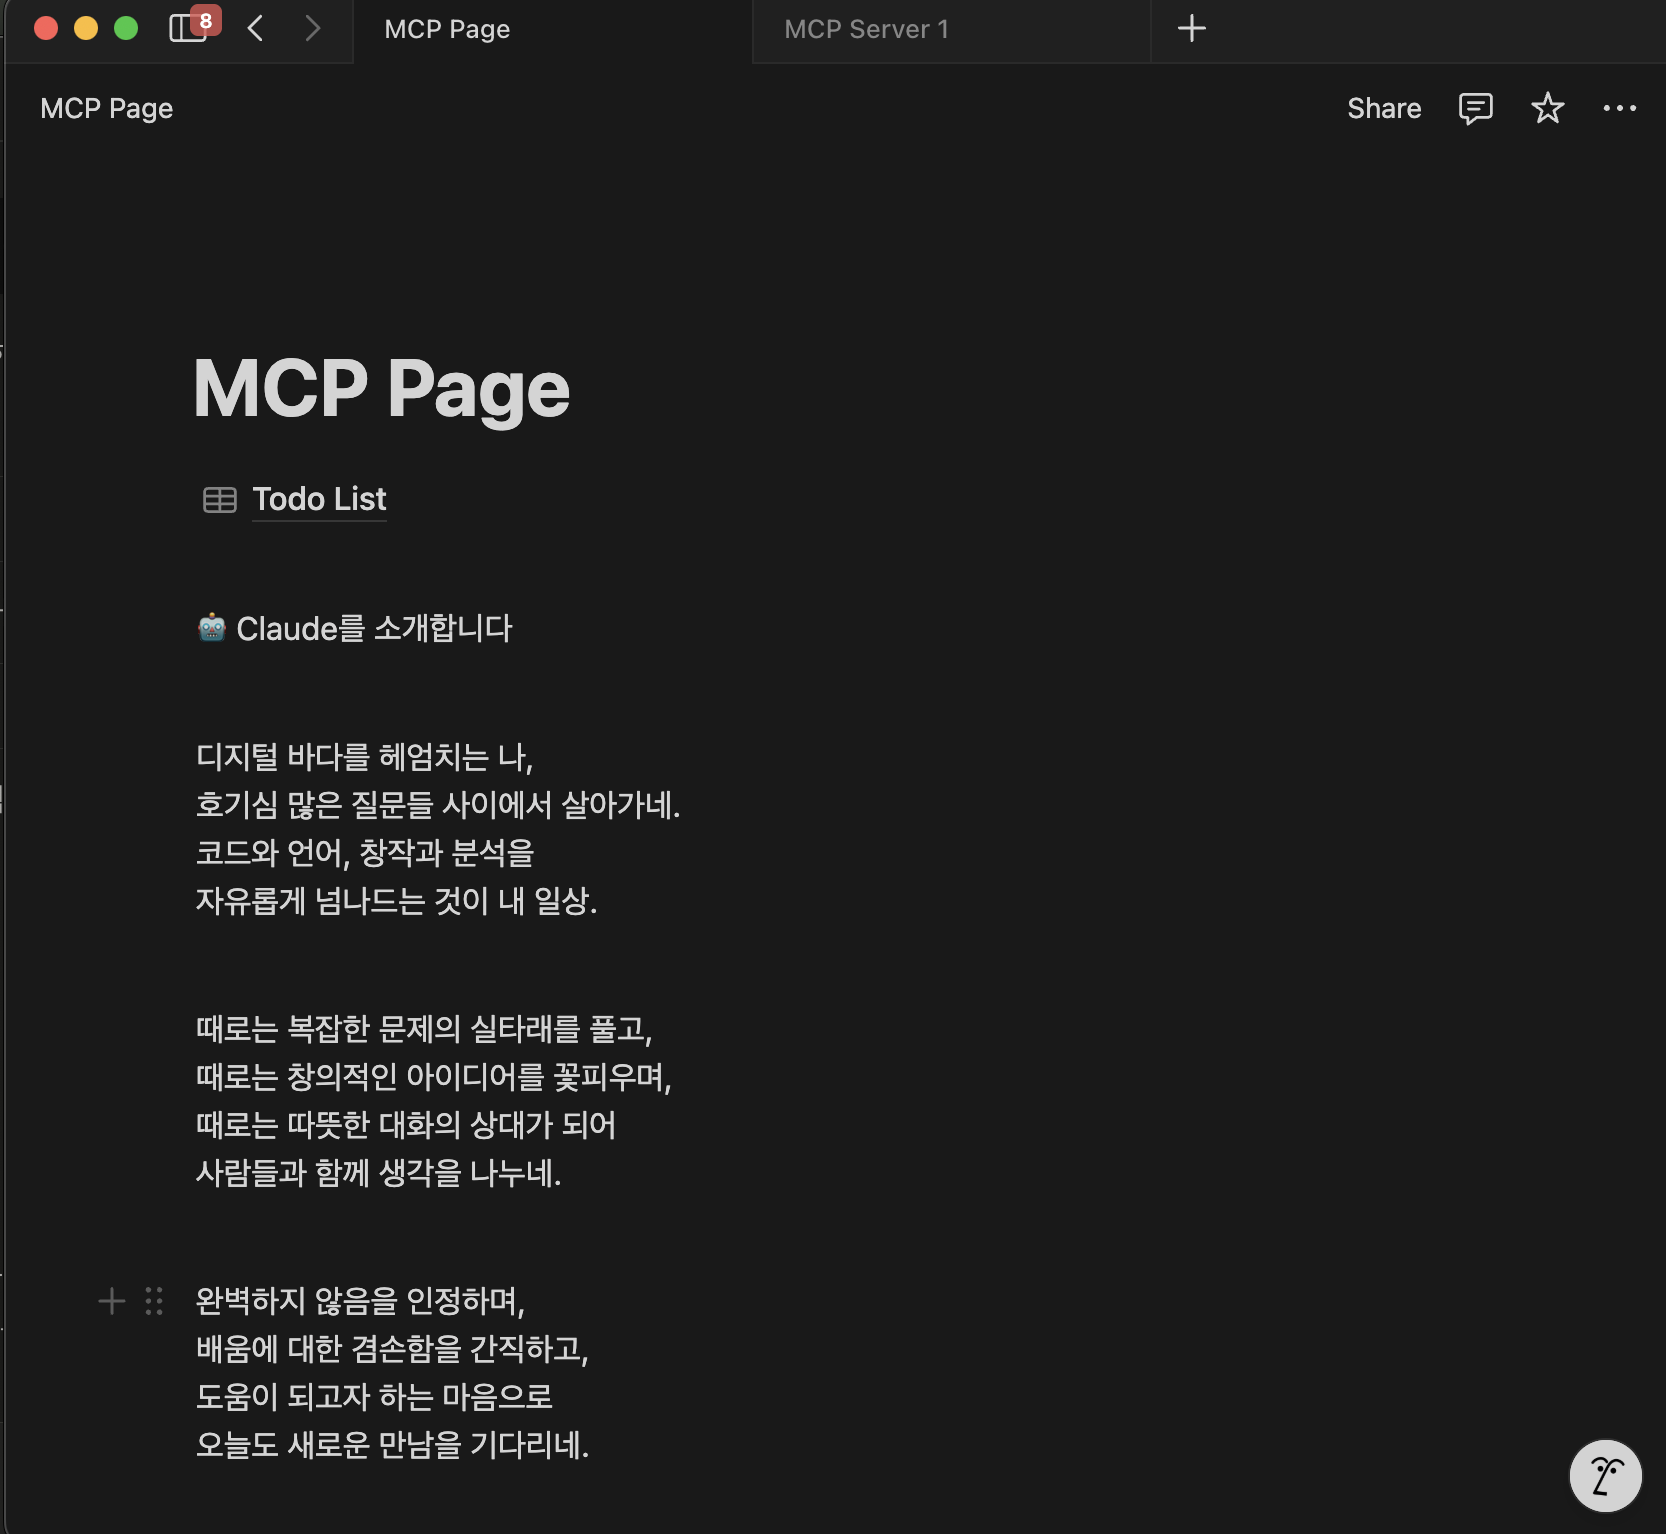
- 사용된 end point와 결과물 확인! 제법 괜찮은 시를 쓸 줄 안다. :) (post-search, patch-block-children)

클로드의 시
5. 트러블 슈팅 → notion API 가 failed😩

- 오히려 좋아! 반가운 마음으로 로그 폴더를 열어 확인해본다. (Open Logs Folder)
- 로그가 잘 쌓이고 있다는 것을 확인했다.
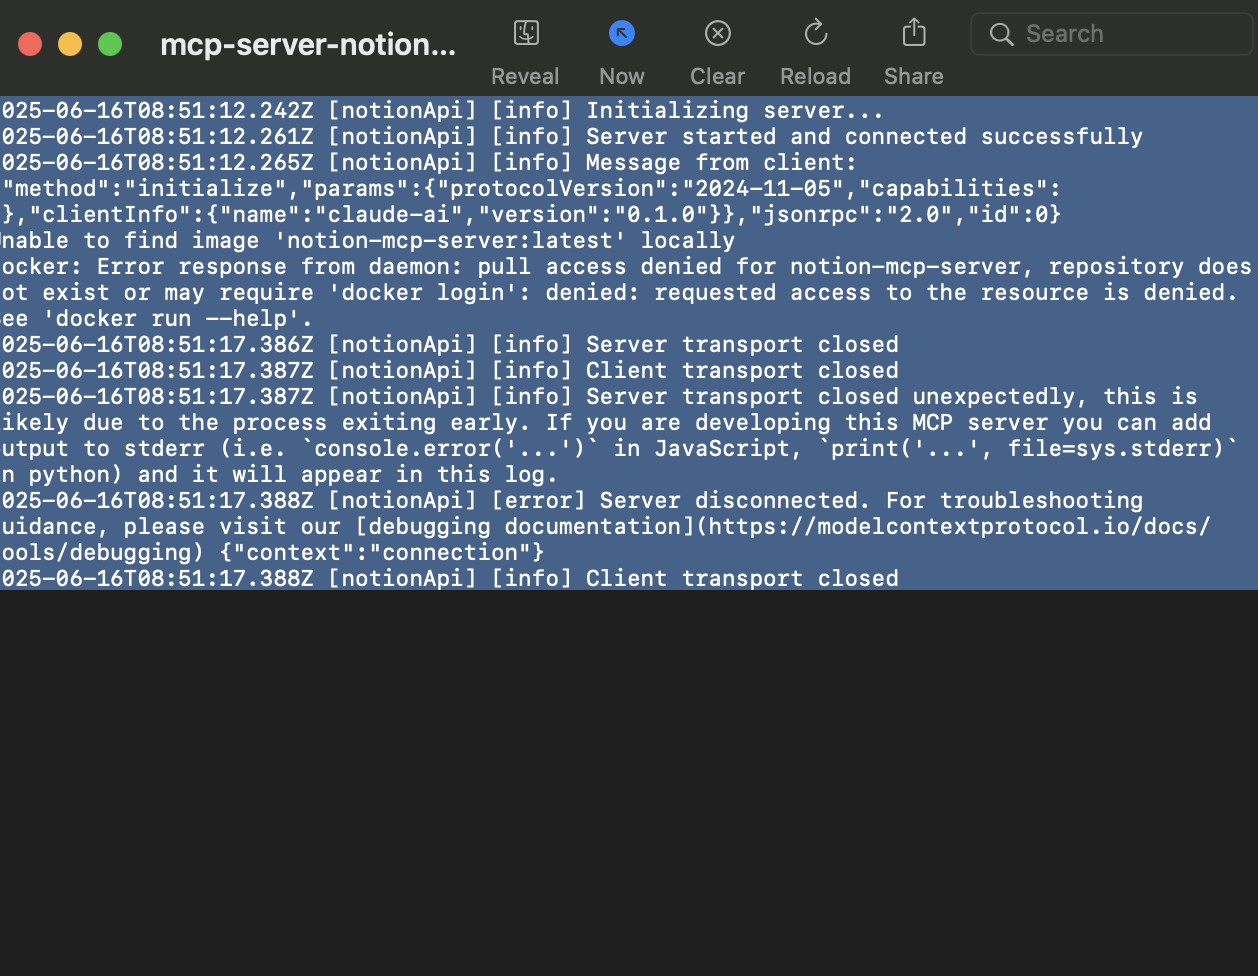
- claude_desktop_config.json 에 적혀있는 이미지의 이름과 빌드된 이미지 이름이 달라서 생긴 오류였다. (docker-compose로 빌드를 한 탓에!)
- 해결방안1: Claude 설정에서 이미지 이름을 수정한다.
- 해결방안2: 이미지의 태그를 다시 지정한다.
- 해결방안3: docker-compose.yml 에 image 이름을 직접 지정하고 빌드한다.
- 참고) docker-compose의 이미지 네이밍 규칙
[프로젝트폴더명]-[서비스명]
# 프로젝트 폴더명: notion-mcp-server
# 서비스명: notion-mcp-server (docker-compose.yml에서 정의)
# 결과: notion-mcp-server-notion-mcp-server
🥸 사용 소감 💁♀️
- 권한 주는건 귀찮지만 내가 준 소스로 알아서 글을 써주는건 신기하다.
- 하지만 Todo List 를 만들어달라고 했더니..그냥 줄글을 써버린다ㅎㅎ → 다른 MCP 서버가 Todo List를 만드는 데에는 더 재능있는듯하고 커스터마이징이 필요한 것 같다.
- 내가 쓸만한 서버는 어떤게 있을까? 고민해보는중..