0. Overview
쿠버네티스를 사용하는 이유엔 여러가지가 있겠지만, 그 중 MSA(Micro Service Architecture) 구조의 배포 및 운영을 쉽게 관리하고 자동화하기 때문에 쿠버네티스와 MSA의 조합은 자주 사용된다.
MSA에서 신경 쓸 구성 요소 또한 여러가지가 있겠지만, 그 중 서비스 디스커버리(Service Discovery) 및 서비스 메시(Service Mesh)는 마이크로 서비스 간 네트워킹에 있어 핵심이다.
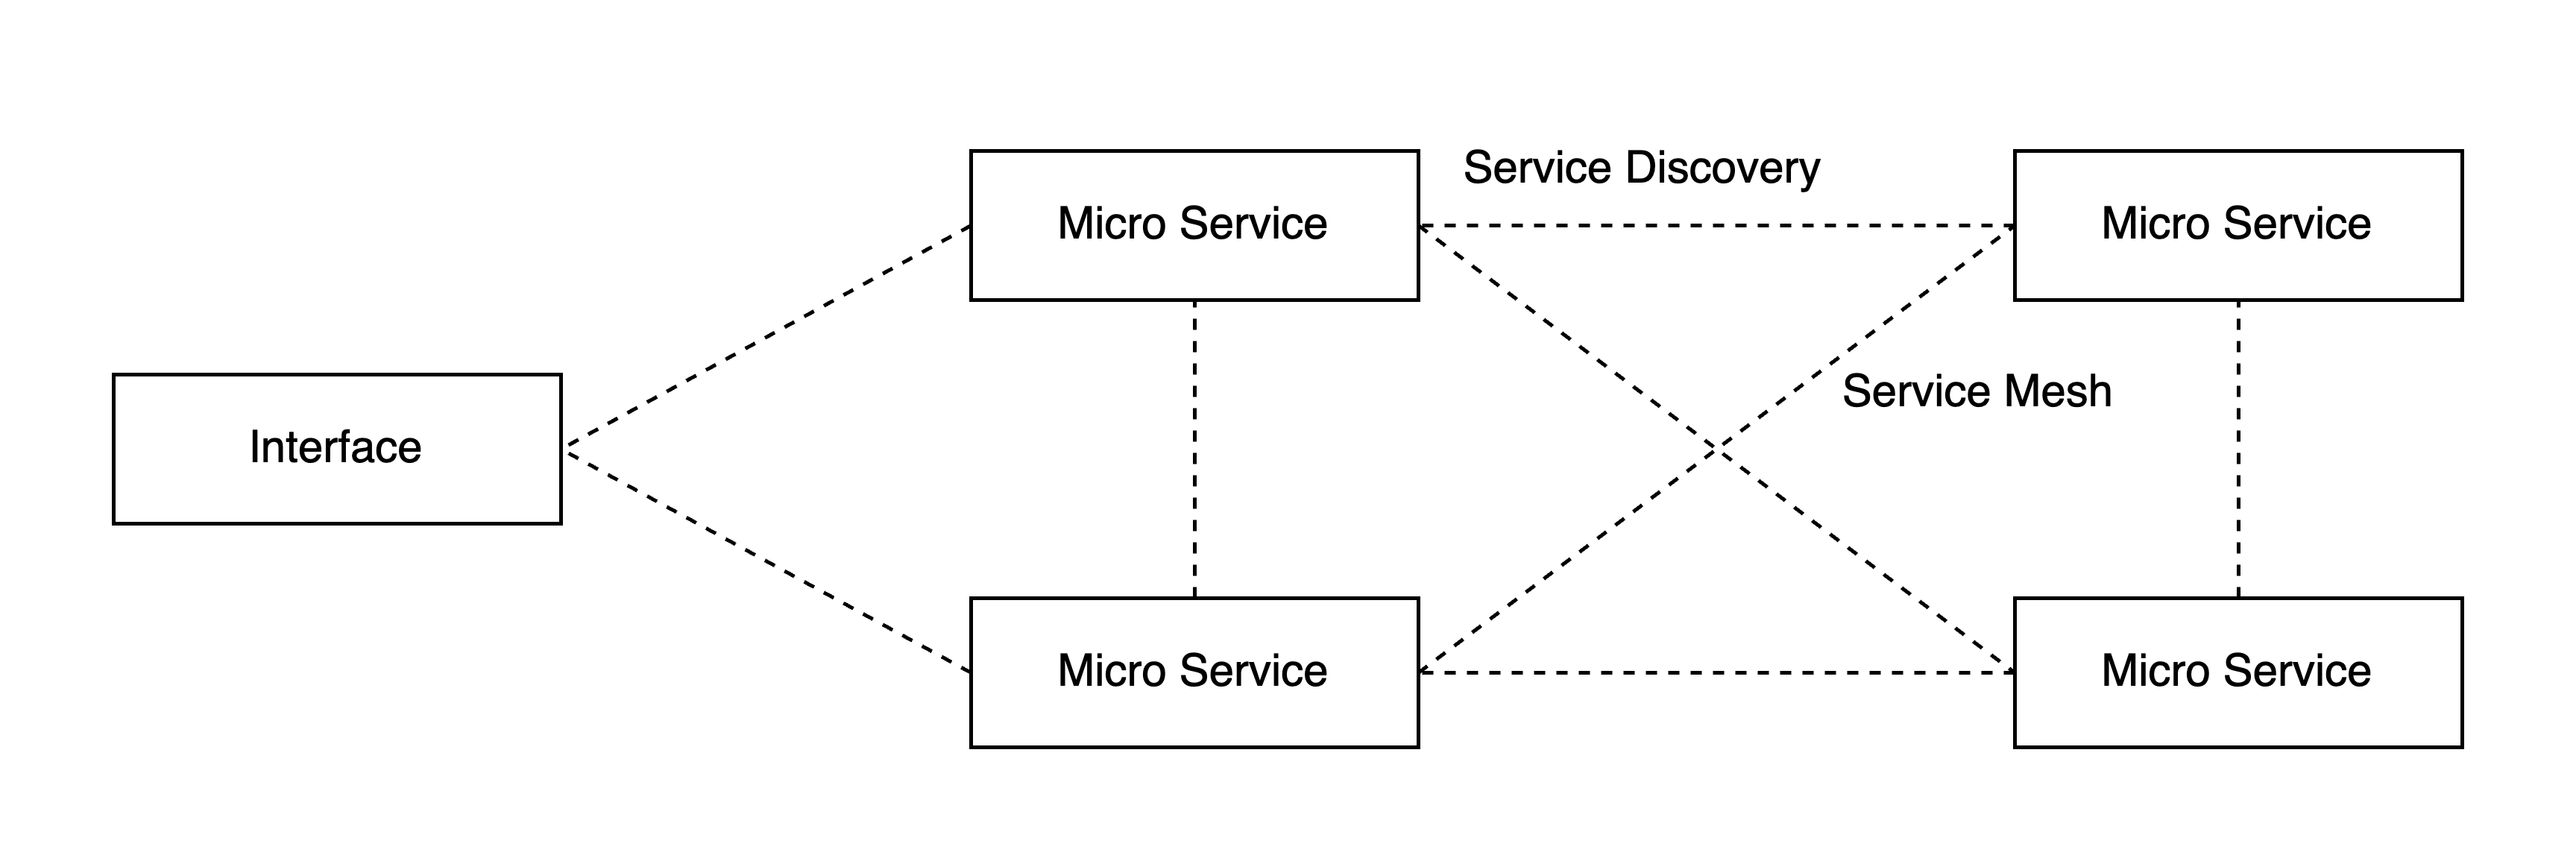
쿠버네티스에선 기본적으로 서비스 디스커버리엔 CoreDNS, 네트워킹에 있어 kube-proxy 및 NetworkPolicy 등의 서비스를 사용할 순 있다.
하지만 이는 L4 중심으로, TLS Termination, 인증/인가, 모니터링(Observability) 등의 세부적인 기능이나 L7 HTTP/HTTPS 트래픽을 세부적으로 다루기엔 어려움이 있다.
이러한 서비스 메시 구조 관리하는 도구엔 Istio나 Linkerd, 그리고 AWS의 완전 관리형 서비스엔 AppMesh(Istio)나 VPC Lattice 등의 서비스도 존재한다.
그 중 서비스 메시의 대표격인 Istio에 대해 알아보겠다.
1. Istio and Envoy Sidecar Proxy
먼저 서비스 메시의 동작 과정을 살펴보자. AWS VPC Lattice와 같은 경우는 예외지만, 서비스 메시 패턴은 대부분 사이드카(Sidecar) 프록시 패턴을 사용한다.
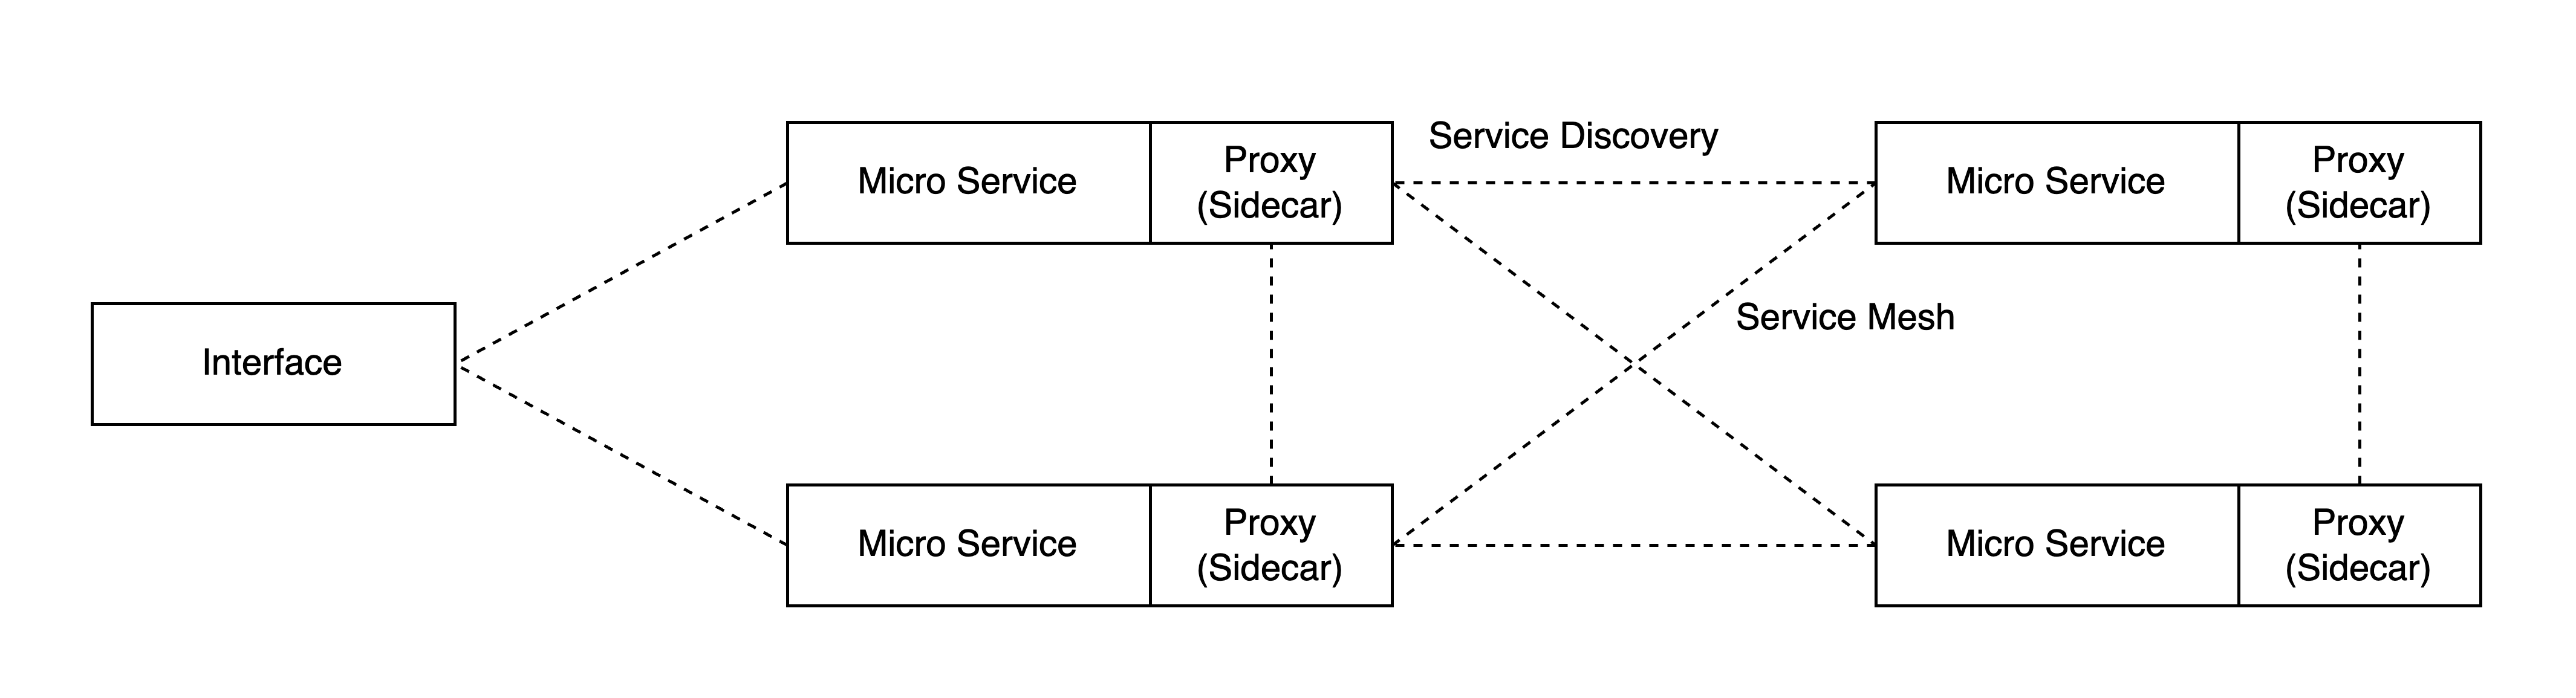
사이드카 프록시는 쿠버네티스 파드에서 함께 실행되는 별도의 컨테이너로 동작하며, 애플리케이션의 네트워킹 기능을 대신 처리하여 관련 정책이나 트래픽 제어, mTLS나 모니터링 등의 기능을 제공한다.
이러한 사이드카 프록시는 Envoy를 통해 L4~L7 트래픽을 처리하게 되고, Istio의 핵심 데이터 플레인(Data Plane)으로 사용된다.
Istio는 이러한 Envoy 사이드카 프록시를 관리하고 제어하는 컨트롤 플레인(Control Plane)으로, 앞서 설명한 사이드카 프록시의 기능 외에 모니터링 등의 세부적인 기능도 제공한다.
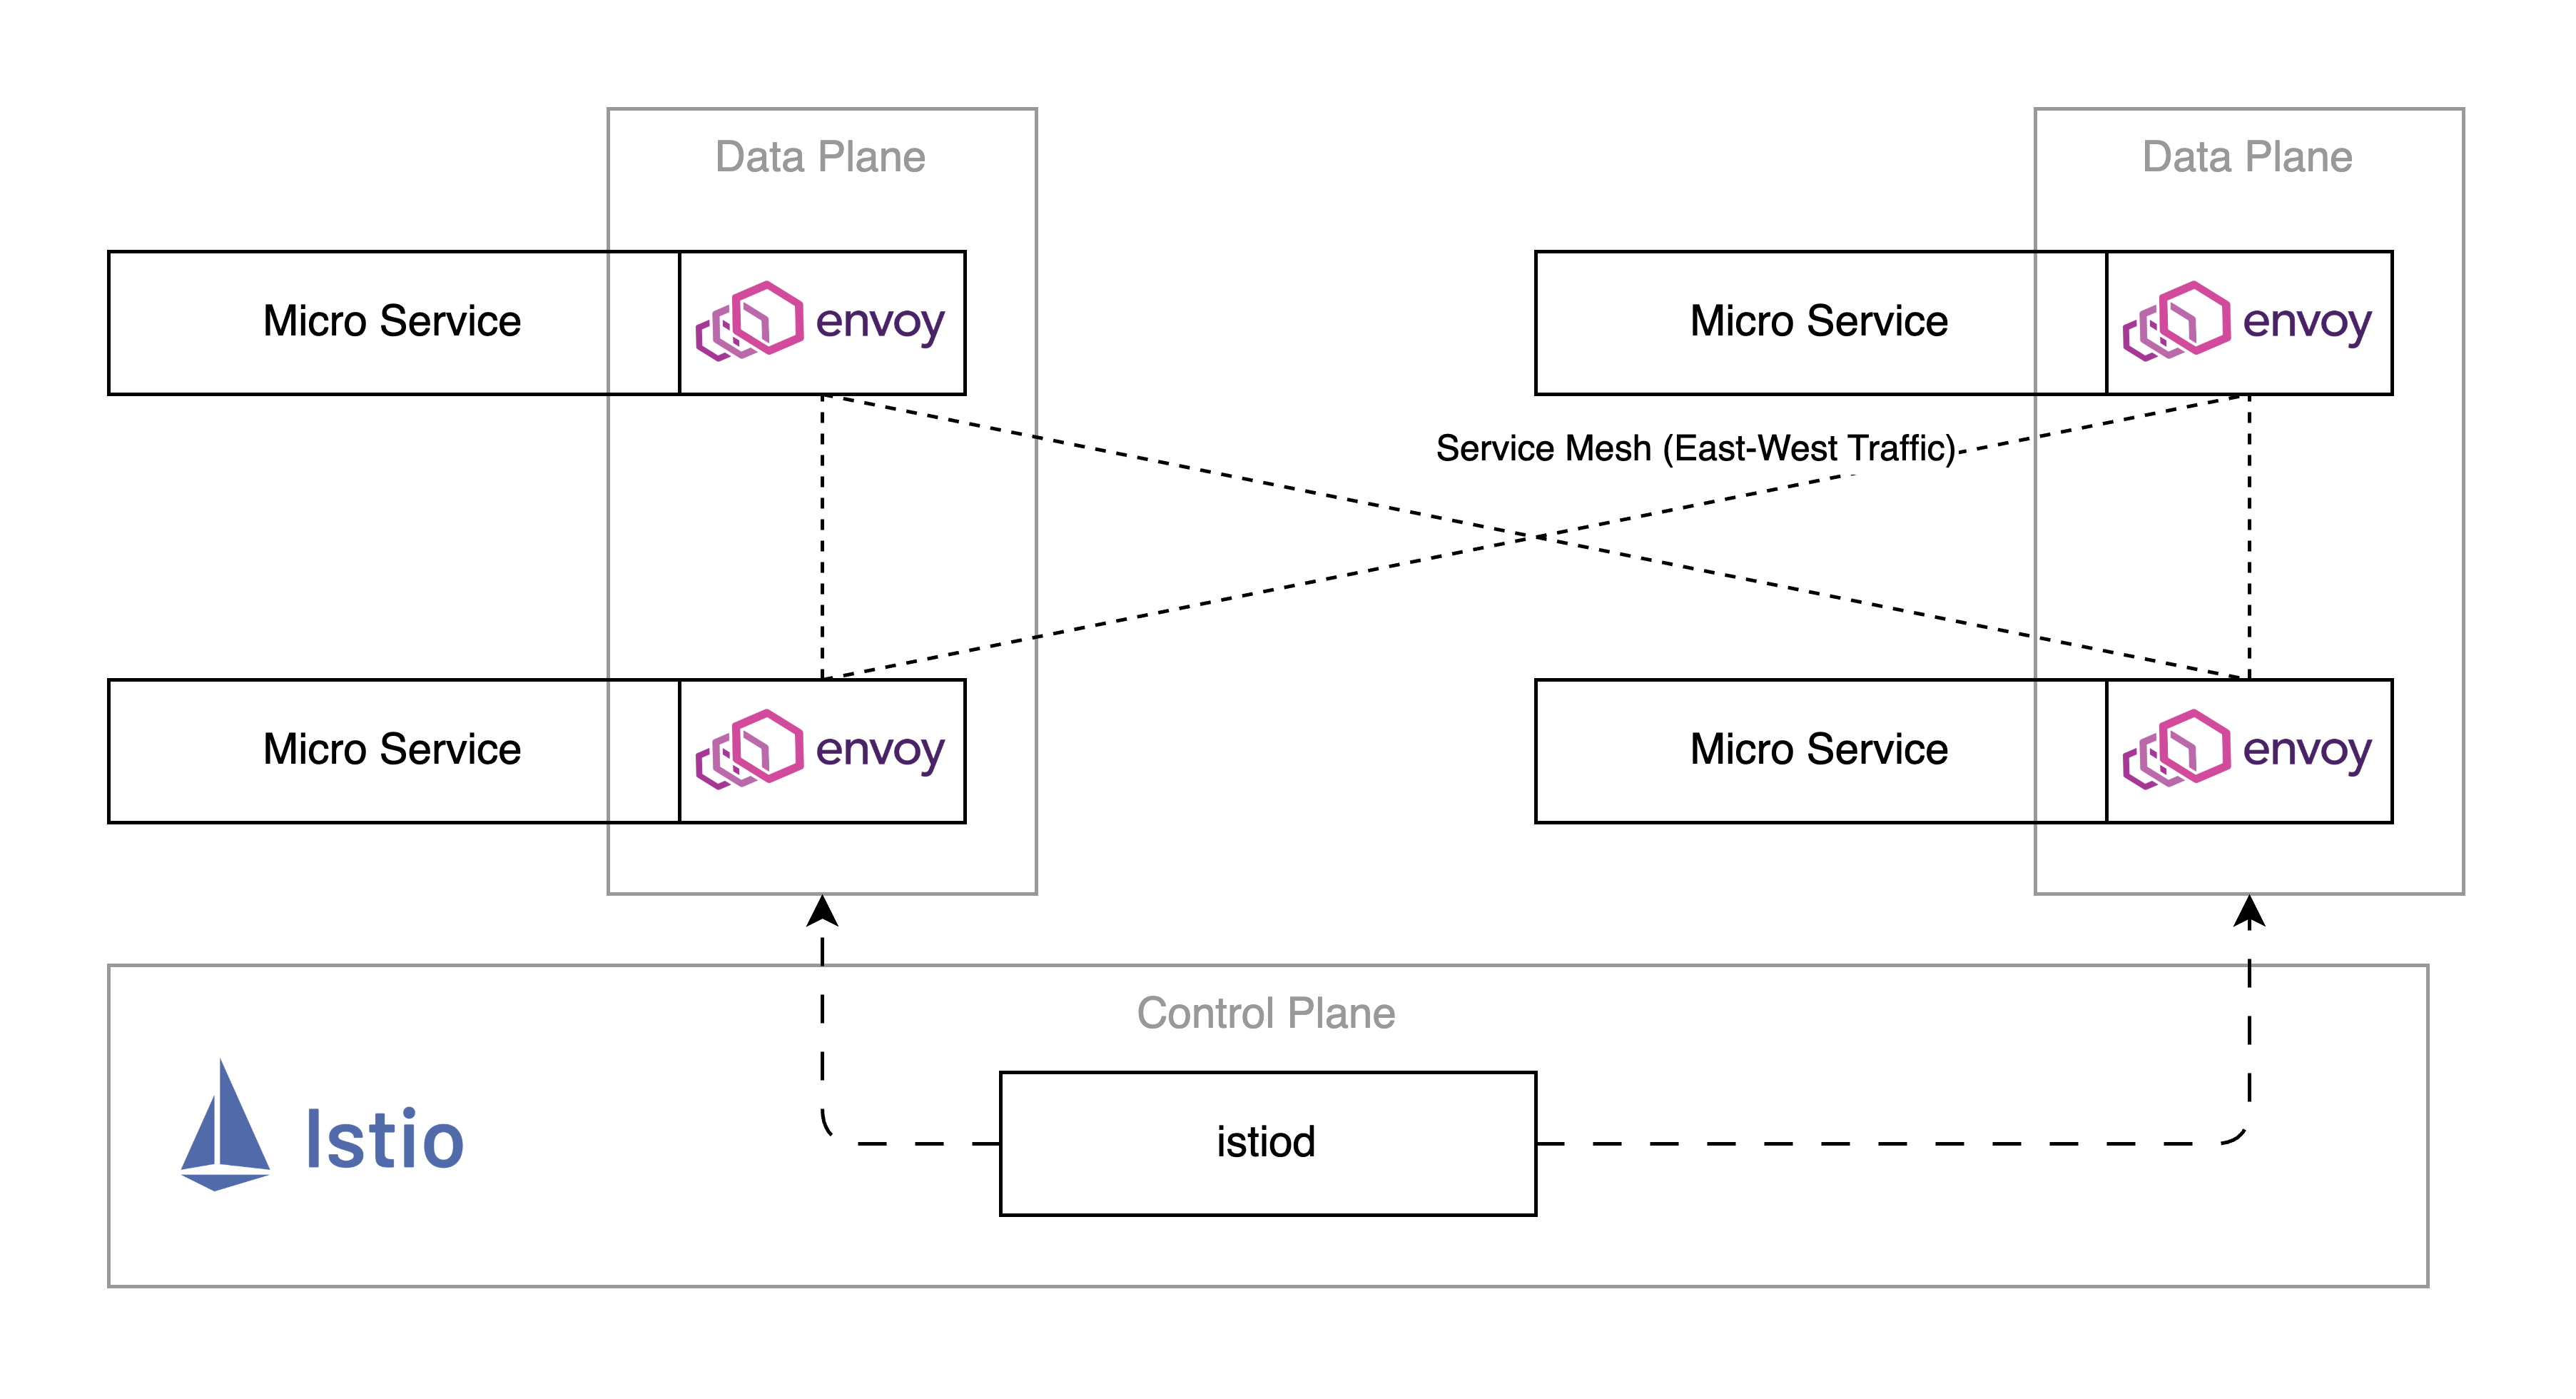
Istio 컨트롤 플레인 내부적으론 istiod를 통해 제어된다. (Pilot, Mixer, Citadel, Galley 등으로 구분되어 있었으나 istiod로 간소화되었다)
물론 mTLS, 세부적인 L7 트래픽 관리 및 모니터링(Observability) 등의 고급 기능이 필요하지 않을 경우 Istio를 사용할 이유가 없을 수 있지만 실제 대규모 서비스에선 서비스 메시가 복잡하게 구성되어 있기 때문에 충분히 사용할 수 있다.
Istio에서 공식으로 추구하는 내용은 아래와 같다.
- Secure by default: 기본적으로 서비스 간 네트워킹에서 mTLS로 암호화되어 통신하고, 세부적인 제어 정책으로 Zero-trust를 기본으로 한다.
- Increase observability: 서비스 간 네트워크 흐름을 실시간으로 모니터링하고, 상세한 Metrics와 로그를 제공한다.
- Manage traffic: Sidecar 프록시(Envoy)를 통해 서비스 레벨의 트래픽을 제어하고, A/B 테스팅과 카나리 배포 등을 쉽게 구성한다.
그리고 이러한 기능은 애플리케이션에서 코드를 수정할 필요 없이 클러스터 내 파드에 사이드카 컨테이너를 붙여 인프라 레벨로 동작할 수 있다.
Istio에 대해 간단하게 개념만 살펴보았고, 설명한 내용 외에도 Istio 및 Envoy 프록시엔 다양한 기능을 제공하는데, 이는 직접 찾아보길 바란다.
Istio Gateway API Controller
전에 다뤘던 AWS VPC Lattice + Gateway API 처럼 Istio 또한 Gateway API Istio Controller를 지원한다.
Istio에서 제공하는 쿠버네티스 CRD인 VirtualService, DestinationRule 등은 Gateway API를 사용하게 될 경우 HTTPRoute, ReferencePolicy 등의 표준 오브젝트를 통해 호환될 수 있고, 따라서 Gateway API 표준 리소스(오브젝트)만으로 Istio + Envoy의 기능을 사용할 수 있다.
이 예제의 경우 아래의 Example Demo에서 살펴보겠다.
2. Example Demo
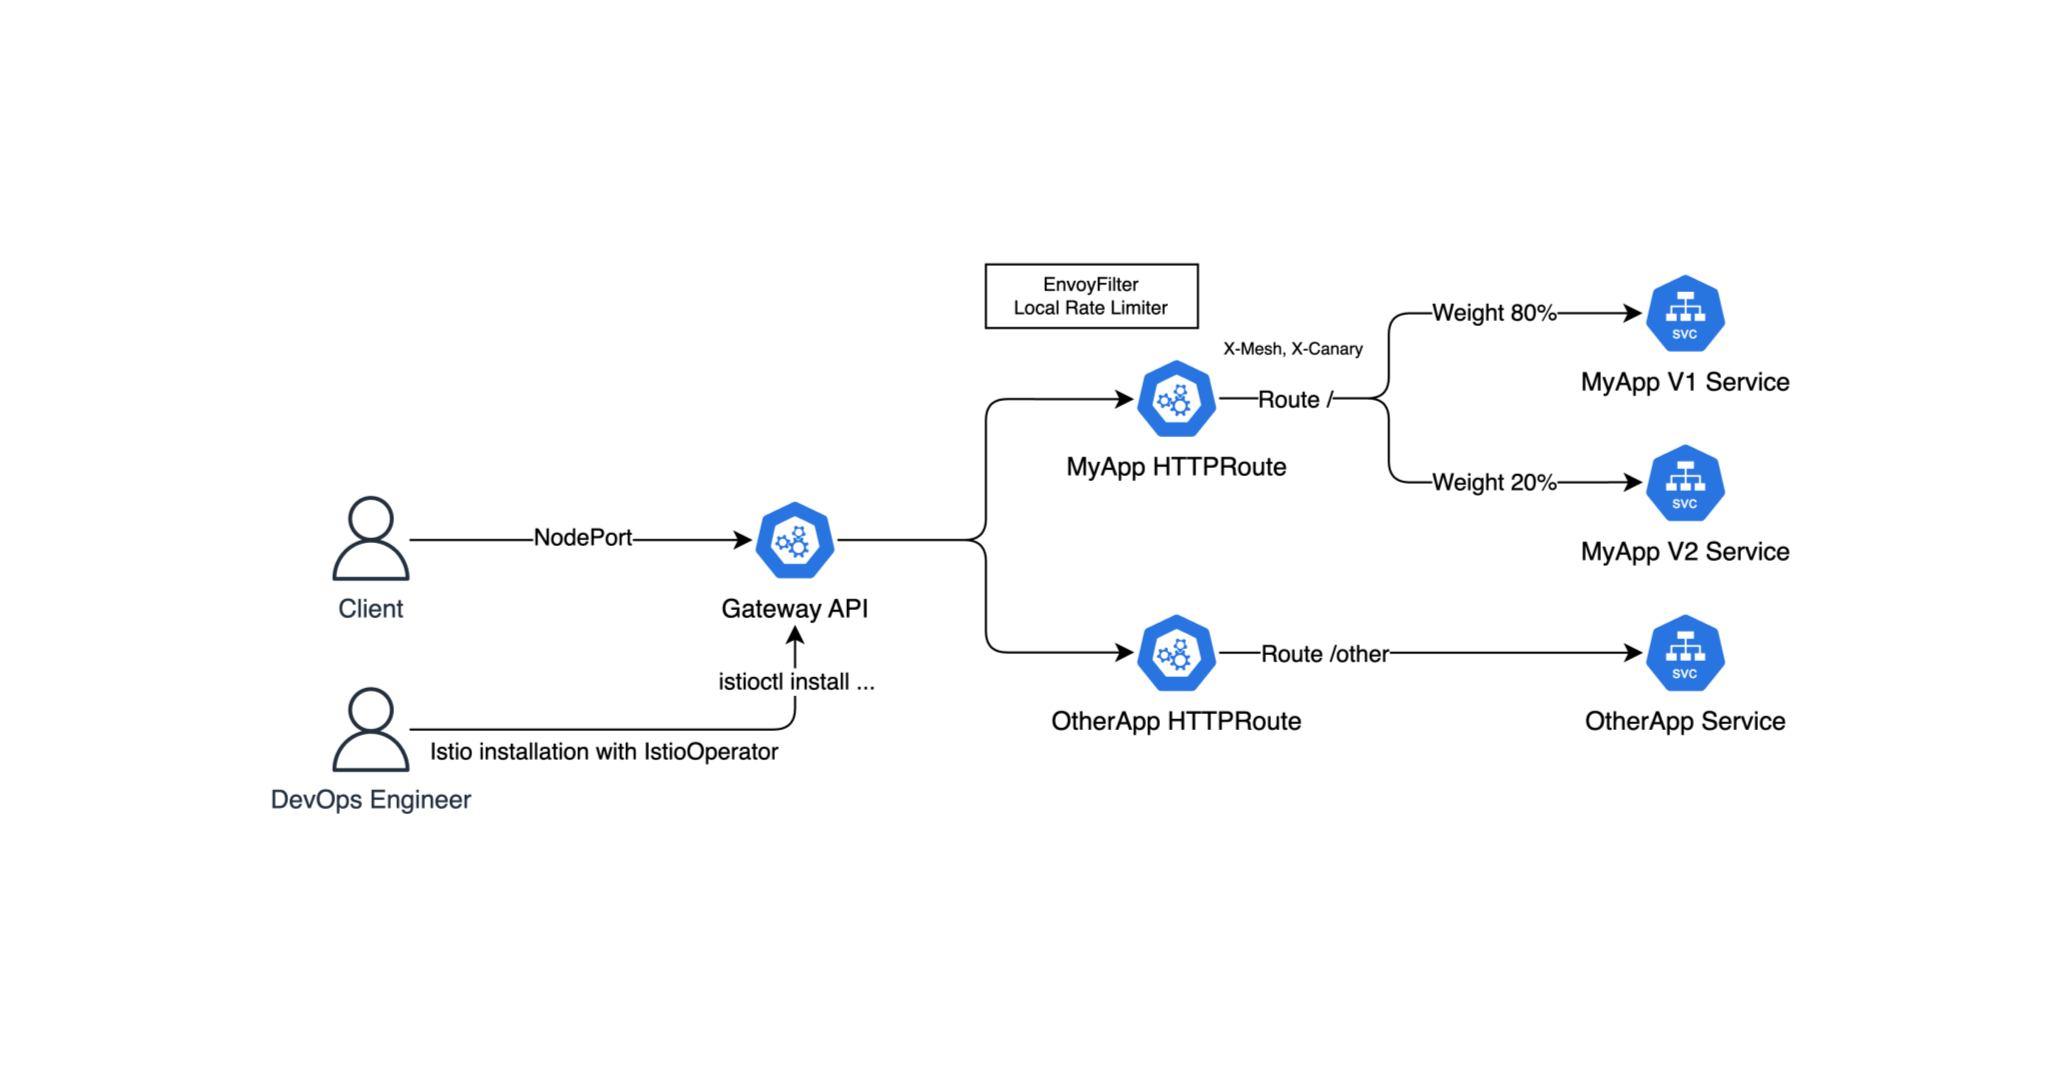
예제로 살펴볼 쿠버네티스 아키텍처는 아래와 같다.
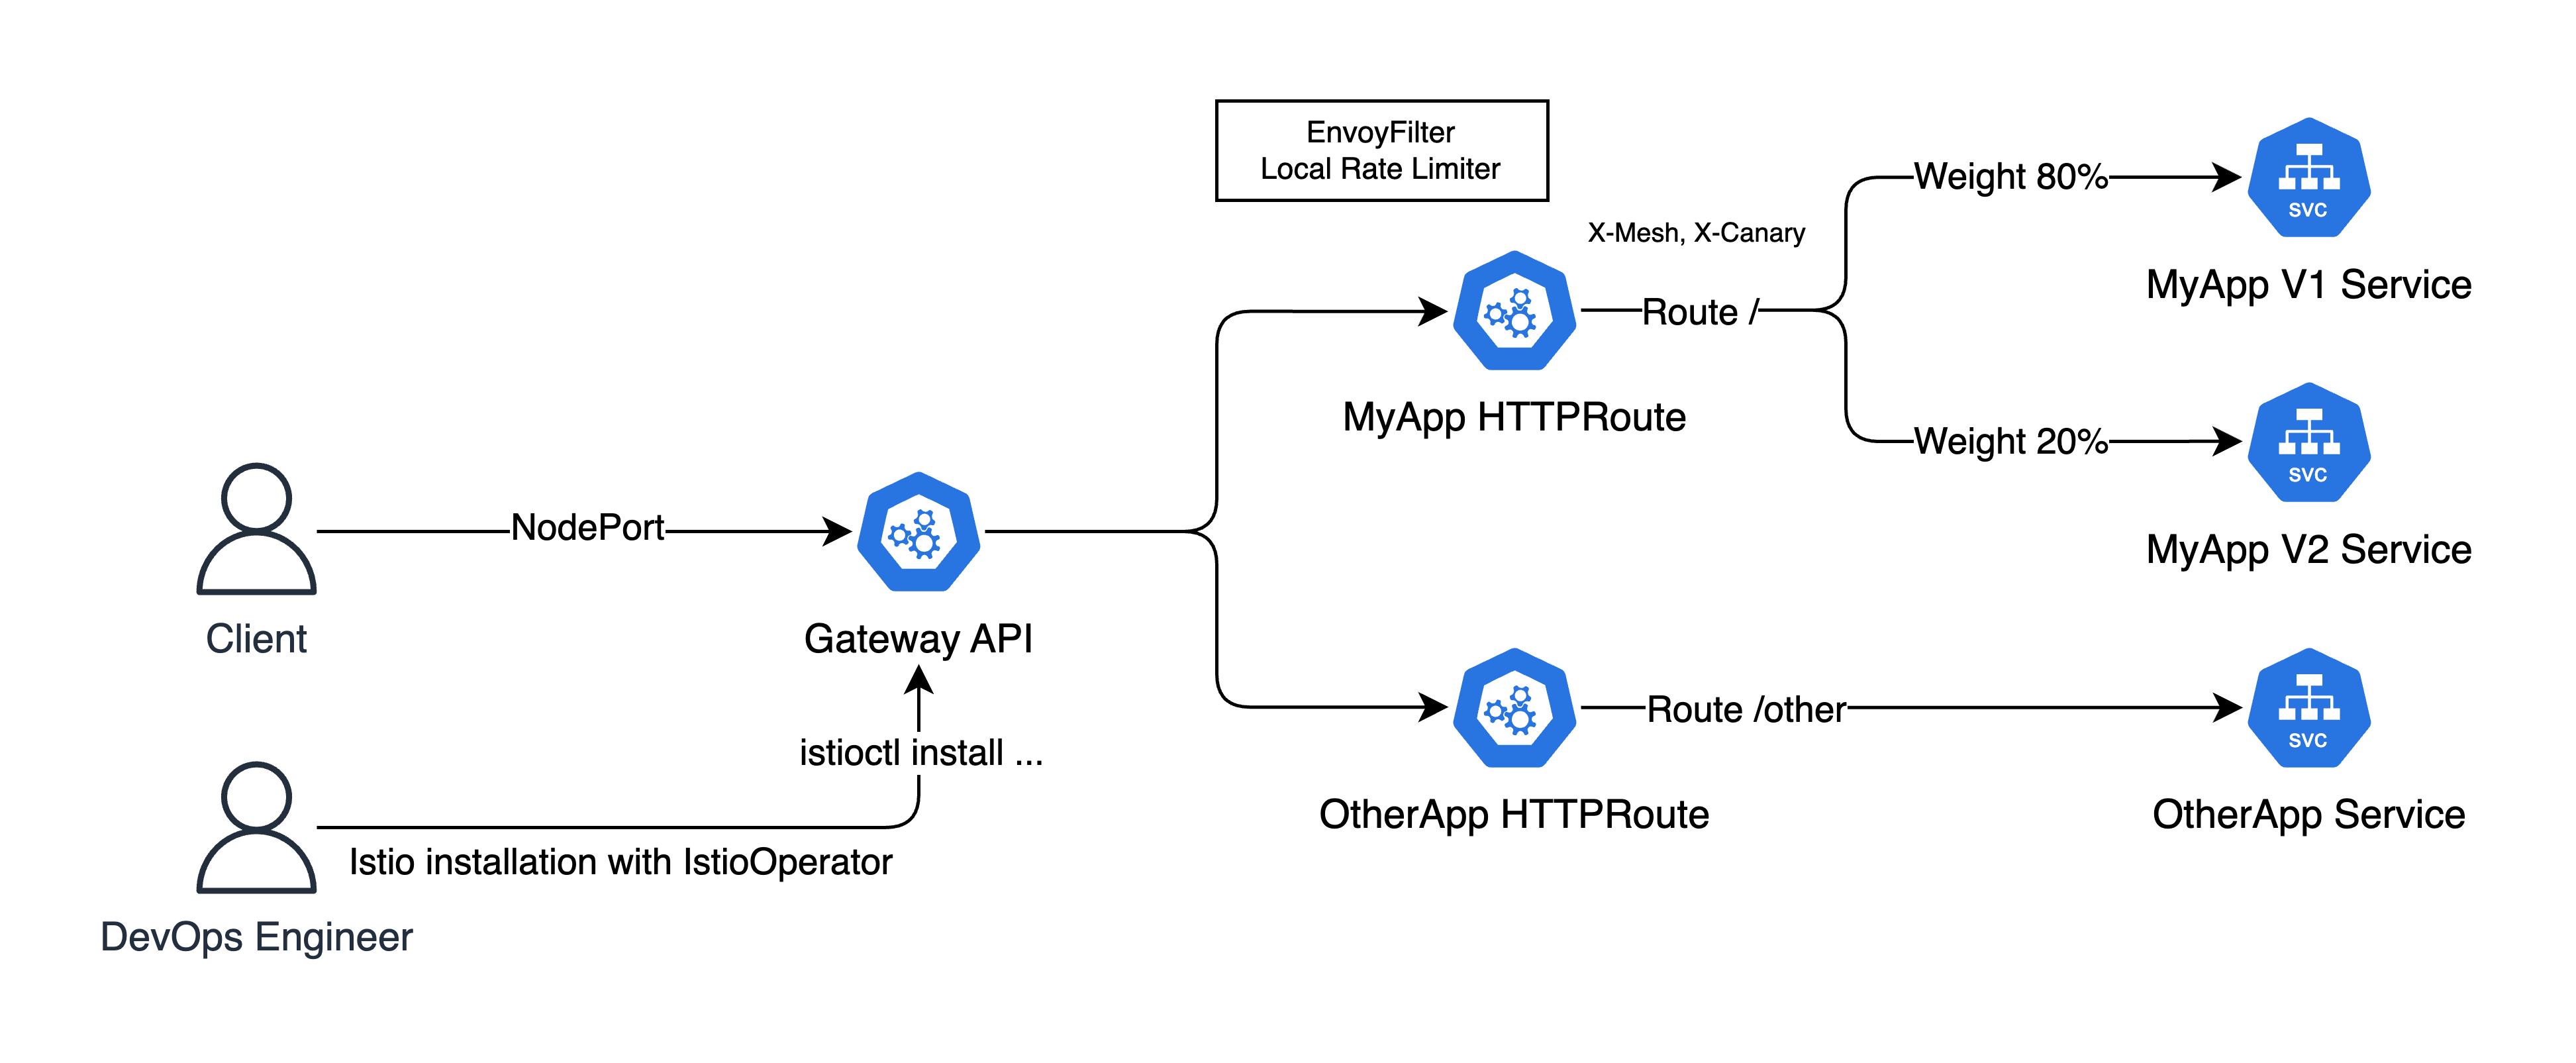
기본적으로 Istio Gateway API Controller를 사용하고, 그 앞단에 NodePort를 통해 테스트해보겠다.
그리고 두 HTTPRoute 리소르를 사용하여 / 라우트엔 MyApp 서비스, 그리고 MyApp V1은 80%, V2는 20%의 가중치를 둬서 카나리 배포를 해볼 것이다.
그리고 EnvoyFilter를 통해 Rate Limiting를 적용해볼 것이다.
(1) EKS Cluster
먼저 ClusterConfig를 선언하고 eksctl로 EKS 클러스터를 만들어보자.
# cluster.yaml

apiVersion: eksctl.io/v1alpha5
kind: ClusterConfig
metadata:
  name: eks-istio-demo
  region: ap-northeast-2
  version: "1.33"
vpc:
  cidr: 10.1.0.0/16
  nat:
    gateway: Single
managedNodeGroups:
  - name: ng-1
    instanceType: t3.medium
    desiredCapacity: 1
    privateNetworking: false
    iam:
      withAddonPolicies:
        ebs: true
eksctl create cluster -f cluster.yaml
aws eks update-kubeconfig --name eks-istio-demo --region ap-northeast-210분 ~ 15분 정도 시간이 소요되니 여유롭게 기다리자.
(2) Istio Gateway API
그리고 Istio를 설치해야 하는데, Helm 차트를 통해 설치할 수 있지만 istioctl이라는 도구를 제공한다.
맥 OS를 기준으로 brew install istioctl로 설치할 수 있다. 그리고 IstioOperator 리소스를 만들어 Istio Gateway API를 구성한다.
# istio-gwapi.yaml

apiVersion: install.istio.io/v1alpha1
kind: IstioOperator
metadata:
  name: istio-gwapi
spec:
  profile: default
  meshConfig:
    enableTracing: false
    accessLogFile: /dev/stdout
  values:
    gateways:
      istio-ingressgateway:
        type: NodePort
        enabled: true
    pilot:
      env:
        PILOT_ENABLE_GATEWAY_API: "true"
아래의 명령어로 이를 적용하고 설치한다.
istioctl install -y -f istio-gwapi.yaml
kubectl get svc -n istio-system istio-ingressgateway
(2) Deployments
이제 배포할 Deployment를 생성해야 하는데, 그 전에 istio-injection=enabled 라벨이 붙어있는 네임스페이스를 만들어야 Envoy 사이드카 프록시가 삽입된다.
kubectl create ns demo
kubectl label ns demo istio-injection=enabled
그리고 아래와 같은 Deployment를 배포한다.
# deployment.yaml

apiVersion: apps/v1
kind: Deployment
metadata:
  name: myapp-v1
spec:
  replicas: 1
  selector:
    matchLabels:
      app: myapp
      version: v1
  template:
    metadata:
      labels:
        app: myapp
        version: v1
    spec:
      containers:
        - name: myapp
          image: rlawnsdud/demo
          env:
            - name: HOST
              value: "0.0.0.0"
            - name: PORT
              value: "5678"
            - name: APP_NAME
              value: "myapp v1"
          ports:
            - containerPort: 5678
---
apiVersion: v1
kind: Service
metadata:
  name: myapp-v1
spec:
  selector:
    app: myapp
    version: v1
  ports:
    - name: http
      port: 80
      targetPort: 5678
---
apiVersion: apps/v1
kind: Deployment
metadata:
  name: myapp-v2
spec:
  replicas: 1
  selector:
    matchLabels:
      app: myapp
      version: v2
  template:
    metadata:
      labels:
        app: myapp
        version: v2
    spec:
      containers:
        - name: myapp
          image: rlawnsdud/demo
          env:
            - name: HOST
              value: "0.0.0.0"
            - name: PORT
              value: "5678"
            - name: APP_NAME
              value: "myapp v2"
          ports:
            - containerPort: 5678
---
apiVersion: v1
kind: Service
metadata:
  name: myapp-v2
spec:
  selector:
    app: myapp
    version: v2
  ports:
    - name: http
      port: 80
      targetPort: 5678
---
apiVersion: apps/v1
kind: Deployment
metadata:
  name: otherapp
spec:
  replicas: 1
  selector:
    matchLabels:
      app: otherapp
  template:
    metadata:
      labels:
        app: otherapp
    spec:
      containers:
        - name: otherapp
          image: rlawnsdud/demo
          env:
            - name: HOST
              value: "0.0.0.0"
            - name: PORT
              value: "5678"
            - name: APP_NAME
              value: "otherapp"
            - name: GLOBAL_PREFIX
              value: "/other"
          ports:
            - containerPort: 5678
---
apiVersion: v1
kind: Service
metadata:
  name: otherapp
spec:
  selector:
    app: otherapp
  ports:
    - name: http
      port: 80
      targetPort: 5678
적용 후 생성된 파드를 선택하여 describe하면 아래와 같이 Istio Envoy 사이드카 프록시가 자동으로 인젝션 된 것을 볼 수 있다.

(3) Gateway, HTTPRoute
그리고 Gateway 리소스와 두 개의 HTTPRoute 리소스를 생성하여 Gateway와 연결해보자.
만약 Gateway CRD가 없다면 아래의 명령어를 통해 설치해주자.
kubectl get crd gateways.gateway.networking.k8s.io httproutes.gateway.networking.k8s.io
# CRD가 없을 경우 설치
kubectl apply -f https://github.com/kubernetes-sigs/gateway-api/releases/download/v1.1.0/standard-install.yaml
그리고 아래의 Gateway 리소스를 선언한다.
# gateway.yaml

apiVersion: gateway.networking.k8s.io/v1
kind: GatewayClass
metadata:
  name: istio
spec:
  controllerName: istio.io/gateway-controller
---
apiVersion: gateway.networking.k8s.io/v1
kind: Gateway
metadata:
  name: istio-gwapi
spec:
  gatewayClassName: istio
  listeners:
  - name: http
    protocol: HTTP
    port: 80
    allowedRoutes:
      namespaces:
        from: All
kubectl apply -n demo -f gateway.yaml그리고 두개의 HTTPRoute를 선언한다.
# httproute-myapp.yaml

apiVersion: gateway.networking.k8s.io/v1
kind: HTTPRoute
metadata:
  name: myapp-route
spec:
  parentRefs:
  - kind: Gateway
    name: istio-gwapi
  rules:
  - matches:
    - path:
        type: PathPrefix
        value: /
    backendRefs:
    - name: myapp-v1
      port: 80
      weight: 80
    - name: myapp-v2
      port: 80
      weight: 20
    filters:
    - type: RequestHeaderModifier
      requestHeaderModifier:
        add:
          - name: X-Mesh
            value: istio
        set:
          - name: X-Canary
            value: "v2-20pct"
    - type: ResponseHeaderModifier
      responseHeaderModifier:
        add:
          - name: X-Mesh
            value: istio
        set:
          - name: X-Canary
            value: "v2-20pct"
# httproute-otherapp.yaml
apiVersion: gateway.networking.k8s.io/v1
kind: HTTPRoute
metadata:
name: other-route
spec:
parentRefs:
- kind: Gateway
name: istio-gwapi
rules:
- matches:
- path:
type: PathPrefix
value: /other
backendRefs:
- name: otherapp
port: 80kubectl apply -n demo -f httproute-myapp.yaml
kubectl apply -n demo -f httproute-otherapp.yaml(4) Testing
그럼 이제 기본적인 라우팅 설정이 끝났다. 포스팅에선 간단하게 NodePort를 통해 외부에서 접속할 수 있으므로 노드의 IP와 포트를 사용하여 접속해보자.
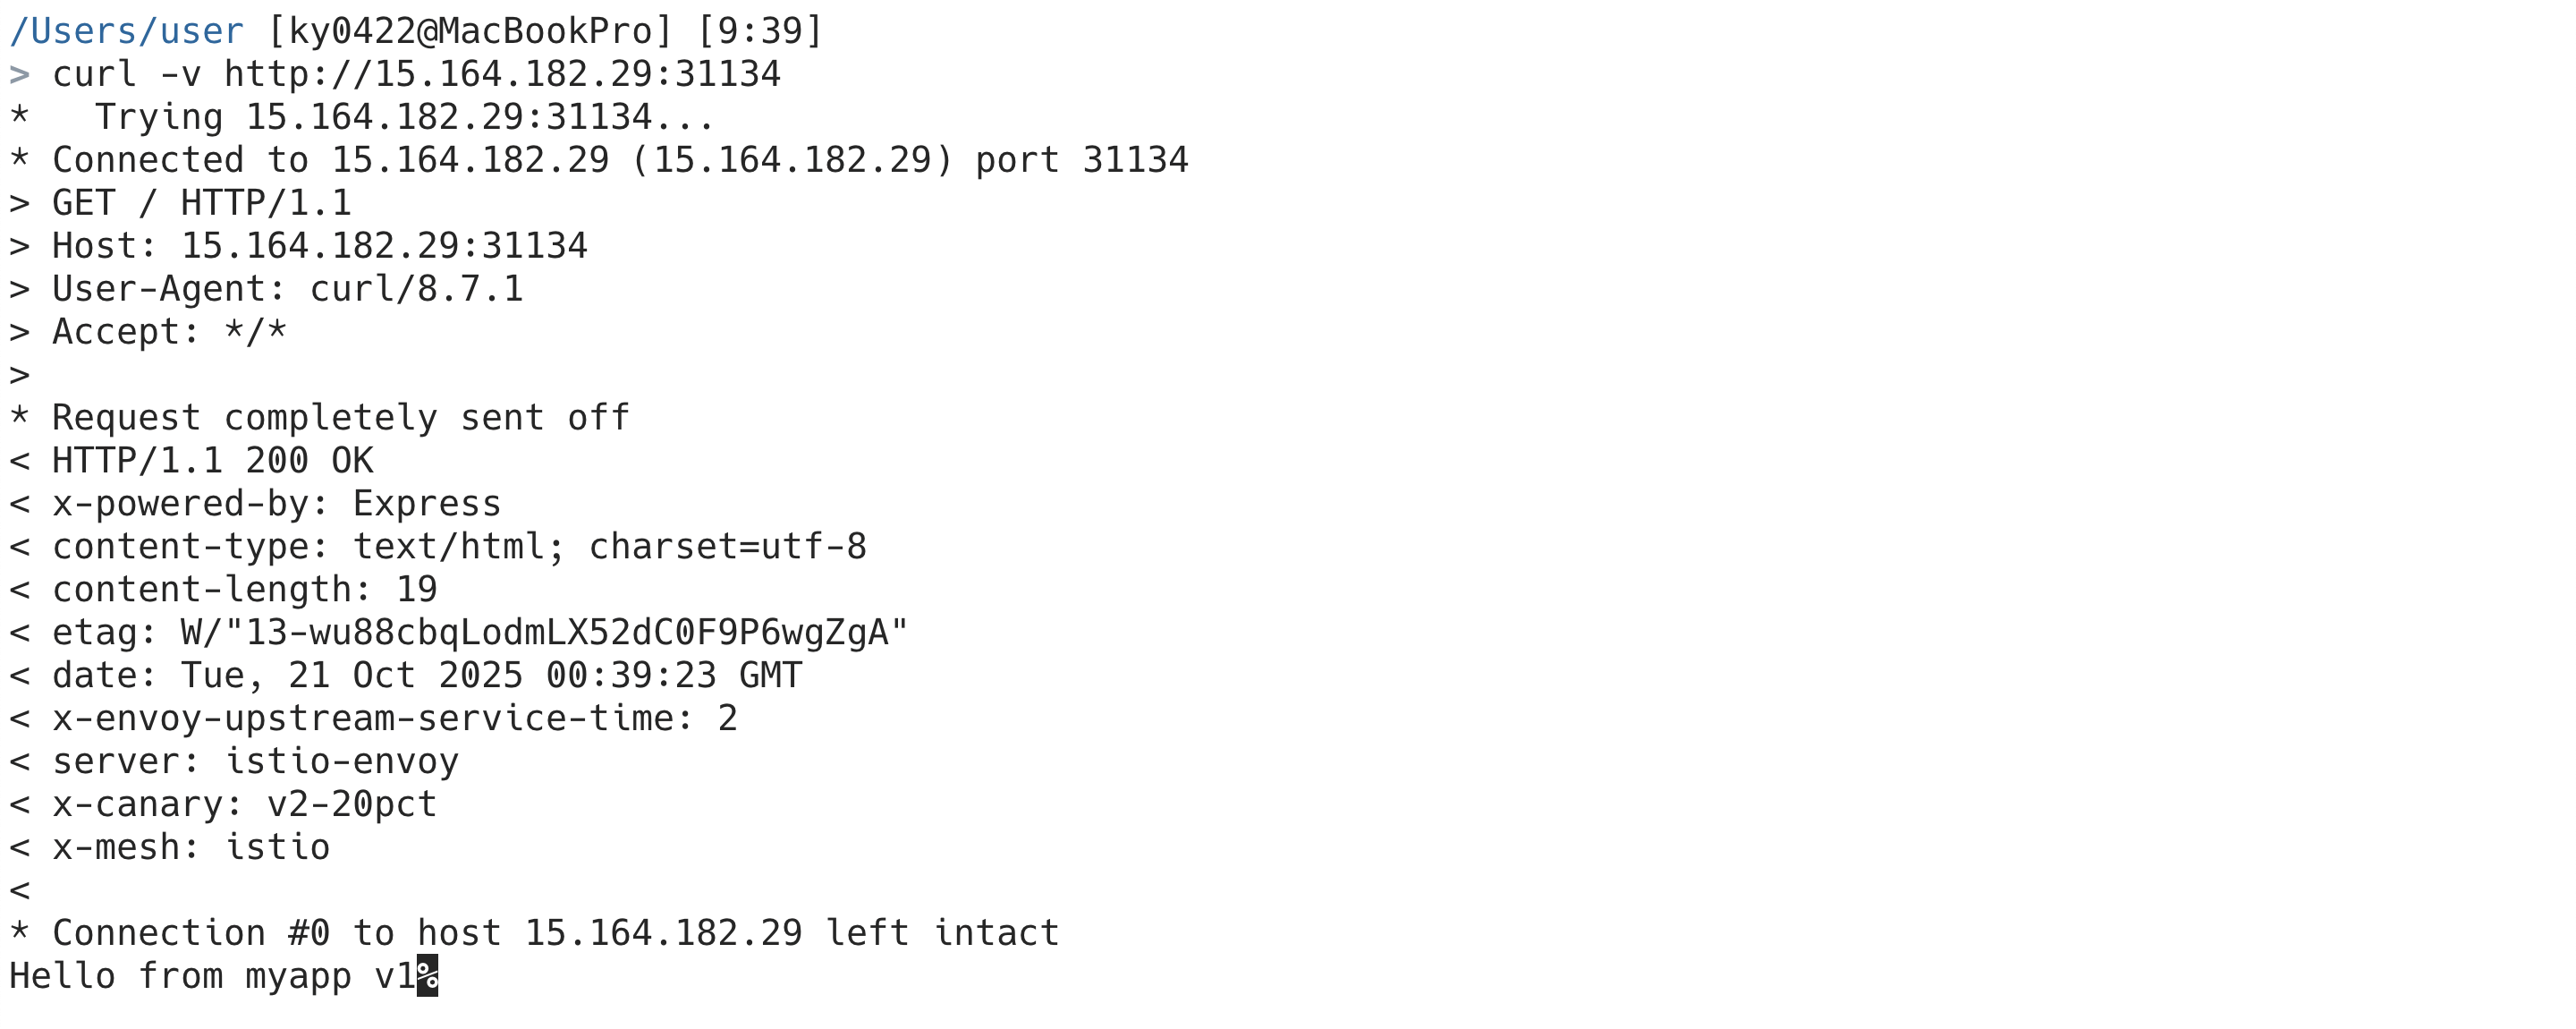
먼저 HTTPRoute에 선언해둔대로 x-canary 헤더와 x-mesh 헤더가 추가된 것을 볼 수 있다. (요청, 응답 둘 다 적용)
이제 MyApp에서 카나리, 즉 가중치가 잘 동작하는지 확인해보자.
# check_canary.py

import requests
import time

url = "http://15.164.182.29:31134"
count = 100
v1 = v2 = 0

for i in range(count):
    try:
        r = requests.get(url, timeout=3)
        text = r.text.strip()
        if "v1" in text:
            v1 += 1
        elif "v2" in text:
            v2 += 1
    except requests.RequestException:
        pass
    time.sleep(0.1)

total = v1 + v2
print(f"v1: {v1}, v2: {v2}")
if total > 0:
    print(f"v1: {v1*100/total:.1f}% / v2: {v2*100/total:.1f}%")
else:
    print("No valid responses.")
> python3 check_canary.py
v1: 79, v2: 21
v1: 79.0% / v2: 21.0%만약 각 요청 후 약간의 딜레이를 준다면 더욱 더 정확하게 나올 것이다. 다음으로 EnvoyFilter를 /other 라우팅(HTTPRoute/other-route)에 적용하고 Rate Limiting을 테스트해보겠다.
(5) Rate Limiting with EnvoyFilter
아래와 같은 EnvoyFilter 리소스를 생성하자.
apiVersion: networking.istio.io/v1alpha3
kind: EnvoyFilter
metadata:
  name: ingress-local-ratelimit
spec:
  workloadSelector:
    labels:
      istio: ingressgateway
  configPatches:
    - applyTo: HTTP_FILTER
      match:
        context: SIDECAR_INBOUND
        listener:
          filterChain:
            filter:
              name: "envoy.filters.network.http_connection_manager"
      patch:
        operation: INSERT_BEFORE
        value:
          name: envoy.filters.http.local_ratelimit
          typed_config:
            "@type": type.googleapis.com/udpa.type.v1.TypedStruct
            type_url: type.googleapis.com/envoy.extensions.filters.http.local_ratelimit.v3.LocalRateLimit
            value:
              stat_prefix: http_local_rate_limiter
              token_bucket:
                max_tokens: 10
                tokens_per_fill: 5
                fill_interval: 60s
              filter_enabled:
                runtime_key: local_rate_limit_enabled
                default_value:
                  numerator: 100
                  denominator: HUNDRED
              filter_enforced:
                runtime_key: local_rate_limit_enforced
                default_value:
                  numerator: 100
                  denominator: HUNDRED
              response_headers_to_add:
                - append_action: APPEND_IF_EXISTS_OR_ADD
                  header:
                    key: x-rate-limited
                    value: TOO_MANY_REQUESTS
              status:
                code: 429
kubectl apply -n istio-system -f istio-envoy-filter.yaml토큰 버킷 알고리즘을 바탕으로 아래와 같은 동작한다.
- 시작 시 버킷엔 10개의 토큰이 들어 있음
- 요청 1개가 들어오면 1개의 토큰이 소모됨
- 10개 이후엔 버킷이 비고, 429 응답 반환
- 1분마다 5개씩 토큰이 다시 채워짐 (
tokens_per_fill,fill_interval)
그리고 아래의 명령어를 실행하여 Rate Limit을 테스트해보자.
seq 1 100 | \
xargs -I{} -P100 curl -s -o /dev/null -w "%{http_code}\n" \
  http://3.34.180.38:32165 | \
sort | uniq -c && \
curl -I http://3.34.180.38:32165
그러면 아래와 같은 결과가 나타날 것이다.
  20 200
  80 429
HTTP/1.1 429 Too Many Requests
x-rate-limited: TOO_MANY_REQUESTS
content-length: 18
content-type: text/plain
date: Tue, 21 Oct 2025 05:55:11 GMT
server: istio-envoy
x-envoy-upstream-service-time: 0
x-canary: v2-20pct
x-mesh: istio
그런데 이상한 점을 느낄 수 있는데, 초기에 10개의 토큰이 있고 1분마다 5개씩 토큰이 채워지는데 왜 20개의 요청이 200이 응답되는지 궁금할 수 있다.
그 이유는 파드가 MyApp V1과 V2가 있기 때문으로, Limiting이 파드별 Envoy 인스턴스 단위로 저장된다.
만약 myapp이 아닌 otherapp으로 변경하면 아래와 같이 예상대로 나타나는 것을 볼 수 있다.
> seq 1 100 | xargs -I{} -P100 curl -s -o /dev/null -w "%{http_code}\n" http://3.34.180.38:32165/other | sort | uniq -c && curl -I http://3.34.180.38:32165/other 10 200
90 429
HTTP/1.1 429 Too Many Requests
x-rate-limited: TOO_MANY_REQUESTS
content-length: 18
content-type: text/plain
date: Tue, 21 Oct 2025 06:12:39 GMT
server: istio-envoy
x-envoy-upstream-service-time: 0이상으로 간단하게 쿠버네티스에서 Istio + Envoy를 실습해보았다.
더욱 더 많이 기능과 고급 기능이 많지만 간단하게 여기까지만 다뤄보겠다.