사용 영역에 따른 종류
멤버 변수 / 메서드
- 인스턴스 멤버변수 / 메서드 - 클래스에서 / 후에 객체 선언, 생성해야함
- 클래스 멤버변수 / 메서드 -클래스 안에서 클래스끼리 (데이터 공유 가능), 객체 생성하지 않아도 사용 가능
인스턴스 / static 차이
인스턴스 멤버 변수는 new 연산자를 통하여 객체를 생성해줘야 하고, 객체 이름이 동일하다 하더라도 각각 다른 객체이기 때문에 다른 값을 가지지만, 클래스 멤버 변수는 객체가 소속이 아닌 클래스 소속이기 때문에 객체를 생성하지 않아도 사용할 수 있으며, 각각 다른 객체에서도 값이 동일하게 출력된다.(공유데이터 생각)
class Variable {
//인스턴스 멤버 변수
String instanceVariable;
//클래스 멤버 변수
static String classVariable;
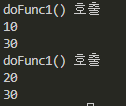
void doFunc1() {
System.out.println("doFunc1() 호출");
System.out.println(instanceVariable);
System.out.println(classVariable);
}
static void doFunc2() {
System.out.println("doFunc2() 호출");
}
}
public class Variable09 {
public static void main(String[] args) {
Variable v1 = new Variable();
Variable v2 = new Variable();
v1.instanceVariable = "10";
v2.instanceVariable = "20";
Variable.classVariable = "30";
v1.doFunc1();
v2.doFunc1();
}
}
또한 스태틱에서 인스턴스객체를 사용할 수 없다(객체 생성 불가)

스태틱 메서드에서 인스턴스 객체 생성 시 발생하는 오류 문구
public class Variable10 {
    String instanceVariable = "10";
    static String ClassVariable = "20";
    public static void main(String[] args) {
        //static 선언했기 때문에 인스턴스는 사용불가, 굳이 사용하려면 인스턴스화 과정 거친 후 사용해야 함
        //System.out.println(instanceVariable);

        System.out.println(ClassVariable);

        Variable10 v1 = new Variable10();
        v1.instanceVariable = "20";
        System.out.println(v1.instanceVariable);

    }

}
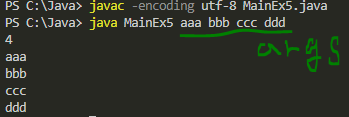
String[] args
프로그램 실행 시에 옵션 입력, 옵션을 문자열로 받아준다.
public class MainEx5 {
    public static void main(String[] args) { //프로그램 실행 시에 옵션입력, 옵션을 문자열로 받아줌
        System.out.println(args.length);

        for(int i =0; i<args.length; i++) {
            System.out.println(args[i]);
        }
    }
}
this(자기참조)
필드변수(멤버 변수)라고 명확하게 명시하기 위해 사용하는 것
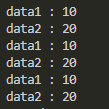
class Method {
String data1;
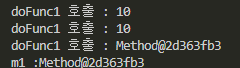
void doFunc1(String data1) {
this.data1 = data1; //this를 붙여 필드 변수라고 명시하기 위함
System.out.println("doFunc1 호출 : " + data1);
System.out.println("doFunc1 호출 : " +this.data1);
//내부에서 참조 값을 this로 확인 가능(자기 참조)
System.out.println("doFunc1 호출 : " + this);
}
}
public class Method1 {
public static void main(String[] args) {
Method m1 = new Method();
m1.doFunc1("10");
//m1 참조 값 출력
System.out.println("m1 :" + m1);
}
}
생성자
생성자가 없으면 자동으로 생성(디폴트 생성자),
리턴값이 없다.
생성 방법 : 클래스 이름() { ~~~ }
Deprecated. -> 언제 없어질 지 모르니 사용 자제하라는 뜻
다른 생성자를 호출하는 this()
this() - 반드시 생성자의 첫문장에 기술 되어야 함(주석 이외 실행문 올 경우 에러)
class Constrctor {
    String data1;
    String data2;

    Constrctor() {
        System.out.println("시작");
        this("10", "20");     --> 중복으로 this. 선언할 때 this()로 대신 사용 가능

        //생성자는 일반 메서드처럼 호출 불가, this 통해서 호출
        //Constructor("10", "20"); (X)
    }

    Constrctor(String data1) {
        this(data1, "20");
    }

    Constrctor(String data1, String data2) {
        this.data1 = data1;
        this.data2 = data2;

        System.out.println("data1 : " + this.data1);
        System.out.println("data2 : " + this.data2);
    }
}
public class Constrctor2 {
    public static void main(String[] args) {
        Constrctor c1 = new Constrctor();
        Constrctor c2 = new Constrctor("10");
        Constrctor c3 = new Constrctor("10", "20");


    }
}
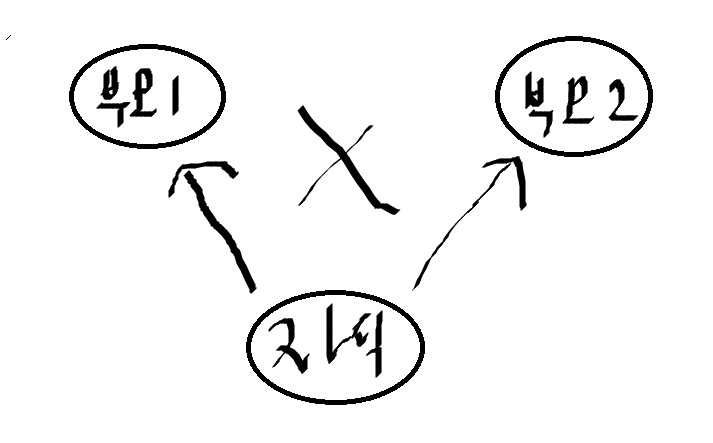
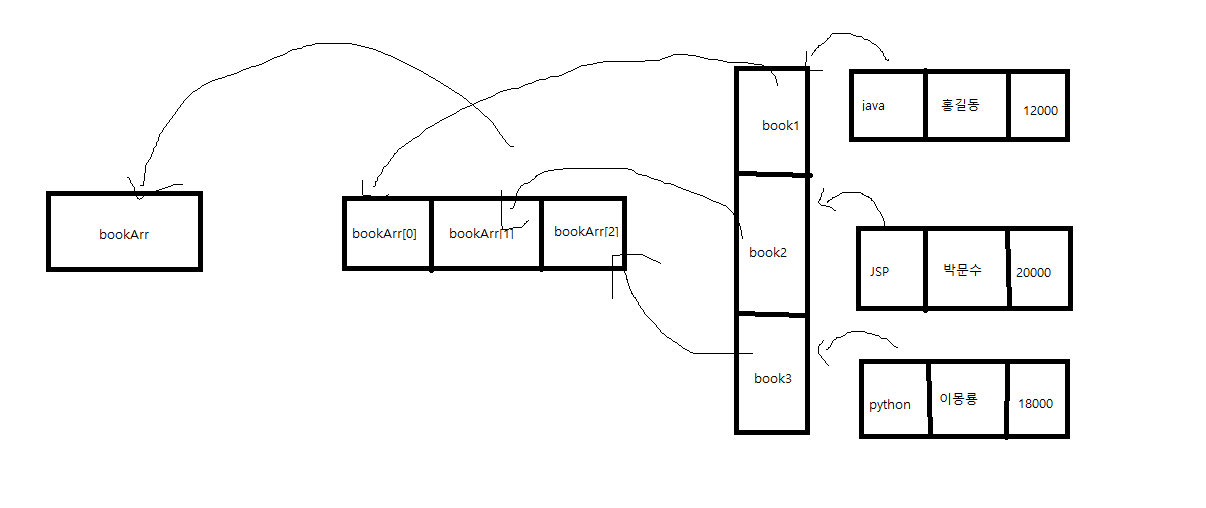
참조 자료형 배열
class Book {
String title;
String author;
int price;
Book(String title, String author, int price) {
this.title = title;
this.author = author;
this.price = price;
}
}
public class Array7 {
public static void main(String[] args) {
//참조 자료형 배열
Book bookArr[] = new Book[3];
//객체 생성
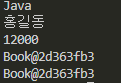
Book book1 = new Book("Java", "홍길동", 12000);
Book book2 = new Book("JSP", "박문수", 20000);
Book book3 = new Book("Python", "이몽룡", 18000);
bookArr[0] = book1;
bookArr[1] = book2;
bookArr[2] = book3;
System.out.println(bookArr[0].title);
System.out.println(bookArr[0].author);
System.out.println(bookArr[0].price);
//참조값 들어있음(두 주소가 같다.)
System.out.println(bookArr[1]);
System.out.println(book2);
}
}
참조 구도 그림
위의 요소들을 각각 for문 / 향상된 for문으로 가져오기
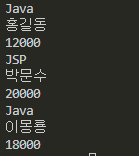
        for(int i = 0; i < bookArr.length; i++) {
            System.out.println(bookArr[i].title);
            System.out.println(bookArr[i].author);
            System.out.println(bookArr[i].price);
        }

        //향상된 포문
        for(Book bookArrs : bookArr) {
            System.out.println(bookArrs.title);
            System.out.println(bookArrs.author);
            System.out.println(bookArrs.price);
        }
    }
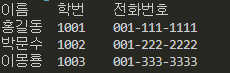
배열로 주소록 출력하기
방법1(2차원 배열)
public class Array8_1 {
    public static void main(String[] args) {
        String addressArr[][] = new String[][] {
            {"이름", "학번", "전화번호"},
            {"홍길동", "1001", "001-111-1111"},
            {"박문수", "1002", "001-222-2222"},
            {"이몽룡", "1003", "001-333-3333"},
        };

    for(String addressArrs[]: addressArr) {
        for(String Arrs: addressArrs) {
            System.out.print(Arrs + '\t');
        }
        System.out.println();
    }
    }
}
방법2(배열 + 클래스)
class Address {
    String name;
    String hakbun;
    String Pnumber;

    public Address(String name, String hakbun, String pnumber) {
        this.name = name;
        this.hakbun = hakbun;
        this.Pnumber = pnumber;
    }
}

public class Array8 {
    public static void main(String[] args) {
        Address adr[] = new Address[4];

        Address adr0 = new Address("이름", "학번", "전화번호");
        Address adr1 = new Address("홍길동", "1001", "001-111-1111");
        Address adr2 = new Address("박문수", "1002", "001-222-2222");
        Address adr3 = new Address("이몽룡", "1003", "001-333-3333");

        adr[0] = adr0;
        adr[1] = adr1;
        adr[2] = adr2;
        adr[3] = adr3;

        for(Address adrs : adr) {
            System.out.println(adrs.name + '\t' + adrs.hakbun + '\t' + adrs.Pnumber);
        }
    }
}
방법2에서 한번에 생성하기
class Address {
    String name;
    String hakbun;
    String Pnumber;

    public Address(String name, String hakbun, String pnumber) {
        this.name = name;
        this.hakbun = hakbun;
        this.Pnumber = pnumber;
    }
}

public class Array8 {
    public static void main(String[] args) {
        Address adr[] = new Address[4];

        adr[0] = new Address("이름", "학번", "전화번호");   --> 한번에 생성하기
        adr[1] = new Address("홍길동", "1001", "001-111-1111");
        adr[2] = new Address("박문수", "1002", "001-222-2222");
        adr[3] = new Address("이몽룡", "1003", "001-333-3333");

        for(Address adrs : adr) {
            System.out.println(adrs.name + '\t' + adrs.hakbun + '\t' + adrs.Pnumber);
        }
    }
}
OOP 객체 지향 프로그램 4가지 성격(문법)
= (OOP is A.P.I.E)
여러개 클래스 사용하기 위한 문법
1. 은닉(캡슐화 : data hiding) - 접근 제어자(Access Modifier)
2. 상속(Inheritance)
3. 추상
4. 다형
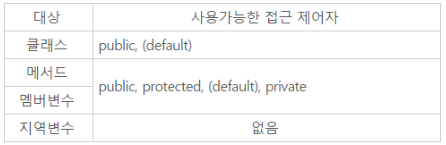
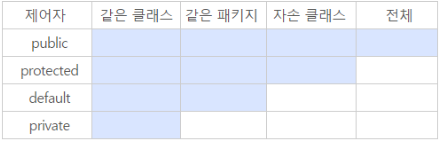
접근 제어자
해당 요소를 외부에서 사용할 수 있게 할 것인지를 제어함
default는 이 중 별도의 키워드 없이 접근 제어자를 생략하는 것이다.
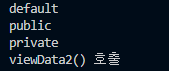
class Modifier {
    String data1 = "default";
    public String data2 = "public";
    //데이터는 private이 기본
    private String data3 = "private";

    void viewData1() {
        System.out.println(this.data1);
        System.out.println(this.data2);
        System.out.println(this.data3);

    }

    //메서드는 public이 기본
    public void viewData2() {
        System.out.println("viewData2() 호출");
    }

    private void viewData3() {
        System.out.println("viewData3() 호출");
    }
}

public class Modifier1 {
    public static void main(String[] args) {
        Modifier m = new Modifier();
        // System.out.println(m.data1);
        // System.out.println(m.data2);
        // //private이라 에러 발생
        // System.out.println(m.data3);

        m.viewData1();
        m.viewData2();
        //m.viewData3();
    }
}
getter / setter 활용하여 private 접근하기
class BelievableUserInfo {
    private String name = "홍길동";
    private int account = 10000;

    public String getName() {
        return this.name;
    }

    public void setName(String name) {
        if(name != null) this.name = name;
        else System.out.println("부적절한 name 할당 시도 무시 : " + name);
    }

    public int getAccount() {
        return this.account;
    }

    public void setAccount(int account) {
        if(account > 0) this.account= account;
            else System.out.println("부적절한 account 할당 기도 무시" + account);
        }
    }

public class Modifier4 {
    public static void main(String[] args) {
        BelievableUserInfo info = new BelievableUserInfo();
        System.out.printf("사용자 정보 : %s %d %n", info.getName(), info.getAccount());

        info.setName("고길동");
        info.setAccount(20000);
        System.out.printf("사용자 정보 : %s %d %n", info.getName(), info.getAccount());
    }
}

상속
부모클래스의 멤버/메서드 등을 자식클래스가 사용할 수 있는 것
extends 키워드를 통해 상속관계 가능
다중상속은 포함하지 않는다. 단일 상속만 사용
부모클래스 ------- 자식클래스
(공통클래스) ------- (서브클래스)
class 자식 클래스 이름 extends 부모 클래스 이름
--> 부모의 멤버필드와 메서드 사용 가능
//부모 클래스
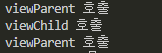
class Parent {
void viewParent() {
System.out.println("viewParent 호출");
}
}
class Child1 {
void viewChild() {
System.out.println("viewChild 호출");
}
}
//상속받은 자식 클래스
class Child2 extends Parent {
void viewChild() {
System.out.println("viewChild 호출");
}
}
public class Inheritance1 {
public static void main(String[] args) {
Parent p = new Parent();
p.viewParent();
Child1 c1 = new Child1();
c1.viewChild();
//c1.viewParent(); // 상속 안 한 상태에서는 사용 불가
Child2 c2 = new Child2();
c2.viewParent(); //상속 관계이므로 부모 클래스 메서드 사용 가능함
}
}
상속 구도 그림
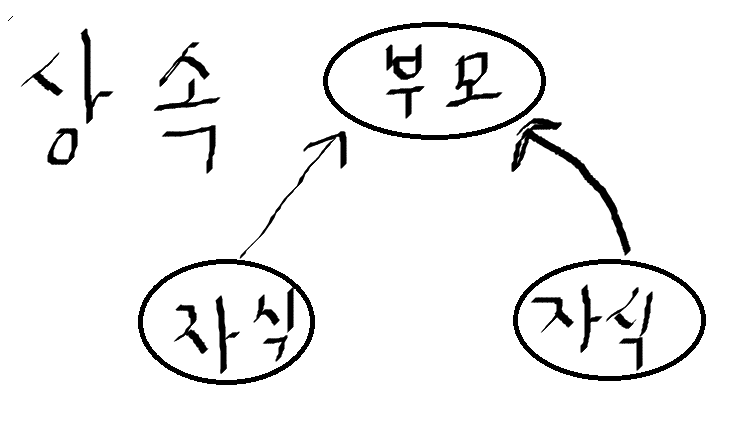
다중 상속은 x