응용 : 콤보박스 / 테이블 등 활용하여 주소 검색기 만들기
- UML 설정
Class Diagram - 클래스 / 메서드 / 필드
ZipcodeTO
필드변수와 getter / setter

ZipcodeDAO
ArrayList<ZipcodeTO> listSido()
ArrayList<ZipcodeTO> listGugun(String strSido)
ArrayList<ZipcodeTO> listDong(String strSido, String strGugun)
ArrayList<ZipcodeTO> listAddress(String Sido, String Gugun, String Dong)

ZipcodeSearchUI

SidoComboboxModel
GugunComboboxModel
DongComboboxModel
getsize() / getElementAt()
Sequence Diagram - 메서드 호출
Use case Diagram - 기능
- 코드 작업 시작 (TO / DAO / ComboBoxModel)
1.ZipcodeTo
package Address;

public class ZipcodeTO {
	private String zipcode;
	private String sido;
	private String gugun;
	private String dong;
	private String ri;
	private String bunji;

   	... (getter / setter)
   }
2.ZipcodeDAO
package Address;

import java.sql.Connection;
import java.sql.DriverManager;
import java.sql.PreparedStatement;
import java.sql.ResultSet;
import java.sql.SQLException;
import java.util.ArrayList;

//DB 연결
public class ZipcodeDAO {
	Connection conn = null;

	public ZipcodeDAO() {
		String url = "jdbc:mariadb://localhost:3306/project";
		String id = "project";
		String password = "1234";

		try {
			Class.forName("org.mariadb.jdbc.Driver");
			conn = DriverManager.getConnection(url, id, password);
		} catch (ClassNotFoundException e) {
			// TODO Auto-generated catch block
			e.printStackTrace();
		} catch (SQLException e) {
			// TODO Auto-generated catch block
			e.printStackTrace();
		}
	}


    //sido
	public ArrayList<ZipcodeTO> listSido() {

		PreparedStatement pstmt = null;
		ResultSet rs = null;

		ArrayList<ZipcodeTO> Sido = new ArrayList<>();

		try {
			String sql = "select distinct sido from zipcode";

			pstmt = conn.prepareStatement(sql);

			rs = pstmt.executeQuery();

			while(rs.next()) {
				ZipcodeTO to = new ZipcodeTO();

				to.setSido(rs.getString("sido"));

				Sido.add(to);
			}

		} catch (SQLException e) {
			// TODO Auto-generated catch block
			e.printStackTrace();
		} finally {
			if(rs != null) try { rs.close(); } catch(SQLException e) {}
			if(pstmt != null) try { pstmt.close(); } catch(SQLException e) {}
			if(conn != null) try { conn.close(); } catch(SQLException e) {}
		}
		return Sido;
	}


    // gugun
	public ArrayList<ZipcodeTO> listGugun(String strSido) {

		PreparedStatement pstmt = null;
		ResultSet rs = null;

		ArrayList<ZipcodeTO> Gugun = new ArrayList<>();

		try {
			String sql = "select distinct gugun from zipcode where sido = ?";

			pstmt = conn.prepareStatement(sql);

			pstmt.setString(1, strSido);

			rs = pstmt.executeQuery();

			while(rs.next()) {
				ZipcodeTO to = new ZipcodeTO();

				to.setGugun(rs.getString("gugun"));

				Gugun.add(to);
			}
		} catch (SQLException e) {
			// TODO Auto-generated catch block
			e.printStackTrace();
		} finally {
			if(rs != null) try { rs.close(); } catch(SQLException e) {}
			if(pstmt != null) try { pstmt.close(); } catch(SQLException e) {}
			if(conn != null) try { conn.close(); } catch(SQLException e) {}
		}
		return Gugun;
	}


    //dong
	public ArrayList<ZipcodeTO> listDong(String strSido, String strGugun) {

		PreparedStatement pstmt = null;
		ResultSet rs = null;

		ArrayList<ZipcodeTO> Dong = new ArrayList<>();

		try {
			String sql = "select distinct dong from zipcode where sido = ? and gugun = ?";

			pstmt = conn.prepareStatement(sql);

			pstmt.setString(1, strSido);
			pstmt.setString(2, strGugun);

			rs = pstmt.executeQuery();

			while(rs.next()) {
				ZipcodeTO to = new ZipcodeTO();

				to.setDong(rs.getString("dong"));

				Dong.add(to);
			}
		} catch (SQLException e) {
			// TODO Auto-generated catch block
			e.printStackTrace();
		} finally {
			if(rs != null) try { rs.close(); } catch(SQLException e) {}
			if(pstmt != null) try { pstmt.close(); } catch(SQLException e) {}
			if(conn != null) try { conn.close(); } catch(SQLException e) {}
		}
		return Dong;
	}


    //address
	public ArrayList<ZipcodeTO> listAddress(String strSido, String strGugun, String strDong) {

		PreparedStatement pstmt = null;
		ResultSet rs = null;

		ArrayList<ZipcodeTO> Address = new ArrayList<>();

		try {
			String sql = "select distinct zipcode, ri, bunji
            from zipcode where sido = ? and gugun = ? and dong = ?";

			pstmt = conn.prepareStatement(sql);

			pstmt.setString(1, strSido);
			pstmt.setString(2, strGugun);
			pstmt.setString(3, strDong);

			rs = pstmt.executeQuery();

			while(rs.next()) {
				ZipcodeTO to = new ZipcodeTO();

				to.setZipcode(rs.getString("zipcode"));
				to.setRi(rs.getString("ri"));
				to.setBunji(rs.getString("bunji"));

				Address.add(to);
			}
		} catch (SQLException e) {
			// TODO Auto-generated catch block
			e.printStackTrace();
		} finally {
			if(rs != null) try { rs.close(); } catch(SQLException e) {}
			if(pstmt != null) try { pstmt.close(); } catch(SQLException e) {}
			if(conn != null) try { conn.close(); } catch(SQLException e) {}
		}
		return Address;
	}


}- ComboBoxModel (sido / gugun / dong)
SidoComboBoxModel
package zipcodeModel;

import java.util.ArrayList;

import javax.swing.DefaultComboBoxModel;

import Address.ZipcodeDAO;
import Address.ZipcodeTO;

public class SidoComboBoxModel extends DefaultComboBoxModel<String> {
	private ArrayList<ZipcodeTO> sidos;

	public SidoComboBoxModel() {
//		sidos = new ArrayList<>();
//
//		ZipcodeTO to = new ZipcodeTO();
//		to.setSido("시도");
//		sidos.add(to);

		ZipcodeDAO dao = new ZipcodeDAO();
		sidos = dao.listSido();
	}

	@Override
	public int getSize() {
		// TODO Auto-generated method stub
		return sidos.size();
	}

	@Override
	public String getElementAt(int index) {
		ZipcodeTO to = sidos.get(index);
		return to.getSido();
	}
}
GugunComboBoxModel
package zipcodeModel;

import java.util.ArrayList;

import javax.swing.DefaultComboBoxModel;

import Address.ZipcodeDAO;
import Address.ZipcodeTO;

public class GugunComboBoxModel extends DefaultComboBoxModel<String> {
	private ArrayList<ZipcodeTO> guguns;

	public GugunComboBoxModel() {
		guguns = new ArrayList<>();

		ZipcodeTO to = new ZipcodeTO();
		to.setGugun("구군");
		guguns.add(to);
	}

	public GugunComboBoxModel(String strSido) {
		ZipcodeDAO dao = new ZipcodeDAO();
		guguns  = dao.listGugun(strSido);
	}

	@Override
	public int getSize() {
		// TODO Auto-generated method stub
		return guguns.size();
	}

	@Override
	public String getElementAt(int index) {
		ZipcodeTO to = guguns.get(index);
		return to.getGugun();
	}
}
DongComboBoxModel
package zipcodeModel;

import java.util.ArrayList;

import javax.swing.DefaultComboBoxModel;

import Address.ZipcodeDAO;
import Address.ZipcodeTO;

public class DongComboBoxModel extends DefaultComboBoxModel<String> {
	private ArrayList<ZipcodeTO> dongs;

	public DongComboBoxModel() {
		dongs = new ArrayList<>();

		ZipcodeTO to = new ZipcodeTO();
		to.setDong("동");
		dongs.add(to);
	}

	public DongComboBoxModel(String strSido, String strGugun) {
		ZipcodeDAO dao = new ZipcodeDAO();
		dongs = dao.listDong(strSido, strGugun);
	}


	@Override
	public int getSize() {
		// TODO Auto-generated method stub
		return dongs.size();
	}

	@Override
	public String getElementAt(int index) {
		ZipcodeTO to = dongs.get(index);
		return to.getDong();
	}
}- 결과
combo1 생성 후 이벤트
combo1 = new JComboBox();
		combo1.setModel(new SidoComboBoxModel()); <-- sido에 대한 콤보박스모델 생성
		combo1.addItemListener( new ItemListener() {
			public void itemStateChanged( ItemEvent e ) {
				if( e.getStateChange() == ItemEvent.SELECTED ) {
					if(combo2 != null) { <--시점 차이로 인하여 if조건문
					combo2.setModel(new GugunComboBoxModel((String) combo1.getSelectedItem()));
                    <-- 콤보박스1의 리스트 중 선택시, 콤보박스2에 해당 매개변수에 대한 박스 생성
					combo2.setSelectedIndex(0); <-- 제일 첫번째 항목 뜨게하기
				}
				}
			}
		} );
combo2 생성 후 이벤트
combo2 = new JComboBox();
		combo2.setModel(new GugunComboBoxModel()); <-- gugun에 대한 콤보박스모델 생성

		combo2.setSelectedIndex(0);
		combo2.addItemListener( new ItemListener() {
			public void itemStateChanged( ItemEvent e ) {
				if( e.getStateChange() == ItemEvent.SELECTED ) {
					if(combo3 != null) { <--시점 차이로 인하여 if조건문
					combo3.setModel( new DongComboBoxModel(
                    (String)combo1.getSelectedItem(), (String)combo2.getSelectedItem() ) );
                    <-- 콤보박스2 리스트 중 선택시, 3에 해당 매개변수에 대한 박스 생성
					combo3.setSelectedIndex(0); <-- 제일 첫번째 항목 뜨게하기
				}
			}
			}
		} );
combo3 생성 후 이벤트
combo3.setModel(new DongComboBoxModel());
		combo3.addItemListener( new ItemListener() {
			public void itemStateChanged( ItemEvent e ) {
				if( e.getStateChange() == ItemEvent.SELECTED ) {
					textArea.setText("");

                    //  따로 클래스가 없으므로 직접 생성
					String strSido = (String)combo1.getSelectedItem();
					String strGugun = (String)combo2.getSelectedItem();
					String strDong = (String)combo3.getSelectedItem();

					ZipcodeDAO dao = new ZipcodeDAO();
					ArrayList<ZipcodeTO> addresses = dao.listAddress(strSido, strGugun, strDong);


					for(ZipcodeTO to : addresses) {
					String address = String.format("[%s] %s %s %s %s %s",
                    to.getZipcode(), strSido, strGugun, strDong, to.getRi(), to.getBunji());

					textArea.append(address + System.lineSeparator());
				}
				}
			}
		} );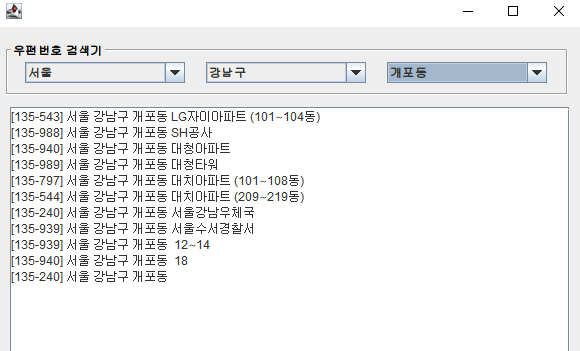
콤보박스1 선택시 쭉 나오는 모습
Layout
컨테이너 / 컴포넌트 배치
Layout 클래스
NullLayout (Absolute Layout) - 좌표 배치
BorderLayout - 한 화면을 5개로 분할해서 배치(동서남북중앙)
FlowLayout - 행 or 열로 배치
GridLayout - 모눈에 배치
CardLayout - 한장씩 덮어쓰면서 배치
setLayout으로 상태주고 getLayout으로 상태 가져옴
컨테이너 - 기본 레이아웃 존재
JFrame 기본 레이아웃 - Border Layout
JPanel - Flow Layout
contentPane.setLayout(null); --> 앱솔루트 레이아웃 적용된 모습 예Border Layout
동 서 남 북 중앙으로 분할하여 배치하는 레이아웃
전체화면의 윤곽을 잡아줄 때 주로 사용
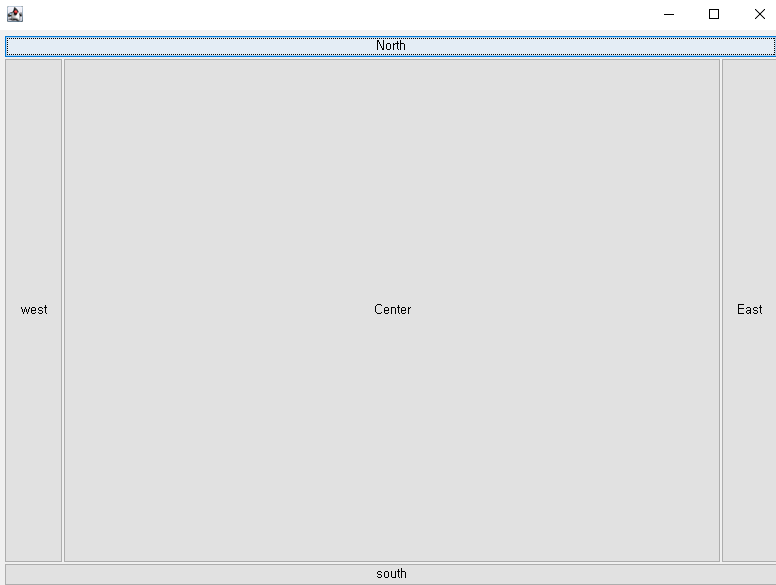
버튼을 분할하여 적용한 모습
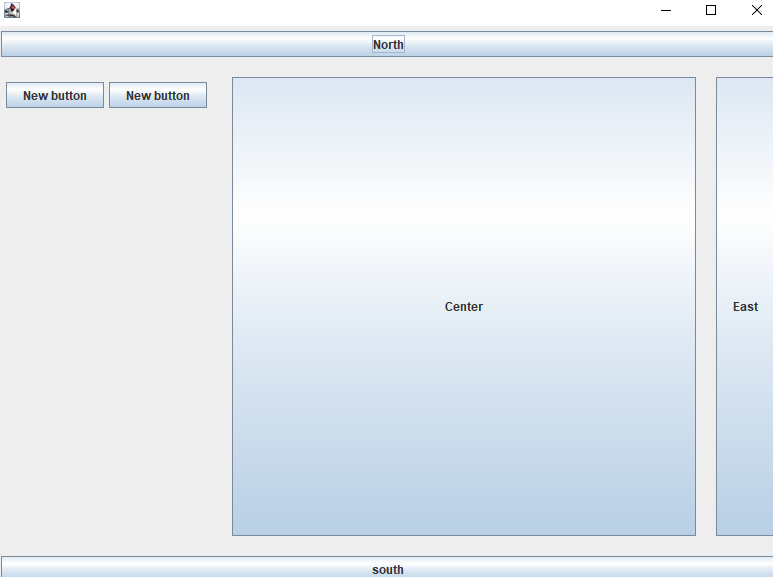
5개의 구역에 집어넣으면 넣을 곳이 없어서 패널을 따로 추가해서 넣기도 한다.
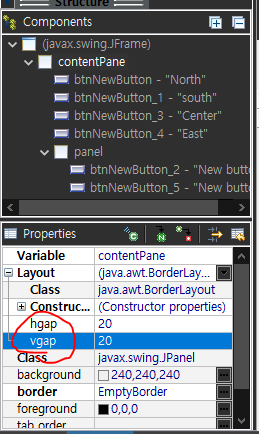
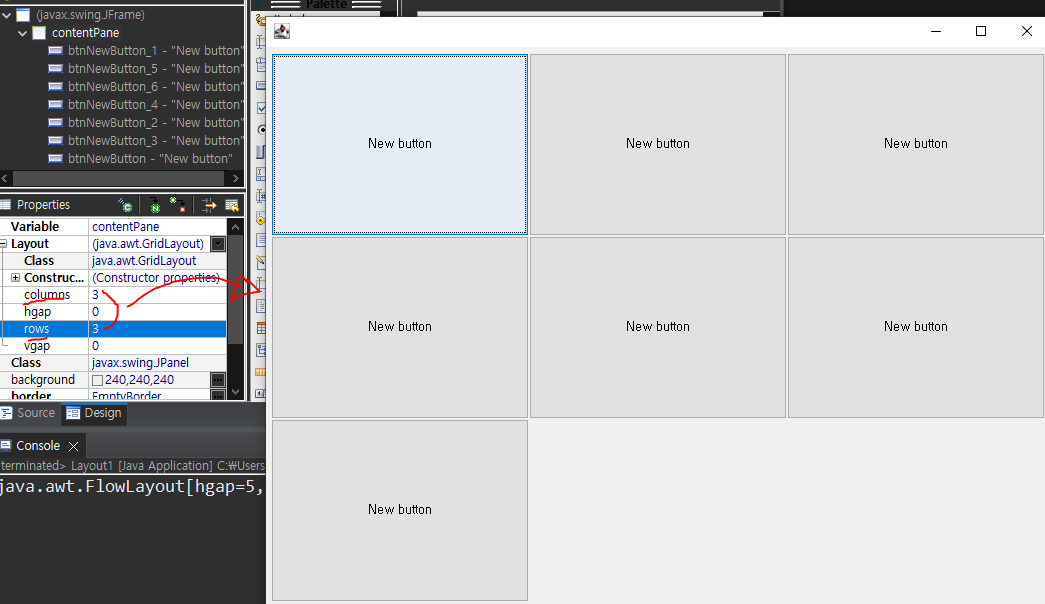
레이아웃 간격 조정 (hgap = 양옆 / vgap = 위아래 )
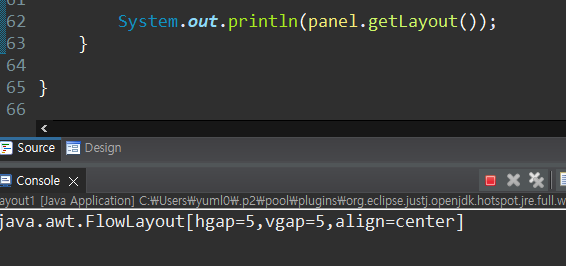
panel의 정보를 가져와 줌
Flow Layout
기본적으로 중앙정렬
alignment로 방향 결정할 수 있다.
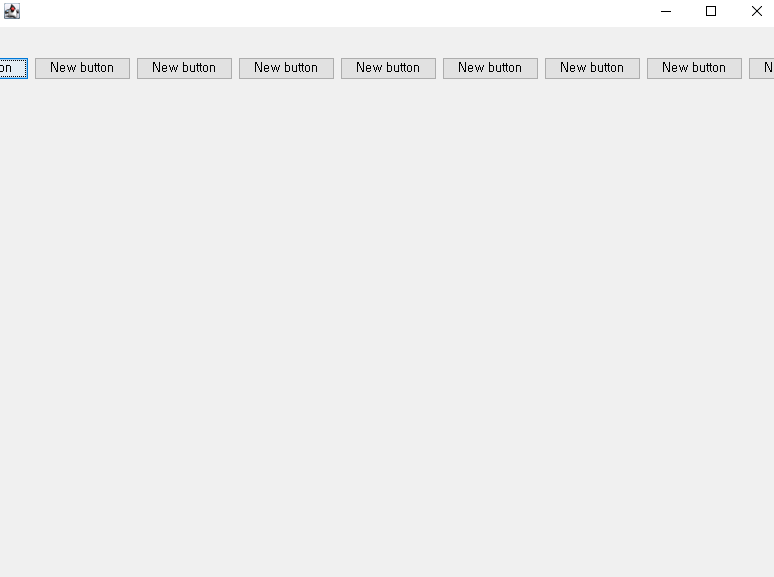
계속 디자인을 넣으면 잘리는데, 이 경우 화면 크기를 키우면 된다.
Grid Layout
ex 계산기, 달력
정해진 행 , 열에 따라 배치가 된다.
Card Layout
한장씩 덮어쓰며 배치함 (여러 장 있는 복잡한 애플리케이션에 사용)
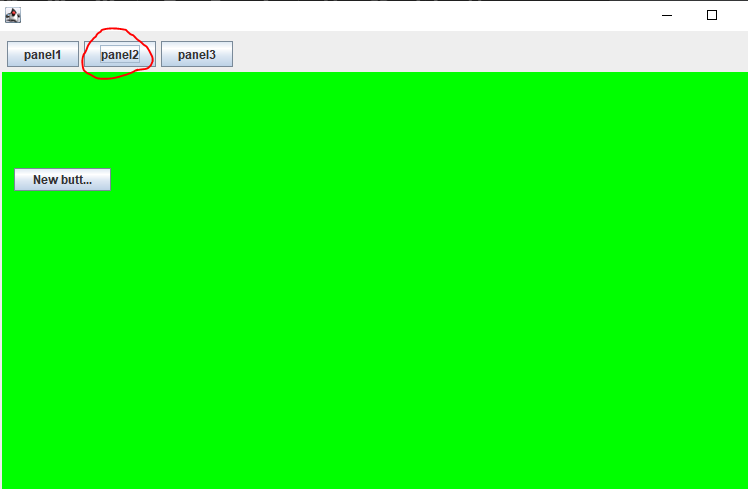
버튼을 누를때마다 화면 색이 바뀌는 코드
1.contentpane을 Border 레이아웃으로 만들고 panel1은 flow layout으로 north 위치에, panel2는 card layout으로 중앙 위치에 적용하고 각각 버튼 / 패널 3개씩 생성한다.
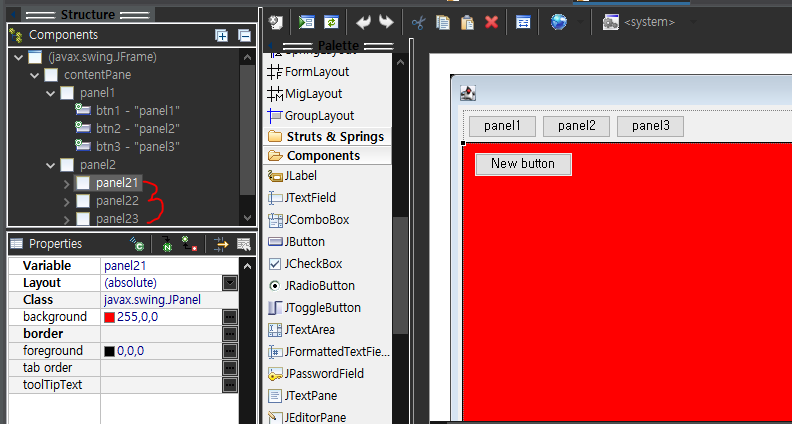
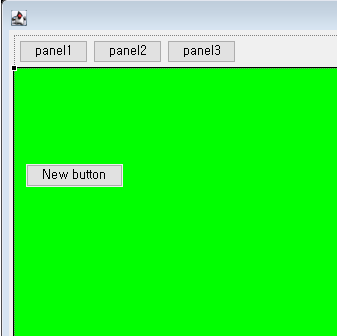
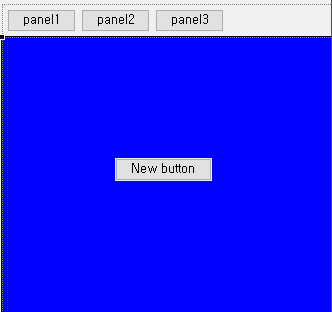
- panel2의 각 패널에 빨 파 초 색깔을 부여하고 각각 absolute 부여하여 아무 자리에 버튼 각각 부여한다.
- panel1 버튼에 각각 클릭 이벤트를 부여하여 버튼 클릭시 각 패널을 가져오는 효과 준다.
((CardLayout)panel2.getLayout()).show(panel2, "name_1603286103881700"); <<-- 버튼 클릭시 panel2의 해당 이름의 패널 보여주는 것


        btn2 /3 도 동일하게 해준다. (name_코드는 다르게 하기)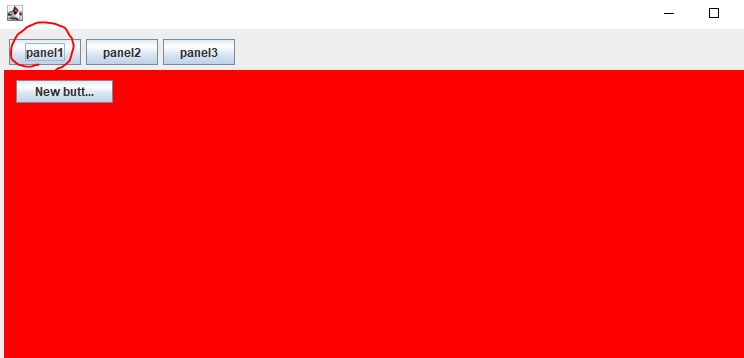
...파란색도 동일
버튼을 클릭하면 해당 패널을 가져온다.
수동으로 이벤트 주기
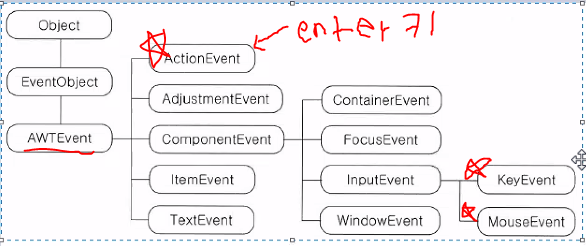
이벤트 관계도
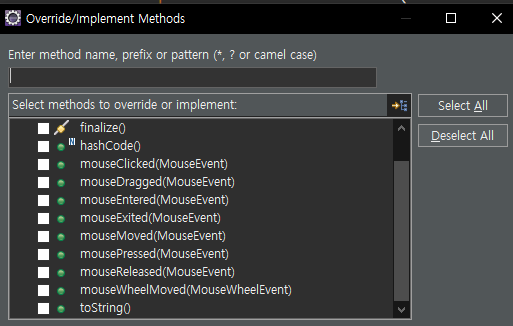
- 이벤트를 연결하는 메서드
- 이벤트가 발생하면 처리 될 이벤트 클래스(interface / adapter class)
- 이벤트가 발생하면 처리 할 이벤트 핸들러(이벤트 처리용 메서드)
btn1.addMouseListener(new MouseListener() { 1,2

			//이벤트 핸들러  3
			@Override
			public void mouseReleased(MouseEvent e) {
				// TODO Auto-generated method stub
				System.out.println("mouseReleased");
			}

... ~ mouseClicked 핸들러까지 재정의됨 (많아서 생략)- addMouseListener -> 연결 메서드
- new MouseListener -> 처리될 클래스
- mouseReleased ~~ mouseclicked -> 이벤트 핸들러
인터페이스로 모두 재정의 하지 않기 위해 어댑터를 사용하여 원하는 것만 사용하게 할 수 있다. (우리가 이벤트를 windowbuilder에서 주면 자동으로 나오는 코드가 이 어댑터 방식이다)
JButton btn2 = new JButton("New button");
		btn2.addMouseListener( new MouseAdapter() { <-- 어댑터 사용

			@Override
			public void mouseClicked(MouseEvent e) {
				System.out.println("mouseClicked");
			}

		});
어댑터로 쓰고 싶은 오버라이딩만 사용
actionPerformed : 이벤트

예시
textField.addActionListener(new ActionListener() {
			public void actionPerformed(ActionEvent e) {
				System.out.println(textField.getText());
			}
		});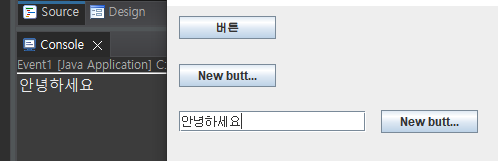
엔터키 누를시 해당 입력값 출력
e의 다양한 메서드
public void mouseClicked(MouseEvent e) {
				System.out.println("mouseClicked");
				System.out.println(e.getX());
				System.out.println(e.getY());
				System.out.println(e.getClickCount());

				JButton btn = (JButton) e.getSource();

				btn.setText("클릭됨");

			}
getX, getY - 클릭된 x,y 좌표 가져옴
getClickCount - 해당 좌표가 몇 번 클릭되었는지 반환해줌
getSource - 해당 버튼의 객체 정보 가져옴 ( settext사용시, 버튼 클릭시 버튼이 settext에 입력된 내용으로 바뀜)

getsource 출력해봤을시
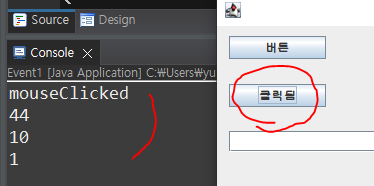
클릭해서 클릭됨< 으로 바뀜
버튼 이벤트 통합하기
이너 클래스를 만들어서 통합 가능하다
- 인터페이스 구현한 이너 클래스 밑에 생성
class UserMouseEvent1 implements MouseListener {

		@Override
		public void mouseClicked(MouseEvent e) {
			// TODO Auto-generated method stub
			System.out.println("mouseClicked");
		}

		@Override
		public void mousePressed(MouseEvent e) {
			// TODO Auto-generated method stub
			System.out.println("mousePressed");

		}

		@Override
		public void mouseReleased(MouseEvent e) {
			// TODO Auto-generated method stub
			System.out.println("mouseReleased");

		}

		@Override
		public void mouseEntered(MouseEvent e) {
			// TODO Auto-generated method stub
			System.out.println("mouseEntered");

		}

		@Override
		public void mouseExited(MouseEvent e) {
			// TODO Auto-generated method stub
			System.out.println("mouseExited");

		}
}- 각 버튼에 이벤트 대신 이너클래스 대입
JButton btn1 = new JButton("New button");
		btn1.addMouseListener(new UserMouseEvent1()); <-- 이너 클래스 대입
		btn1.setBounds(12, 10, 97, 23);
		contentPane.add(btn1);

        버튼 2,3 도 동일하게.
버튼 이벤트를 각각 줬을 때와 동일한 기능 적용 ( 각각을 통합한 것!)
마찬가지로 이너 클래스에 어뎁터를 상속받고 사용 가능
class UserMouseEvent2 extends MouseAdapter {

		@Override
		public void mouseClicked(MouseEvent e) { <-- 사용하고 싶은 것만 재정의할 수 있음
			// TODO Auto-generated method stub
			System.out.println("mouseClicked");

            //클릭된 버튼들을 구별하기 위하여 사용하는 메서드들

            // 클릭한 버튼에 쓰여진 text 출력
 			System.out.println(((JButton)e.getSource()).getText());

            //windowbuilder에서 확장메뉴 사용하여 이름 설정 후 확인하는 게 좋다(디폴트 null)
			System.out.println(((JButton)e.getSource()).getName());

            // 조건에 따라 출력!
            String name = ((JButton)e.getSource()).getName();

			switch(name) {
			case "button1" :
				System.out.println("btn1 mouseClicked");
				break;
			case "button2" :
				System.out.println("btn2 mouseClicked");
				break;
			case "button3" :
				System.out.println("btn3 mouseClicked");
				break;
			default :
				System.out.println("Error");
				break;
			}

		}

	}
    마찬가지로 UserMouseEvent2 대입해서 사용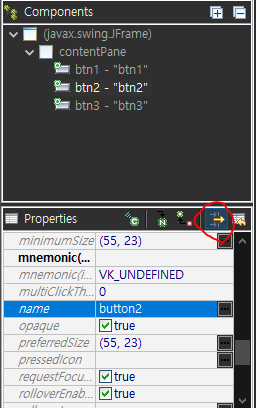
확장 메뉴 설정 버튼

출력 결과
내부 클래스 = > 외부 클래스로 분리해서 사용가능하다.
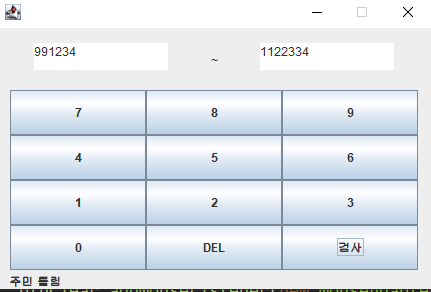
응용 : 주민등록번호 검사기 업그레이드
버튼을 눌러서 검사하는 프로그램
통합 버튼 이벤트 메서드(adapter 사용)
public class MouseAdapterModel extends MouseAdapter {
@Override
public void mouseClicked(MouseEvent e) {
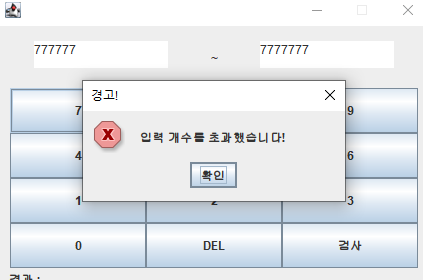
//입력 검사 + 앞자리 입력 후 뒷자리 입력하기
if (textArea.getText().length() < 6) {
textArea.append(((JButton) e.getSource()).getText());
} else {
if(textArea2.getText().length() < 7) {
textArea2.append(((JButton) e.getSource()).getText());
}
else {
JOptionPane.showMessageDialog(JuminCheck.this, "입력 개수를 초과했습니다!",
"경고!", JOptionPane.ERROR_MESSAGE);
}
}
}
}각 버튼에 통합 버튼 메서드 주기
JButton btn7 = new JButton("7");
		btn7.addMouseListener(new MouseAdapterModel());
		panel_1.add(btn7);

		JButton btn8 = new JButton("8");
		btn8.addMouseListener(new MouseAdapterModel());
		panel_1.add(btn8);

		JButton btn9 = new JButton("9");
		btn9.addMouseListener(new MouseAdapterModel());
		panel_1.add(btn9);

		JButton btn4 = new JButton("4");
		btn4.addMouseListener(new MouseAdapterModel());
		panel_1.add(btn4);

		JButton btn5 = new JButton("5");
		btn5.addMouseListener(new MouseAdapterModel());
		panel_1.add(btn5);

		JButton btn6 = new JButton("6");
		btn6.addMouseListener(new MouseAdapterModel());
		panel_1.add(btn6);

		JButton btn1 = new JButton("1");
		btn1.addMouseListener(new MouseAdapterModel());
		panel_1.add(btn1);

		JButton btn2 = new JButton("2");
		btn2.addMouseListener(new MouseAdapterModel());
		panel_1.add(btn2);

		JButton btn3 = new JButton("3");
		btn3.addMouseListener(new MouseAdapterModel());
		panel_1.add(btn3);

		JButton btn0 = new JButton("0");
		btn0.addMouseListener(new MouseAdapterModel());
		panel_1.add(btn0);
UI
클릭시 Clear 하는 버튼 이벤트
JButton btnClear = new JButton("DEL");
		btnClear.addMouseListener(new MouseAdapter() {
			@Override
			public void mouseClicked(MouseEvent e) {
				textArea.setText("");
				textArea2.setText("");
			}
		});
클릭시 주민등록 검사하는 버튼 이벤트
JButton btnCheck = new JButton("검사");
		btnCheck.addMouseListener(new MouseAdapter() {
			@Override
			public void mouseClicked(MouseEvent e) {
				String jumin1 = textArea.getText();
				String jumin2 = textArea2.getText();

				String jumin = jumin1 + jumin2;

				int bit[] = { 2, 3, 4, 5, 6, 7, 8, 9, 2, 3, 4, 5 };

				int sum = 0;

				for (int i = 0; i < bit.length; i++) {
					sum += Integer.parseInt(jumin.substring(i, i + 1)) * bit[i];
				}

				int resultNum = (11 - (sum % 11)) % 10;
				int lastNum = Integer.parseInt(jumin.substring(12, 13));

				if (resultNum == lastNum) {
					lblResult.setText("주민 맞음");
				} else {
					lblResult.setText("주민 틀림");
				}
			}
		});