1. 사용자 인증 - 회원가입 (with firebase)
1) firebase console 창에 들어가서 프로젝트를 하나 생성한다.
2) 프로젝트가 모두 생성되었다면 아래의 버튼을 클릭한다.
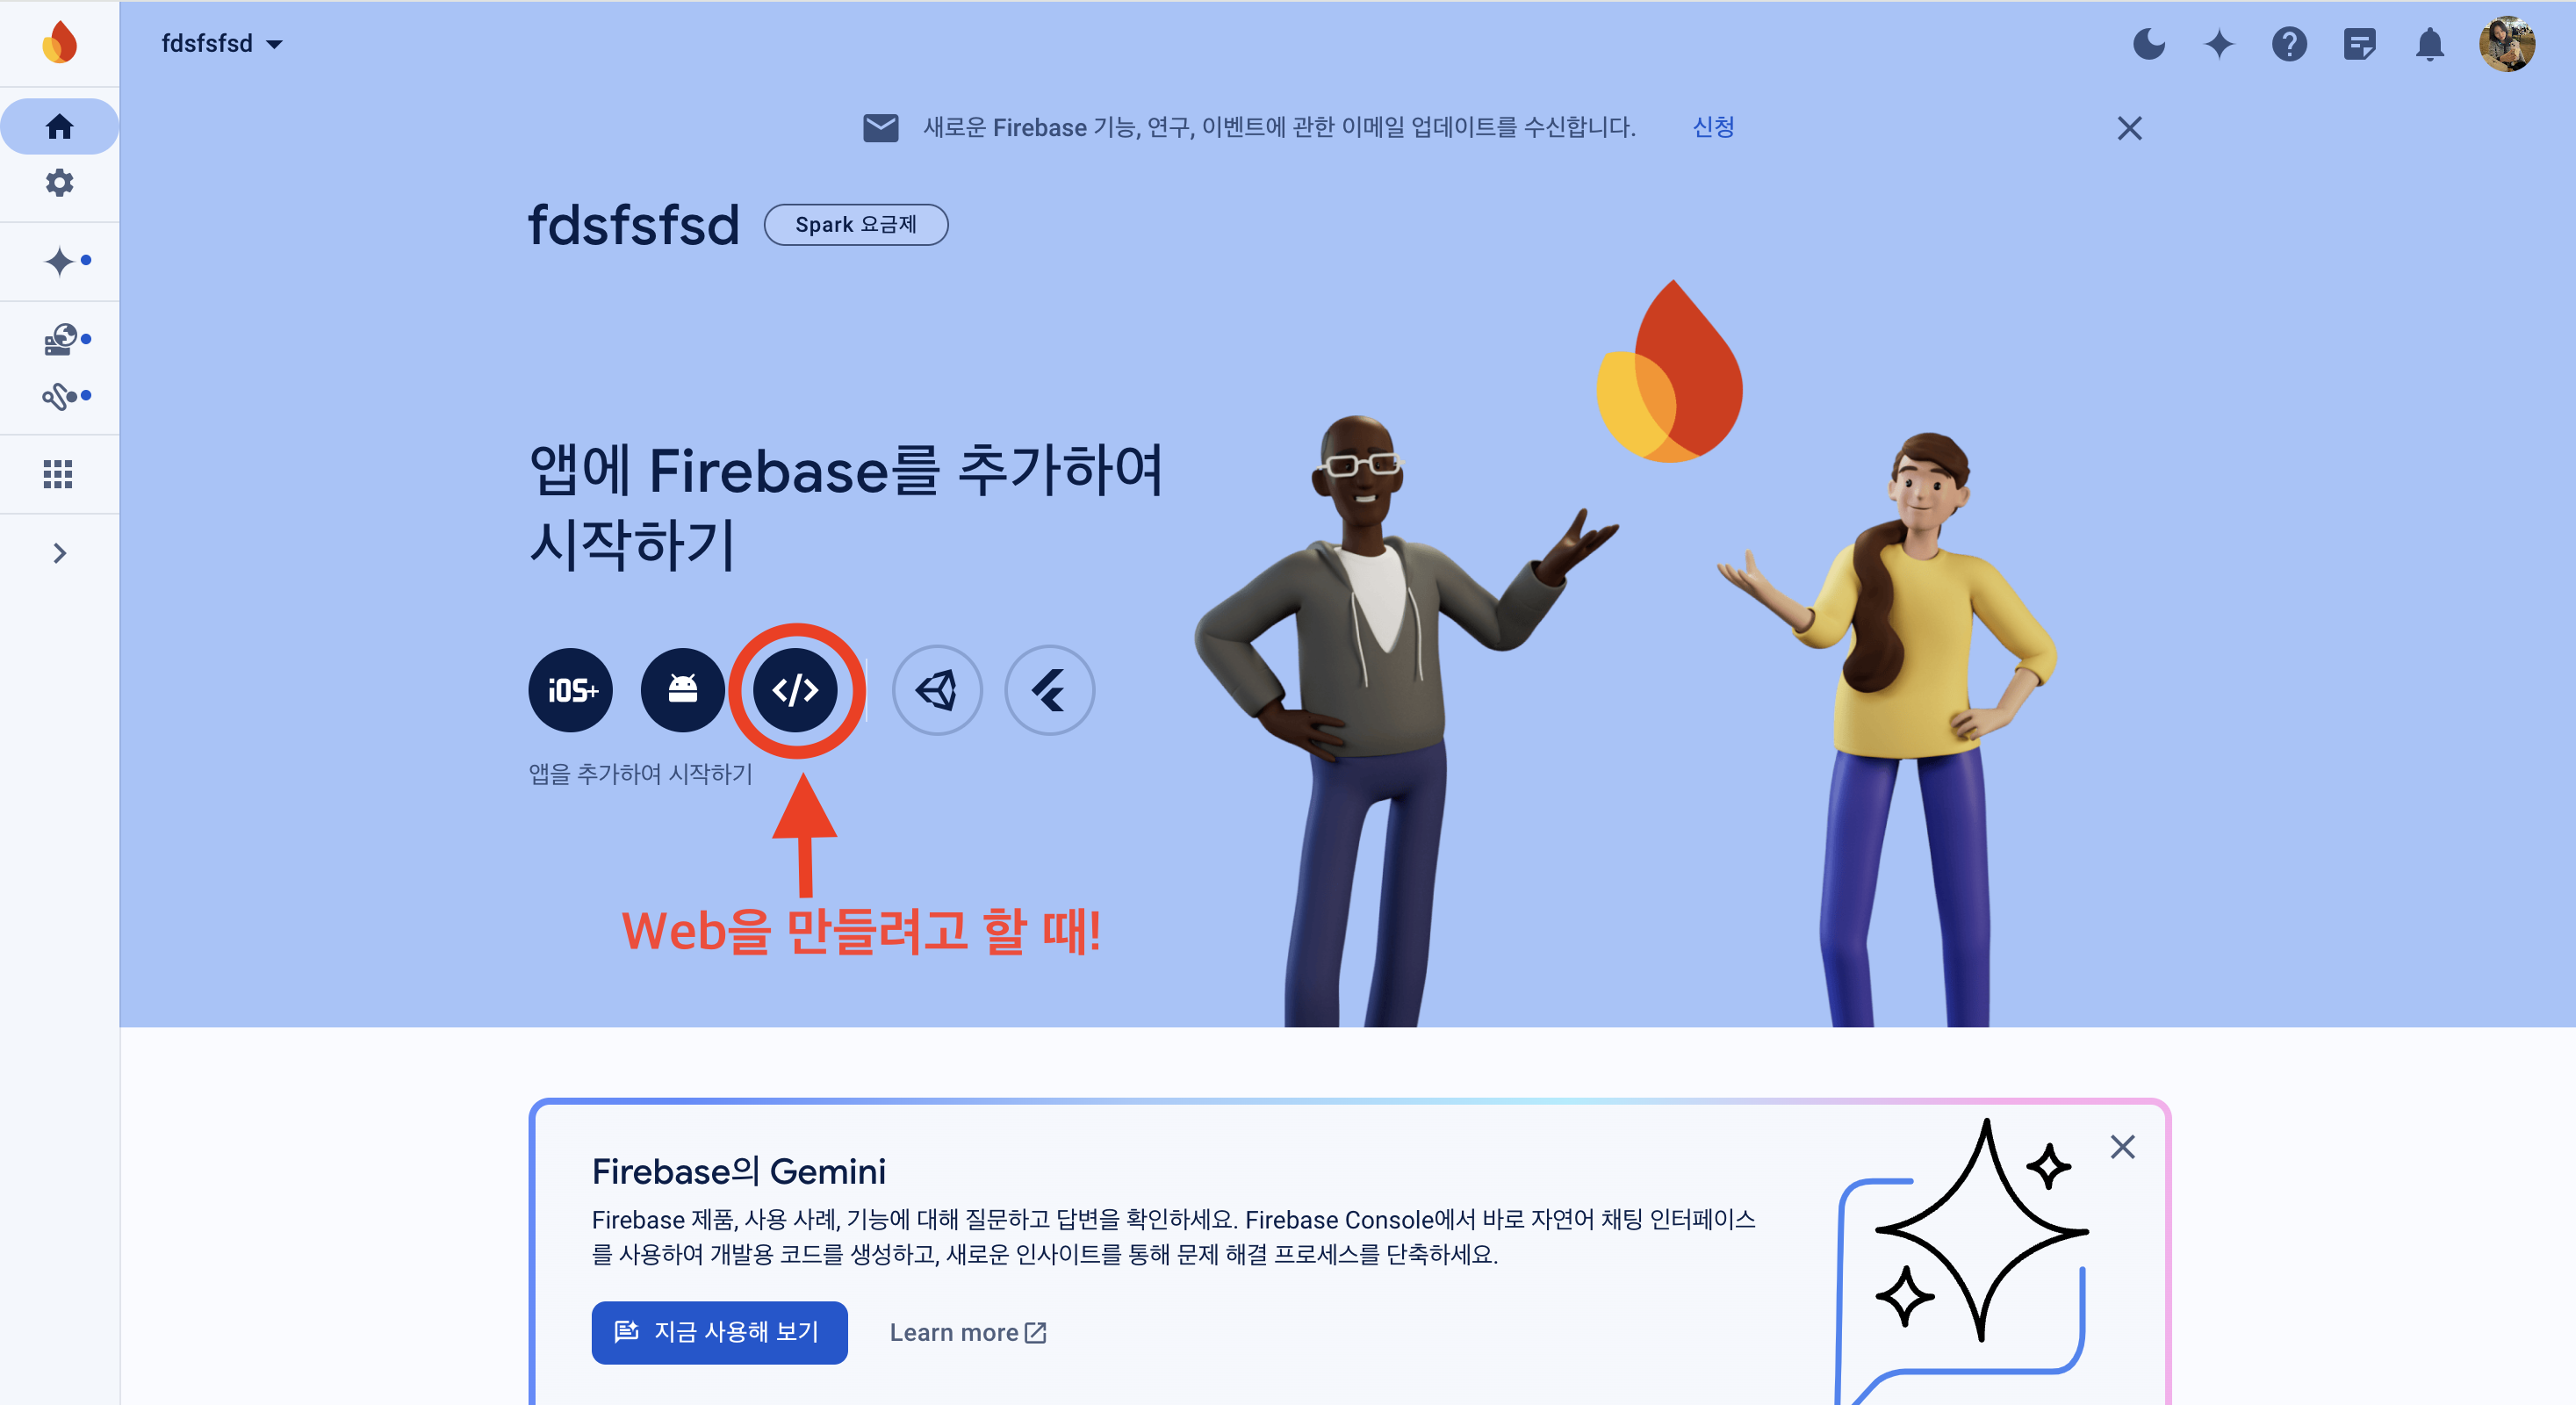
3) 위의 버튼을 클릭하면 아래의 화면이 나온다. 웹 이름을 설정하고 나면 명령어와 코드가 나오는데, 터미널에 명령어를 쳐서 firebase SDK를 설치하고, 코드를 복사한다.
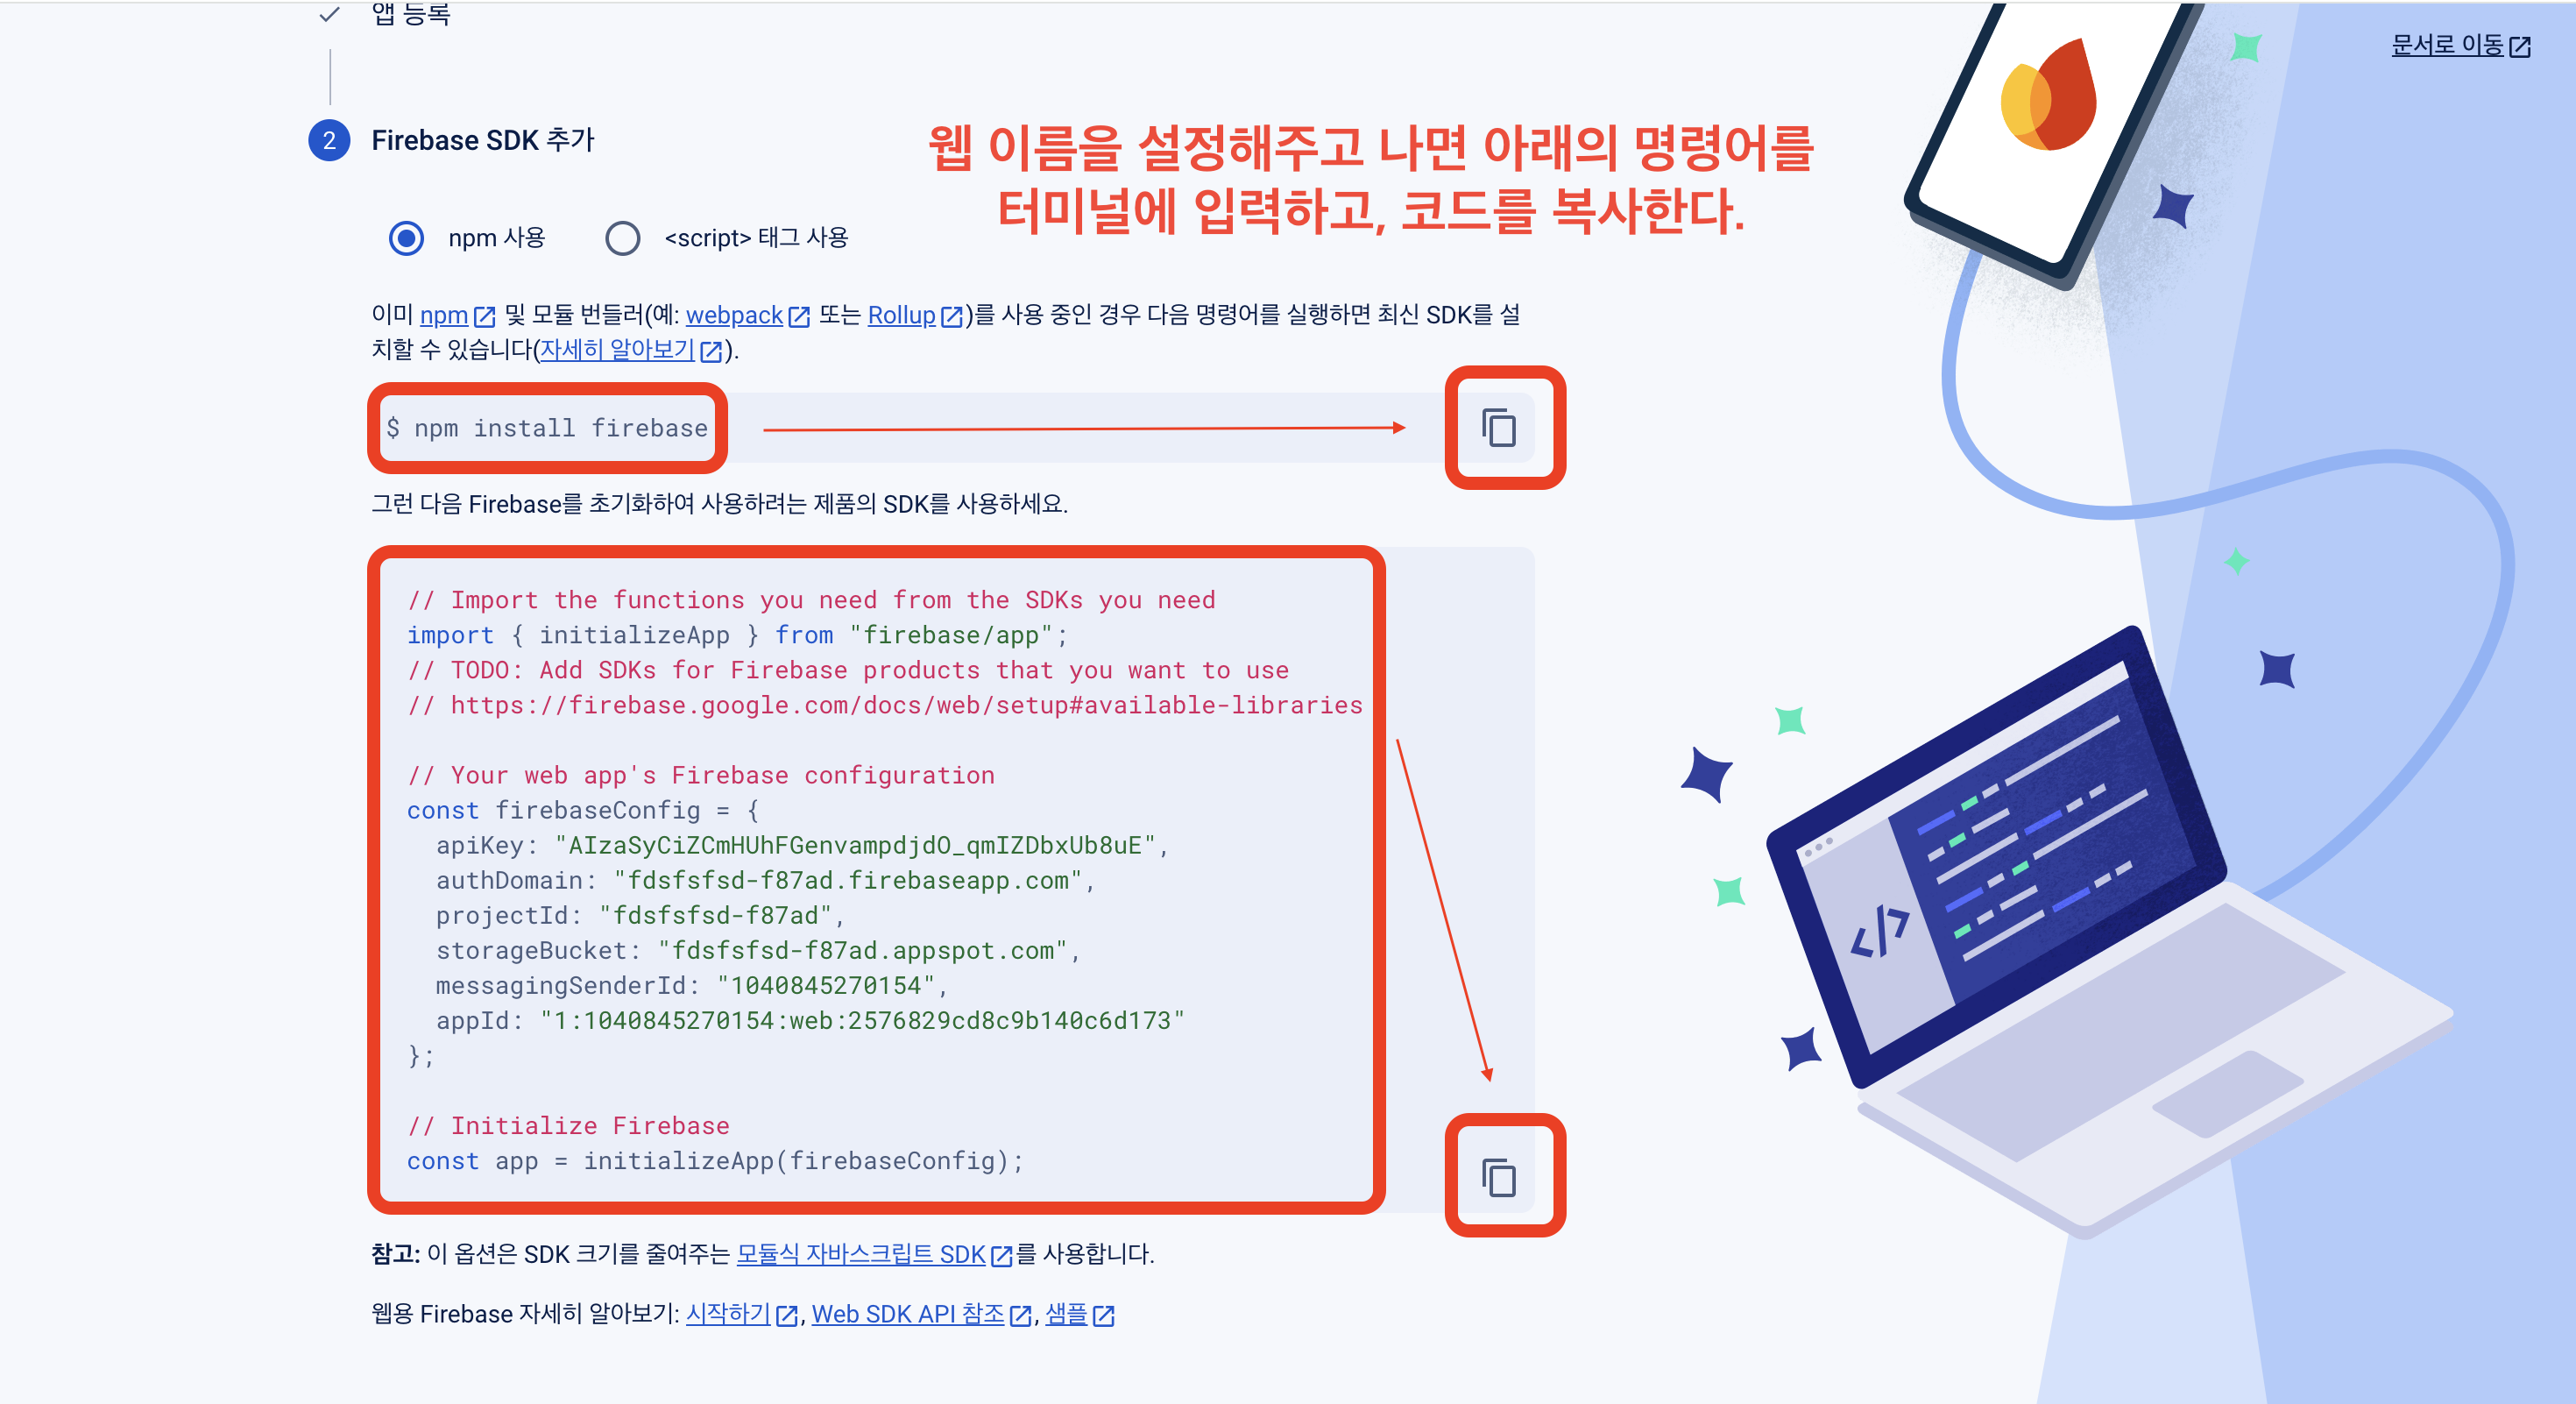
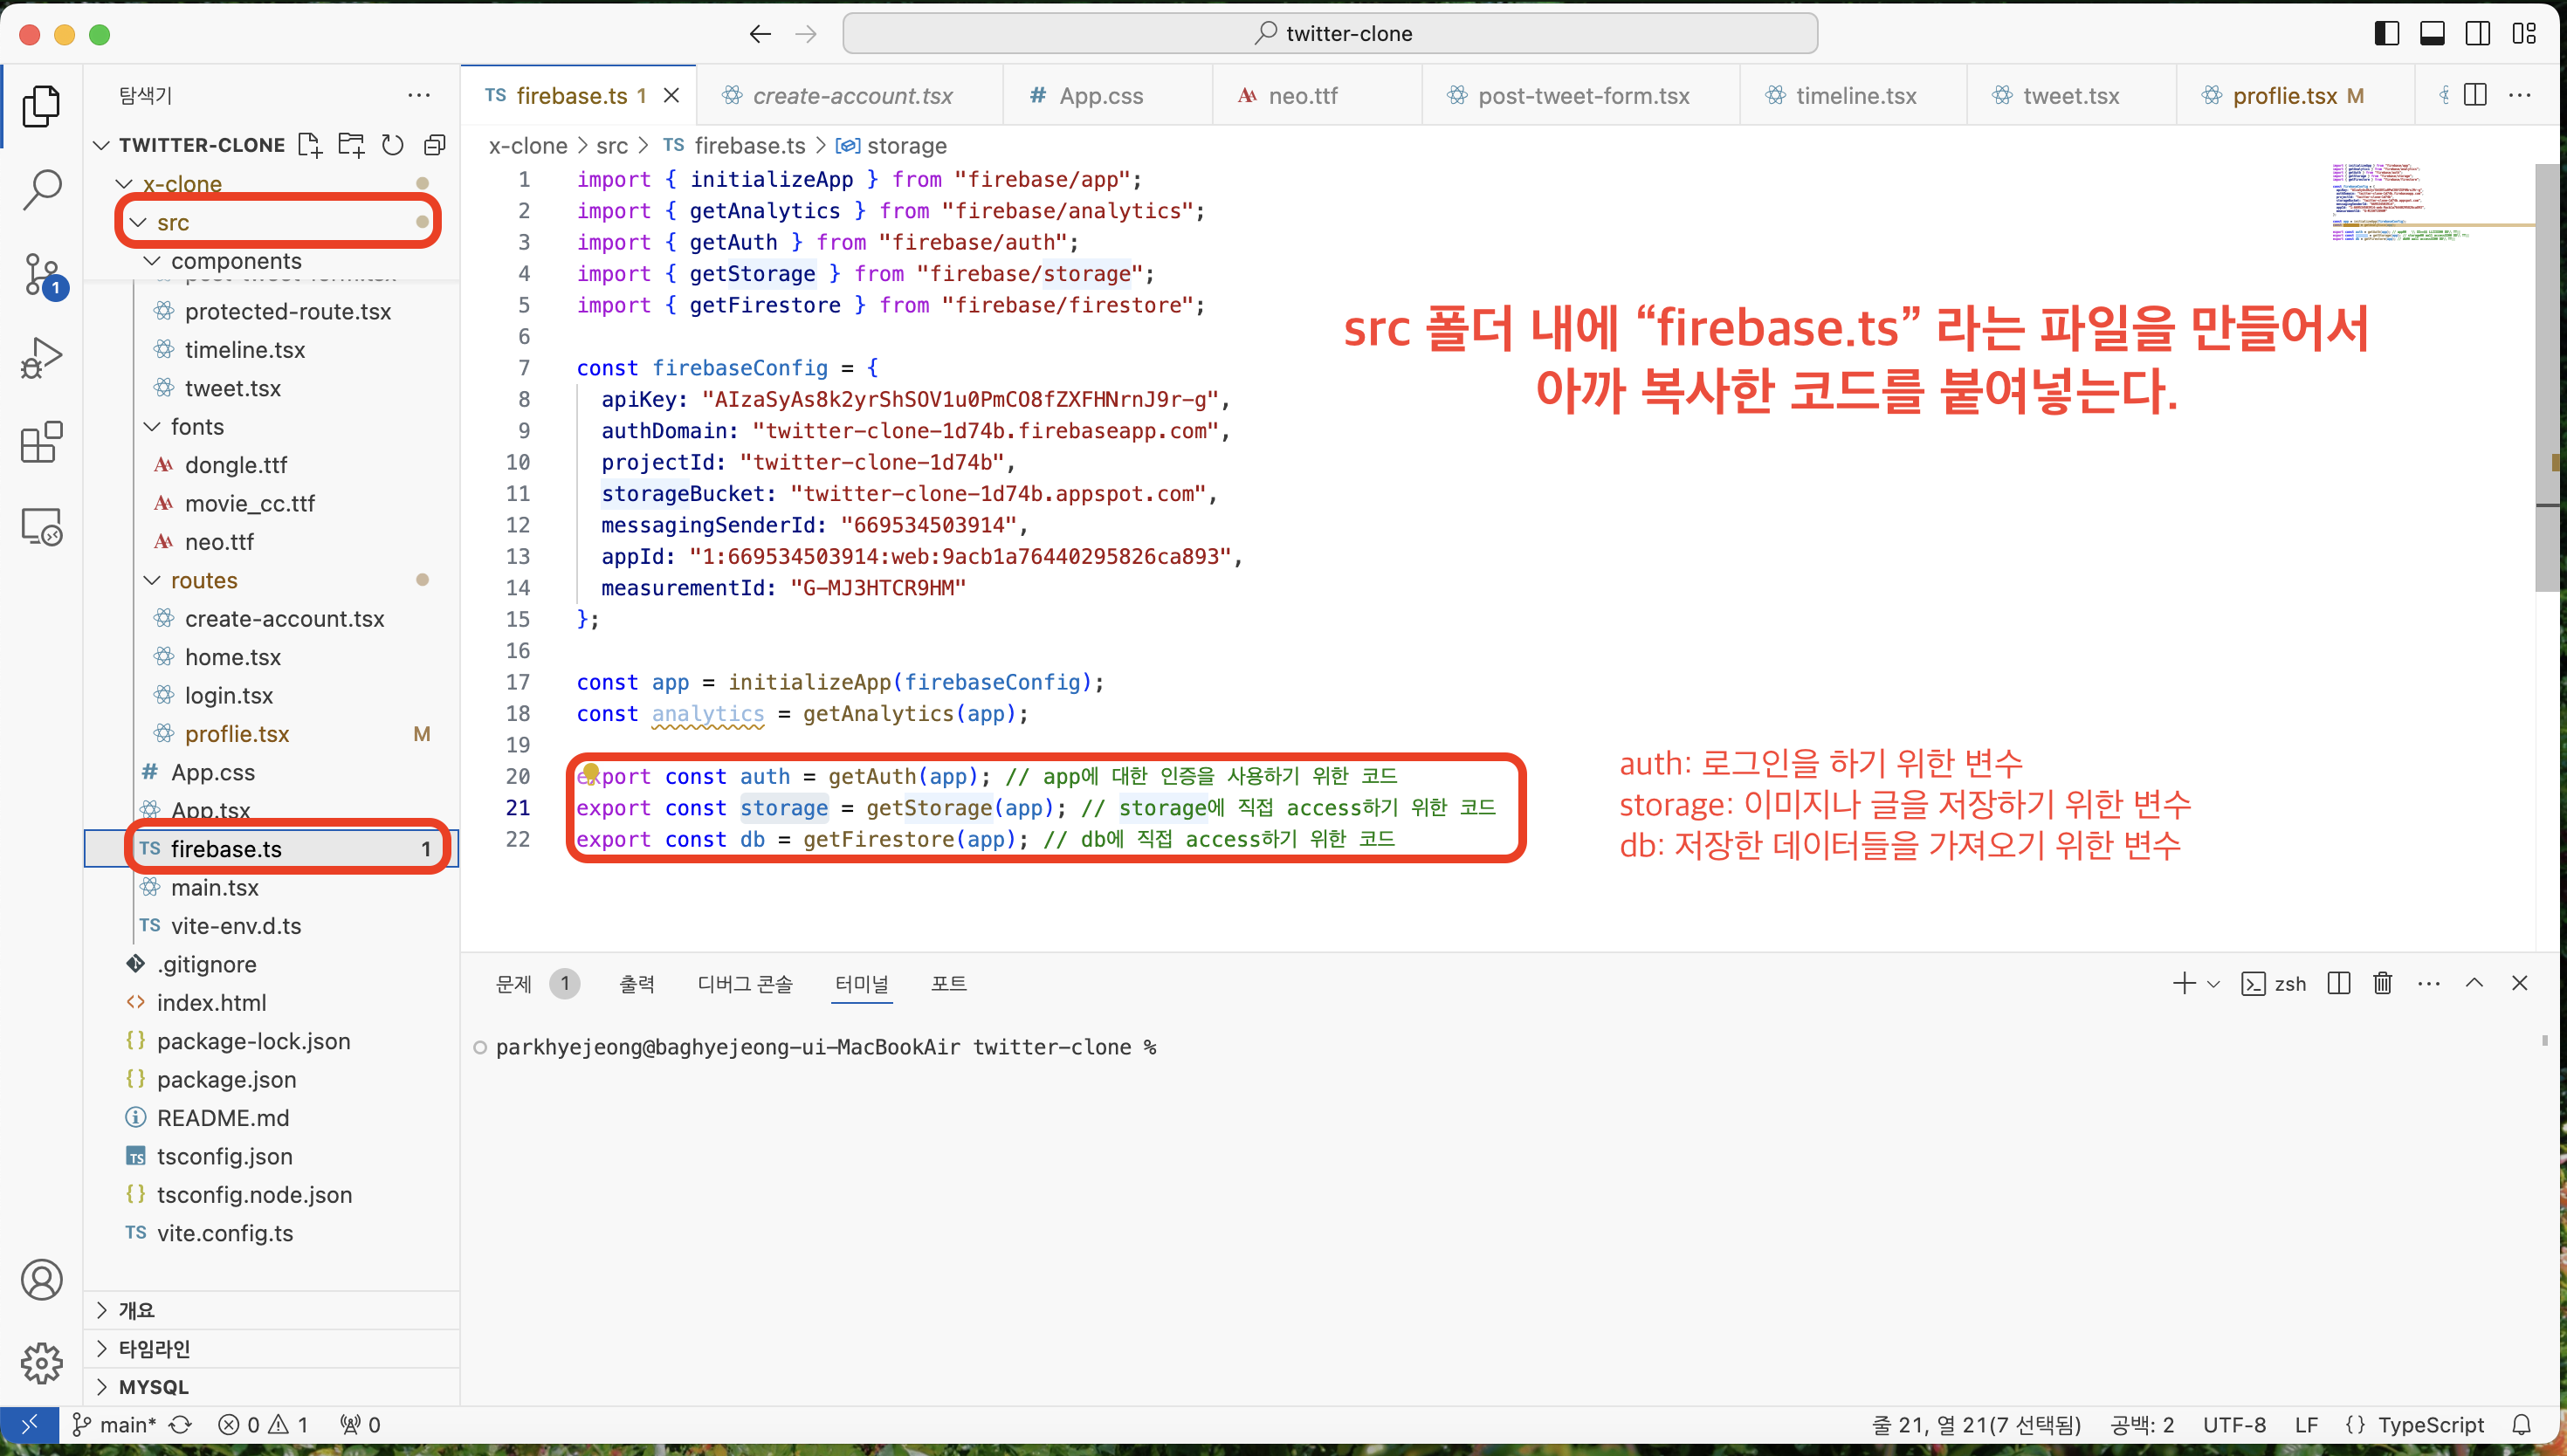
4) 복사한 코드를 src 내의 firebase.ts라는 파일을 생성해서 붙여넣는다.
(1) 인증 상태가 준비되었는지 기다리기(App.tsx)
=> firebase가 쿠키와 토큰을 읽고 백엔드와 소통해서 로그인 여부를 확인하는 동안 기다리겠다는 뜻!
function App() {
  const [isLoading, setIsLoading] = useState(true);
  const init = async() => {
    // firebase를 기다려주는 비동기함수 로직 (firebase가 user를 확인하는 동안!)
    await auth.authStateReady(); // 인증 상태가 준비되었는 지 기다림
    setTimeout(() => setIsLoading(false), 2000);
  };
  useEffect(() => {
    init();
  }, []);
  return (
    <>
      <GlobalStyles />
      {isLoading ? <LoadingScreen/> : <RouterProvider router={router} />}
    </>
  );
}
(2) 회원가입 화면 구현하기(CreateAccount.tsx)
export default function CreateAccount() {
    const navigate = useNavigate();
    const [isLoading, setLoading] = useState(false);
    const [name, setName] = useState("");
    const [email, setEmail] = useState("");
    const [password, setPassword] = useState("");
    const [error, setError] = useState("");

    // Input에 name을 부여한 이유: input이 변경되었을 때, 어떤 input이 변경되었는지 찾을 수 있기 때문에
    const onChange = (e: React.ChangeEvent<HTMLInputElement>) => {
        {/* 이벤트에서 target 추출 */}
        const { target: {name, value} } = e;
        if(name === "name") {
            setName(value);
        } else if(name === "email") {
            setEmail(value);
        } else if(name === "password") {
            setPassword(value);
        }
    }

    const onSubmit = async (e: React.FormEvent<HTMLFormElement>) => {
        e.preventDefault(); // 화면이 새로고침되지 않도록 하는 함수
        setError("");

        if(isLoading || name === "" || email === "" || password === "") return;

        try {
            setLoading(true);

            // 계정 생성 & 사용자 프로필 이름 설정 & 홈페이지로 리디렉션 필요
            // 계정이 생성되면 사용자가 자동으로 로그인됨
            const credentials = await createUserWithEmailAndPassword(auth, email, password); // createUserWithEmailAndPassword: async에서만 사용가능한 함수, 자격 증명 발급 가능
            console.log(credentials.user);

            // 사용자 프로필 update
            await updateProfile(credentials.user, {
                displayName: name,
            });

            // navigate to home
            navigate("/");
        } catch(e) {
            // 오류 설정 필요
            // 자격 증명을 발급받지 못 했을 경우 실행
            // ex, 해당 이메일로 이미 계정이 있거나 비밀번호가 유호하지 않은 경우
            if(e instanceof FirebaseError) {
                setError(e.message);
            }
        } finally {
            setLoading(false);
        }
    }

    return <Wrapper>
        <Logo src={potatoImage} alt="Logo" />
        <Title>Join 감자' 𝕏</Title>
        <Form onSubmit={onSubmit}>
            <Input onChange={onChange} name="name" value={name} placeholder="Name" type="text" required/> {/* name */} {/* required: 필수로 입력해야 할 때 사용 */}
            <Input onChange={onChange} name="email" value={email} placeholder="Email" type="email" required/> {/* email */}
            <Input onChange={onChange} name="password" value={password} placeholder="Password" type="password" required/> {/* password */}
            <Input onChange={onChange} type="submit" value={isLoading ? "Loading..." : "Create Account"}/> {/* login btn */}
        </Form>
        {error != "" ? <Error>{error}</Error> : null}
        <Switcher>
            이미 계정이 있으신가요? <Link to="/login">로그인</Link>
        </Switcher>
        <GithubButton/>
    </Wrapper>;
}
2. 사용자 인증 - 로그인
(1) 로그인 화면 구현하기(login.tsx)
export default function Login() {
    const navigate = useNavigate();
    const [isLoading, setLoading] = useState(false);
    const [email, setEmail] = useState("");
    const [password, setPassword] = useState("");
    const [error, setError] = useState("");

    const onChange = (e: React.ChangeEvent<HTMLInputElement>) => {
        {/* 이벤트에서 target 추출 */}
        const { target: {name, value} } = e;
        if(name === "email") {
            setEmail(value);
        } else if(name === "password") {
            setPassword(value);
        }
    }

    const onSubmit = async (e: React.FormEvent<HTMLFormElement>) => {
        e.preventDefault(); // 화면이 새로고침되지 않도록 하는 함수
        setError("");

        if(isLoading || email === "" || password === "") return;

        try {
            setLoading(true);

            // not cordova!
            await signInWithEmailAndPassword(auth, email, password);

            // navigate to home
            navigate("/");
        } catch(e) {
            // 오류 설정 필요
            // 자격 증명을 발급받지 못 했을 경우 실행
            // ex, 해당 이메일로 이미 계정이 있거나 비밀번호가 유호하지 않은 경우
            if(e instanceof FirebaseError) {
                setError(e.message);
            }
        } finally {
            setLoading(false);
        }
    }

    return <Wrapper>
        <Logo src={potatoImage} alt="Logo" />
        <Title>Log into 감자' 𝕏</Title>
        <Form onSubmit={onSubmit}>
            <Input onChange={onChange} name="email" value={email} placeholder="Email" type="email" required/> {/* email */}
            <Input onChange={onChange} name="password" value={password} placeholder="Password" type="password" required/> {/* password */}
            <Input onChange={onChange} type="submit" value={isLoading ? "Loading..." : "Log In"}/> {/* login btn */}
        </Form>
        {error != "" ? <Error>{error}</Error> : null}
        <Switcher>
            계정이 없으신가요? <Link to="/create-account">회원가입</Link>
        </Switcher>
        <GithubButton/>
    </Wrapper>;
}
(2) 사용자가 맞는지 확인하기(ProtectedRoute.tsx)
Layout의 children은 로그인한 사용자만 볼 수 있고, Layout의 children이 아닌 login과 create-account 페이지는 모든 사용자가 볼 수 있다.
export default function ProtectedRoute({children,
}: {
    children: React.ReactNode;
}) {
    // user가 로그인했는지 확인
    const user = auth.currentUser;

    // user가 맞다면 children return, 아니라면 login page로 이동
    if(user === null) {
        return <Navigate to="/login"/>;
    }
    return children;
}
(3) login하지 않은 사용자는 다른 화면에 가지 못하도록 막기(App.tsx)
const router = createBrowserRouter([ //배열을 라우터에 전달
  {
    path: "/",
    element: (
      <ProtectedRoute>
        <Layout />
      </ProtectedRoute>
    ),
    children: [ // Layout의 요소!
      {
        path: "", // "" == "/" -> 그래서 루트 링크에 들어가면 Outlet으로 Home이 렌더링되는 것임!
        element: <Home />,
      },
      {
        path: "profile", // "/profile" -> 이 링크로 접속 시, Outlet으로 Proflie이 렌더링됨!
        element: <Proflie />,
      }
    ]
  },
  { // Layout의 요소가 아님!
    path: "/login",
    element: <Login />
  },
  {
    path: "/create-account",
    element: <CreateAccount />
  }
]);
3. 소셜 로그인으로 사용자 인증하기
(1) Continue with Github
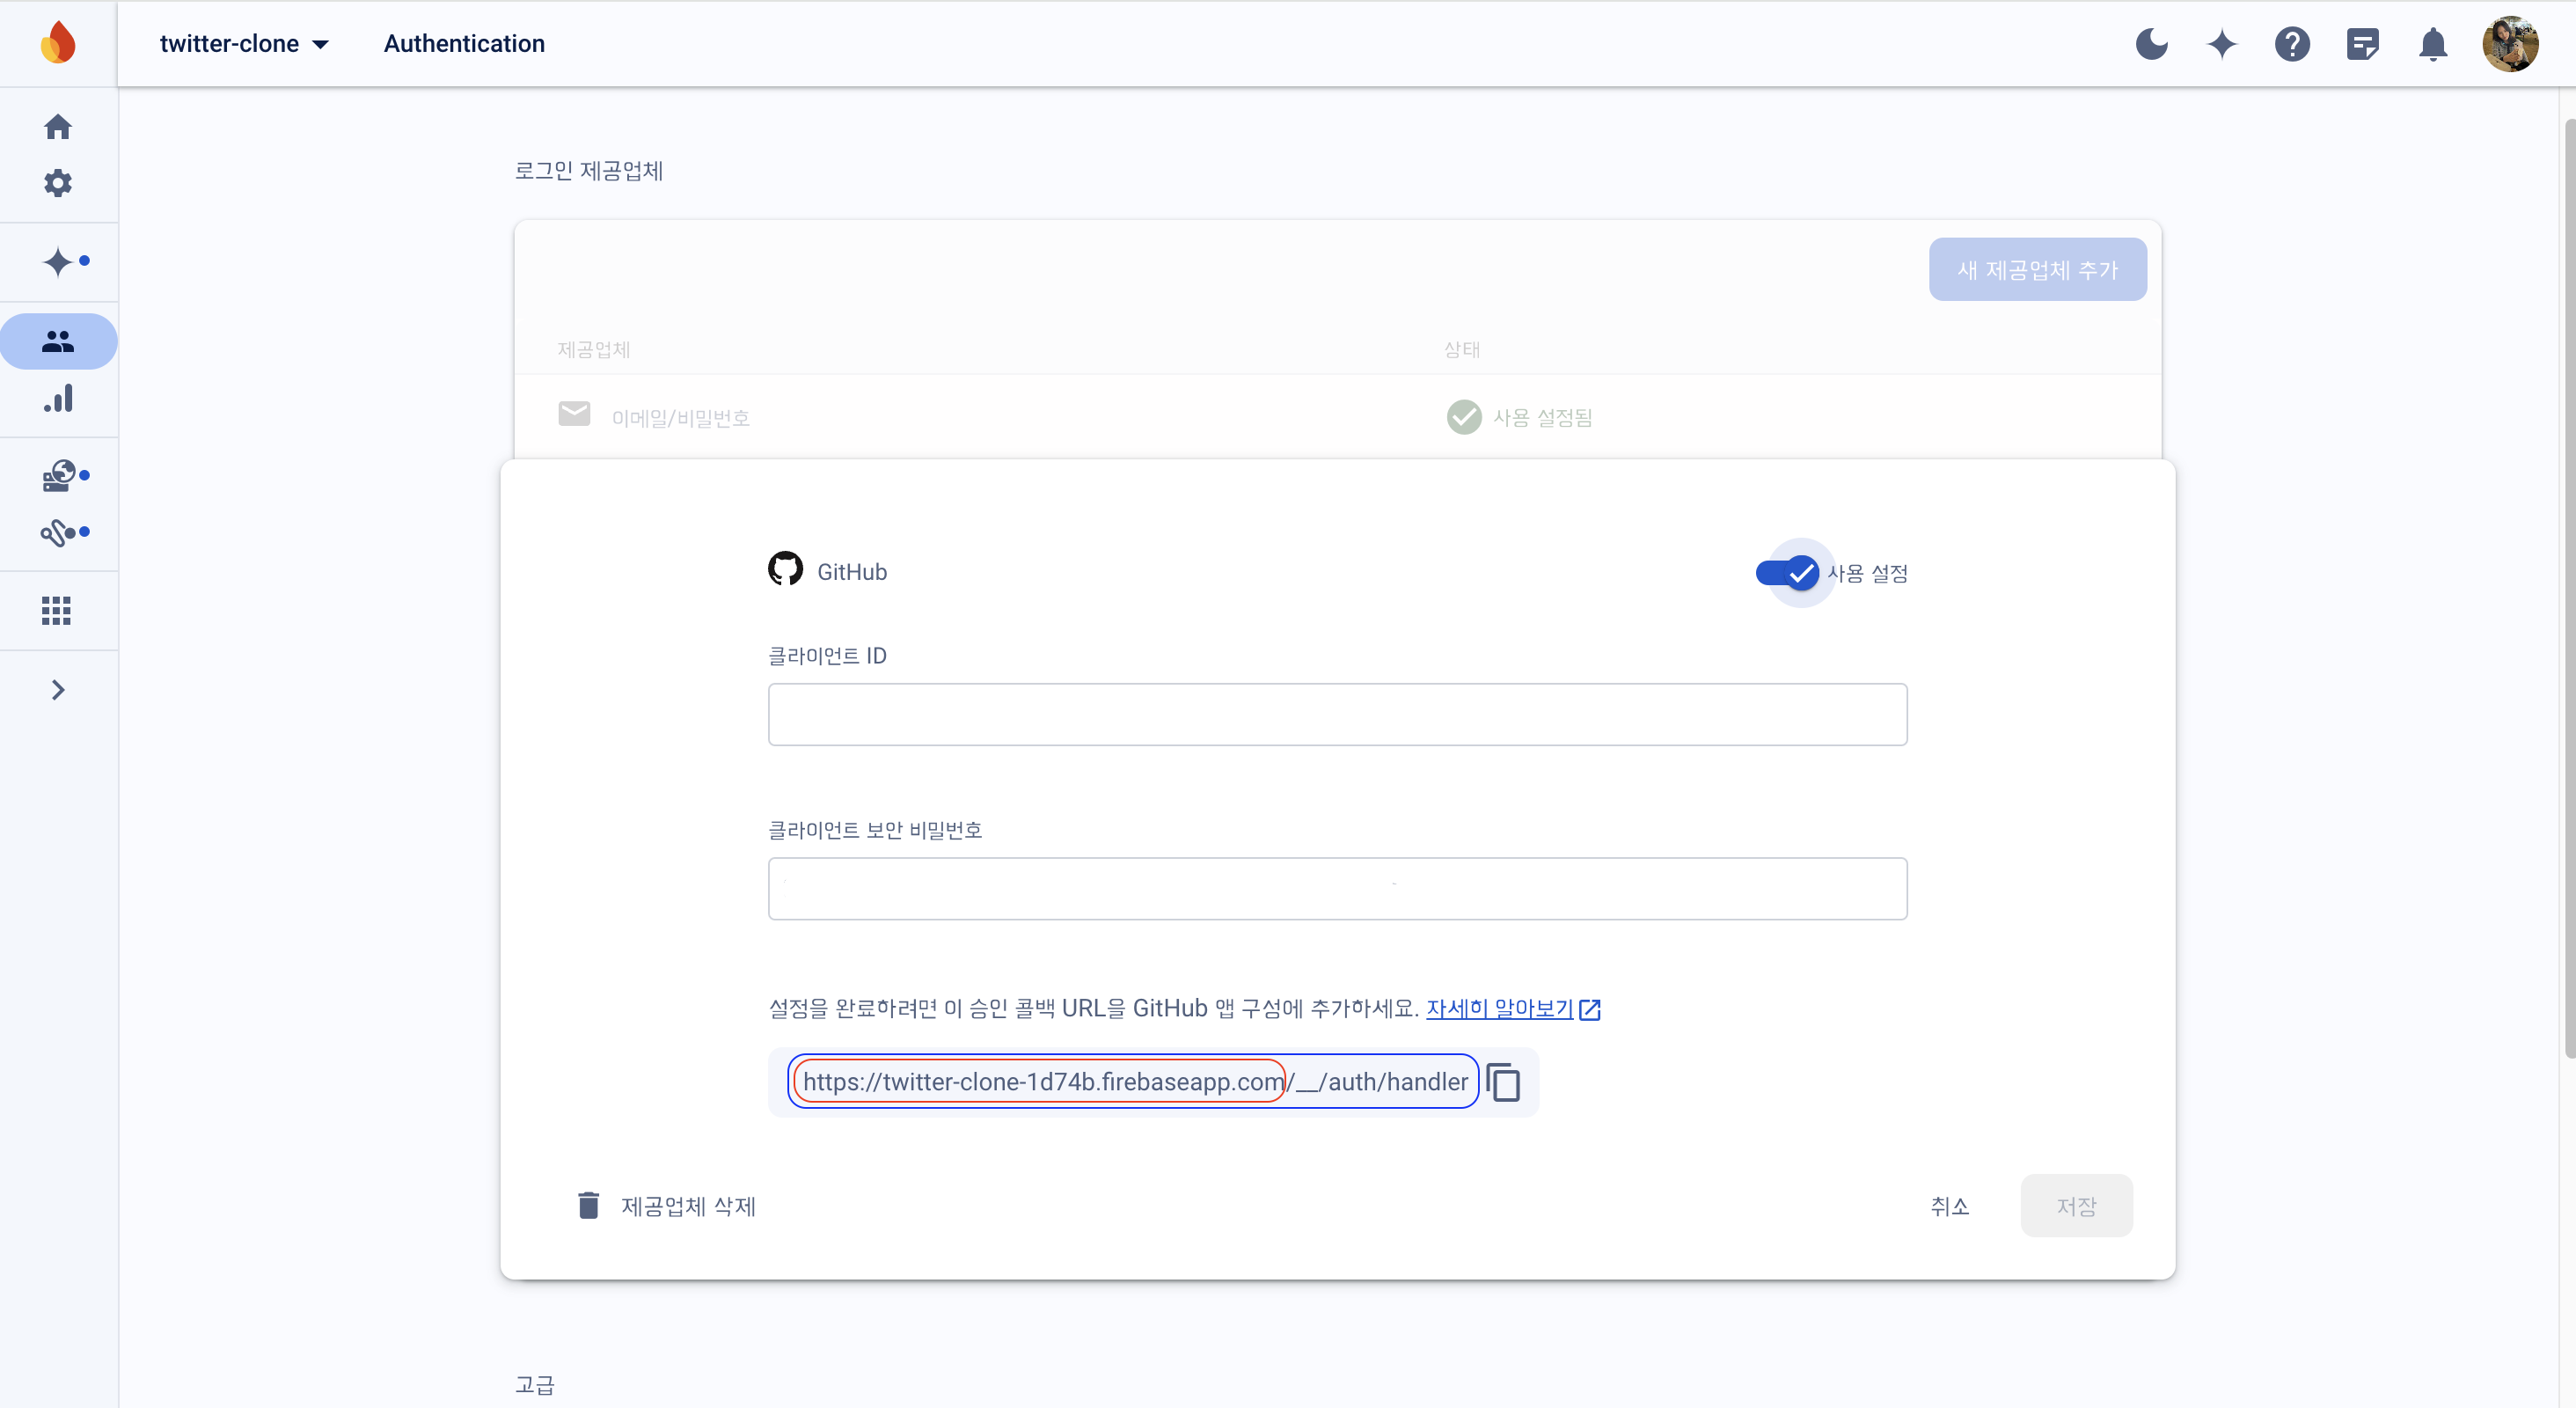
깃허브 디벨로퍼에서 다음의 순서를 따른다.
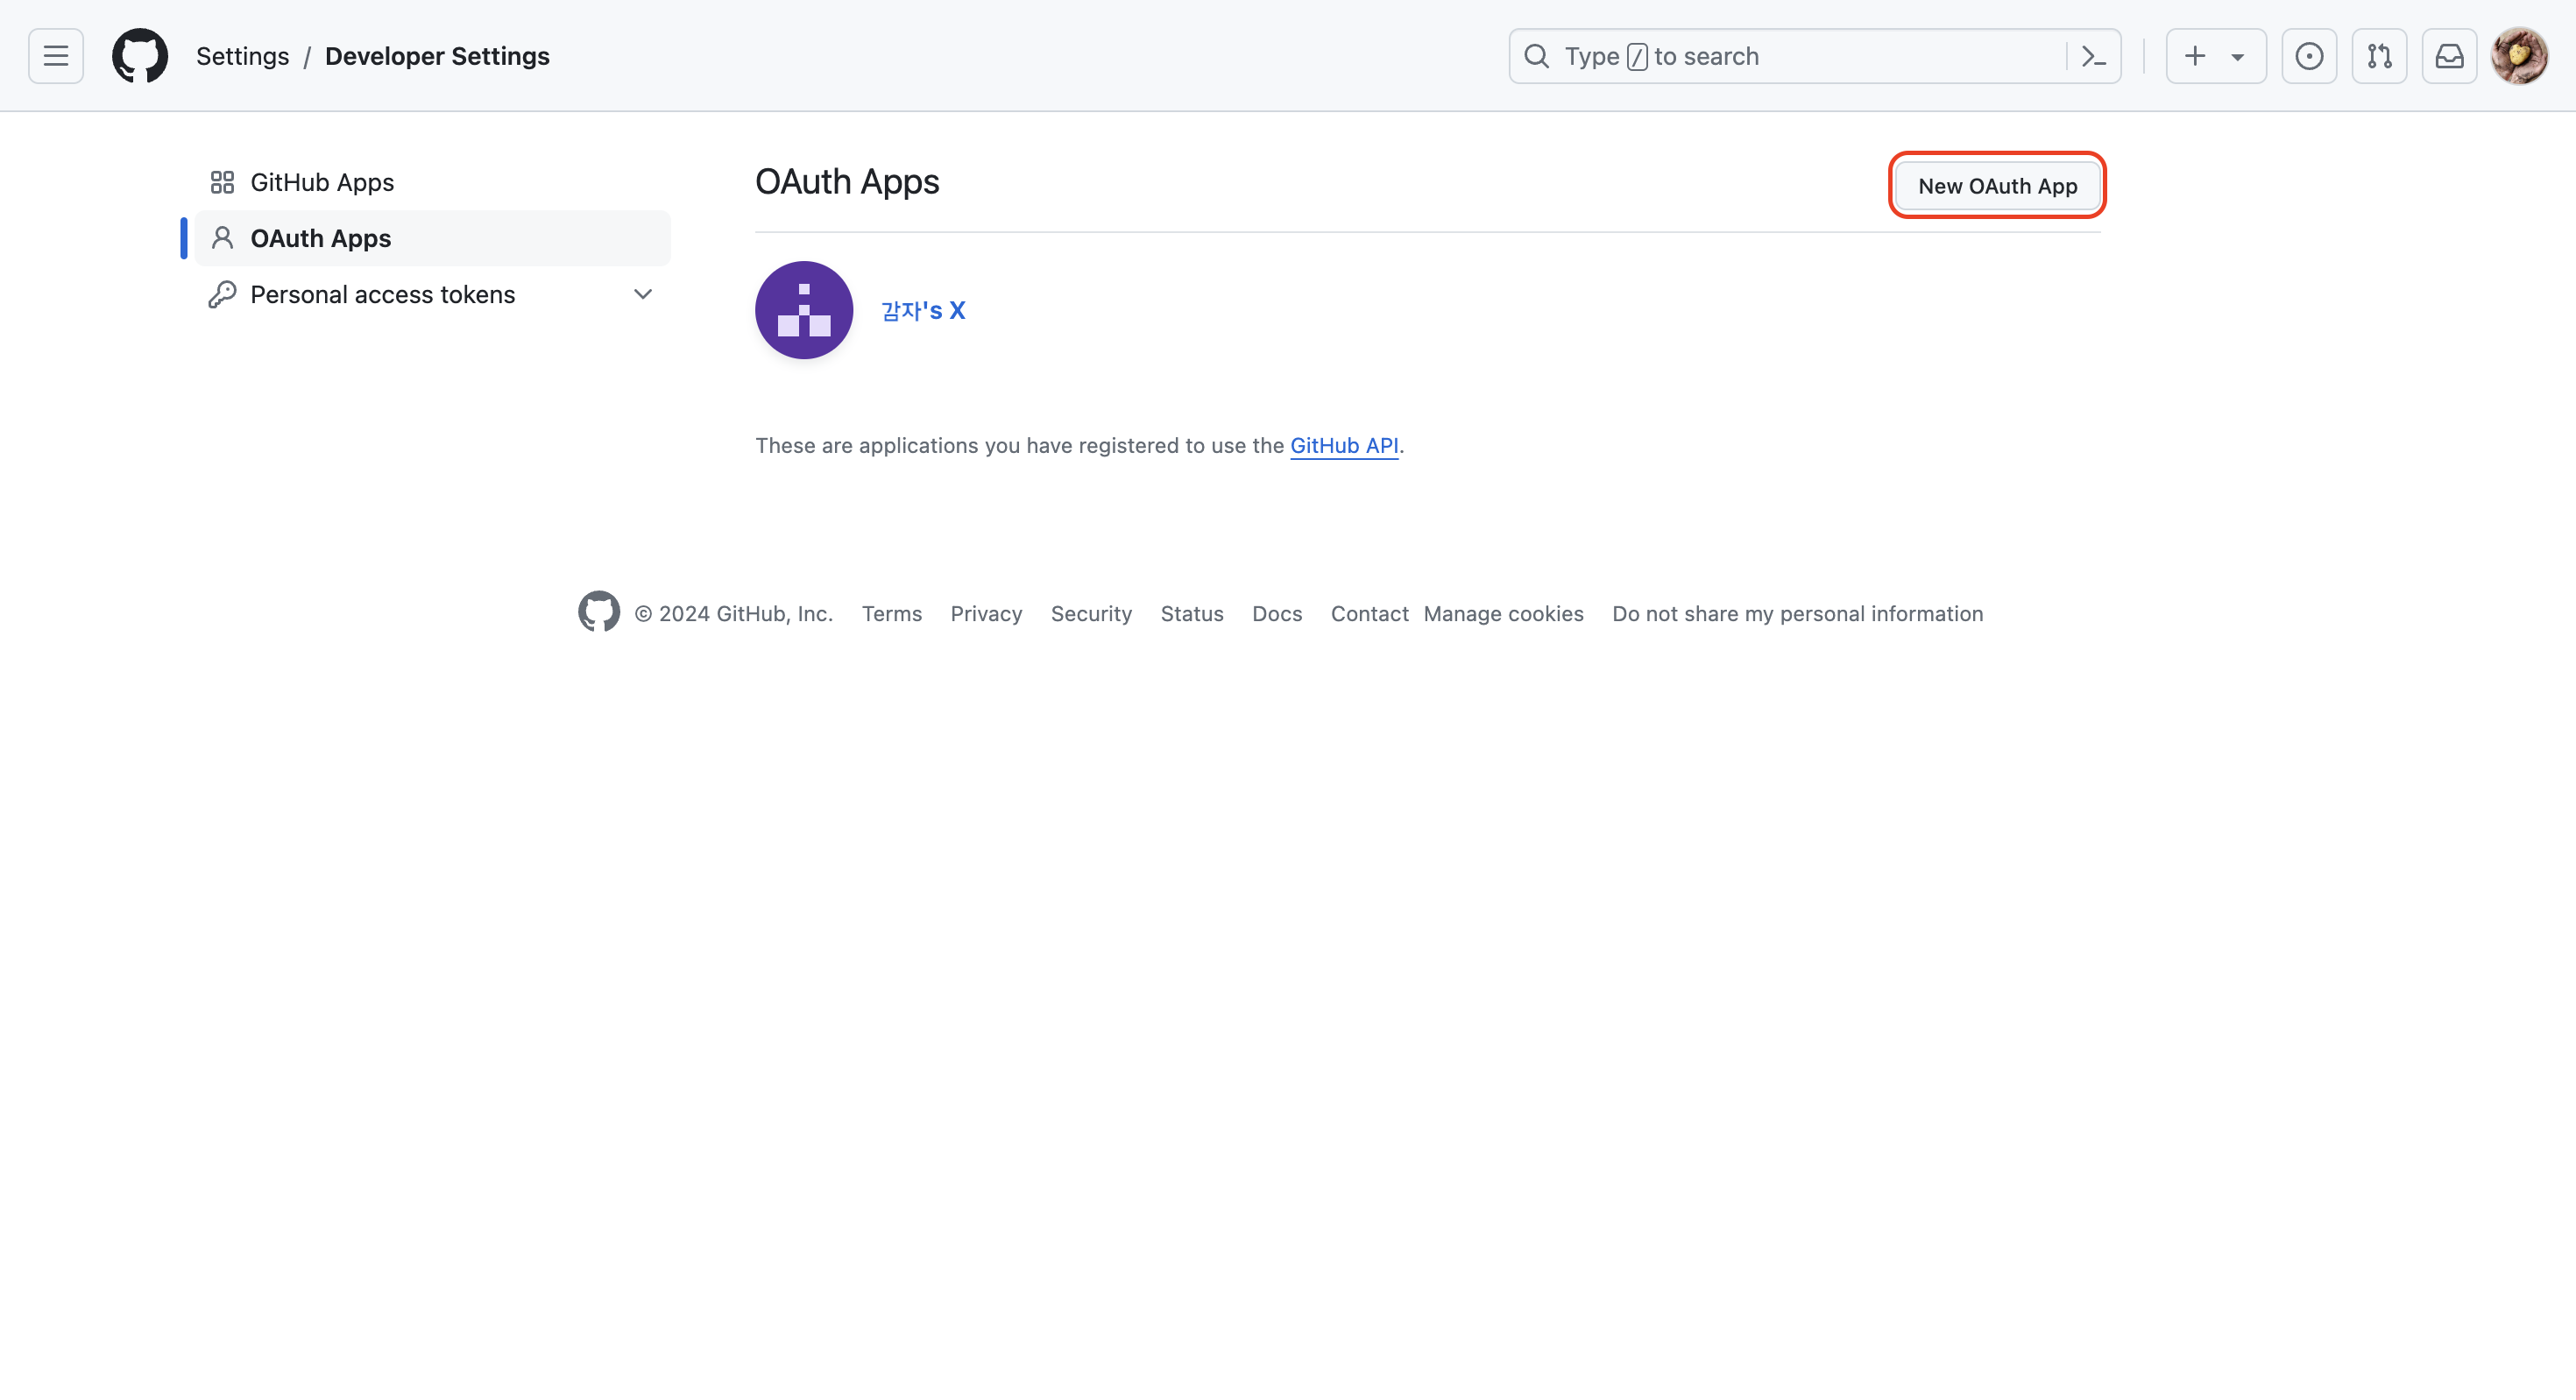
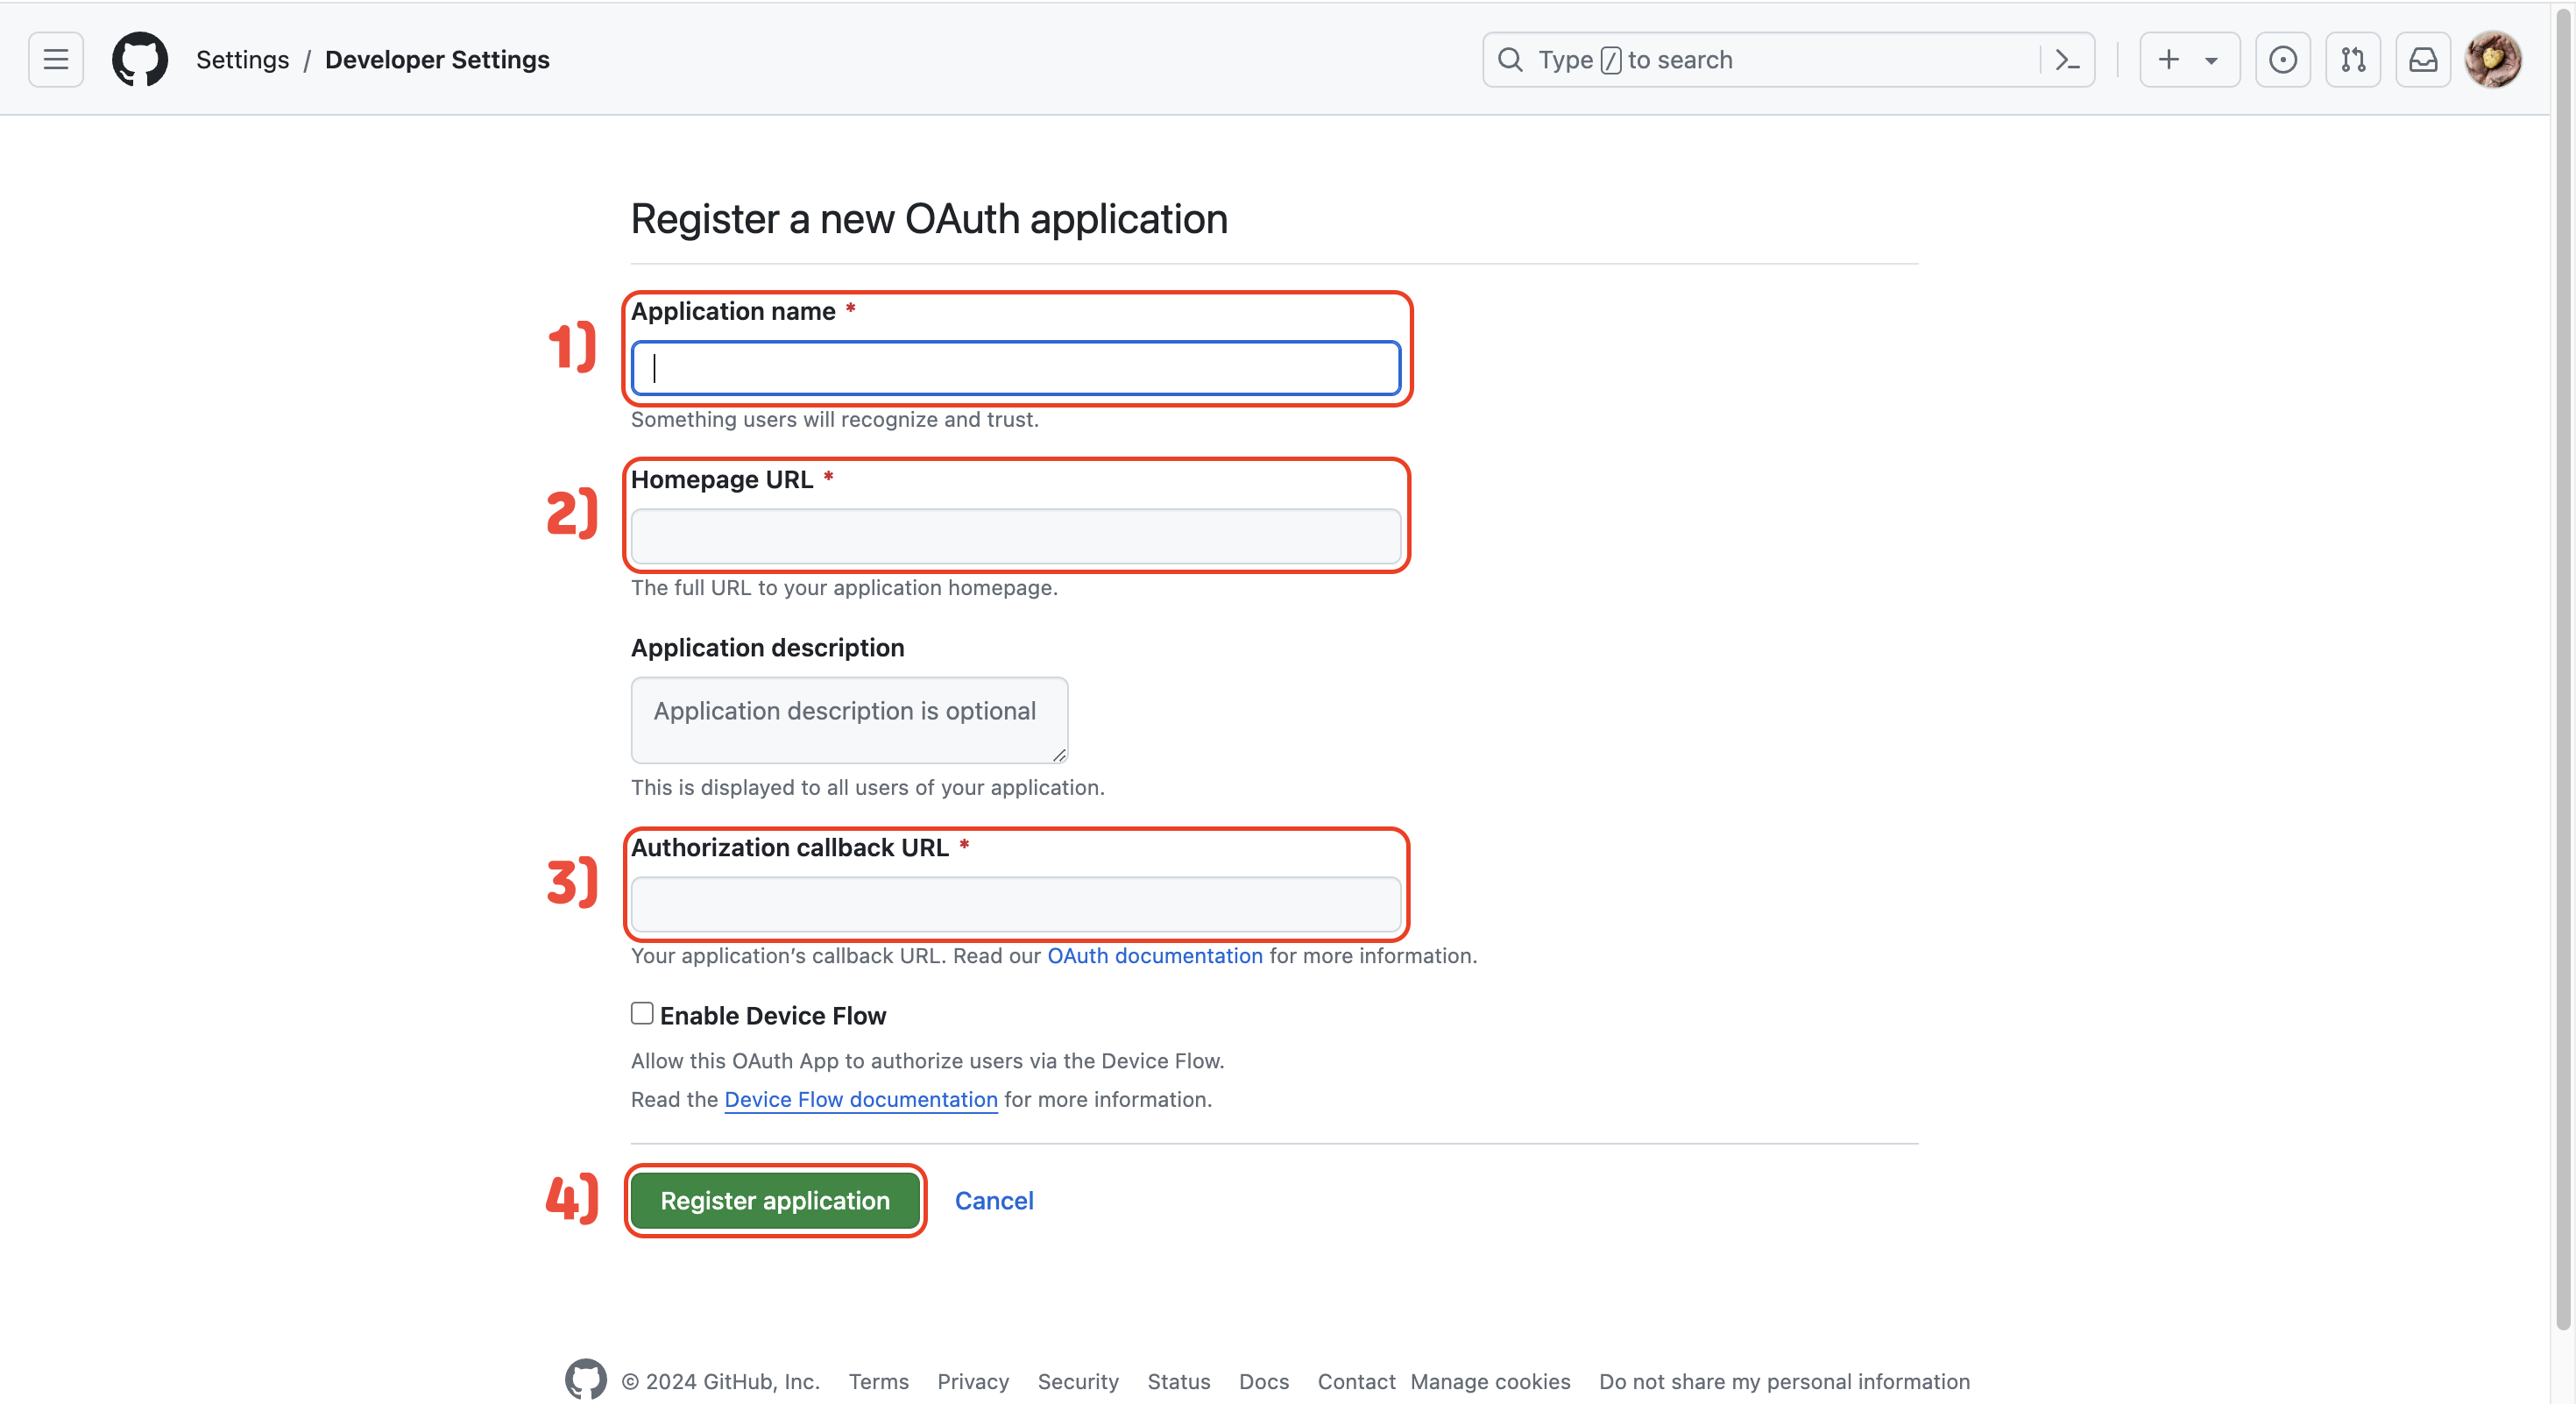
위에서 2)는 아래 사진의 빨간 링크, 3)은 파란 링크를 복붙하면 된다.
위의 과정을 다 마치고 나면 아래의 코드를 입력하면 된다.
export default function GithubButton() {
    const navigate = useNavigate();
    const onClick = async () => {
        try {
            // not cordova!
            const provider = new GithubAuthProvider();
            // github 로그인을 취소하면 다시 login page로 돌아오게 됨.
            // await signInWithRedirect(auth, provider);

            // popup창에서 github 로그인이 이루어짐.
            await signInWithPopup(auth, provider);
            navigate("/");
        } catch(e) {
            console.log(e);
        }

    }
    return (
        <Button onClick={onClick}>
            <Logo src="/github-logo.svg" />
            Continue with Github
        </Button>
    );
}
(+) createAccount와 login 화면에 겹치는 components가 많을 때 => auth-components.tsx를 새로 만들어서 공통 부분을 넣기!
import styled, {keyframes} from "styled-components";

// 회전 애니메이션 정의
export const rotate = keyframes`
    from {
        transform: rotate(0deg);
    }
    to {
        transform: rotate(360deg);
    }
`;

export const Wrapper = styled.div`
    height: 100%;
    display: flex;
    flex-direction: column;
    align-items: center;
    width: 26.25rem;
    padding: 3.125rem 0rem;
`;
export const Logo = styled.img`
    width: 300px;
    height: auto;
    animation: ${rotate} 10s linear infinite; // 애니메이션 추가
`;
export const Title = styled.h1`
    font-size: 42px;
`;
export const Form = styled.form`
    margin-top: 50px;
    display: flex;
    flex-direction: column;
    gap: 10px;
    width: 100%;
`;
export const Input = styled.input`
    padding: 10px 20px;
    border-radius: 50px;
    border: none;
    width: 100%;
    font-size: 16px;
    font-weight: 600;
    font-family: sans-serif; // 브라우저 기본 폰트로 설정

    // type이 submit이라면 cursor를 pointer로 한다는 코드
    &[type="submit"]{
        background-color: #1d9bf0;
        color: white;
        cursor: pointer;
        &:hover {
            opacity: 0.8; // 투명도 설정
        }
    }
`;
export const Error = styled.span`
    color: tomato;
    margin-top: 10px;
`;
export const Switcher = styled.span`
    margin-top: 20px;
    a {
        color: #1d9bf0;
    }
`;