FeedB는 개발자들이 자신이 만든 토이 프로젝트나 사이드 프로젝트를 공유하고, 다른 사람들이 피드백을 남길 수 있는 서비스입니다.
오늘은 댓글 상세페이지에 어떤 기능들을 구현했는지 자세하게 이야기해볼 예정입니다. 그럼 레츠고 ✨
프로젝트 피드백
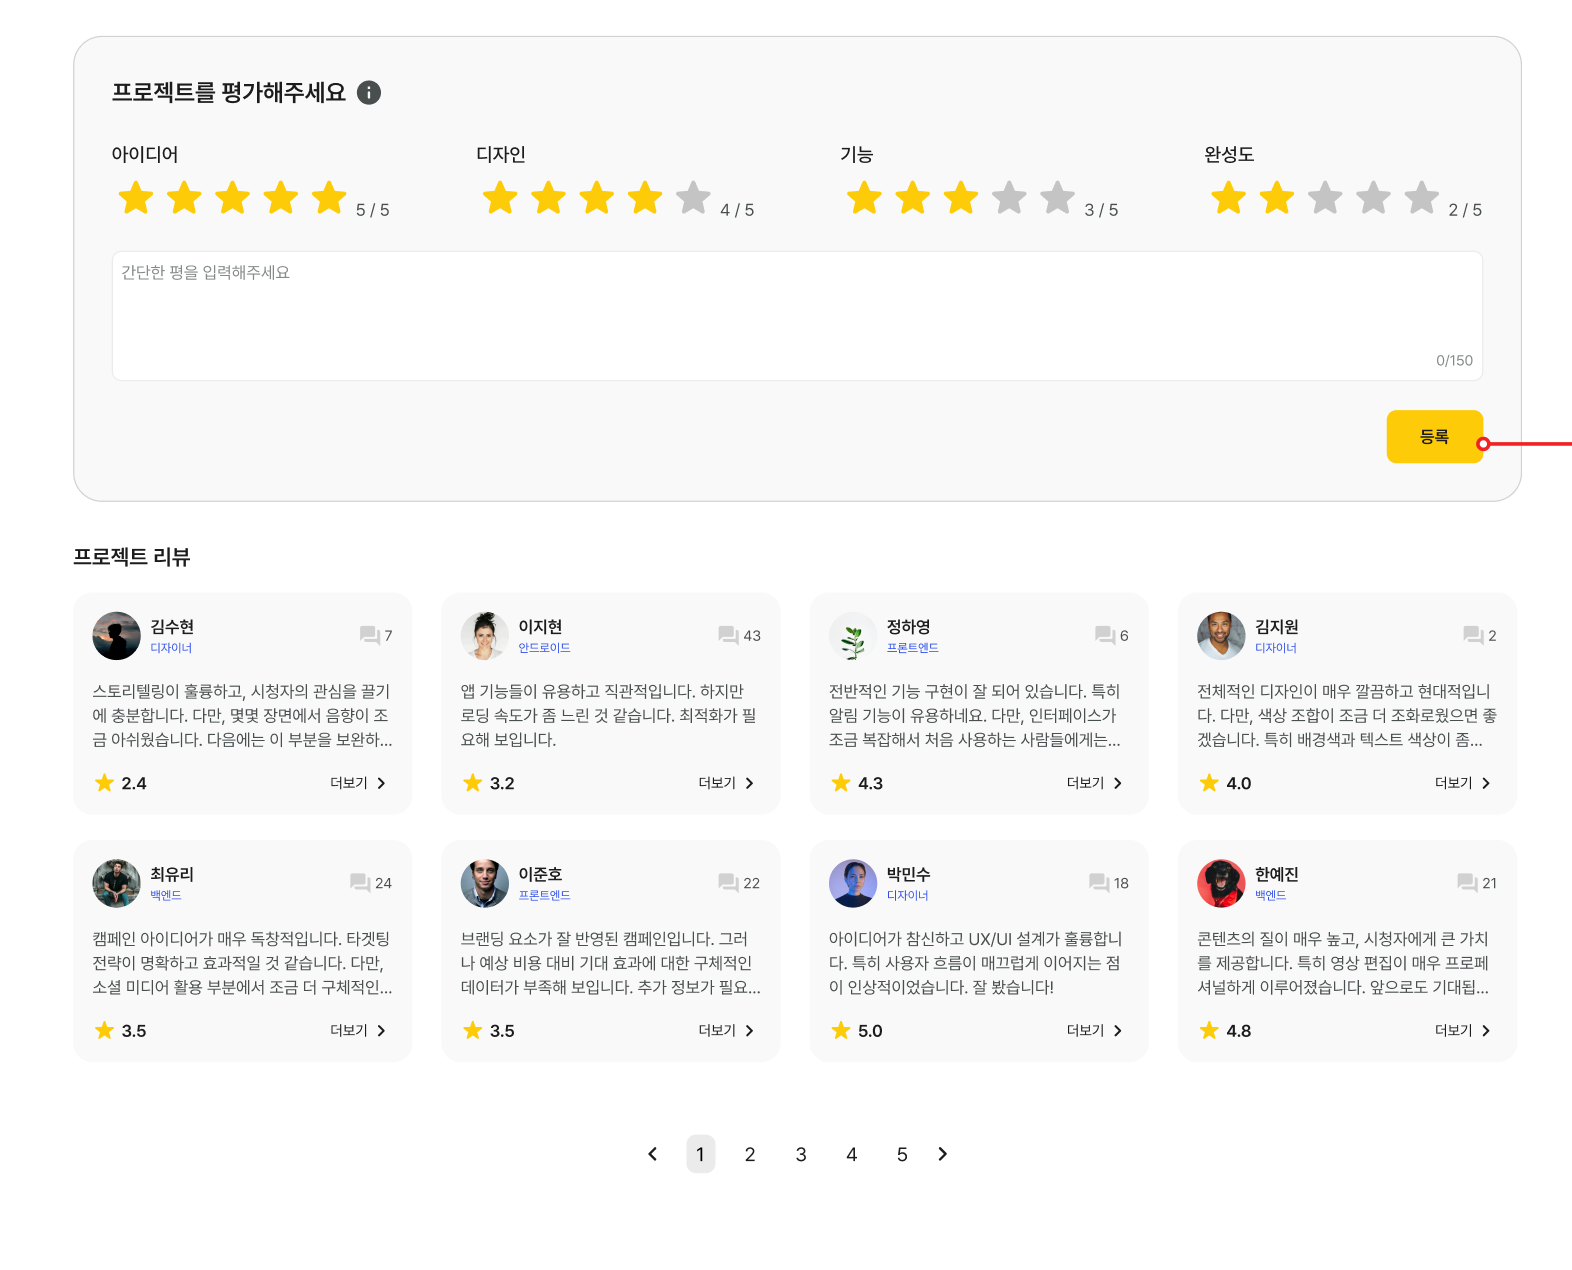
저희 서비스에서는 다른 사람들이 별점과 코멘트 두 가지 방법으로 피드백을 남길 수 있어, 사용자들이 부담 없이 자신의 생각을 표현할 수 있습니다.
그리고 사진에서 보이는 피드백을 누르면 자세한 내용을 볼 수 있는 페이지로 이동하게 된다. 내가 맡은 부분은 바로 이 부분이다.
🧩 피드백 상세 페이지
어떤 사람의 피드백에 질문이 있거나, 더 자세한 의견을 듣고 싶을 때가 있을 겁니다. 이러한 경험을 반영하여, 피드백 상세 페이지를 만들었습니다. 이 페이지는 한 사람의 의견에 대해 여러 사람들과 소통하며 다양한 의견과 토론을 나눌 수 있도록 하는 것을 목적으로 하고 있습니다.
이 페이지에서 구현해야할 내용은 크게 아래와 같습니다.
1. 피드백 RUD 기능 구현
2. 댓글 CRUD 기능 구현
3. 카톡 공유, 링크 복사
4. Toast UI 구현
이번 포스트에서는 1,2,3 내용만 다룰 것 입니다. 4번은 나중에 따로 포스팅을 할 예정입니다. 그것도 많관부
🍀 피드백, 댓글 get 요청
interface Props {
params: {
ratingId: number;
projectId: number;
};
}
async function CommentPage({ params }: Props) {
const queryClient = new QueryClient();
const reflyCommentListQuery = commentQueryKeys.reflyList({
projectId: params.projectId,
ratingId: params.ratingId,
page: 1,
size: 10,
});
await queryClient.prefetchQuery(commentQueryKeys.detail(params.ratingId));
await queryClient.prefetchInfiniteQuery({
queryKey: reflyCommentListQuery.queryKey,
queryFn: reflyCommentListQuery.queryFn,
initialPageParam: 1 as never,
getNextPageParam: (lastPage: any) => {
const { customPageable } = lastPage;
if (customPageable.hasNext) {
return customPageable.page + 1; // 다음 페이지 번호 반환
}
return undefined; // 더 이상 페이지가 없으면 undefined 반환
},
});
const dehydratedState = dehydrate(queryClient);
return (
<HydrationBoundary state={dehydratedState}>
...
</HydrationBoundary>
);
}아마 이전 포스트부터 보신 분들은 이 코드가 어떤 코드인제 대충 짐작이 가실텐데요 그래서 설명은 간단하게 하고 넘어가겠습니다.
먼저 Next.js는 동적 경로를 지원하며, 이 경로 매개변수들을 params 객체로 제공합니다. 이 기능을 이용하여 projectId, ratingId를 쉽게 가져올 수 있었습니다.
피드백과 댓글 리스트 데이터를 서버에서 prefetch하여 이 데이터들이 필요한 컴포넌트에서 useQuery훅으로 가져다 사용할 수 있게 해주고 있습니다. 이렇게 해주면 보다 나은 랜더링 속도를 얻을 수 있습니다.
🍀 피드백 Update & Delete

영상을 보면 알 수 있듯이 간단해보이는 기능이다. 이 기능을 어떻게 구현했는지 자세히 설명해드리겠습니다.
드롭다운 박스 컴포넌트
function DropDown({ children, className, ref }: DropDownProps) {
  const DefaultDropDownClass =
    "absolute z-50 rounded-lg border border-solid border-gray-300 bg-white px-4 py-3 text-sm text-black";
  const DropDownClass = twMerge(DefaultDropDownClass, className);

  return (
    <div ref={ref} className={DropDownClass}>
      {children}
    </div>
  );
}

function LinkItem({ children, className, href }: DropDownLinkProps) {
  const DefaultLinkItemClass =
    "text-nowrap block cursor-pointer p-2 text-black font-semibold hover:bg-gray-100 rounded";
  const LinkItemClass = twMerge(DefaultLinkItemClass, className);

  return (
    <Link href={href} className={LinkItemClass}>
      {children}
    </Link>
  );
}

function TextItem({ children, className, onClick }: DropDownProps) {
  const DefaultTextItemClass = "text-nowrap cursor-pointer p-2 text-black font-semibold hover:bg-gray-100 rounded";
  const TextItemClass = twMerge(DefaultTextItemClass, className);

  return (
    <p className={TextItemClass} onClick={onClick}>
      {children}
    </p>
  );
}

function HR() {
  return <hr className="m-1" />;
}

DropDown.LinkItem = LinkItem;
DropDown.TextItem = TextItem;
DropDown.HR = HR;

export default DropDown;
이전 포스트에서 드롭박스 다운 컴포넌트를 어떻게 만들고 왜 만들었는지 설명했습니다.
지금 이 컴포넌트를 사용해서 프로젝트에 보여지는 드롭다운 박스를 전부 만들 정도로 아주 알차게 사용하고 있습니다.
드롭다운 박스 컴포넌트 활용
"use client";
interface CommentDropboxProps {
  toggleState: () => void;
  ratingId: number;
  projectId: number;
}

function CommentDropbox({ toggleState: editToggle, ratingId, projectId }: CommentDropboxProps) {
  const queryClient = useQueryClient();
  const router = useRouter();

  const { addToast } = useToast();
  const { isOpen, toggleState } = useToggleHook();


  const mutation = useMutation({
    mutationFn: () => {
      return commentApi.deleteComment(ratingId);
    },
    onSuccess: () => {
      queryClient.removeQueries({
        queryKey: ["comment", "detail", "commentData", ratingId],
      });

      addToast("프로젝트 리뷰가 삭제되었습니다", "error");
    },
    onError: error => {
      console.error("Error:", error);
      addToast("프로젝트 리뷰 삭제 오류가 발생했습니다", "error");
    },
  });

  const handleDeleteComment = () => {
    mutation.mutate();
    router.push(`/project/${projectId}`);
    toggleState();
  };

  const handleEditComment = () => {
    editToggle();
    toggleState();
  };

  return (
    <>
      <button
        type="button"
        onClick={toggleState}
        className="h-10 w-10 rounded-lg p-2 hover:bg-gray-100"
        ref={buttonRef}>
        <Image src={KebabDropDown} alt="댓글 모달 메뉴" width={24} />
      </button>

      {isOpen && (
        <DropDown className="right-0 top-11 animate-dropdown-grow" itemRef={dropdownRef}>
          <DropDown.TextItem onClick={handleEditComment}>수정</DropDown.TextItem>
          <DropDown.TextItem onClick={handleDeleteComment}>삭제</DropDown.TextItem>
        </DropDown>
      )}
    </>
  );
}

export default CommentDropbox;
이 컴포넌트에 역할은 두 가지 입니다.
- 사용자가 삭제를 누르면 삭제 요청이 실행
- 사용자가 수정을 누르면 수정 UI들이 나올 수 있도록 toggleState훅을 실행시킨다
1번 같은 경우에는 삭제를 누르면 mutate()가 실행되면서 백엔드 측으로 Delete 요청을 보낸다. 이 작업이 정상적으로 진행됐으면 캐싱되어 있는 데이터 중 해당 피드백에 대한 데이터를 지워주는 흐름으로 진행되고 있다.
2번은 props로 받아오는 toggleState() 함수가 실행되게 되는데 이걸 보내주는 코드 쪽을 같이 한 번 보면서 설명하겠습니다.
피드백 상세 컴포넌트
function CommentSection({ projectId, ratingId }: CommentSectionProps) {
  const { isOpen: commentEditOpen, toggleState } = useToggleHook();
  const { data: commentDetailData, isPending } = useQuery(commentQueryKeys.detail(ratingId));

  if (!commentDetailData) {
    return <p>데이터를 가져오는데 실패했습니다. 죄송합니다.</p>;
  }

  if (isPending) {
    return <DetailLoading />;
  }

  return (
    <>
      <section className="mt-10 w-full p-4">
        <div className="flex items-center justify-between">
          <CommentProfile
            userId={commentDetailData?.authorId}
            userName={commentDetailData.authorName}
            userJob={commentDetailData.job}
            userProfileImageUrl={commentDetailData.authorProfileImageUrl}
          />
          <div className="relative flex items-center gap-2">
            <SocialDropBox projectId={projectId} />
            <CommentDropbox toggleState={toggleState} ratingId={ratingId} projectId={projectId} />
          </div>
        </div>
      </section>
      {commentEditOpen ? (
        <section className=" mt-4 flex min-h-[300px] flex-col gap-10">
          <EnterCommentProvider>
            <EnterText commentValue={commentDetailData.comment} />
            <EnterRating ratingValue={transformedData} />
            <CommentEditButton onClick={toggleState} ratingId={ratingId} />
          </EnterCommentProvider>
        </section>
      ) : (
        <section className="mt-4">
          <p className="mt-4 min-h-[230px] w-full p-4 text-sm font-normal text-gray-900">
            {commentDetailData?.comment}
          </p>
          <RatingBox {...ratingData} />
        </section>
      )}
    </>
  );
}

export default CommentSection;
코드를 보시면 CommentDropbox라는 컴포넌트가 보일 것 입니다. 이 컴포넌트가 방금 위에서 받던 드롭다운 박스 컴포넌트를 활용해서 만든 컴포넌트 입니다.
아까 저희가 받던 toggleState()도 prop으로 전달해주고 있죠?
toggleState()는 제가 미리 만들어둔 useToggleHook() 커스텀훅 안에 있는 useState 상태를 바꿔주는 함수입니다.
CommentDropbox 컴포넌트 안에 있는 수정 버튼을 누르게 되면 기존 피드백 내요을 보여주는 UI는 사라지고 피드백을 수정할 수 있는 UI가 나타나게 되는 구조입니다.
수정 컴포넌트
EnterText : 수정된 피드백 내용을 적는 컴포넌트
EnterRating : 기존 별점을 가지고 있고, 별점을 수정할 수 있는 컴포넌트
CommentEditButton : 수정 요청을 하는 버튼 컴포넌트
위에 적힌 컴포넌트들은 EnterCommentProvider로 감싸져 있는데 context를 이용하여 이 컴포넌트들이 값을 공유할 수 있도록 해주었습니다.
그러면 CommentEditButton 컴포넌트에서 EnterCommentProvider에서 가지고 있는 피드백 내용, 별점 상태값을 가져와 백엔드 측으로 수정 요청을 보낼 수 있는 구조입니다.
🍀 댓글 CRUD

이 부분은 사실상 피드백과 크게 다르지않게 구현할 수 있는 부분이다.
댓글 작성 및 불러오기
- 댓글을 입력한다.
- 버튼을 누르면 리엑트 쿼리 mutation으로 Post 요청이 보내지고
invalidateQueries함수가 실행되면서 캐싱되어 있는 댓글 리스트 키값을 무효화시켜 새로운 데이터를 불러올 수 있도록 한다.
댓글 수정
사진을 보시면 댓글 작성과 수정은 똑같은 컴포넌트를 재사용하는 것을 알 수가 있습니다.
🚨 이슈 발생
여기서 문제는 똑같은 컴포넌트를 쓰게 되면 버튼을 눌렀을 때 Post 요청과 put 요청이 둘 다 가능하고 상황에 맞게 요청이 실행되어야한다.
기존코드
"use client";

interface CommentInputProps {
  ratingId: number;
}

function CommentInput({ ratingId }: CommentInputProps) {
  const queryClient = useQueryClient();
  const [textValue, setTextValue] = useState("");

  const mutation = useMutation({
    mutationFn: (comment: string) => {
      return commentApi.postReflyComment(ratingId, comment);
    },
    onSuccess: () => {
      queryClient.invalidateQueries({
        queryKey: ["comment", "reflyList", "reflyCommentList"],
      });
      setTextValue("");
    },
  });

  const onChange = (event: ChangeEvent<HTMLTextAreaElement>) => {
    setTextValue(event.target.value);
  };

  const handelSubmit = (event: FormEvent<HTMLFormElement>) => {
    event.preventDefault();
    const formData = new FormData(event.currentTarget);
    const comment = formData.get("comment");
    if (comment) {
      mutation.mutate(comment.toString());
    }
  };

  return (
    <form onSubmit={handelSubmit}>
      <textarea />
      <div className="flex flex-col justify-between">
        <p className="text-end text-sm text-gray-500">
          {textValue.length}/{REFLY_COMMENT_LENGTH}
        </p>
        <Button bgColor="yellow" buttonSize="small" type="submit">
          등록
        </Button>
      </div>
    </form>
  );
}

export default CommentInput;
기존에는 이 컴포넌트를 post 요청에만 사용하려고 했기 때문에 다른 용도로 쓰기에는 다소 어려운 점이 있었다.
그래서 컴포넌트를 재사용하기 위해 코드를 개선해보았습니다.
🛠️ 개선된 코드
"use client";

interface CommentInputProps {
  ratingId?: number;
  commentId?: number;
  type: "post" | "put";
  toggleState?: () => void;
  commentValue?: string;
}

function CommentInput({ ratingId, commentId, type, toggleState, commentValue }: CommentInputProps) {

  const postReflyCommentmutation = useMutation({
    mutationFn: (comment: string) => {
      return commentApi.postReflyComment(ratingId, comment);
    },
    onSuccess: () => {
      queryClient.invalidateQueries({
        queryKey: ["comment", "reflyList", "reflyCommentList"],
      });
      setTextValue("");
    },
  });

  const putReflyCommentmutation = useMutation({
    mutationFn: (comment: string) => {
      return commentApi.putReflyComment(commentId, comment);
    },
    onSuccess: () => {
      queryClient.invalidateQueries({
        queryKey: ["comment", "reflyList", "reflyCommentList"],
      });
      setTextValue("");
    },
  });


  return (
    <form onSubmit={handelSubmit} className="flex min-h-32 gap-1 rounded-lg border border-solid border-gray-200 p-3">
      <textarea/>
      <div className="flex flex-col justify-between">
        <p className="text-end text-sm text-gray-500">
          {textValue.length}/{REFLY_COMMENT_LENGTH}
        </p>
        <div className="flex gap-3">
          {type === "put" && (
            <Button bgColor="gray" buttonSize="small" type="button" onClick={handelToggle}>
              취소
            </Button>
          )}
          <Button bgColor="yellow" buttonSize="small" type="submit">
            {type === "post" ? "등록" : "수정"}
          </Button>
        </div>
      </div>
    </form>
  );
}

export default CommentInput;
props로 type을 받게 하여 이 컴포넌트를 post 또는 put 요청 중 어떤 목적으로 사용할 것인지 받은 다음에 버튼을 누르면 type에 따라 각각 다른 요청을 할 수 있도록 코드를 개선해보았습니다.
댓글 삭제
댓글 삭제는 피드백 삭제와 별 다른 거 없이 구현했기 때문에 넘어가도록 하겠습니다.
🍀 카톡 공유, 링크 복사
이번에는 링크 복사와 카카오톡 공유하기 기능을 어떻게 구현했는지 말해드리겠습니다.
코드
const url: string = window.location.href;

export const copyLink = async () => {
  await navigator.clipboard.writeText(url);
};

// Kakao
export const shareKakao = async (projectId: number) => {
  const result = await projectApi.getProject(projectId);

  if (typeof window !== "undefined" && (window as any).Kakao) {
    const kakao = (window as any).Kakao;
    if (!kakao.isInitialized()) {
      const apiKey = process.env.NEXT_PUBLIC_KAKAO_API_KEY;
      if (!apiKey) {
        console.error("Kakao API key is not defined");
        return;
      }
      kakao.init(apiKey);
    }

    kakao.Share.sendDefault({
      objectType: "feed",
      content: {
        title: "",
        description: result.introductions,
        imageUrl: result.thumbnailUrl,
        link: {
          mobileWebUrl: "https://feedb.vercel.app",
          webUrl: "https://feedb.vercel.app",
        },
      },
      itemContent: {
        profileText: result.title,
      },
      social: {
        likeCount: result.likeCount,
      },
      buttons: [
        {
          title: "자세히 보기",
          link: {
            mobileWebUrl: `https://feedb.vercel.app/project/${projectId}`,
            webUrl: `https://feedb.vercel.app/project/${projectId}`,
          },
        },
      ],
    });
  } else {
    console.error("Kakao object is not defined on the window");
  }
};
링크 복사 같은 경우에는 간단하게 할 수 있었습니다. window 객체에 접근하여 현재 접속해 있는 URL을 가져온 다음에 클립보드에 넣어주기만 하면 링그 복사 기능은 끝납니다.
🐝 카카오톡 공유 결과물
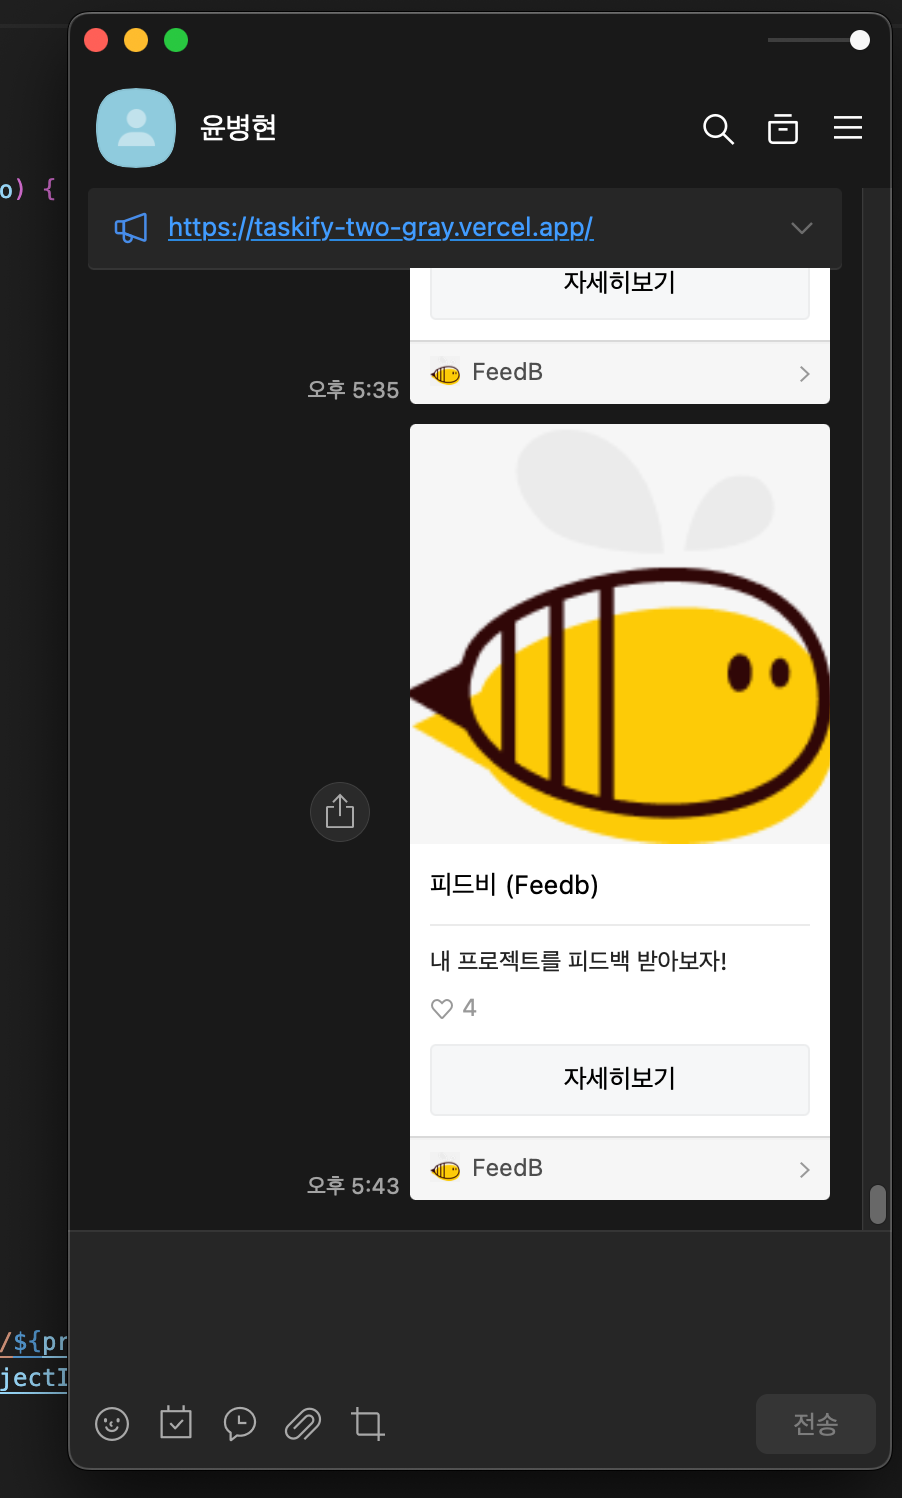
코드를 보시면 제가 원하는대로 값을 지정하고 카카오톡으로 공유를 할 수 있습니다.
저 같은 경우에는 해당 프로젝트 데이터를 서버에서 가져와 데이터를 바탕으로 공유되는 내용을 동적으로 바꿀 수 있도록 구현을 해주었습니다.
제가한 방법말고도 커스터마이징할 수 있는 방법이 많으니 그건 링크 참고해주시기 바랍니다.
깃허브