
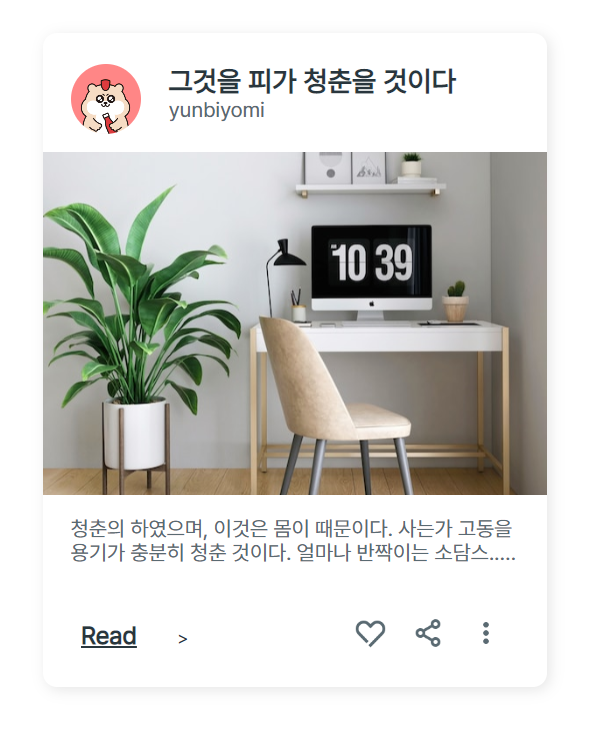
📒 완성작품
📙 HTML 코드
<!DOCTYPE html>
<html lang="ko-KR">
<head>
    <meta charset="UTF-8">
    <meta http-equiv="X-UA-Compatible" content="IE=edge">
    <meta name="viewport" content="width=device-width, initial-scale=1.0">
    <title>카드 UI 만들기 - UPGRADE</title>
    <link rel="stylesheet" href="css/card.css">
    <link rel="stylesheet" href="css/normalize.css">
</head>
<body>
    <article class="card-item">
        <div class="card-profile">
            <img class="card-profile-img" src="img/weniv-chilli.png" alt="profile">

            <div class="card-profile-content">
                <span class="card-profile-msg">그것을 피가 청춘을 것이다</span>
                <span class="card-profile-id">yunbiyomi</span>
            </div>
        </div>

        <img class="card-img" src="img/thumbnail.png" alt="img">

        <p class="card-content">청춘의 하였으며, 이것은 몸이 때문이다. 사는가 고동을 용기가 충분히 청춘 것이다. 얼마나 반짝이는 소담스...운 열락의 아름다우냐? 가지에 같지 청춘의 옷을 목숨을 피어나기 오직 군영과 칼이다. 거친 끓는 예가 뿐이다. 방지하는 꽃이 청춘을 생명을 이것이다. 인간의 거선의 피고, 모래뿐일 작고 우리 평화스러운 있는가?</p>

        <div class="card-underline">
            <div>
                <a class="card-underline-link" href="#">Read</a>
                <a class="card-underline-arrow" href="#">></a>
            </div>

            <div class="card-underline-icon">
                <img class="icon-heart" src="img/icon-heart.png" alt="heart">
                <img class="icon-share" src="img/icon-share.png" alt="share">
                <img class="icon-more" src="img/icon-more.png" alt="more">
            </div>
        </div>
    </article>

</body>
</html>
📘 CSS 코드
@font-face {
    font-family: 'Pretendard-Regular';
    src: url('https://cdn.jsdelivr.net/gh/Project-Noonnu/noonfonts_2107@1.1/Pretendard-Regular.woff') format('woff');
    font-weight: 400;
    font-style: normal;
}

body {
    font-family: 'Pretendard-Regular', sans-serif;
    font-size: 12px;
    font-weight: 400;
    color: #5A6A72;
}

* a {
    text-decoration: none;
}

.card-item {
    margin: 30px;
    width: 288px;
    height: 374px;
    background: #FFF;
    box-shadow: 2px 2px 8px rgba(0, 0, 0, 0.1);
    border-radius: 8px;
}

.card-profile {
    width: 288px;
    height: 68px;
    display: flex;
}

.card-profile-img {
    width: 40px;
    height: 40px;
    border-radius: 100%;
    margin: 18px 0 0 16px;
    object-fit: cover;
}

.card-profile-content {
    margin: 19px 16px 15px 16px;
}

.card-profile-msg {
    font-size: 16px;
    font-weight: 700;
    color: #29363D;
}

.card-img {
    width: 288px;
    height: 196px;
}

.card-content {
    margin: 10px 16px;
    overflow: hidden;
    text-overflow: ellipsis;
    display: -webkit-box;
    -webkit-box-orient: vertical;
    -webkit-line-clamp: 2;
    word-break: break-all;
}

.card-underline {
    width: 288px;
    height: 60px;
    display: flex;
    justify-content: space-between;
    align-items: center;
}

.card-underline-link {
    font-size: 14px;
    font-weight: 700;
    color: #29363D;
    text-decoration: underline;
    margin: 0 20px 0 22px;
    line-height: 50px;
}

.card-underline-arrow {
    font-size: 5px;
    color: #29363D;
}

.card-underline-icon {
    margin-right: 22px;
}

.card-underline-icon img {
    width: 25px;
    height: 25px;
    margin-left: 5px;
}
저번에 만든 카드 UI의 업그레이드 버전으로 위에 프로필과 밑에 언더라인에 아이콘을 추가해주었다.
수업 시간에는 시간이 부족해 다 만들지 못했는데 다시 처음부터 하나씩 차근차근 해보니 큰 어려움 없이 구현할 수 있었다.
새로 추가된 부분에 대해서만 설명을 해보자면
사진 위의 상단 부분은 두개의 span을 div로 묶어준 뒤 이미지를 추가해 다시 한번 div로 감싸주었다.
감싸준 div인 card-profile 클래스에 display: flex;을 추가해주어 사진 옆에 두개의 span이 위치할 수 있도록 정렬해 주었다.
그리고 프로필 사진은 object-fit: cover;를 이용하여 비율이 고정된 상태로 개체에 크기에 맞게 잘릴 수 있도록 해주었다.
그리고 맨 밑 부분인 underline부분도 read와 화살표를 묶어준 div와 아이콘들을 묶어준 div를 다시 한번 div로 감싸주었다.
그리고 이번에는 display: flex; 속성의 justify-content: space-between;를 이용하여 양 끝에 위치할 수 있도록 정렬시켜주고 align-items: center;를 이용하여 가운데 정렬해주었다.

새로움을 두려워 하지 않는 도전하는 프론트엔드 개발자👩💻