📅 2024-03-26, 72일차
Ajax View More 버튼으로 리스트 더 보여주기
- 처음엔 Ajax로 키워드별 카페를 보여주면서 페이지네이션도 함께 보여줘야했고, 페이지네이션까지는 성공했지만 2페이지로 넘어가면 Ajax가 풀려(?)버리는 문제가 발생하여,
event.preventDefault(); // 기본 동작 방지 (페이지 이동 막기)- 이런 함수가 있다고 한다. 설명은 주석으로! 리스트 아래에 더보기(View More) 버튼을 세팅해놓고 더보기 버튼을 누르면 2페이지로 넘어가는것이 아닌 다음 페이지에 있는 리스트들이 쌓이고 쌓이는 식으로 보여주기로 변경했다.
문제 상황
- 전체 카페 리스트에서 더보기 버튼을 누르면 리스트를 아래로 추가정렬하여 보여주는게아닌 다음페이지로 넘어가듯이 새로운 리스트를 보여준다. 더보기 버튼 구현이 안되는건가 싶더니...
- 웃긴건, 여기서 더보기 버튼을 한번 더 누르면 리스트를 아래로 정렬하여 보여준다
- 더 웃긴건, 키워드 필터버튼으로 카페를 정렬 했을 경우엔, 더보기 버튼이 잘 된다
- 일관성이 없네; 뭐지 ㅋ
전체보기 리스트에서 첫번째 더보기 클릭시 발생하는 에러를 수정하면 될 듯 한데, 일단 카페 리스트 구현은 이제 슬슬 나를 힘들게한다...ㅋㅋㅋㅋ 여기에만 꽂혀서 다른 기능을 구현을 못하고있기도하니, 카페리스트 구현은 잠시 거리두기를 하고 날씨기능 구현을 시작해야겠다. 카페리스트는 며칠 후에 다시 건드려보자.
OpenWeather API
https://openweathermap.org/ 에서 회원가입 후 API Key를 발급받음.
jsp에 발급받아 놓은 API Key와, 도시를 변수로 세팅해주면 된다.
 <script>
        function fetchWeather() {
            var city = "Daejeon";
            var apiKey = "API Key";
            var lang = "kr";

            var apiUrl = "http://api.openweathermap.org/data/2.5/weather?q=" + city + "&appid=" + apiKey + "&lang=" + lang + "&units=metric";

            fetch(apiUrl)
                .then(function(response) {
                    return response.json();
                })
                .then(function(data) {
                    console.log(data); // 데이터를 콘솔에 출력
                })
                .catch(function(error) {
                    console.error('Error:', error);
                });
        }
</script> <h1>Weather Information</h1>
<button onclick="fetchWeather()" style ="margin-top: 50px; margin-left: 50px;">Get Weather</button>
Get Weather 버튼을 클릭 후 콘솔을 확인하면 대전 날씨 데이터를 볼 수 있다!
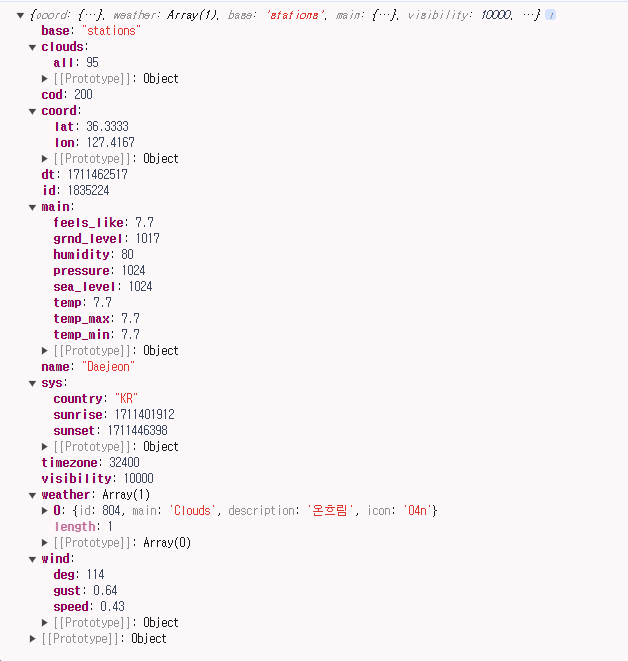
여기서 내가 필요한 건
- 기온
["main"]["temp"] - 습도
["main"]["humidity"] - 강수상태/날씨상태
["weather"][0]["id"]
OpenWeather에서는 weather condition을 ID 코드로 설정해놓는다.
날씨별 ID 코드 리스트 : https://openweathermap.org/weather-conditions
강수상태나 날씨상태는 ID 코드별로 묶어서 조건문을 만들 예정이다.
예를들어 ID가 200~599라면 비오는날에 가기 좋은 카페를 추천해주고 그에 맞는 이미지와 문구를 보여준다.
Rainy : ID 200~599
ID 200~299 : Thunderstorm (폭풍우)
ID 300~399 : Drizzle (이슬비)
ID 500~ 599 : Rain(비)
Snowy : ID 600~699
ID 600~699 : Snow (눈)
Cloudy : ID 700~804
ID 700~799 : mist(안개)
ID 801~804 : Clouds (흐림)
Sunny : ID 800
ID 800 : Clear (맑음)
날씨 불러오기 테스트는 성공했으니 가공은 내일부터! 일단 좀 자자..

hello world