Section 3. CRUD 구현
모든 게시물을 가져오는 서비스 만들기
이 로직은 데이터베이스 조작 로직이므로 서비스에서 처리할 수 있다. 우선 메모리 기반으로 작업을 시작한다.
src/boards/boards.service.ts
import { Injectable } from '@nestjs/common';

@Injectable()
export class BoardsService {
  private boards = [];

  getAllBoards() {
    return this.boards;
  }
}
이제 getAllBoards() 메서드가 실제로 호출되게 하기 위해서 컨트롤러 코드를 수정한다.
src/boards/boards.controller.ts
import { Controller, Get } from '@nestjs/common';
import { BoardsService } from './boards.service';

@Controller('boards')
export class BoardsController {
  constructor(private boardsService: BoardsService) {}

  @Get()
  getAllTask() {
    return this.boardsService.getAllBoards();
  }
}
서버를 실행하고 http://localhost:3000/boards에 접속하거나 포스트맨을 사용해 응답을 확인할 수 있다.
정리
다음과 같은 흐름으로 클라이언트의 요청이 처리되고 있다.
- 클라이언트에서 요청을 보내면 먼저 컨트롤러가 이를 받는다.
- 컨트롤러가 알맞은 요청 경로 및 메서드로 라우팅하여 해당 핸들러로 이동한다.
- 세부적인 로직을 처리하기 위해 서비스를 호출한다.
- 서비스가 로직을 처리한 후 결과를 컨트롤러에 반환한다.
- 컨트롤러는 클라이언트에 응답을 보낸다.
Board Model 정의하기
게시물 모델을 정의하여 게시물에 필요한 데이터를 정의한다. 먼저 src/boards/board.model.ts를 생성한다.
모델을 정의하기 위해 Interface 또는 Class를 사용할 수 있다. Interface는 변수의 타입만을 검사하고, Class는 변수의 타입 검사 및 인스턴스 생성까지 할 수 있다. 우선 구조를 정의하기 위해 Interface를 사용한다.
src/boards/board.model.ts
export interface Board {
  id: string;
  title: string;
  description: string;
  status: BoardStatus;
}

export enum BoardStatus {
  PUBLIC = 'PUBLIC',
  PRIVATE = 'PRIVATE',
}
생성한 Board 모델을 사용한 타이핑
정의한 모델을 사용해 서비스부터 타이핑을 시작한다.
src/boards/boards.service.ts
import { Injectable } from '@nestjs/common';
import { Board } from './board.model';

@Injectable()
export class BoardsService {
  private boards: Board[] = [];

  getAllBoards(): Board[] {
    return this.boards;
  }
}
그 다음으로는 컨트롤러를 타이핑한다.
src/boards/boards.controller.ts
import { Controller, Get } from '@nestjs/common';
import { BoardsService } from './boards.service';
import { Board } from './board.model';

@Controller('boards')
export class BoardsController {
  constructor(private boardsService: BoardsService) {}

  @Get()
  getAllTask(): Board[] {
    return this.boardsService.getAllBoards();
  }
}
이렇게 타이핑을 수행하면 코드의 가독성이 좋아지고 타입으로 인한 오류를 방지할 수 있다.
게시물 생성하기: Service
게시물에 관한 로직을 처리하는 것은 서비스이므로 먼저 서비스에서 로직을 생성하고 컨트롤러에서 불러와 주는 순서로 구현한다.
src/boards/board.service.ts
...
  createBoard(title: string, description: string) {
    const board: Board = {
      title,
      description,
      status: BoardStatus.PUBLIC,
    };
  }
...
여기서 ID를 설정하지 않았기 때문에 타입스크립트 에러가 발생한다. ID는 데이터베이스에서 고유한 값을 자동 생성해 주지만 현재는 데이터베이스 연동이 되어 있지 않은 상황이므로 uuid를 사용해 고유한 숫자를 부여한다. 먼저 모듈을 설치한다.
$ npm i uuid --save이후 import { v1 as uuid } from 'uuid'로 모듈을 불러오고 다음과 같이 서비스 로직을 수정한다.
...
  createBoard(title: string, description: string): Board {
    const board: Board = {
      id: uuid(),
      title,
      description,
      status: BoardStatus.PUBLIC,
    };

    this.boards.push(board);
    return board;
  }
...
게시물 생성하기: Controller
서비스 로직을 만들었으므로 이제 컨트롤러에서 클라이언트 요청을 처리하고 응답해 주는 로직을 만든다. NestJS에서는 요청 body의 내용을 @Body() body 파라미터로 받아올 수 있다. 개별 속성은 @Body('attribute') attribute와 같이 받아올 수 있다.
src/boards/boards.controller.ts
...
  @Post()
  createBoard(
    @Body('title') title: string,
    @Body('description') description: string,
  ): Board {
    return this.boardsService.createBoard(title, description);
  }
...
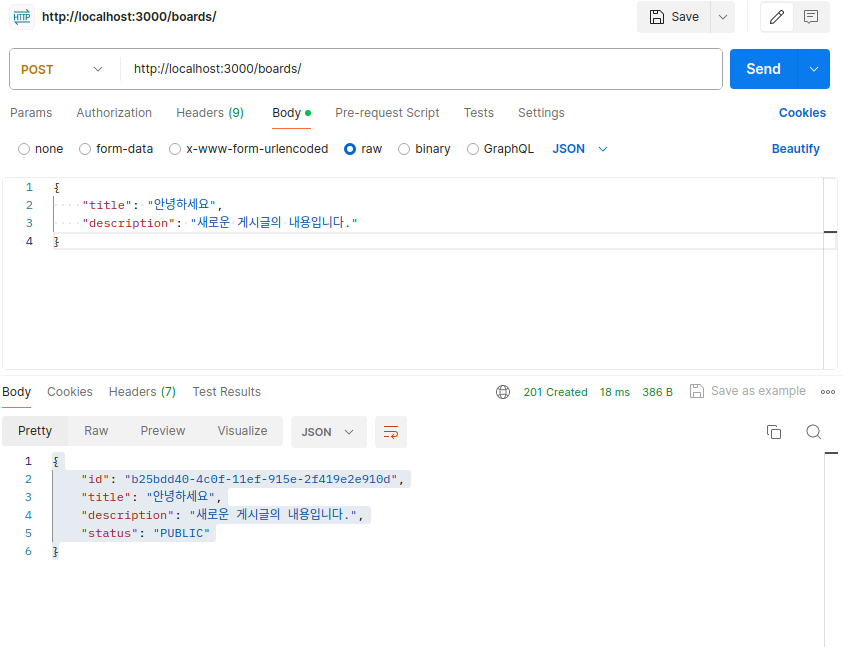
이제 서버를 실행하고 Postman을 사용해 새롭게 만든 기능이 잘 동작하는지 테스트한다.
Data Transfer Object(DTO)
DTO란 계층 간 데이터 교환을 위한 객체이다. 데이터베이스에서 데이터를 얻어 서비스나 컨트롤러로 전송할 때 사용하는 객체를 의미한다. DTO는 데이터가 네트워크를 통해 전송되는 방법을 정의한다. Interface나 Class를 이용해 정의할 수 있고, NestJS에서는 Class를 사용한 정의를 추천하고 있다.
DTO는 데이터 유효성 검사에 효율적이며, 타입스크립트 타입으로도 사용될 수 있어 코드를 더 안정적으로 만들어준다는 장점이 있다.
앞서 만든 서비스와 컨트롤러에서는 데이터 처리를 위해 title, description이라는 프로퍼티를 직접 명시하여 사용하였다. 그러나 애플리케이션이 복잡해지면서 이러한 프로퍼티가 수정되어야 하는 경우가 생긴다면 유지보수가 매우 힘들어질 것이다. 이러한 상황을 방지하기 위해 DTO가 사용된다.
Interface vs. Class for DTO
인터페이스는 타입스크립트의 트랜스파일 과정 중에 제거되므로 NestJS가 런타임에 참조할 수 없다. 그러나 클래스는 자바스크립트 ES6 표준의 일부이므로 컴파일 이후에도 실제 엔티티로 유지된다. 따라서 파이프와 같은 기능이 런타임에서 원활히 사용되려면 DTO는 Class로 정의되는 것이 중요하다.
게시물 생성을 위한 DTO
게시물 생성 기능을 위한 DTO를 실제로 생성하고 적용해 보자. 먼저 DTO를 생성하기 위한 디렉터리와 파일을 생성한다. 먼저 src/boards 안에 dto라는 디렉터리를 생성하고 해당 디렉터리 안에 create-board.dto.ts를 생성한다.
src/boards/dto/create-board.dto.ts
export class CreateBoardDto {
  title: string;
  description: string;
}
생성된 DTO를 실제 서비스와 컨트롤러에 적용한다.
src/boards/boards.controller.ts
...
  @Post()
  createBoard(@Body() createBoardDto: CreateBoardDto): Board {
    return this.boardsService.createBoard(createBoardDto);
  }
...
src/boards/boards.service.ts
...
  createBoard(createBoardDto: CreateBoardDto): Board {
    const { title, description } = createBoardDto;

    const board: Board = {
      id: uuid(),
      title,
      description,
      status: BoardStatus.PUBLIC,
    };

    this.boards.push(board);
    return board;
  }
...
이렇게 하여 DTO를 사용해 로직의 유지보수성을 증가시켰다.
ID로 특정 게시물 조회하기
이번에는 ID를 이용해 특정 게시물을 조회하는 기능을 구현한다. 이번에도 서비스 로직으로 주요 기능을 먼저 구현하고 컨트롤러에서 이를 연결하는 순서로 진행한다.
이번에는 요청 파라미터를 추출할 것인데, NestJS에서는 @Param() attributes: string[] 데코레이터로 전체 요청 파라미터를 가져올 수 있고, @Param('attribute') attribute 데코레이터를 사용하여 요청 파라미터의 특정 키의 값을 추출할 수 있다.
src/boards/boards.service.ts
...
  getBoardById(id: string): Board {
    return this.boards.find((board) => board.id === id);
  }
...
src/boards/boards.controller.ts
...
  @Get('/:id')
  getBoardById(@Param('id') id: string): Board {
    return this.boardsService.getBoardById(id);
  }
...
ID로 특정 게시물 삭제하기
이번에는 ID를 사용해 특정 게시물을 삭제하는 기능을 구현한다.
src/boards/boards.service.ts
...
  deleteBoard(id: string): void {
    this.boards = this.boards.filter((board) => board.id !== id);
  }
...
src/boards/boards.controller.ts
...
  @Delete('/:id')
  deleteBoard(@Param('id') id: string): void {
    this.boardsService.deleteBoard(id);
  }
...
특정 게시물의 상태 업데이트하기
이번에는 특정 게시물의 상태를 PUBLIC, PRIVATE 간 업데이트해주는 기능을 구현한다.
src/boards/boards.service.ts
...
  updateBoardStatus(id: string, status: BoardStatus): Board {
    const board = this.getBoardById(id);
    board.status = status;

    return board;
  }
...
src/boards/boards.controller.ts
...
  @Patch('/:id/status')
  updateBoardStatus(
    @Param('id') id: string,
    @Body('status') status: BoardStatus,
  ) {
    return this.boardsService.updateBoardStatus(id, status);
  }
...
이렇게 메모리 기반의 저장소를 사용하여 기본적인 CRUD를 모두 구현해 보았다.