Section 7. 인증 기능 구현하기
인증 기능 구현을 위한 준비
이번 섹션부터는 인증 기능을 구현할 것이다. 다시 한번 만들고자 하는 애플리케이션의 전체적인 구조를 확인하자.
- AppModule(root)
- BoardModule
- BoardController
- BoardEntity
- BoardService
- BoardRepository
- ValidationPipe
- AuthModule
- AuthController
- UserEntity
- AuthService
- UserRepository
- JWT, Passport
- BoardModule
즉, 지금부터는 AutoModule을 구현한다.
CLI를 이용한 Module, Controller, Service 생성
먼저 CLI를 이용해 모듈, 컨트롤러, 서비스를 생성한다.
$ nest g module auth
$ nest g controller auth --no-spec
$ nest g service auth --no-spec
사용자 Entity 생성
다음으로는 사용자에 대한 인증을 해야 하므로 사용자 엔티티를 생성한다.
src/auth/user.entity.ts
import { BaseEntity, Column, Entity, PrimaryGeneratedColumn } from "typeorm";

@Entity()
export class User extends BaseEntity {
  @PrimaryGeneratedColumn()
  id: number;

  @Column()
  username: string;

  @Column()
  password: string;
}
Repository 생성
이 부분은 강의 내용과 달리 TypeORM 0.3 이상 버전 환경을 고려해 EntityRepository 대신 Repository를 사용할 것이다.
src/auth/user.repository.ts
import { Injectable } from '@nestjs/common';
import { InjectRepository } from '@nestjs/typeorm';
import { User } from './user.entity';
import { Repository } from 'typeorm';

@Injectable()
export class UserRepository {
  constructor(
    @InjectRepository(User)
    private readonly repository: Repository<User>,
  ) {}
}
생성된 Repository를 AuthModule에 등록
생성된 리포지토리를 다른 곳에서 사용할 수 있도록 모듈에 등록하는 과정이 필요하다.
src/auth/auth.module.ts
import { Module } from '@nestjs/common';
import { AuthController } from './auth.controller';
import { AuthService } from './auth.service';
import { TypeOrmModule } from '@nestjs/typeorm';
import { User } from './user.entity';
import { UserRepository } from './user.repository';

@Module({
  imports: [TypeOrmModule.forFeature([User])],
  controllers: [AuthController],
  providers: [AuthService, UserRepository],
})
export class AuthModule {}
생성된 Repository를 AuthService에 Injection
이제 서비스 계층에서 리포지토리를 사용할 수 있도록 의존성을 주입해 주는 과정이 필요하다.
src/auth/auth.service.ts
import { Injectable } from '@nestjs/common';
import { UserRepository } from './user.repository';

@Injectable()
export class AuthService {
  constructor(private readonly userRepository: UserRepository) {}
}
회원가입 기능 구현
이번에는 사용자 회원가입 기능을 구현할 것이다. 다시 한번 리포지토리 패턴을 사용한 흐름을 확인해 보자.
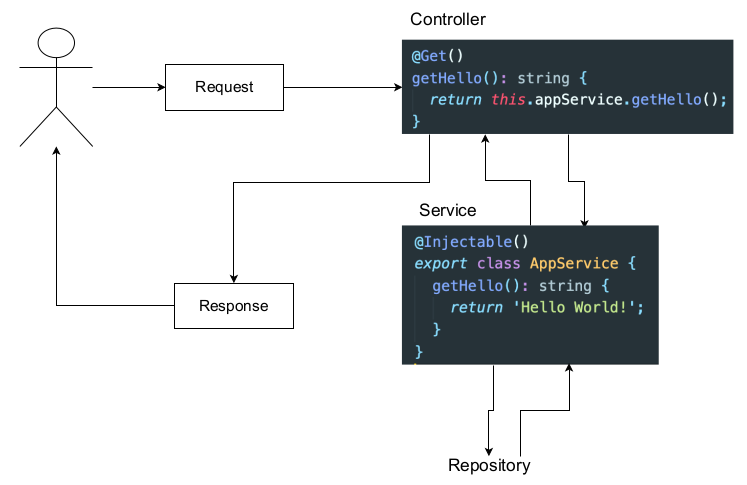
먼저 요청을 유지보수성 있게 받기 위한 DTO를 정의한다.
src/auth/dto/auth-credential.dto.ts
export class AuthCredentialsDto {
  username: string;
  password: string;
}
그 다음 사용자 정보를 생성하기 위한 리포지토리 계층의 로직을 구현한다.
src/auth/user.repository.ts
...
  async createUser(authCredentialsDto: AuthCredentialsDto): Promise<void> {
    const { username, password } = authCredentialsDto;

    const user = this.repository.create({
      username,
      password,
    });

    await this.repository.save(user);
  }
...
그 다음 서비스 계층의 로직을 구현한다.
src/auth/auth.service.ts
...
  async signUp(authCredentialsDto: AuthCredentialsDto): Promise<void> {
    return this.userRepository.createUser(authCredentialsDto);
  }
...
그 다음 컨트롤러 계층에서 구현한 내용들을 연결한다.
src/auth/auth.controller.ts
import { Body, Controller, Post } from '@nestjs/common';
import { AuthService } from './auth.service';
import { AuthCredentialsDto } from './dto/auth-credential.dto';

@Controller('auth')
export class AuthController {
  constructor(private authService: AuthService) {}

  @Post('signup')
  signUp(@Body() authCredentialsDto: AuthCredentialsDto): Promise<void> {
    return this.authService.signUp(authCredentialsDto);
  }
}
서버를 실행하고 Postman을 사용해 회원가입 기능을 테스트해보자.
사용자 데이터 유효성 검사
이번에는 사용자 회원가입 시 이름의 길이, 비밀번호 길이와 같은 조건을 명시하고 유효성 검사를 할 수 있도록 각 컬럼에 조건을 부여한다.
Class-validator
먼저 class-validator를 사용해 DTO에 조건을 명시한다.
src/auth/dto/auth-credential.dto.ts
import { IsString, Matches, MaxLength, MinLength } from "class-validator";

export class AuthCredentialsDto {
  @IsString()
  @MinLength(4)
  @MaxLength(20)
  username: string;

  @IsString()
  @MinLength(4)
  @MaxLength(20)
  // only enable english and number
  @Matches(/^[a-zA-Z0-9]*$/, {
    message: 'password only accepts english and number',
  })
  password: string;
}
ValidationPipe
요청이 컨트롤러로 전달되었을 때 DTO에 명시한 조건을 만족하는지 먼저 검사하려면 컨트롤러에서 @Body() 데코레이터에 파이프를 인자로 전달한다.
src/auth/auth.controller.ts
...
  @Post('signup')
  signUp(
    @Body(ValidationPipe) authCredentialsDto: AuthCredentialsDto,
  ): Promise<void> {
    return this.authService.signUp(authCredentialsDto);
  }
...
사용자 이름의 고유성 보장
이번에는 사용자 이름이 중복되지 않도록 하는 기능을 구현할 것이다. 이 기능은 두 가지 방식으로 구현이 가능하다.
- 애플리케이션 레벨에서 데이터베이스 조회를 통해 같은 사용자 이름이 존재하는지 검사한다.
- 데이터베이스 레벨에서 같은 사용자 이름을 가진 사용자가 있다면 예외를 발생시킨다.
두 번째 방식으로 구현해 보자. 엔티티 클래스에 @Unique() 데코레이터를 사용하여 고유한 값을 가지는 속성명을 명시해 주면 된다.
src/auth/user.entity.ts
import { BaseEntity, Column, Entity, PrimaryGeneratedColumn, Unique } from "typeorm";

@Entity()
@Unique(['username'])
export class User extends BaseEntity {
  @PrimaryGeneratedColumn()
  id: number;

  @Column()
  username: string;

  @Column()
  password: string;
}
현재 상태에서 같은 사용자 이름으로 회원가입을 두 번 시도하면 Internal Server Error가 발생한다. 하지만 이는 바람직하지 않다. 만약 REST API 규칙에 맞추어 서버를 설계하는 상황이라면 다른 처리를 해주어야 할 것이다.
이를 위해 try-catch 문법을 사용해 해당 오류가 발생하는 지점에서 적절하게 예외 처리를 해주어야 한다. 현재는 리포지토리 계층의 save() 메서드에서 발생함을 알 수 있다.
src/auth/user.repository.ts
...
  async createUser(authCredentialsDto: AuthCredentialsDto): Promise<void> {
    try {
      const { username, password } = authCredentialsDto;

      const user = this.repository.create({
        username,
        password,
      });

      await this.repository.save(user);
    } catch (error) {
      if (error.code === '23505') {
        throw new ConflictException('Existing username');
      } else {
        throw new InternalServerErrorException();
      }
    }
  }
...
비밀번호 암호화하기
이번에는 사용자 생성 시 비밀번호를 암호화해 저장하는 로직을 구현한다. 기능 구현을 위해 bcrypt를 사용한다. 다음과 같이 모듈을 설치하자.
$ npm i bcryptjs --save비밀번호를 데이터베이스에 저장하는 방법
일반적으로 비밀번호를 데이터베이스에 저장하는 방법은 다음과 같은 것들이 있다.
- 원본 비밀번호를 저장: 최악의 방법이다.
- 비밀 키를 사용해 양방향 암호화하여 저장: 비밀 키가 노출되면 위험하다.
- SHA256 등의 알고리즘으로 단방향 암호화하여 저장: 레인보우 테이블을 사용한 해킹 취약점이 존재한다. 이를 보완하기 위해 salt라고 불리는 임의의 문자열을 비밀번호에 붙여 단방향 암호화한다.
그러므로 세 번째 방법과 솔트를 함께 사용하여 암호화할 것이다.
소스 코드 구현
기존의 회원가입 기능의 리포지토리 로직을 다음과 같이 수정한다.
src/auth/user.repository.ts
...
import * as bcrypt from 'bcrypt'
...
  async createUser(authCredentialsDto: AuthCredentialsDto): Promise<void> {
    try {
      const { username, password } = authCredentialsDto;

      const salt = await bcrypt.genSalt();
      const hashedPassword = await bcrypt.hash(password, salt);
      const user = this.repository.create({
        username,
        password: hashedPassword,
      });

      await this.repository.save(user);
    } catch (error) {
      if (error.code === '23505') {
        throw new ConflictException('Existing username');
      } else {
        throw new InternalServerErrorException();
      }
    }
  }
...
이후 회원가입을 진행하고 데이터베이스에 저장된 비밀번호를 확인하면 단방향 암호화가 잘 수행되었음을 확인할 수 있다.
로그인 기능 구현하기
이번에는 로그인 기능을 구현한다.
리포지토리 계층에서는 데이터베이스에서 ID로 사용자를 찾는 findUserById() 메서드를 구현한다.
src/auth/user.repository.ts
...
  async findUserById(username: string): Promise<User> {
    return this.repository.findOne({ where: { username } });
  }
...
서비스 계층에서는 리포지토리 메서드를 사용하여 사용자를 찾고 비밀번호가 유효한지 검사한다.
src/auth/auth.service.ts
...
  async signIn(authCredentialsDto: AuthCredentialsDto): Promise<string> {
    const { username, password } = authCredentialsDto;
    const user = await this.userRepository.findUserById(username);

    if (user && bcrypt.compare(user.password, password)) {
      return 'logIn has been succeeded';
    } else {
      throw new UnauthorizedException('logIn has been failed');
    }
  }
...
컨트롤러 계층에서는 위에서 구현한 내용을 연결한다.
src/auth/auth.controller.ts
...
  @Post('signin')
  signIn(
    @Body(ValidationPipe) authCredentialsDto: AuthCredentialsDto
  ): Promise<string> {
    return this.authService.signIn(authCredentialsDto);
  }
...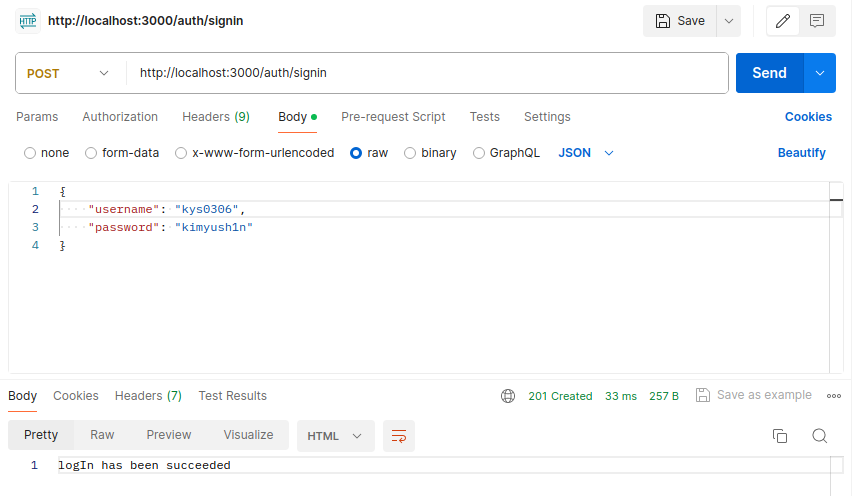
기존에 가입한 회원 정보로 로그인을 시도하면 다음과 같이 성공함을 확인할 수 있다.
JWT
토큰 기반의 로그인 기능을 구현하기 위해 JWT라는 모듈을 사용해야 한다. JWT 토큰은 다음과 같은 구조를 가진다.
- Header: 타입, 해싱 알고리즘 등 토큰에 대한 메타데이터를 포함한다.
- Payload: 사용자 정보, 만료 기간 등의 정보를 포함한다.
- Signature: base64 인코딩된 헤더와 페이로드 및 비밀 키를 해싱 알고리즘으로 해싱한 것이다. 사용되는 비밀 키는 노출되어선 안 된다.
JWT를 사용한 요청의 흐름
- 클라이언트는 JWT 토큰을 헤더에 포함하여 요청한다.
- 서버에서는 클라이언트 토큰의 Header, Payload와 서버가 갖고 있는 비밀 키로 Signature 부분을 생성한다.
- 클라이언트의 JWT 토큰의 Signature와 서버가 생성한 Signature가 동일한지 비교하고 요청에 대한 서비스를 처리한다.
JWT를 이용해서 토큰 생성하기
이번에는 JWT 모듈을 이용해 토큰을 생성한다. 또한 Passport 모듈도 함께 사용해 로그인 기능을 조금 더 쉽게 구현할 것이다. 필요한 모듈들은 다음과 같다.
- @nestjs/jwt: NestJS에서 JWT를 사용하기 위한 모듈이다.
- @nestjs/passport: NestJS에서 Passport를 사용하기 위한 모듈이다.
- passport: Passport 모듈이다.
- passport-jwt: JWT 로그인을 위한 Passport 모듈이다.
다음과 같은 명령어로 필요한 모듈들을 설치한다.
$ npm i @nestjs/jwt @nestjs/passport passport passport-jwt --save애플리케이션에 JWT 모듈 등록하기
애플리케이션에서 JWT 모듈을 사용하려면 앱 모듈에 등록해야 한다.
src/auth/auth.module.ts
import { Module } from '@nestjs/common';
import { AuthController } from './auth.controller';
import { AuthService } from './auth.service';
import { TypeOrmModule } from '@nestjs/typeorm';
import { User } from './user.entity';
import { UserRepository } from './user.repository';
import { JwtModule } from '@nestjs/jwt';
import * as dotenv from 'dotenv';
dotenv.config();

@Module({
  imports: [
    JwtModule.register({
      secret: process.env.JWT_SECRET,
      signOptions: {
        expiresIn: 60 * 60,
      },
    }),
    TypeOrmModule.forFeature([User]),
  ],
  controllers: [AuthController],
  providers: [AuthService, UserRepository],
})
export class AuthModule {}dotenv를 사용해 JWT 시크릿 키를 은닉하였다. JwtModule.register()로 등록해 주면 된다.
- secret: 토큰을 생성할 때 사용하는 비밀 키
- expiresIn: 초 단위의 토큰 유효 기간
애플리케이션에 Passport 모듈 등록하기
애플리케이션에서 Passport를 사용하려면 앱 모듈에 등록해야 한다.
src/auth/auth.module.ts
...
imports: [
    PassportModule.register({ defaultStrategy: 'jwt' }),
    JwtModule.register({
      secret: process.env.JWT_SECRET,
      signOptions: {
        expiresIn: 60 * 60,
      },
    }),
...
Passport 모듈은 전략 패턴으로 구현되어 있기 때문에 위와 같이 사용할 전략을 명시해 주면 된다.
로그인 성공 시 JWT 토큰 생성
이제 기존에 구현하였던 로그인 기능에 대한 서비스 로직에서 JWT 토큰을 생성해 주도록 만들면 된다.
src/auth/auth.service.ts
...
  async signIn(
    authCredentialsDto: AuthCredentialsDto,
  ): Promise<{ accessToken: string }> {
    const { username, password } = authCredentialsDto;
    const user = await this.userRepository.findUserById(username);

    if (user && bcrypt.compare(user.password, password)) {
      // generate user token (requires Secret + Payload)
      const payload = { username };
      const accessToken = this.jwtService.sign(payload);

      return { accessToken };
    } else {
      throw new UnauthorizedException('logIn has been failed');
    }
  }
...
함수의 반환형이 바뀌었으므로 컨트롤러의 타이핑도 수정해 주어야 한다.
src/auth/auth.controller.ts
...
  @Post('signin')
  signIn(
    @Body(ValidationPipe) authCredentialsDto: AuthCredentialsDto,
  ): Promise<{ accessToken: string }> {
    return this.authService.signIn(authCredentialsDto);
  }
...
이제 로그인하면 다음과 같은 응답이 온다.
{
    "accessToken": "eyJhbGciOiJIUzI1NiIsInR5cCI6IkpXVCJ9.eyJ1c2VybmFtZSI6Imt5czAzMDYiLCJpYXQiOjE3MjIyNDgyMzUsImV4cCI6MTcyMjI1MTgzNX0.oQ9yITLHXT6agqTlzN1nlhWHdqcbk643XPosAPUE7PY"
}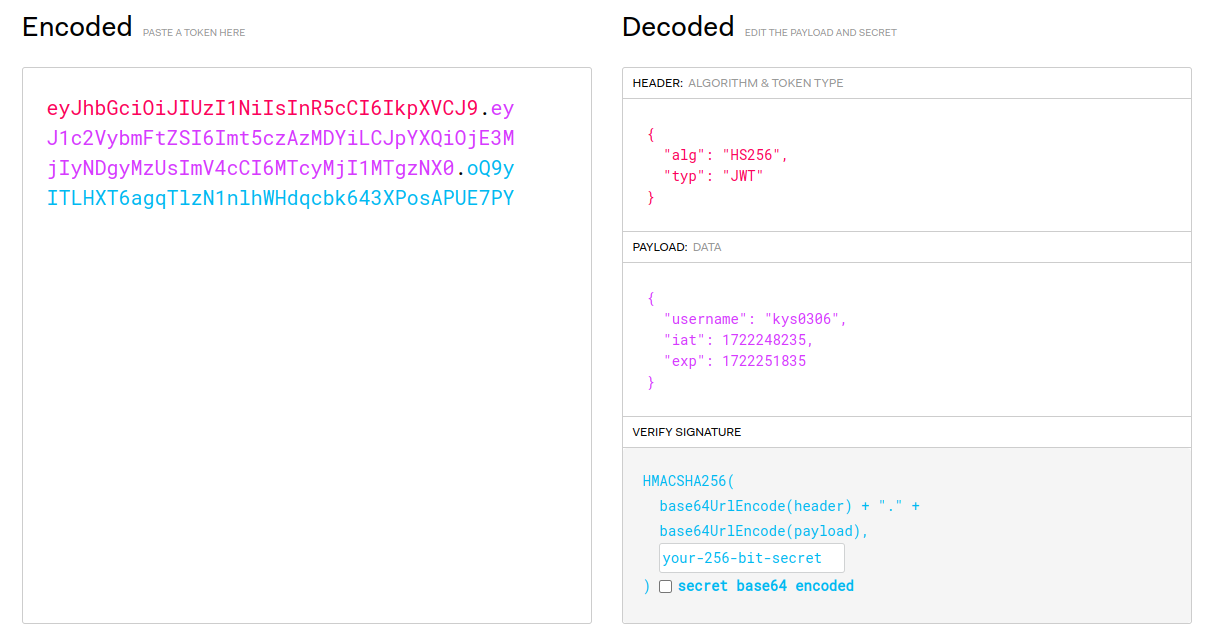
JWT 홈페이지에서 디버깅하면 사용자 정보가 잘 해석되는 것을 확인할 수 있다. 이처럼 JWT 토큰은 디버깅이 쉽기 때문에 중요한 정보를 포함하지는 않는다.
실제 서비스를 구현할 때 JWT 토큰 기반의 로그인을 구현한다면 액세스 토큰과 리프레시 토큰을 함께 사용하여 기능을 구현해야 한다는 점에 주의하자.
Passport, JWT 이용하여 토큰 인증 후 사용자 정보 조회하기
로그인 후 JWT 토큰을 발급했다면 이제 사용자는 인증이 필요한 요청을 보낼 때마다 헤더에 JWT 토큰을 담아 요청을 전송할 것이다. 이때 서버는 토큰이 유효한지 검증하는 과정을 거쳐야 한다. 이번에는 이 기능에 해당되는 Passport 전략을 구현할 것이다.
먼저 구현하기에 앞서 필요한 모듈인 @types/passport-jwt 모듈을 설치하고 JWT 전략 파일을 생성한다.
$ npm i @types/passport-jwt --savesrc/auth/jwt.strategy.ts
import { Injectable, UnauthorizedException } from '@nestjs/common';
import { PassportStrategy } from '@nestjs/passport';
import { ExtractJwt, Strategy } from 'passport-jwt';
import { UserRepository } from './user.repository';
import * as dotenv from 'dotenv';
import { User } from './user.entity';
dotenv.config();

@Injectable()
export class JwtStrategy extends PassportStrategy(Strategy) {
  constructor(private readonly userRepository: UserRepository) {
    super({
      secretOrKey: process.env.JWT_SECRET,
      jwtFromRequest: ExtractJwt.fromAuthHeaderAsBearerToken(),
    });
  }

  async validate(payload): Promise<User> {
    const { username } = payload;

    const user: User = await this.userRepository.findUserById(username);
    if (!user) {
      throw new UnauthorizedException();
    }

    return user;
  }
}- @Injectable(): NestJS는 JWT 전략을 필요한 곳 어디에서든 주입할 수 있다.
- secretOrKey: 토큰을 검증할 때 사용할 비밀 키를 명시한다.
- jwtFromRequest: 요청에 어떤 부분에서 JWT 토큰을 탐색할지를 명시한다. 여기서는 헤더의 Authorization 키의 값으로 Bearer 와 함께 전달된다고 명시하였다.
- validate(): 생성자가 토큰 자체의 유효성을 검증했다면, 이 메서드는 사용자 정보의 유효성을 검증한다. 데이터베이스에서 사용자가 있는지 확인한 후 있다면 사용자 객체를 반환한다. 반환된 사용자 객체는
@UseGuards(AuthGuard())를 이용한 모든 요청의 요청 객체에 포함된다.
이렇게 만든 전략을 실제로 사용하기 위해선 앱 모듈에 등록해 주어야 한다.
src/auth/auth.module.ts
@Module({
  imports: [
    PassportModule.register({ defaultStrategy: 'jwt' }),
    JwtModule.register({
      secret: process.env.JWT_SECRET,
      signOptions: {
        expiresIn: 60 * 60,
      },
    }),
    TypeOrmModule.forFeature([User]),
  ],
  controllers: [AuthController],
  providers: [AuthService, UserRepository, JwtStrategy],
  exports: [JwtStrategy, PassportModule],
})
프로바이더에 JWT 전략을 추가하고, JWT 전략과 Passport 모듈을 다른 모듈에서도 사용할 수 있도록 export 옵션에 명시하였다.
요청 객체 안에 사용자 객체가 포함되도록 설정
Express.js에서는 passport 사용 시 요청 객체를 사용해 req.user와 같이 사용자 정보를 가져올 수 있다. 이는 미들웨어로 동작하는 Passport 모듈이 요청 객체에 자동적으로 사용자 객체를 포함시켜주기 때문이다. 이번에는 NestJS에서 이러한 기능을 어떻게 사용하는지 알아보자. 이를 위해 테스트용 API를 만든다.
src/auth/auth.controller.ts
...
  @Post('authtest')
  @UseGuards(AuthGuard())
  authTest(@Req() req) {
    console.log(req);
  }
...
이제 로그인한 후 응답되는 JWT 토큰을 요청 헤더에 담아 /auth/authtest 경로에 요청하면 요청 객체의 형태를 확인할 수 있다.
NestJS Middlewares
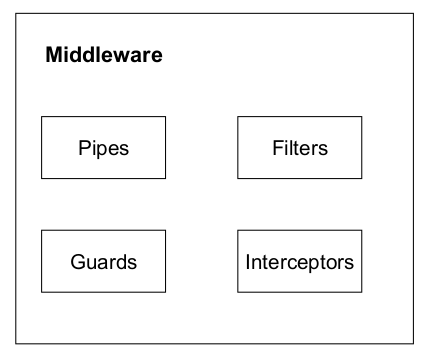
NestJS에는 여러 가지 종류의 미들웨어가 있다. 이들은 상이한 목적을 가지며 사용되고 있다.
- Pipes: 파이프는 요청 유효성 검사 및 데이터 파싱을 위해 사용된다. 데이터를 목적에 맞게 직렬화한다.
- Filters: 필터는 오류 처리 미들웨어이다.
- Guards: 가드는 인증 미들웨어이다.
- Interceptors: 인터셉터는 응답 매핑, 캐시 관리, 요청 로깅 등과 같은 역할을 수행하는 요청 전후 미들웨어이다. 각 요청의 전후에 활용된다.
클라이언트 요청이 이동하는 흐름
- client
- middleware
- guard
- interceptor (before)
- pipe
- controller
- service
- repository (optional)
- service
- controller
- interceptor (after)
- filter (if applicable)
- client
커스텀 데코레이터 생성하기
현재 Passport 모듈은 요청 객체의 user 속성에 데이터베이스에서 조회한 사용자 정보를 저장하고 있다. 그래서 사용자 정보를 읽으려면 req.user와 같이 참조해야 한다.
이번에는 커스텀 데코레이터를 사용하여 req.user가 아닌 user로 사용자 정보를 참조해 오도록 설정한다. 데코레이터 파일을 다음과 같이 작성하자.
src/auth/get-user.decorator.ts
import { createParamDecorator, ExecutionContext } from '@nestjs/common';
import { User } from './user.entity';

export const GetUser = createParamDecorator(
  (data, ctx: ExecutionContext): User => {
    const req = ctx.switchToHttp().getRequest();
    return req.user;
  },
);
이제 기존에 컨트롤러에서 요청 객체를 파라미터 데코레이터로 저장했던 그 부분을 커스텀 데코레이터로 변경한다.
src/auth/auth.controller.ts
...
  @Post('authtest')
  @UseGuards(AuthGuard())
  authTest(@GetUser() user: User) {
    console.log(user);
  }
...
인증된 사용자만 게시물을 조회하고 작성할 수 있게 해주기
이번에는 인증된 사용자만 게시물에 대한 조작을 수행할 수 있도록 하는 기능을 구현한다.
사용자에게 게시물 접근 권한 부여하기
먼저, 인증과 관련된 기능을 Board 모듈에서 사용할 수 있어야 하기 때문에 Board module에서 인증 모듈을 import 해야 한다. 그러면 인증 모듈에서 export 하는 어떤 것이든 사용할 수 있게 된다.
src/boards/boards.module.ts
import { Module } from '@nestjs/common';
import { BoardsController } from './boards.controller';
import { BoardsService } from './boards.service';
import { TypeOrmModule } from '@nestjs/typeorm';
import { Board } from './board.entity';
import { BoardRepository } from './board.repository';
import { AuthModule } from 'src/auth/auth.module';

@Module({
  imports: [TypeOrmModule.forFeature([Board]), AuthModule],
  controllers: [BoardsController],
  providers: [BoardsService, BoardRepository],
})
export class BoardsModule {}
다음으로는 컨트롤러에서 @UseGuards(AuthGuard()) 데코레이션으로 데코레이터가 적용되는 모든 범위의 라우터가 작동할 때 사용자 검증을 수행한다.
src/boards/boards.controller.ts
...
@Controller('boards')
@UseGuards(AuthGuard())
export class BoardsController {
...
컨트롤러에 @UseGuards() 데코레이터를 적용하면 해당 데코레이터는 하위에 있는 라우터 모두에 적용된다.
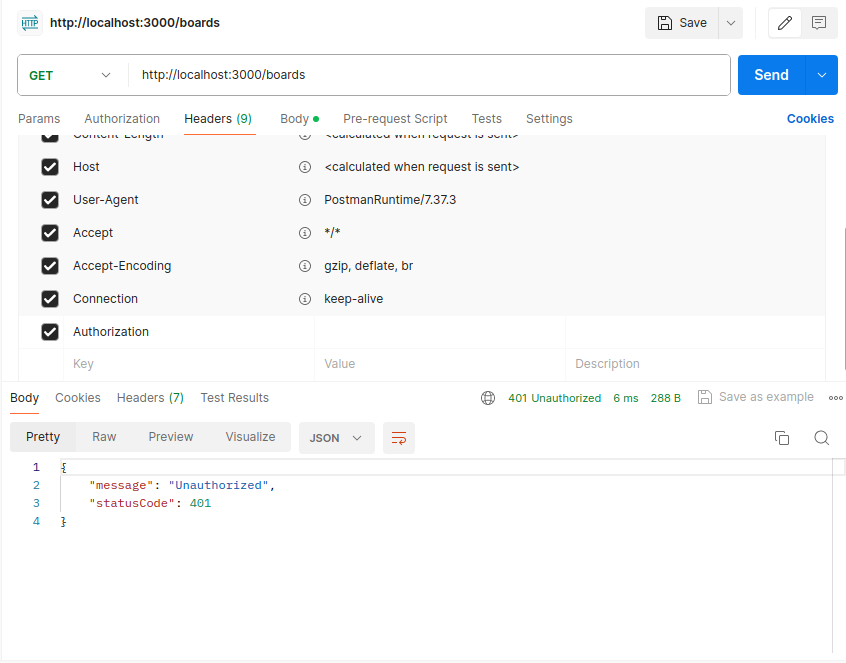
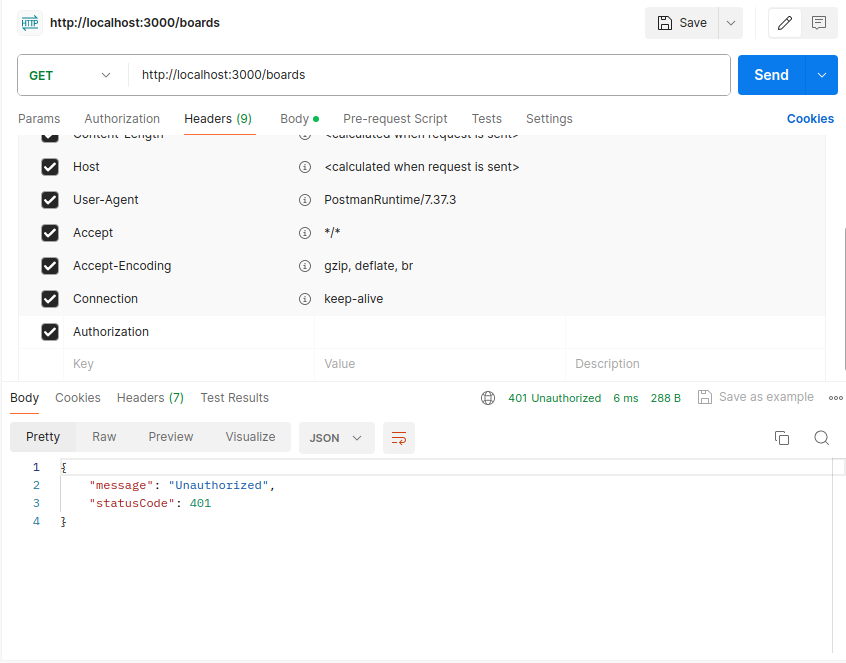
설정하면 게시물 자체에 대한 API 요청을 JWT 토큰이 없는 사용자는 하지 못함을 확인할 수 있다.