『Do it! 깡샘의 안드로이드 앱 프로그래밍 with 코틀린』 교재를 바탕으로 정리한 내용입니다.
1. 앱바 사용하기
머티리얼 라이브러리란?
- 머티리얼 디자인 지침에 맞게 앱을 개발할 수 있도록 다양한 뷰를 지원하는 구글의 라이브러리 머티리얼 디자인 모바일, 데스크탑 등의 다양한 장치를 아우르는 일관된 애플리케이션 지침
implementation 'com.google.android.material:material:1.4.0'AppBarLayout - 화면 위쪽 영역 꾸미기
- 앱바의 크기에 따라 화면 위쪽 영역을 다양하게 꾸밀 수 있음
- 툴바나 이미지, 문자열 등을 활용해 앱바 구성해 사용
- 툴바 포함하기

    <com.google.android.material.appbar.AppBarLayout
        android:id="@+id/appbar"
        android:layout_width="match_parent"
        android:layout_height="242dp"
        android:theme="@style/ThemeOverlay.AppCompat.Dark.ActionBar" >
</com.google.android.material.appbar.AppBarLayout>- 크기 확장하기
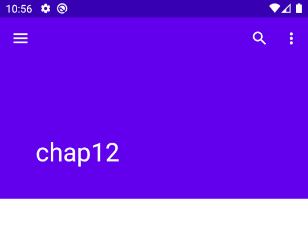
    <com.google.android.material.appbar.AppBarLayout
        android:id="@+id/appbar"
        android:layout_width="match_parent"
        android:layout_height="242dp"
        android:theme="@style/ThemeOverlay.AppCompat.Dark.ActionBar" >
</com.google.android.material.appbar.AppBarLayout>- 이미지 넣기
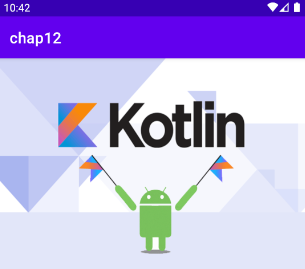
    <com.google.android.material.appbar.AppBarLayout ... 생략 ... >
        <androidx.appcompat.widget.Toolbar ... 생략 ... />
        <ImageView ... 생략 ... />
    </com.google.android.material.appbar.AppBarLayout>
CoordinatorLayout - 뷰끼리 상호 작용하기
- 머티리얼이 아닌 제트팩의 androidx 라이브러리에서 제공
- 앱바 레이아웃에서 가장 많이 사용
implementation 'androidx.coordinatorlayout:coordinatorlayout:1.1.0'- 스크롤 연동하기
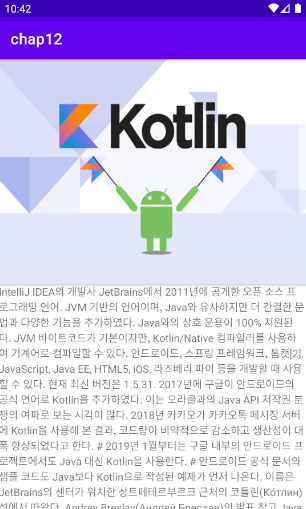
- 뷰 B와 A가 각각 상하로 위치해 있다고 할 때, 사용자가 뷰 A를 스크롤할 때 뷰 B도 함께 스크롤하기 위해 CoordinatorLayout 사용
- CoordinatorLayout은 behavior를 사용해 자식 뷰들 간의 스크롤 정보를 전달해주는 역할을 함
- 대부분 RecyclerView와 AppBarLayout을 CoordinatorLayout의 자식 뷰로 구성해 사용
- 중첩 스크롤 뷰 사용하기
- 코디네이터 레이아웃을 이용해도 텍스트 뷰, 이미지 뷰 등은 스크롤 연동 불가 → androidx.core.widget.NestedScrollView (중첩 스크롤 뷰) 이용!
- CoordinatorLayout에 NestedScrollView를 포함하고, 여기에 텍스트 뷰나 이미지 뷰를 넣어 스크롤 연동에 사용
- app:layout_behavior 속성 → 자신의 스크롤 정보를 어느 behavior클래스로 보낼지 지정 app:layout_scrollFlags 속성 → 속성이 설정된 뷰가 스크롤 정보를 수신해서 함께 스크롤 됨
- 코디네이터 레이아웃을 이용해도 텍스트 뷰, 이미지 뷰 등은 스크롤 연동 불가 → androidx.core.widget.NestedScrollView (중첩 스크롤 뷰) 이용!
- 뷰 B와 A가 각각 상하로 위치해 있다고 할 때, 사용자가 뷰 A를 스크롤할 때 뷰 B도 함께 스크롤하기 위해 CoordinatorLayout 사용
<androidx.coordinatorlayout.widget.CoordinatorLayout ... 생략 ... >
	<com.google.android.material.appbar.AppBarLayout ... 생략 ... >
		<androidx.appcompat.widget.Toolbar
			... 생략 ...
			app:layout_scrollFlags="scroll|enterAlways"/>

			<ImageView
				... 생략 ...
				app:layout_scrollFlags="scroll|enterAlways"/>
	</com.google.android.material.appbar.AppBarLayout>

	<androidx.core.widget.NestedScrollView
		... 생략 ...
		app:layout_behavior="@string/appbar_scrolling_view_behavior">

		<TextView ... 생략 .../>
	</androidx.core.widget.NestedScrollView>
</androidx.coordinatorlayout.widget.CoordinatorLayout>
CollapsingToolbarLayout - 앱바 접히는 형태 설정하기
- 앱바 레이아웃 하위에 선언해 앱바가 접힐 때 다양한 설정을 할 수 있는 뷰
- 앱바 레이아웃에 여러 개의 뷰가 추가된 경우, 개별 뷰에 layout_scrollFlags 속성을 지정하는 것은 비효율적→ 앱바 레이아웃 하위에 CollapsingToolbarLayout 추가해 스크롤 접히거나 나타날 때 동작 설정해 사용
    <androidx.coordinatorlayout.widget.CoordinatorLayout ... 생략 ...>
    	<com.google.android.material.appbar.AppBarLayout ... 생략 ...>
    		<com.google.android.material.appbar.CollapsingToolbarLayout
    			android:contentScrim="?attr/colorPrimary"
    			app:expandedTitleMarginBottom="50dp"
    			app:expandedTitleMarginStart="48dp"
    			app:layout_scrollFlags="scroll|exitUntilCollapsed"
    			app:title="AppBarTitle">
    			<ImageView
    				... 생략 ...
    				app:layout_collapseMode="parallax"/>
    			<androidx.appcompat.widget.Toolbar
    				... 생략 ...
    				app:layout_collapseMode="pin"/>
    		</com.google.android.material.appbar.CollapsingToolbarLayout>
    	</com.google.android.material.appbar.AppBarLayout>

    	<androidx.recyclerview.widget.RecyclerView
    		... 생략 ...
    		app:layout_behavior="@string/appbar_scrolling_view_behavior" />
</androidx.coordinatorlayout.widget.CoordinatorLayout>- 앱바 스크롤 설정하기
- layout_scrollFlags 속성 사용
- scroll | enterAlways : 스크롤 시 완전히 사라졌다가 거꾸로 스크롤 시 처음부터 다시 나타남
- scroll | enterAlwaysCollapsed : 스크롤 시 완전히 사라졌다가 거꾸로 스크롤 시 처음부터 나타나지 않고 메인 콘텐츠 부분이 끝까지 스크롤된 다음에 나타남
- scroll | exitUntilCollapsed : 스크롤 시 모두 사라지지 않고 툴바를 출력할 정도의 한 줄만 남을 때까지 스크롤됨- 개별 뷰의 스크롤 설정하기
- layout_collapseMode 속성 사용 pin : 고정되어 스크롤되지 않음 parallax : 함께 스크롤됨 → 앱바 스크롤 시 앱바에 포함된 개별 뷰가 어떻게 움직여야 하는 지 설정 → 앱바 전체의 스크롤 설정은 layout_scrollFlags 속성으로 하고, 하위 뷰들은 각각 layout_collapseMode 속성으로 설정
- layout_collapseMode 속성 사용 pin : 고정되어 스크롤되지 않음 parallax : 함께 스크롤됨 → 앱바 스크롤 시 앱바에 포함된 개별 뷰가 어떻게 움직여야 하는 지 설정 → 앱바 전체의 스크롤 설정은 layout_scrollFlags 속성으로 하고, 하위 뷰들은 각각 layout_collapseMode 속성으로 설정
- 개별 뷰의 스크롤 설정하기
            <com.google.android.material.appbar.CollapsingToolbarLayout ... 생략...
            	app:layout_scrollFlags="scroll|exitUntilCollapsed"
            	<ImageView ... 생략 ...
            		app:layout_collapseMode="parallax"/>
            	<androidx.appcompat.widget.Toolbar ... 생략 ...
            		app:app:layout_collapseMode="pin" />
            </com.google.android.material.appbar.CollapsingToolbarLayout>
2. TabLayout
- 탭으로 구분하는 화면에서 탭 버튼을 배치하는 레이아웃
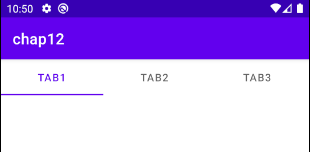
- 탭 레이아웃 등록
    <LinearLayout xmlns:android="http://schemas.android.com/apk/res/android"
    	android:layout_width="match_parent"
    	android:layout_height="match_parent"
    	android:orientation="vertical">
    	<com.google.android.material.tabs.TabLayout
    		android:id="@+id/tabs"
    		android:layout_width="match_parent"
    		android:layout_height="wrap_content" />
    	<FrameLayout
    		android:id="@+id/tabContent"
    		android:layout_width="match_parent"
    		android:layout_height="match_parent" />
</LinearLayout>- 탭 버튼 정의
- 코드에서 탭 버튼 정의
    val tabLayout : TabLayout = findViewById(R.id.tabs)
    val tab1: TabLayout.Tab = tabLayout.newTab()
    tab1.text = "Tab1"
    tabLayout.addTab(tab1)

    val tab2: TabLayout.Tab = tabLayout.newTab()
    tab2.text = "Tab2"
    tabLayout.addTab(tab2)

    val tab3: TabLayout.Tab = tabLayout.newTab()
    tab3.text = "Tab3"
tabLayout.addTab(tab3)- XML 파일에서 탭 버튼 정의
    <com.google.android.material.tabs.TabLayout
    	android:id="@+id/tabs"
    	android:layout_width="match_parent"
    	android:layout_height="wrap_content" >

    	<com.google.android.material.tabs.TabItem
    		android:layout_width="wrap_content"
    		android:layout_height="wrap_content"
    		android:text="Tab1" />

    	<com.google.android.material.tabs.TabItem
    		android:layout_width="wrap_content"
    		android:layout_height="wrap_content"
    		android:text="Tab2" />

    	<com.google.android.material.tabs.TabItem
    		android:layout_width="wrap_content"
    		android:layout_height="wrap_content"
    		android:text="Tab3" />
</com.google.android.material.tabs.TabLayout>- 탭 버튼 이벤트 처리
    tabLayout.addOnTabSelectedListener(object : TabLayout.OnTabSelectedListener {
    	// 탭 버튼을 선택할 때 이벤트
    	override fun onTabSelected(tab: TabLayout.Tab?) {
    		val transaction = supportFragmentManager.beginTransaction()
    		when(tab?.text) {
    			"Tab1" -> transaction.replace(R.id.tabContent, OneFragment())
    			"Tab2" -> transaction.replace(R.id.tabContent, TwoFragment())
    			"Tab3" -> transaction.replace(R.id.tabContent, ThreeFragment())
    		}
    		transaction.commit()
    	}

    	// 선택된 탭 버튼을 다시 선택할 때 이벤트
    	override fun onTabReselected(tab: TabLayout.Tab?) { ... }

    	// 다른 탭 버튼을 눌러 선택된 탭 버튼이 해제될 때 이벤트
    	override fun onTabUnselected(tab: TabLayout.Tab?) { ... }
    })
탭 버튼 정렬하기
- tabGravity 속성 사용 fill (기본값) → 탭 버튼을 가로로 등분해 배치
center → 탭 버튼 가운데 정렬
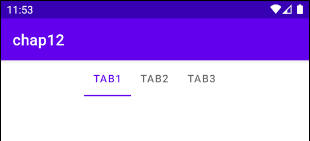 tabGravity = center 설정
스크롤 설정하기
- tabMode 속성 사용
fixed (기본값) → 스크롤 지원하지 않음
scrollable → 탭 버튼이 왼쪽부터 나열되고, 모두 출력할 수 없는 경우 자동으로 가로 스크롤 생성
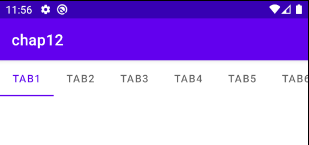 탭 버튼 6개인 경우 tabMode = scrollable 설정
뷰 페이저 연동하기
- 탭의 콘텐츠 부분을 뷰 페이저로 제공하면 스와이프로 화면 전환 가능
- 탭 레이아웃과 뷰 페이저 등록
    <LinearLayout
    android:layout_width="match_parent"
    android:layout_height="match_parent"
    android:orientation="vertical">
    	<com.google.android.material.tabs.TabLayout
    		android:id="@+id/tabs"
    		android:layout_width="match_parent"
    		android:layout_height="wrap_content"
    		app:tabMode="scrollable">
    	</com.google.android.material.tabs.TabLayout>
    	<androidx.viewpager2.widget.ViewPager2
    		android:id="@+id/viewpager"
    		android:layout_width="match_parent"
    		android:layout_height="match_parent" />
</LinearLayout>- 탭 레이아웃과 뷰 페이저 연동
    TabLayoutMediator(tabLayout, viewpager) { tab, position ->
    	tab.text = "Tab${(position + 1)}"
    }.attach()
3. NavigationView
- DrawerLayout 사용 시, 레이아웃을 상하로 구분해 사용하기 위해 내비게이션 뷰 이용
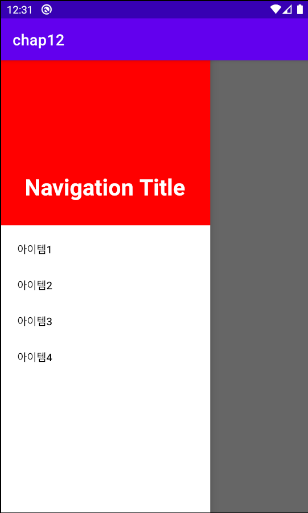
- 네비게이션 뷰 등록
    <androidx.drawerlayout.widget.DrawerLayout ... 생략 ... >
    	<LinearLayout ... 생략 ... />

    	<com.google.android.material.navigation.NavigationView
    		android:id="@+id/main_drawer_view"
    		android:layout_width="wrap_content"
    		android:layout_height="match_parent"
    		android:layout_gravity="start"
    		app:headerLayout="@layout/navigation_header"
    		app:menu="@menu/menu_navigation" />
</androidx.drawerlayout.widget.DrawerLayout>- 항목 선택 이벤트 핸들러 지정
    binding.mainDrawerView.setNavigationItemSelectedListener {
    	Log.d("kkang", "navigation item click... ${it.title}")
    	true
    }
4. ExtendedFloatingActionButton
- 현재는 버튼에 문자열까지 출력할 수 있는 확장된 플로팅 액션 버튼이 제공됨
    <com.google.android.material.floatingactionbutton.ExtendedFloatingActionButton
    	... 생략 ...
    	android:id="@+id/extendedFab
    	android:text="extended FAB"
app:icon="@android:drawable/ic_input_add"/>- 확장된 플로팅 액션 버튼 조절
    binding.extendedFab.setOnClickListener {     // 아이콘만 표시
    	when(binding.extendedFab.isExtended) {     // 아이콘과 문자열 함께 표시했다면
    		true -> binding.extendedFab.shrink()
    		false -> binding.extendedFab.extend()
    	}
    }