
본선 프로젝트
- 주제 : EO/IR 영상 및 이미지 내 드론을 실시간으로 detect 하는 모델 개발(Object Class : Drone(1개))
- 주어진 데이터셋 : EO/IR으로 촬영한 드론 이미지 및 label 데이터 약 16만장
- 전체 데이터셋은 비공개
- 평가지표 : Average Precision(AP)
- Precision-Recall 그래프에서 그래프 선 아래쪽의 면적으로 계산됨
- Computer Vision 분야에서 Object detection 및 Image Classification Task의 성능은 대부분 AP로 측정된다. 물체의 클래스가 여러개인 경우 각 클래스당 AP를 구한 다음 그것의 평균을 구하는 것이 mAP이다.
1. Convert COCO format to YOLO format
-
본선 대회에서 주어진 데이터셋의 labeling은 COCO data format으로 구성되어 있었는데, 실시간으로 드론을 탐지하는 모델 개발을 고려하였을 때 YOLO 모델 학습을 가장 우선적으로 고려하였고 따라서 주어진 COCO format의 데이터셋 label을 YOLO format으로 변경해주어야만 했다. 우선 data format 변경에 앞서, COCO data format과 YOLO data format 두 가지 포맷의 차이를 확인해보았다.
-
COCO data format
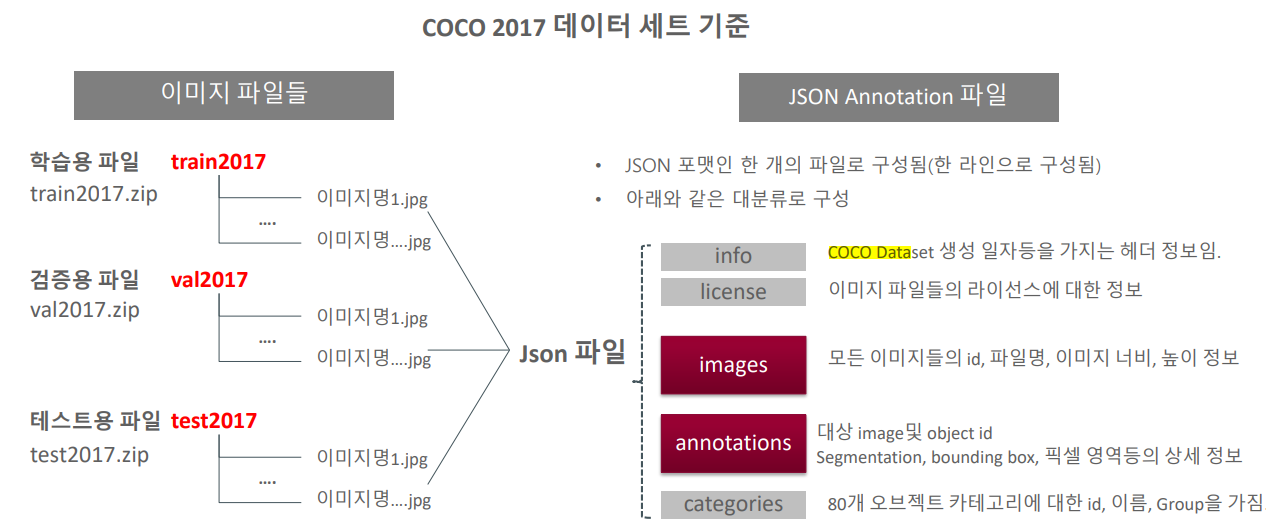
- COCO data format은 이미지와 annotation 파일 두가지로 분류되는데, 다른 Data format과 구분되는 가장 큰 특징은 여러 이미지에 대한 annotation이 단 하나의 Json 파일로 따로 생성된다는 점이다.
- COCO data format을 담고있는 json 파일은 크게 5가지로 구분된 정보를 포함하고 있다.
- info : 데이터셋의 버전, 생성일자 등 헤더정보
- license : 이미지 파일들의 라이센스에 대한 정보
- images : 모든 이미지들의 고유 id, 파일명, width, height 정보
- annotations : image ID, 여러개의 Object ID, bounding box, segmentation 상세정보 등
- 이때 bounding box를 나타내는 좌표값은 (min_x, min_y, width, height) 픽셀단위로 나타내어진다.
- categories : object group 나타내줌
-
YOLO data format
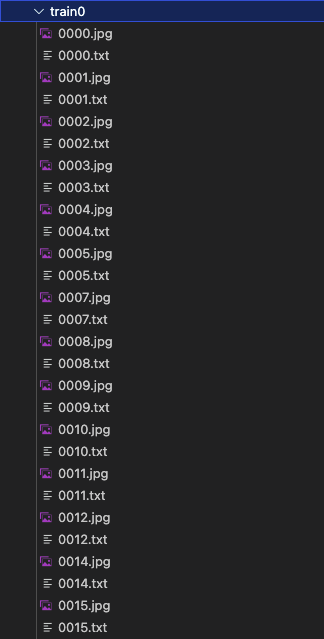
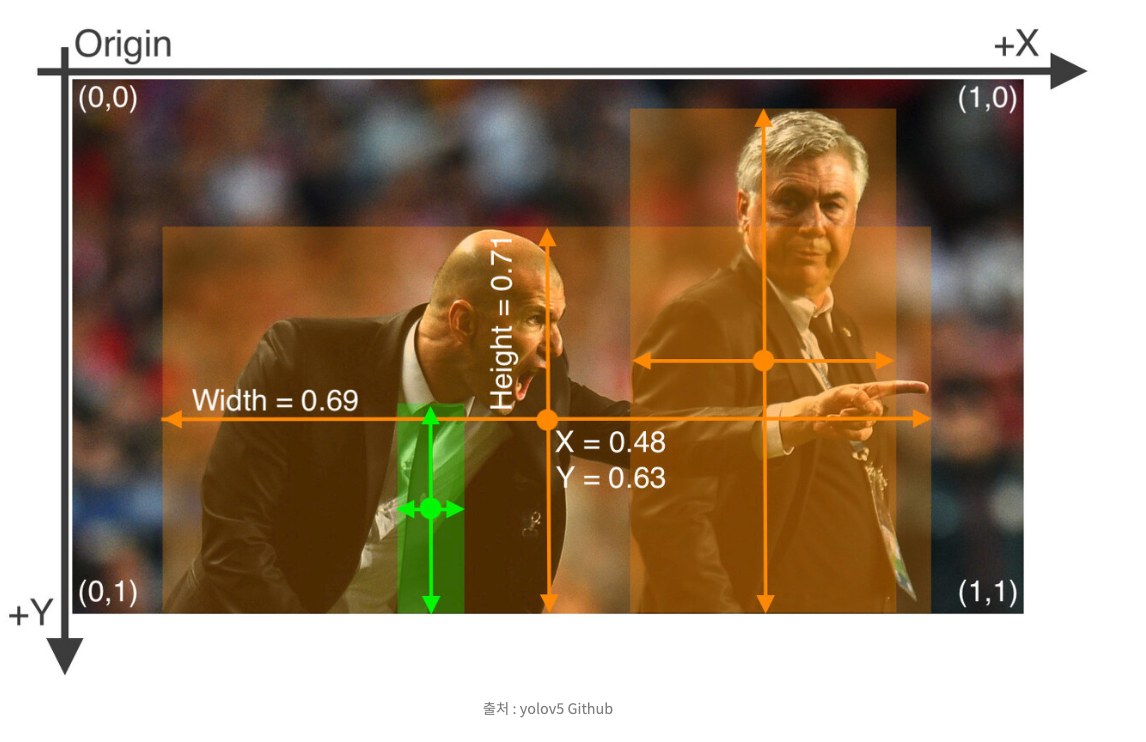
- 반면 COCO format과 달리 YOLO format은 이름이 같은 이미지 파일과 label txt 파일이 대응되는 방식이며 bounding box를 나타내는 좌표값도 (object class, center_x, center_y, width, height)로 표현되며 좌측 상단 좌표를 (0,0), 우측 하단 좌표를 (1,1)로 한 후 정규화하여 0~1 사이의 실수로 표현되어 있다는 점이 차이점이다.
-
당연히 두 데이터 format 사이의 변환이 가능하다. COCO format -> YOLO format 변환의 경우 아래 두가지 방법을 추천한다.
- Convert2Yolo 라이브러리 활용
- Custom 파이썬 코드 활용
	import os
	import json
	from tqdm import tqdm
	import shutil
	def convert_bbox_coco2yolo(img_width, img_height, bbox):

    # YOLO bounding box format: [x_center, y_center, width, height]
    # (float values relative to width and height of image)
    	x_tl, y_tl, w, h = bbox

    	dw = 1.0 / img_width
    	dh = 1.0 / img_height

    	x_center = x_tl + w / 2.0
	    y_center = y_tl + h / 2.0

	    x = x_center * dw
	    y = y_center * dh
	    w = w * dw
	    h = h * dh

    	return [x, y, w, h]

def make_folders(path="output"):
    if os.path.exists(path):
        shutil.rmtree(path)
    os.makedirs(path)
    return path

def convert_coco_json_to_yolo_txt(output_path, json_file):

    path = make_folders(output_path)

    with open(json_file) as f:
        json_data = json.load(f)

    # write _darknet.labels, which holds names of all classes (one class per line)
    label_file = os.path.join(output_path, "_darknet.labels")
    with open(label_file, "w") as f:
        for category in tqdm(json_data["categories"], desc="Categories"):
            category_name = category["name"]
            f.write(f"{category_name}\n")

    for image in tqdm(json_data["images"], desc="Annotation txt for each iamge"):
        img_id = image["id"]
        img_name = image["file_name"]
        img_width = image["width"]
        img_height = image["height"]

        anno_in_image = [anno for anno in json_data["annotations"] if anno["image_id"] == img_id]
        anno_txt = os.path.join(output_path, img_name.split(".")[0] + ".txt")
        with open(anno_txt, "w") as f:
            for anno in anno_in_image:
                category = anno["category_id"]
                bbox_COCO = anno["bbox"]
                x, y, w, h = convert_bbox_coco2yolo(img_width, img_height, bbox_COCO)
                f.write(f"{category} {x:.6f} {y:.6f} {w:.6f} {h:.6f}\n")
#{'output 결과 저장경로', 'coco_format json파일 경로'}로 설정해주면 됩니다.
convert_coco_json_to_yolo_txt("data/yolo/labels/val", "/home/ubuntu/seadronesee/data/SeaDronesSee Object Detection v2/Uncompressed Version/annotations/instances_val.json")
convert_coco_json_to_yolo_txt("data/yolo/labels/train", "/home/ubuntu/seadronesee/data/SeaDronesSee Object Detection v2/Uncompressed Version/annotations/instances_train.json")
2. YOLOv7 Custom Dataset 학습
- YOLOv7 모델을 활용하여, 본선대회에서 주어진 데이터셋을 활용하여 Transfer learning을 수행하였다.
- 데이터셋 구조
- YOLO를 학습하기 위한 데이터셋 형태는 아래와 같다.
- 학습을 위한 image 파일들
- 개별 이미지 파일과 이름이 동일한 yolo format의 annotation(label) text 파일
- 앞서 coco format을 yolo format으로 변경해주면서, yolo 학습을 위한 데이터셋 형태는 갖추게 되었다.
- 학습을 위한 YOLO 데이터셋 구조는 아래와 같음. 아래와 같이 설정해주지 않을 시 Official YOLOv7 모델을 학습시켰을 때 이미지와 label 데이터를 모델이 제대로 읽어오지 못하는 Error가 발생함을 확인하였다.
- Root Dir
- Train
- Image
- Label
- Val
- Image
- Label
- Test
- Image
- Train
- Root Dir
- YOLO를 학습하기 위한 데이터셋 형태는 아래와 같다.
- Custom dataset에 맞는 yaml 파일 설정
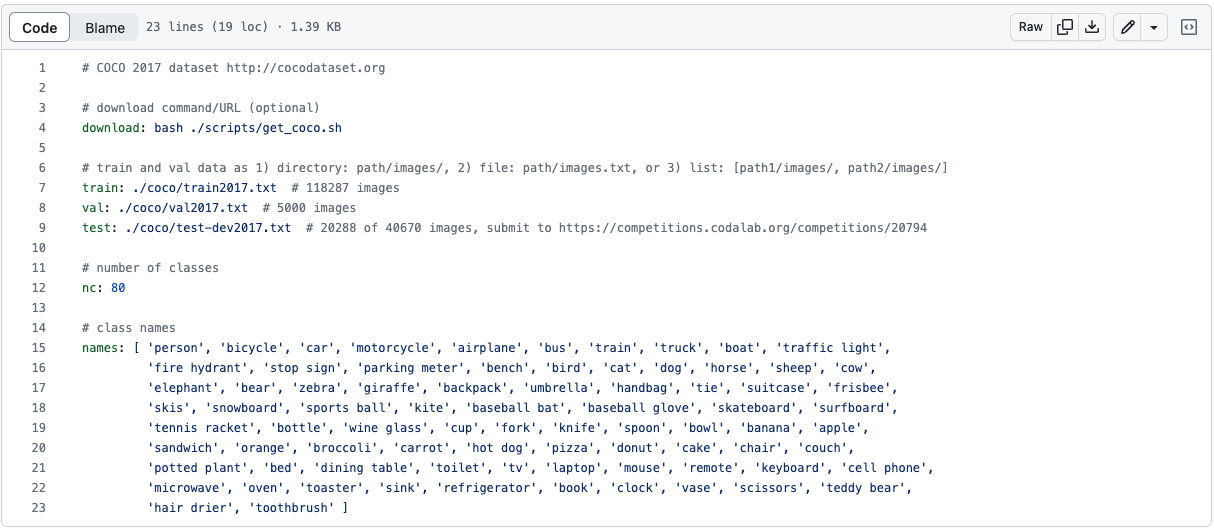
- 출처 : yolov7 official github 내 yaml 파일
- Train/Val/Test : Dataset 내 train/val/test 이미지 데이터셋 경로로 설정
- nc(number of classes) : object class 수
(본선 문제에서는 drone 하나만 detect 하는 문제여서 1로 설정해주었다.) - names : YOLO 모델이 detect 하고자 하는 class의 이름으로 설정
(해당 Task 에서는 drone으로 설정)
- pre-trained 된 weight 다운받은 후 Transfer learning 진행
- pre-trained weight 다운로드 및 transfer learning 학습 참고자료 : https://github.com/WongKinYiu/yolov7
- 학습정확도와 overfitting 방지를 위해 외부 데이터셋 활용하여 추가 학습
- 주어진 데이터셋 외, 추가로 활용한 외부 데이터셋은 아래와 같습니다. - 전체 학습코드 : https://github.com/YoongeeYEO/NAVY_AI
3. 학습결과
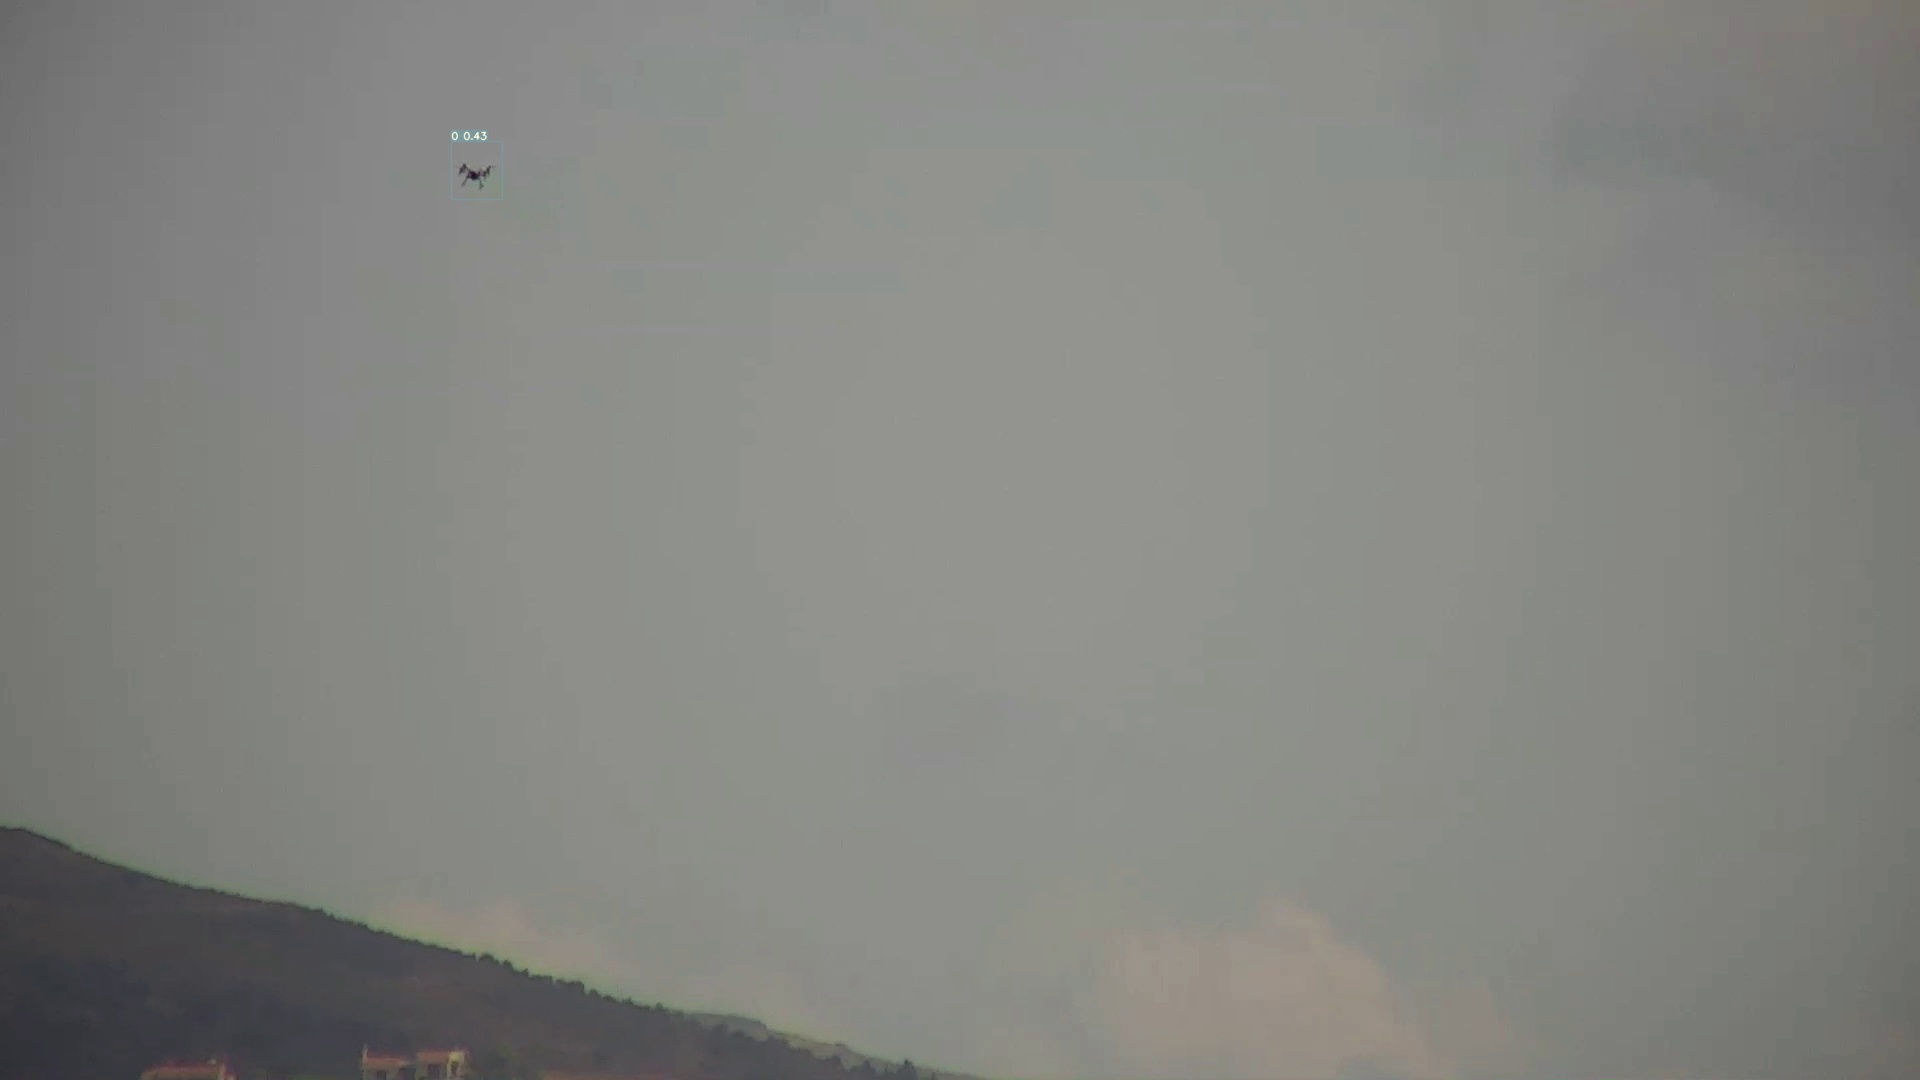
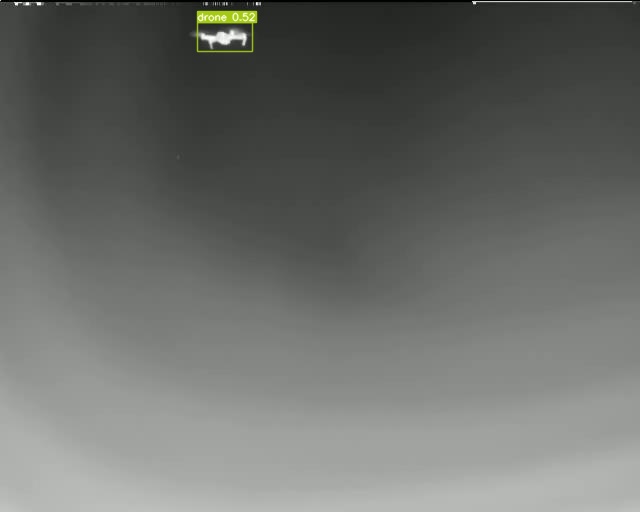
- 모델 개발 및 학습에 주어진 시간이 약 20시간 정도로 짧아 아쉬운 부분도 있었지만 pre-trained된 weight를 활용하여 Transfer learning 시키니 저화질 이미지 내 매우 작은 드론도 YOLO 모델이 나쁘지않게 탐지하는 학습결과를 볼 수 있었다.
- Drone Detect 결과(Sample)
- EO Camera
- IR Camera
- EO Camera
참고자료

📚 IT 지식과 최신 기술 트렌드, 금융 관련 내용을 공유합니다.