 # 학습할 것 (필수)
1. Thread 클래스와 Runnable 인터페이스
2. 쓰레드의 상태
3. 쓰레드의 우선순위
4. Main 쓰레드
5. 동기화
6. 데드락
- 번외
1.Thread 클래스와 Runnable 인터페이스
Prcoess란?
-
현재 실행중인 프로그램이다.
-
사용자가 작성한 프로그램이 OS에 의해 메모리 공간을 할당받아 실행 중인것을 말한다.
이러한 프로세스는 프로그램에 사용되는 데이터와 메모리 등의 자원 그리고 쓰레드로 구성이된다.
Thread란?
-
프로세스 내에서 실제로 작업을 수행하는 주체이다.
-
모든 프로세스에는 1개 이상의 쓰레드가 존재하여 작업을 수행한다.
-
두개 이상의 쓰레드를 가지는 프로세스를 멀티 쓰레드 프로세스라고 한다.
-
경량 프로세스라고 불리며 가장 작은 실행단위이다.
일반쓰레드와 데몬 쓰레드:
-
쓰레드는 데몬 쓰레드, 일반 쓰레드 두가지 종류가 있다.
-
JVM이 시작되면 생성되는 모든 쓰레드는 메인 쓰레드를 제외한 모두가 데몬 쓰레드이다.
-
쓰레드는 해당 쓰레드를 생성한 쓰레드의 상태를 상속받으므로 메인 쓰레드에 의해 만들어지는 쓰레드는 일반 쓰레드이다.
데몬쓰레드:
-
데몬 쓰레드는 일반 쓰레드의 작업을 돋는 보조적 역할을 담당하는 쓰레드이다.
-
garbage collection, 요청처리, 리소스 청소(resource cleanup)와 같은 백그라운드 테스크를 실행하며 낮은 우선순위를 가지고 있다.
-
일반쓰레드를 보조하기 때문에, 데몬쓰레드는 일반 쓰레드가 실행 중일 때에만 동작하며 일반 쓰레드가 종료되면 데몬 쓰레드는 강제 종료된다.
Thread 클래스와 Runnable 인터페이스
쓰레드를 생성하는 방법은 크게 두 가지 방법이 있다.
- Runnable 인터페이스을 implements
- Thread 클래스를 extends
- Thread 클래스는 Runnable 인터페이스를 구현한 클래스이므로 어떤 것을 적용 하느냐의 차이이다.
package me.whiteship.livestudy.week10;

public class PrimeThread extends Thread {
    long minPrime;

    public PrimeThread(long minPrime) {
        this.minPrime = minPrime;
    }

    @Override
    public void run() {
        // compute primes larger than minPrime;
    }

    public static void main(String[] args) {
        PrimeThread p = new PrimeThread(143);
        p.start();

    }
}
package me.whiteship.livestudy.week10;

public class PrimeRun implements Runnable{
    long minPrime;

    public PrimeRun(long minPrime) {
        this.minPrime = minPrime;
    }

    @Override
    public void run() {
        // compute primes larger than minPrime
    }

    public static void main(String[] args) {
        PrimeRun p = new PrimeRun(143);
        new Thread(p).start();
    }
}- Runnable와 Thread 모두 java.lang패키지에 포함되어있다.
어느걸 사용해야 하나?
- Thread 클래스가 다른 클래스를 확장할 필요가 있을 경우에는 Runnable 인터페이스를 구현하면 되며, 그렇지 않은 경우는 Thread 클래스를 사용하는 것이 편하다.

Runnable 샘플:
package me.whiteship.livestudy.week10;

public class RunnableSample implements Runnable{

    @Override
    public void run() {
        System.out.println("This is RunnableSample's run() method");
    }
}
Thread 샘플:
package me.whiteship.livestudy.week10;

public class ThreadSample extends Thread{

    @Override
    public void run() {
        System.out.println("This is ThreadSample's run() method");
    }
}
실행:
package me.whiteship.livestudy.week10;

public class RunThreads {
    public static void main(String[] args) {
        runBasic();

    }

    public static void runBasic(){
        RunnableSample runnable = new RunnableSample();
        new Thread(runnable).start();

        ThreadSample thread = new ThreadSample();
        thread.start();
        System.out.println("RunThreads.runBasic() method is ended");
    }
}
output:
his is RunnableSample's run() method
RunThreads.runBasic() method is ended
This is ThreadSample's run() method

Process finished with exit code 0- 이러한 경우도 나온다
- start() 메서드가 끝날때까지 기다리지 않고, 그 다음 줄에 있는 thread 객체의 start() 메서드를 실행한다.
- 새로운 쓰레드를 시작하므로 run()메서드가 종료될때까지 기다리지않고 다음 줄로 넘어가게 된다.
Thread는 순서대로 동작할까?
package me.whiteship.livestudy.week10;

public class RunMultiThreads {
    public static void main(String[] args) {
        runMultiThread();
    }

    private static void runMultiThread() {
        RunnableSample[] runnableSamples = new RunnableSample[5];
        ThreadSample[] threadSamples = new ThreadSample[5];
        for (int i = 0; i < 5; i++) {
            runnableSamples[i] = new RunnableSample();
            threadSamples[i] = new ThreadSample();

            new Thread(runnableSamples[i]).start();
            threadSamples[i].start();
        }


        System.out.println("RunMultiThread. runMultiThread() method is ended");

    }
}
output:
This is RunnableSample's run() method
This is ThreadSample's run() method
This is RunnableSample's run() method
RunMultiThread. runMultiThread() method is ended
This is ThreadSample's run() method
This is RunnableSample's run() method
This is ThreadSample's run() method
This is RunnableSample's run() method
This is RunnableSample's run() method
This is ThreadSample's run() method
This is ThreadSample's run() method

Process finished with exit code 0-
실행하면 순서대로 실행도지 않는다. 컴퓨터의 성능에 따라 달라질수도있으며 매번 결과가 다르다.
-
run() 메서드가 끝나지 않으면 애플리케이션은 종료되지 않는다.
Thread 메서드:
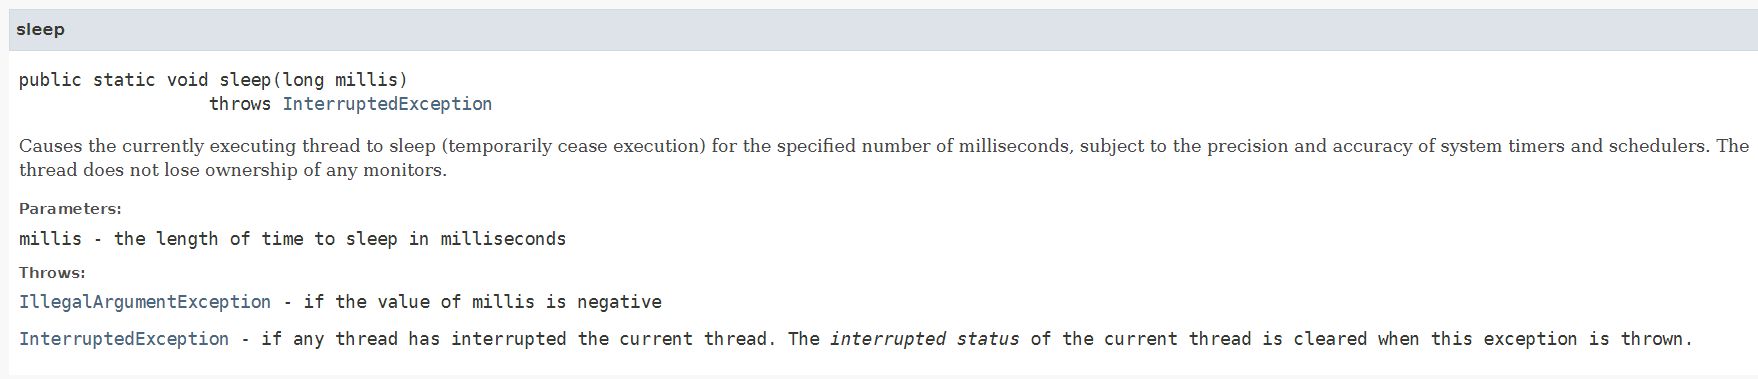
- sleep
- sleep 메서드는 주어진 시간만큼 대기를 한다.
package me.whiteship.livestudy.week10;

public class EndlessThread extends Thread {
    @Override
    public void run() {
        while(true) {
            try {
                System.out.println(System.currentTimeMillis());
                Thread.sleep(1000);
            } catch (InterruptedException e) {
                e.printStackTrace();
            }

        }
    }
}-
이 예제를 실행하면 무한으로 실행하게 되니 직접 실행을 중지 해줘야 한다.
-
Thread.sleep() 메서드를 사용할 떄는 항상 try-catch로 묶어줘야 한다.
-
sleep() 메서드는 InterruptedException을 던지기 때문에 InterruptedException로 예외처리를 해준다.
- start()와 run()
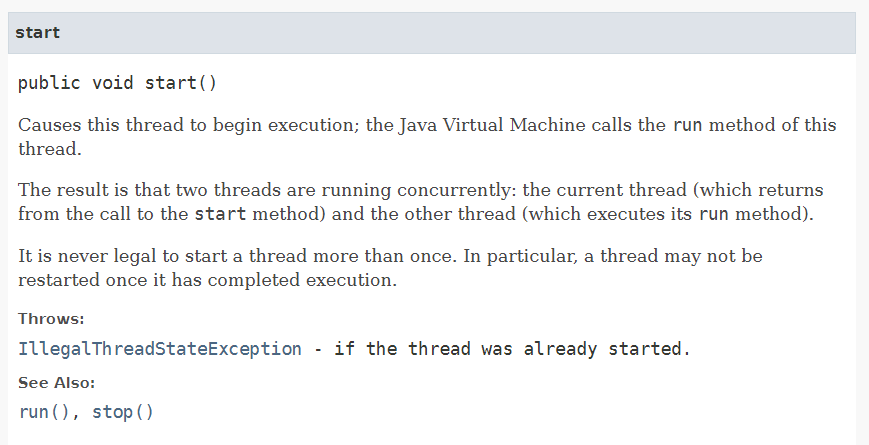
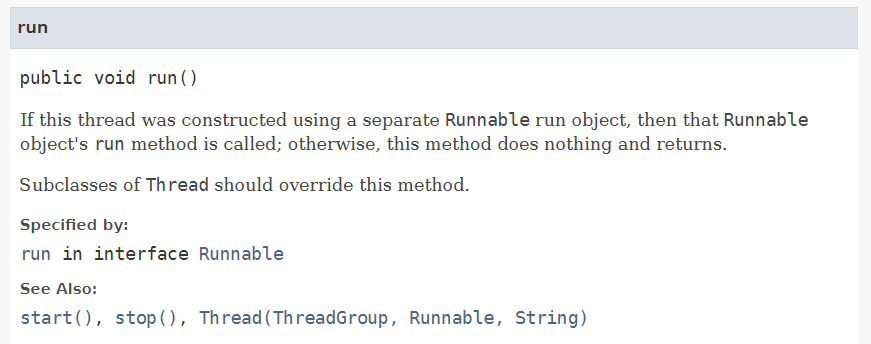
쓰레드를 실행하기 위해서는 start 메서드를 통해 해당 쓰레드를 호출해야한다.
start 메서드는 쓰레드가 작업을 실행할 호출 스택을 만들고 그 안에 run 메서드를 올려주는 역할을 한다.
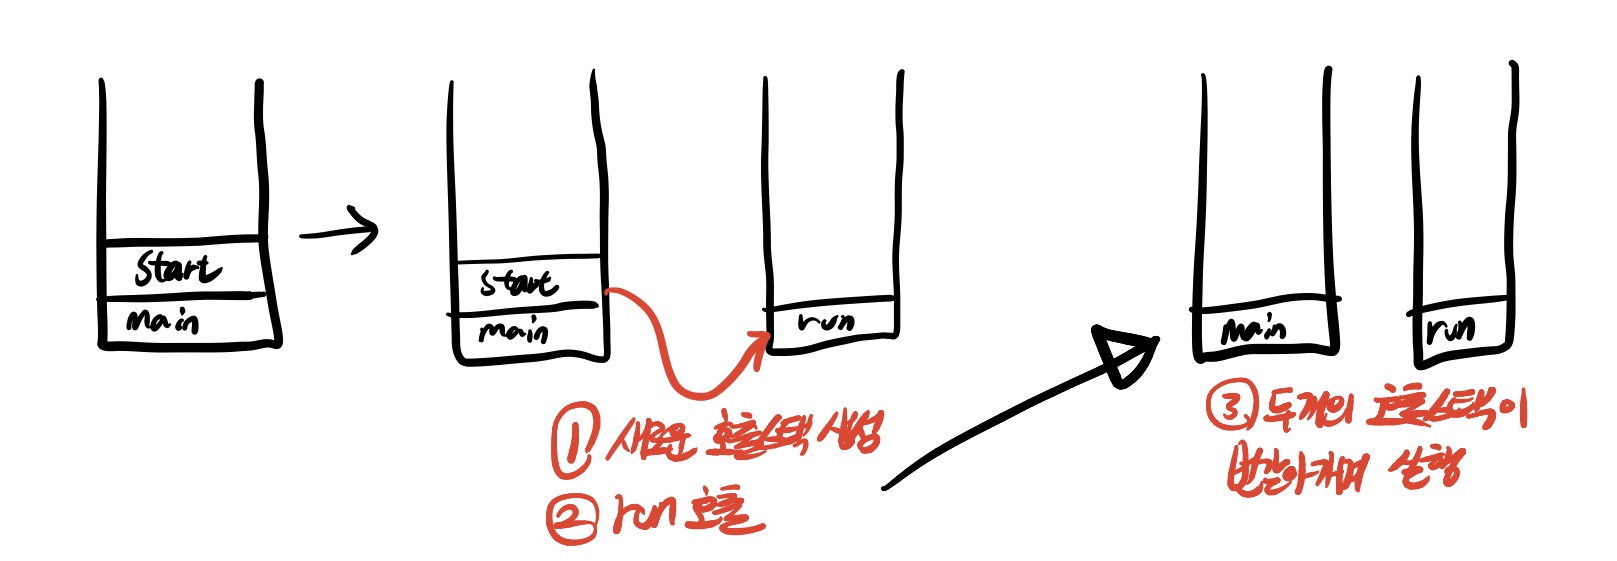
한번 사용한 쓰레드는 재사용할 수 없다. start()를 호출해서 쓰레드를 한 번 실행했따면, 해당 쓰레드를 다시 실행하기 위해서는 쓰레드를 다시 생성해서 start를 호출해야한다.
생성은 한번하고 start를 두 번 호출하면 IllegalThreadStateException이 발생한다.
2.쓰레드의 상태
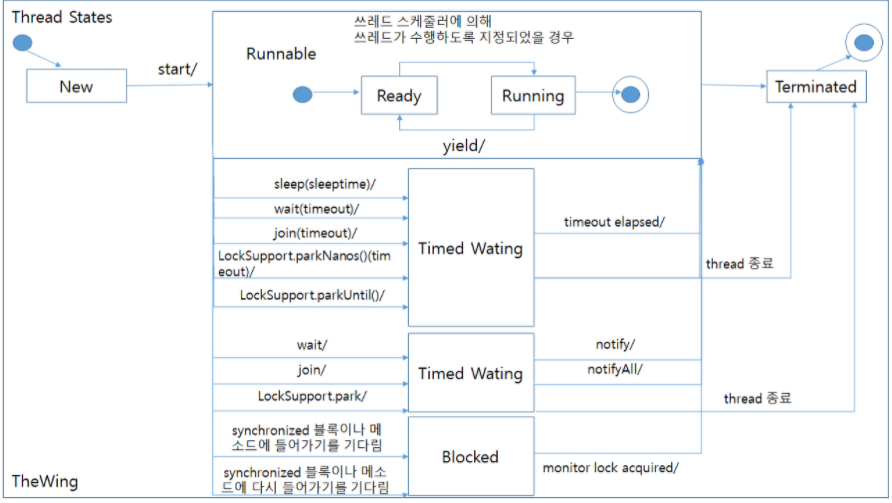
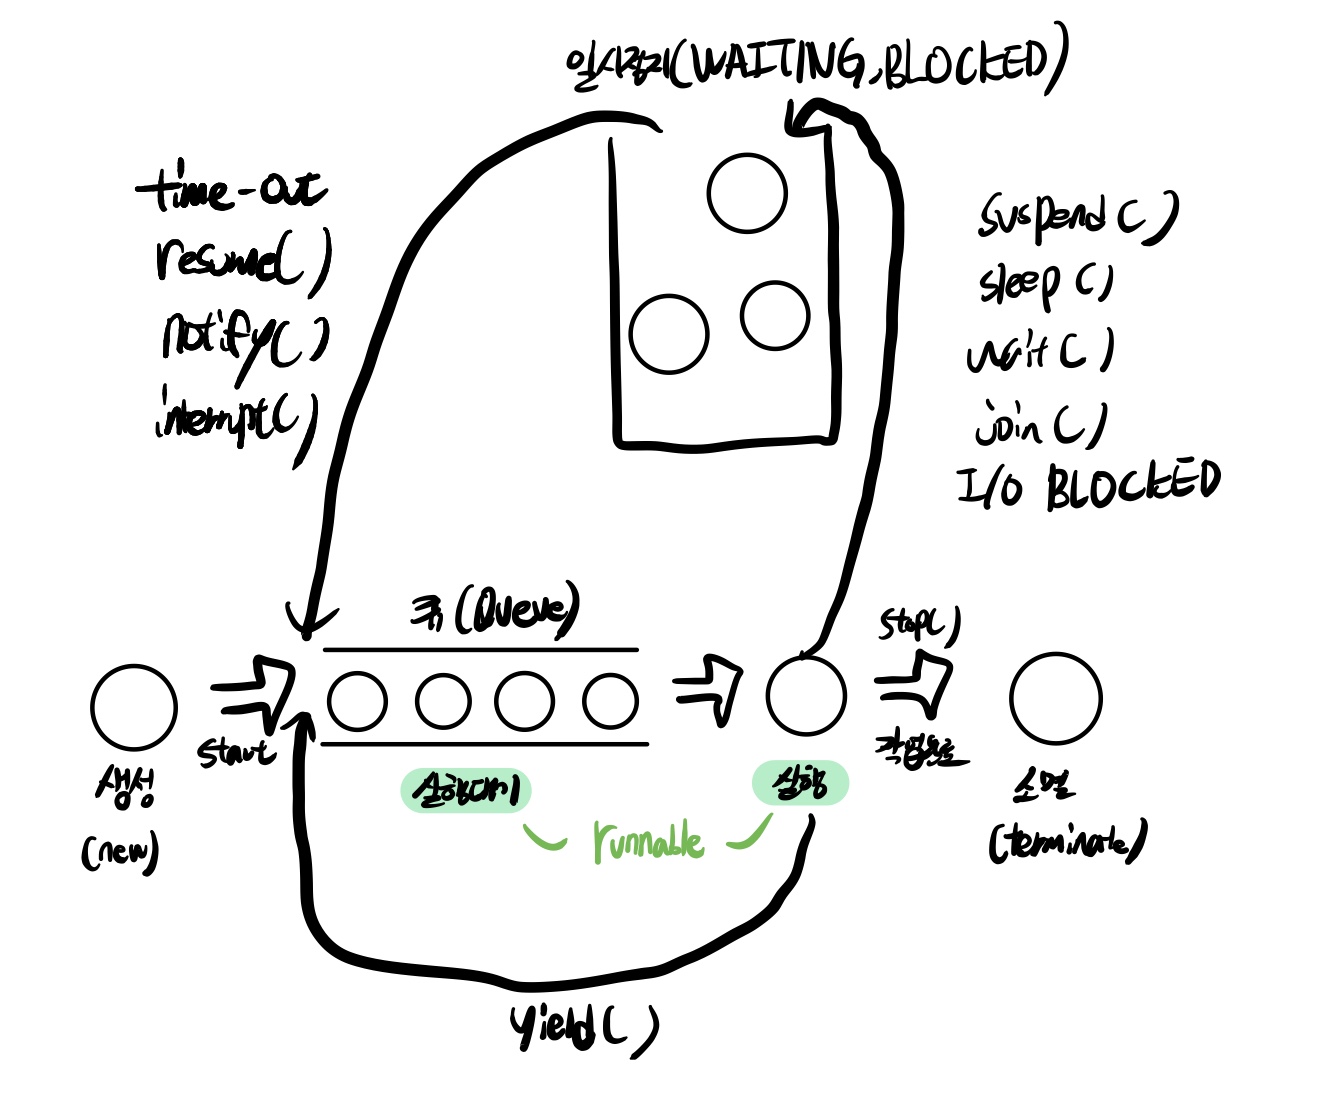
Thread.yield()
- 이 메소드를 호출한 쓰레드는 자신과 race condition에 놓여있는 다른 쓰레드 중, 자신과 우선순위가 같거나 높은 쓰레드가 더 많은 실행을 할 수 있또록 양보한다.
Thread.join()
- Thread.join() or Thread.join(0)
- 해당 쓰레드가 종료될때 까지 기다린다.
- Thread.join(60000)
- 60초 동안 기다린다
- 매개변수에 음수를 넣으면 IllegalArgumentException 예외발생
Thread.interrupt()
- 현재 수행중인 쓰레드를 깨운다.
- 그냥 깨우지 않고 InterruptedException 예외를 발생시키면서 깨운다. sleep() 과 join() 메서드에서 발생한다고 했던 예외이다.
Thread.stop()
- 안정상의 이유로 deprecated 되었다. 이 메서드를 사용하면 안된다.
package me.whiteship.livestudy.week10;

public class SleepingThread extends Thread{
    long term;

    public SleepingThread(long term) {
        this.term = term;
    }

    public static void checkJoin()  {
       SleepingThread thread = new SleepingThread(2000);
        try {
                thread.start();
                thread.join(5000);
                thread.interrupt();
                System.out.println("thread state(after join)="+thread.getState());
            } catch (InterruptedException e) {
                e.printStackTrace();
            }
    }

    @Override
    public void run() {
        try {
           Thread.sleep(term);
        } catch (InterruptedException e) {
            e.printStackTrace();
        }

    }

    public static void main(String[] args) {
        checkJoin();
    }
}
output:
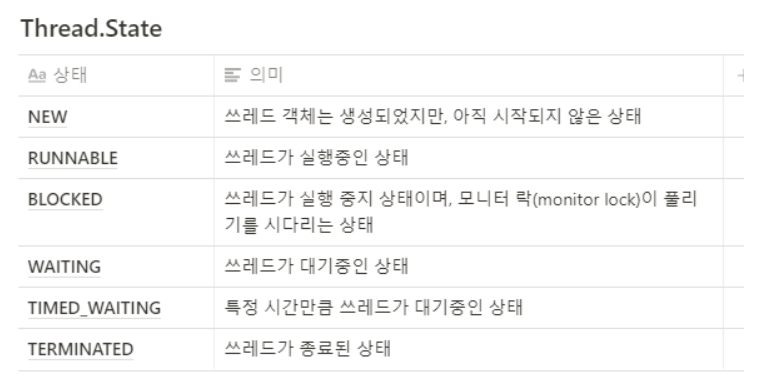
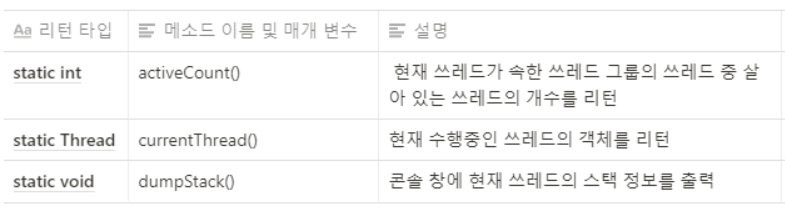
thread state(after join)=TERMINATED쓰레드 상태확인 메서드
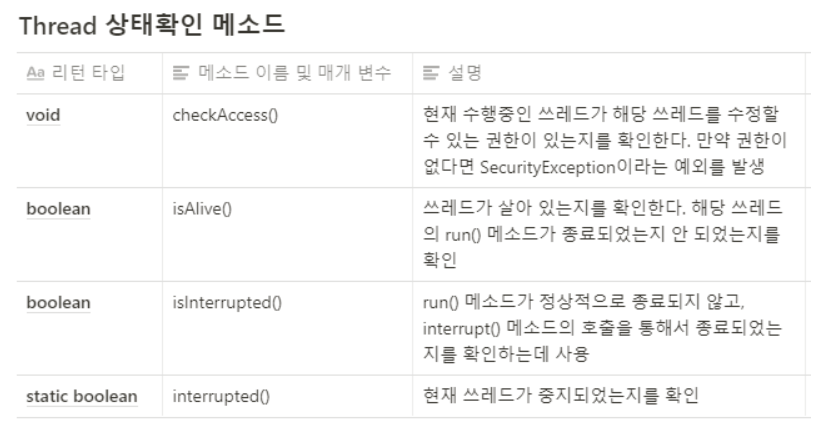
Thread satatic 메서드 목록
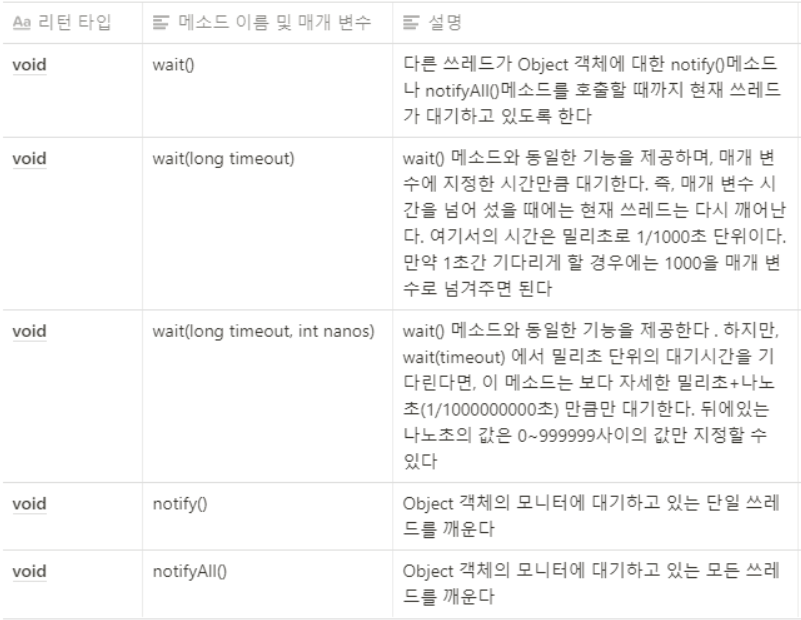
Object 클래스에 선언된 쓰레드와 관련있는 메서드들
예제
StateThread
package me.whiteship.livestudy.week10;

public class StateThread extends Thread{
    private Object monitor;

    public StateThread(Object monitor) {
        this.monitor = monitor;
    }

    @Override
    public void run() {
        try {
            for (int i = 0; i < 10000; i++) {
                String a = "A";
            }
            synchronized (monitor){
                monitor.wait();
            }

            System.out.println(getName()+"is notified.");
            Thread.sleep(1000);
        } catch (InterruptedException e) {
            e.printStackTrace();
        }
    }
}- monitor라는 이름의 객체를 매개 변수로 받아 인스턴스 변수로 선언해 두었다.
- 쓰레드를 실행중인 상태로 만들기 위해서 간단하게 루프를 돌면서 String 객체를 생성하낟.
- synchronize 블록 안에서 monitor 객체의 wait() 메서드를 호출했다.
- wait() 상황이 끝나면 1초간 대기했다가 쓰레드를 종료한다.
public static void main(String[] args) {
        Object monitor = new Object();
        StateThread thread = new StateThread(monitor);

        try {
            System.out.println("thread state = " + thread.getState());
            thread.start();
            System.out.println("thread state(after start) = " + thread.getState());

            Thread.sleep(100);
            System.out.println("thread state(after 0.1 sec) = " + thread.getState());

            synchronized (monitor){
                monitor.notify();
            }

            Thread.sleep(100);
            System.out.println("thread state(after notify) = " + thread.getState());

            thread.join();
            System.out.println("thread state(after join) = " + thread.getState());

        } catch (InterruptedException e) {
            e.printStackTrace();
        }
}- StateThread의 매개 변수로 넘겨줄 monitor라는 Object 클래스 객체를 생성한다.
- 쓰레드 객체를 생성하고 시작한다.
- monitor 객체를 통하여 notify() 메서드를 호출한다.
- 쓰레드가 종료될 때까지 기다린 후 상태를 출력한다.
output:
thread state = NEW
thread state(after start) = RUNNABLE
thread state(after 0.1 sec) = WAITING
Thread-0 is notified.
thread state(after notify) = TIMED_WAITING
thread state(after join) = TERMINATED

Process finished with exit code 0-
wait() 메서드가 호출되면 상태는 WAITING 상태가 된다.
-
누군가 이 쓰레드를 깨워줘야만 이 WAITING 상태에서 풀린다.
-
Interrupt() 메서드를 ㅗ출하여 대기 상태에서 풀려날 수도 있겠지만, notify() 메서드를 호출해서 풀어야 InterruptedException도 발생하지않고, wait()이후의 문장도 정상적으로 수행하게 된다.
public static void main(String[] args) {
        Object monitor = new Object();
        StateThread thread = new StateThread(monitor);
        StateThread thread2 = new StateThread(monitor);
        try {
            System.out.println("thread state = " + thread.getState());
            thread.start();
            thread2.start();
            System.out.println("thread state(after start) = " + thread.getState());

            Thread.sleep(100);
            System.out.println("thread state(after 0.1 sec) = " + thread.getState());

            synchronized (monitor){
                monitor.notify();
            }

            Thread.sleep(100);
            System.out.println("thread state(after notify) = " + thread.getState());

            thread.join();
            System.out.println("thread state(after join) = " + thread.getState());
            thread2.join();
            System.out.println("thread state(after join) = " + thread2.getState());

        } catch (InterruptedException e) {
            e.printStackTrace();
        }
    }
output:
thread state = NEW
thread state(after start) = RUNNABLE
thread state(after 0.1 sec) = WAITING
Thread-0 is notified.
thread state(after notify) = TIMED_WAITING
thread state(after join) = TERMINATED- thread2는 notify 되지 않았고 끝나지도 않았다.
- 왜냐하면 자바에서 notify() 메서드를 호출하면 먼저 대기하고 있는 것부터 그 상태를 풀어주기 때문이다.
- 좀 무식하게 풀어주려면 다음과 같이 synchronized 블록을 수정해주면 된다.
synchronized (monitor){
                monitor.notify();
}- 이렇게 하면 두 개의 쓰레드 모두 wait() 상태에서 풀린다. 하지만 monitor 객체를 통해서 wait() 상태가 몇 개인지 모르는 상태에서는 이와 같이 구현하는 것이 좋은 방법은 아니다.
-> notifyAll() 메서드를 사용하는것을 권장한다.
synchronized (monitor){
                monitor.notifyAll();
            }
output:
thread state = NEW
thread state(after start) = RUNNABLE
thread state(after 0.1 sec) = WAITING
Thread-1 is notified.
Thread-0 is notified.
thread state(after notify) = TIMED_WAITING
thread state(after join) = TERMINATED
thread2 state(after join) = TERMINATED

Process finished with exit code 0
3.쓰레드의 우선순위:
- Java에서 각 쓰레드는 우선순위에 관한 자신만의 필드를 가지고있다.
- 우선순위에 따라 특정 쓰레드가 더 많은 시간동안 작업을 할 수 있도록 설정한다.

-
getPriority() 와 setPriority() 메서드를 통해 쓰레드의 우선순위를 반환하거나 설정할수있다.
-
쓰레드의 우선순위가 가질 수 있는 범위는 1부터 1-까지이며, 숫자가 높을수록 우선순위 또한 높아진다.
-
하지만 쓰레드의 우선순위는 비례적인 절댓값이 아닌 어디까지나 상대적인 값일뿐이다.
-
우선순위가 10인 쓰레드가 우선순위가 1인 쓰레드보다 10배 더 빨리 수행되는 것은 아니다.
-
단지 우선순위가 10인 쓰레드가 우선순위가 1인 쓰레드보다 좀 더 많이 실행큐에 포함되어, 좀 더 많은 작업 시간을 할당받을 뿐이다.
ThreadWithRunnable:
package me.whiteship.livestudy.week10;

public class ThreadWithRunnable implements Runnable{
    @Override
    public void run() {
        for (int i = 0; i < 5; i++) {
            System.out.println(Thread.currentThread().getName());
            // 현재 실행중인 스레드의 이름을 반환함.
            try {
                Thread.sleep(10);
            } catch (InterruptedException e) {
                e.printStackTrace();
            }
        }
    }
}
Thread02:
package me.whiteship.livestudy.week10;

public class Thread02 {
    public static void main(String[] args) {
        Thread thread1 = new Thread(new ThreadWithRunnable());
        Thread thread2 = new Thread(new ThreadWithRunnable());
        thread2.setPriority(10);
        thread1.start(); // Thread-0 실행
        thread2.start(); // Thread-1 실행
        System.out.println(thread1.getPriority());
        System.out.println(thread2.getPriority());
    }
}
output:
5
10
Thread-1
Thread-0
Thread-1
Thread-0
Thread-1
Thread-0
Thread-0
Thread-1
Thread-1
Thread-0

Process finished with exit code 0
main() 메서드를 실행하는 쓰레드의 우선순위는 언제나 5이다.
main() 메서드 내에서 생성된 Thread-0의 우선순위는 5로 설정되는 것을 확인할수 있다.
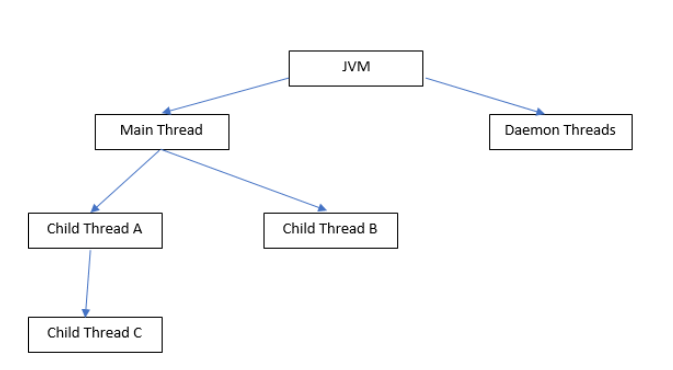
4.Main 쓰레드
Main Thread
-
Java는 실행환경인 JVM(java virtual machine)에서 돌아가게 된다. 이것이 하나의 프로세스이고 Java를 실행하기 위해 우리가 실행하는 main() 메서드가 메인 쓰레드이다.
-
public static void main(String[] args){} 이것이 메인 쓰레드이고 메인 쓰레드의 시작점을 선언하는 것이다.
-
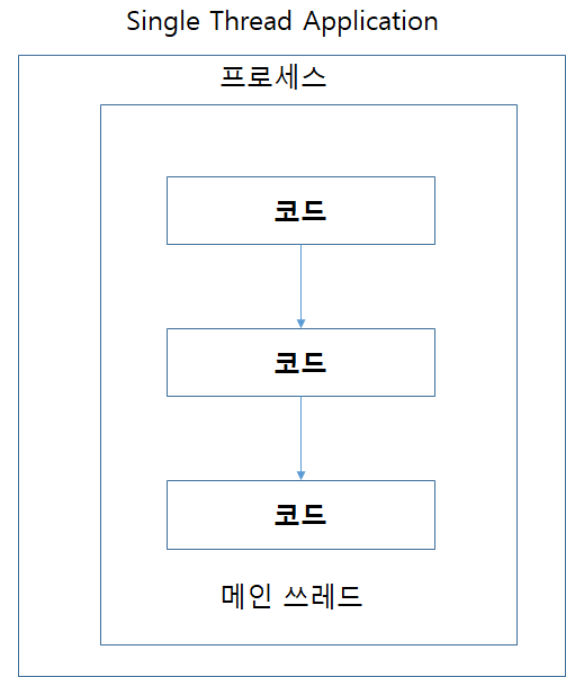
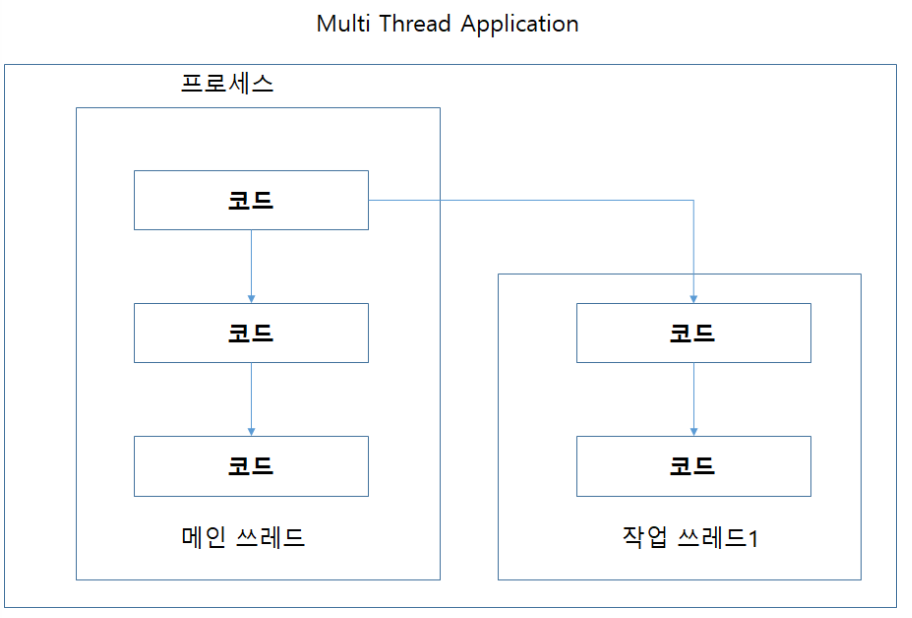
따로 쓰레드를 실행하지 않고 main() 메서드만 실행하는 것을 싱글쓰레드 애플리케이션이라고 한다.
- 싱글쓰레드 애플리케이션
- 멀티쓰레드 애플리케이션
Daemon Thread 사용:
- Main 쓰레드가 Daemon이 될 쓰레드의 setDaemon(true)를 호출해주면 Daemon 쓰레드가 된다.
package me.whiteship.livestudy.week10;

public class DaemonThread extends Thread{
    @Override
    public void run() {
        try {
            Thread.sleep(Long.MAX_VALUE);
        } catch (InterruptedException e) {
            e.printStackTrace();
        }
    }
}

public void runCommonThread(){
    DaemonThread thread = new DaemonThread();
    thread.start();
}- 이렇게 실행하면 long의 최대값만큼 대기하게 된다
public void runDaemonThread(){
    DaemonThread thread = new DaemonThread();
    thread.setDaemon(true);
    thread.start();
}- 이처럼 setDaemon(true)를 설정하면 프로그램이 대기하지 않고 그냥 끝나버린다.
- 즉, 데몬 쓰레드는 해당 쓰레드가 종료되지 않아도 다른 실행중인 일반 쓰레드가 없다면 멈춰버리게 된다.
Daemon thread를 만든 이유?
- 예를 들어 모니터링하는 쓰레드를 별도로 띄워 모니터링을 하다가, Main 쓰레드가 종료되면 관련 모니터링 쓰레드가 종료되어야 프로세스가 종료된다.
- 모니터링 쓰레드를 데몬 쓰레드로 만들지 않으면 프로세스가 종료할 수 없게 된다.
- 이처럼 부가적인 작업을 수행하는 쓰레드를 선언할 때 데몬 쓰레드를 만든다.
5.동기화
0. 임계구역
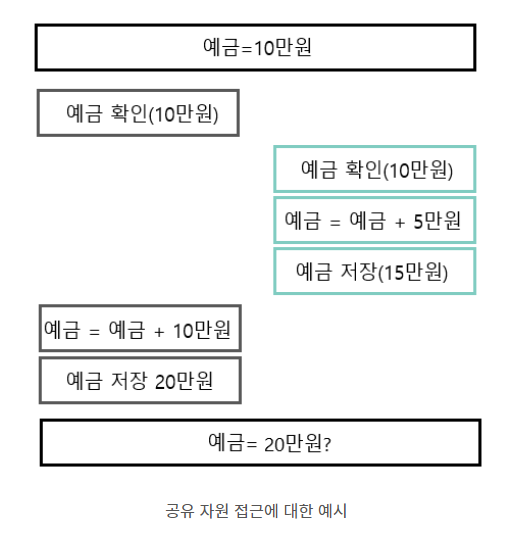
-
예금이 10만원인 통장에서 두 쓰레드가 각각 접근해서 10만원,5만원을 입금해서 원래라면 35만원이 됐어야 하는데 최종적으로 저장된 예금은 20만원이 된다.
-
이렇게 공유 자원 접근 순서에 따라 실행 결과가 달라지는 프로그램의 영역을 임계구역(critical section)이라고 한다.
임계구역 해결조건
-
상호 배제(mutual exclusion): 한 쓰레드가 임계구역에 들어가면 다른 쓰레드는 임계구역에 들어갈수 없다. 이것이 지켜지지 않으면 임계구역을 설정한 의미가 없다
-
한정 대기(bounded waiting): 한 쓰레드가 계속 자원을 사용하고 있어 다른 쓰레드가 사용하지 못한채 계속 기다리면 안된다. 어떤 스레드도 무한대기(infinite postpone)하지 않아야 한다. 즉 특정 쓰레드가 임계구역에 진입하지 못하면 안된다.
-
진행의 융통성(progress flexibility): 한 쓰레드가 다른 쓰레드의 작업을 방해해서는 안된다.
임계 구역(critical section)과 잠금(lock)의 개념을 활용해서 한 쓰레드가 특정 작업을 마치기 전까지 다른 쓰레드에 의해 방해받지 않도록 해야한다.
공유데이터를 사용하는 코드 영역을 임계구역으로 지정해놓고, 공유 데이터(객체)가 가지고 있는 lock을 획득한 단 하나의 쓰레드만 이 영역내의 코드를 수행할수있게 해야 한다.
그리고 해당 쓰레드가 임계 구역내의 모든 코드를 수행하고 벗어나서 lock을 반납해야만 다른 쓰레드가 반납된 lock을 획득하여 임계구역의 코드를 수행할수있다
-> 마치 공공 장소의 화장실을 사용할때 문을 잠그고 들어가서 일을 본뒤 화장실 문을 열고 다음사람에게 차례를 넘겨주는 것을 떠올리면 lock에 대한 이해가 쉽다.
이처럼 한 쓰레드가 진행 중인 작업을 다른 쓰레드가 간섭하지 못하도록 막는 것을 쓰레드의 동기화(synchronization) 라고 한다.
- 여러개의 쓰레드가 한 개의 리소스를 사용하려고 할 때 사용하려는 쓰레드를 제외한 나머지들을 접근하지 못하게 막는것이다.
- 이것을 Thread-safe 라고 한다
- 자바에서는 동기화 하는 방법을 3가지로 분류한다.
- Synchronized 키워드(임계영역을 지정해준다. 임계영역=멀티쓰레드에서 단 하나의 쓰레드만 실행할 수 있는 코드 영역)
- Atomic 클래스
- Volatile 키워드
1. Synchronized
- java 예약어 중 하나이다.
- 변수명이나 클래스명으로 사용 불가능
- 공유되는 자원에 한번에 한개의 쓰레드만 접근가능하다.
사용방법
- 메소드 자체를 synchronized로 선언하는 방법(synchronized methods)
- 메소드 내의 특정 문장만 synchronize로 감싸는 방법(synchronized statements)이다.

Synchronized 적용하지 않은 예제:
CommonCalculate:
package me.whiteship.livestudy.week10;

public class CommonCalculate {
    private int amount;

    public CommonCalculate() {
        amount = 0;
    }

    public int getAmount() {
        return amount;
    }

    public void plus(int value){
        amount+= value;
    }

    public void minus(int value){
        amount -= value;
    }
}
ModifyAmountThread
package me.whiteship.livestudy.week10;

public class ModifyAmountThread extends Thread {
    private CommonCalculate calc;
    private boolean addFlag;

    public ModifyAmountThread(CommonCalculate calc, boolean addFlag) {
        this.calc = calc;
        this.addFlag = addFlag;
    }

    @Override
    public void run() {
        for (int i = 0; i < 10000; i++) {
            if (addFlag) {
                calc.plus(1);
            } else {
                calc.minus(1);
            }

        }
    }
}
RunSync
package me.whiteship.livestudy.week10;

public class RunSync {
    public static void main(String[] args) {
        RunSync runSync = new RunSync();
        runSync.runCommonCalculate();
    }

    private void runCommonCalculate() {
        CommonCalculate calc = new CommonCalculate();
        ModifyAmountThread thread1 = new ModifyAmountThread(calc,true);
        ModifyAmountThread thread2 = new ModifyAmountThread(calc,true);

        thread1.start();
        thread2.start();

        try {
            thread1.join();
            thread2.join();
            System.out.println("Final value is "+ calc.getAmount());
        } catch (InterruptedException e) {
            e.printStackTrace();
        }
    }
}- 각 쓰레드를 실행한다.
- try-catch 블록안에서는 join() 이라는 메서드를 각각의 스레드에 대해서 호출한다, join()메서드는 쓰레드가 종료될 때까지 기다리는 메소드
- join()이 끝나면 calc 객체의 getAmount 메서드를 호출한다.
- getAmount 메서드의 호출 결과는 join 메서드 수행이후이므로, 모든 쓰레드가 종료된 이후의 결과다.
output:
Final value is 12477결과가 20000이 나오지 않는다.
5번 반복시키는 예제:
for (int i = 0; i < 5; i++) {
            runSync.runCommonCalculate();
        }
output:
Final value is 19137
Final value is 11831
Final value is 14487
Final value is 13268
Final value is 12567

Process finished with exit code 0
원하는 결과인 20000이 나오지 않는다.
Synchronized 적용예제(메서드)
CommonCalculate
package me.whiteship.livestudy.week10;

public class CommonCalculate {
    private int amount;

    public CommonCalculate() {
        amount = 0;
    }

    public int getAmount() {
        return amount;
    }

    public synchronized void plus(int value){
        amount+= value;
    }

    public synchronized void minus(int value){
        amount -= value;
    }
}
output:
Final value is 20000
Final value is 20000
Final value is 20000
Final value is 20000
Final value is 20000

Process finished with exit code 0
Synchronized 적용예제(block)
synchronized에 this를 사용하는 것은 메서드에 synchronized에 붙이는 것과 다르지 않다.
그러나 this가 아닌 다른 object 별로 lock을 걸게되면 락걸리는 것이 다르다.
package me.whiteship.livestudy.week10;

public class CommonCalculate {
    private int amount;
    private int interest;
    public static Object interestLock = new Object();

    public CommonCalculate() {
        amount = 0;
    }

    public void addInterrest(int value){
        synchronized (interestLock){
            interest += value;
        }
    }

    public int getAmount() {
        return amount;
    }

    public  void plus(int value){
        synchronized (this){
            amount +=value;
        }
    }

    public  void minus(int value){
        synchronized (this){
            amount -=value;
        }
    }
}
output:
Final value is 20000
Final value is 20000
Final value is 20000
Final value is 20000
Final value is 20000

Process finished with exit code 0
결과는 synchronized 메서드와 동일하게 20000으로 나오게된다.
2. Atomic
-
Atomicity의 개념은 '쪼갤 수 없는 가장 작은 단위'를 뜻한다
-
자바의 Atomic type은 Wrapping 클래스의 일종으로, 참조 타입과 원시 타입 두 종류의 변수에 모두 적용이 가능하다. 사용시 내부적으로 CAS(compare and swap) 알고리즘을 사용해 lock 없이 동기화 처리를 할수있다.
-
Atomic Type 경우 volatille과 synchronized와 달리 java.util.concurrent.atomic 패키지에 정의된 클래스이다.
-
CAS는 특정 메모리 위치와 주어진 위치의 value를 비교하여 다르면 대체하지 않는다.
-
사용법은 변수를 선언할때 타입을 atomic type으로 선언해주면 된다.
주요 클래스
- AtomicBoolean
- AtomicInteger
- AtomicLong
- AtomicIntegerArray
- AtomicDoubleArray
주요 메서드
- get()
- 현재값을 반환 - set(newValue)
- newValue로 값을 업데이트한다. - getAndSet(newValue)
- 원자적으로 값을 업데이트하고 원래의 값을 반환한다 - CompareAndSet(expect,update)
- 현재의 값이 예상하는 값(expect)과 동일하다면 값을 update 한후 true를 반환한다.- 예상하는 값과 같지 않다면 update는 생략하고 false를 반환
- Number 타입의 경우 값의 연산을 할 수 있또록 addAndGet(delta), getAnddAdd(delta),getAndDecrement(),getAndIncrement(),incrementAndGet() 등의 메서드를 추가로 제공한다.
Compare-And-Swap(CAS)란?
-
메모리 위치의 내용을 주어진 값과 비교하고 동일한 경우메나 해당 메모리 위치의 내용을 새로 주어진 값으로 수정을 한다.
-
즉, 현재 주어진 값(=현재 쓰레드에서의 데이터)과 실제 저장된 데이터를 비교해서 두개가 일치할때만 값을 업데이트한다. 이 역할을 하는 메서드가 compareAndSet() 이다.
-
synchronized 처럼 임계영역에 같은 시점에 두개 이상의 쓰레드가 접근하려 하면 쓰레드 자체를 blocking 시키는 메커니즘이 아니다.
Atomic 예제:
package me.whiteship.livestudy.week10;

import java.util.concurrent.atomic.AtomicLong;

public class AtomicTypeSample {
    public static void main(String[] args) {
        AtomicLong atomicLong = new AtomicLong();
        AtomicLong atomicLong1 = new AtomicLong(123);

        long expectedValue= 123;
        long newValue = 234;

        System.out.println(atomicLong.compareAndSet(expectedValue,newValue));
        atomicLong1.set(234);

        System.out.println(atomicLong1.compareAndSet(234,newValue));
        System.out.println(atomicLong1.compareAndSet(expectedValue,newValue));
        System.out.println(atomicLong.get());
        System.out.println(atomicLong1.get());
    }
}
output:
false
true
false
0
234
3. Volatile
- volatile 키워드는 java 변수를 main memory에 저장하겠다라는 것을 명시하는 것이다.
- 매번 변수의 값을 read할때마다 cpu cache에 저장된 값이 아닌 main memory에서 읽는 것이다.
- 또한 변수의 값을 write할때마다 main memory에 작성하는것입니다.
why?
-
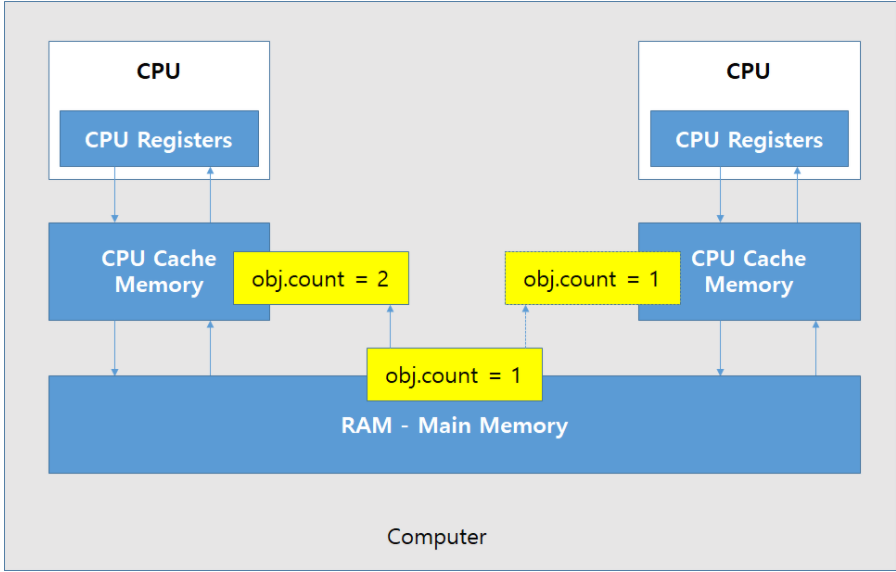
volatile 변수를 사용하고 있지 않는 MultiThread 애플리케이션은 작업을 수행하는 동안 성능 향상을 위해서 Main memory에서 읽은 변수를 cpu cahce에 저장하게 된다.
-
만약 multi thread 환경에서 thread가 변수 값을 읽어올때 각각의 cpu cahce에 저장된 값이 다르기 때문에 변수값 불일치 문제가 발생하게 된다.
예제:
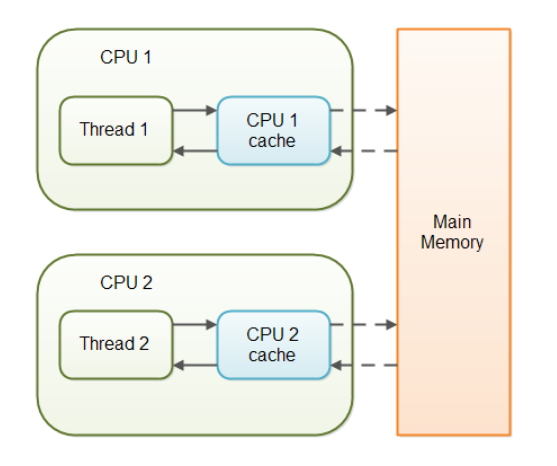
- SharedObject를 공유하는 두 개의 Thread가 있다.
- thread-1는 counter 값을 더하고 읽는 연산을 한다(Read & Write)- thread-2는 counter 값을 읽기만 한다(Only Read)
public class SharedObject{
	public int counter = 0;
}- Thread-1만 counter 변수를 증가시키지만 cpu cahce에만 반영되어있고 실제로 Main memory에는 반영이 되어있지 않았다. 그렇기 때문에 Thread-2는 counter 값을 계속 읽어오지만 0을 가져오는 문제가 발생한다.
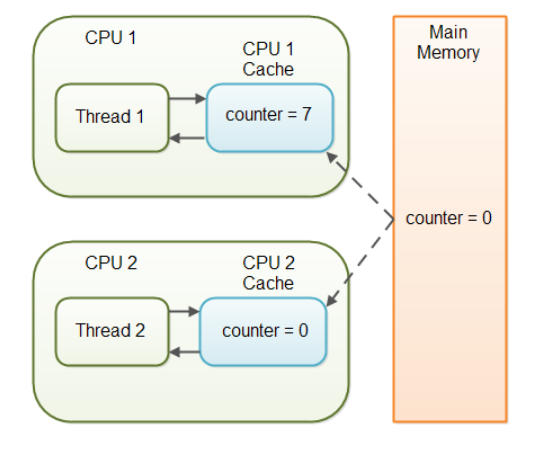
다른 쓰레드에 의해 아직 Main Memory에 다시 기록되지 않았기 때문에 Thread가 변수의 최신값을 보지 못하는 문제를 "가시성" 문제라고 한다. 한 쓰레드의 업데이트는 다른 Thread에 표시되지 않는다.
어떻게 해결을 하는지?
- volatile 키워드를 추가하게 되면 Main memory에 저장하고 읽어오기 때문에 변수 값 불일치 무넺를 해결할수있다.
public class ShareObject{
	public volatile int counter = 0;
}
언제사용하지?
- Multi thread 환경에서 하나의 thread만 read&write하고 나머지 thread가 read하는 상황에서 가장 최신의 값을 보장한다
volatile 성능에 영향?
- volatile는 변수의 read와 write를 main memory에서 진행하게 된다.
- CPU cache 보다 main memory에서 비용이 더 크기 때문에 변수 값 일치를 보장해야하는 경우에 volatile을 사용한다.
6.데드락
Thread Deadlock
-
Deadlock은 둘 이상의 쓰레드가 lock을 획득하기 위해 대기하는데, 이 lock을 잡고 있는 쓰레드들도 독같이 다른 lock을 기다리면서 서로 block 상태에 놓이는 것을 말한다. Deadlock은 다수의 쓰레드가 같은 lock을 동시에, 다른 명령에 의해 획득하려 할때 발생할수있다.
-
예를 들어, Thread-1이 A의 lock을 가지고 있는 상태에서 B의 lock을 획득하려 한다. 그리고 THread-2는 B의 lock을 가진 상태에서 A의 lock을 획득하려 한다. 이런 상황에서 데드락이 생긴다.
-
Thread-1은 절대 B의 lock을 얻을수없고 마찬가지로 Thread-2 역시 절대 A의 lock을 얻을 수 없다. 두 쓰레드 중 어느 쪽도 이 사실유무를 모르며, 쓰레드들은 각 개체 A와 B에서 영원히 block 된 상태로 유지된다. 이를 데드락 이라고 한다
Thread1 locks a, waits for B
Thread2 locks B ,waits for A
예제:
package me.whiteship.livestudy.week10;

public class DeadlockSample {
    public static final Object LOCK_1 = new Object();
    public static final Object LOCK_2 = new Object();

    public static void main(String[] args) {
        ThreadSample1 thread1 = new ThreadSample1();
        ThreadSample2 thread2 = new ThreadSample2();
        thread1.start();
        thread2.start();

    }

    private static class ThreadSample1 extends Thread {
        @Override
        public void run() {
            synchronized (LOCK_1){
                System.out.println("Thread1 : Holding lock 1..." );
                try {
                    Thread.sleep(10);
                } catch (InterruptedException e) {
                    e.printStackTrace();
                }
                System.out.println("Thread1: Waiting for lock 2...");
                synchronized (LOCK_2){
                    System.out.println("Thread 1 : Hodling lock 1 & 2 ...");
                }
            }

        }
    }

    private static class ThreadSample2 extends Thread {
        @Override
        public void run() {
            synchronized (LOCK_2){
                System.out.println("Thread2: holding lock2 ....");
                try {
                    Thread.sleep(10);
                } catch (InterruptedException e) {
                    e.printStackTrace();
                }
                System.out.println("Thread2: Waiting for lock 1...");
                synchronized (LOCK_1){
                    System.out.println("Thead2 : Holding 1 & 2 ...");
                }
         }
        }
    }
}
output:
Thread1 : Holding lock 1...
Thread2: holding lock2 ....
Thread2: Waiting for lock 1...
Thread1: Waiting for lock 2...
내부에서 서로의 lock을 얻으려고 호출하기 때문에 무한정 데드락에 빠지게 된다.
7. 번외
lock 클래스와 synchronized 키워드의 차이
java.util.concurrent
- 자바 5에서 추가된 패키지로 동기화가 필요한 상황에서 사용할 수 있는 다양한 유틸리티 클래스들을 제공한다.
주요 기능
- locks:
상호배제를 사용할 수 있는 클래스를 제공 - Atomic:
동기화 되어있는 변수를 제공한다.
위에서 다룬 Atomic은 java.util.concurrent에 포함된다. - Executors:
쓰레드 풀 생성, 생명주기 관리, Task 등록과 실행 등을 간편하게 처리가능 - Queue:
Thread-safe한 FIFO Queue를 제공 - Synchronizers:
특수한 목적의 동기화를 처리하는 5개의 클래스를 제공한다.(Semaphore, CountDownLatch, CyclicBarrier,Phaser,Exchanger)
java.util.concurrent.locks
- synchronized 블록을 사용했을 때와 동일한 메커니즘으로 동작한다.
- 내부적으로 synchronized를 사용하여 구현되어 있고, synchronize를 더욱 유연하고 세밀하게 처리하기 위해 사용하는 것이며 대체하는 목적은 아니다.
Interface
-
Lock
- 공유 자원에 한번에 한 쓰레드만 read,write를 수행 가능하도록 한다 -
ReadWriteLock
- Lock에서 한단계 발전된 메커니즘을 제공하는 인터페이스이다. 공유자원에 여러개의 쓰레드가 read를 수행할수있지만, write는 한번에 한 쓰레드만 수행이 가능하다.
-
Condition(Spring의 Condition이 아님)
- Object 클래스의 monitor method 인 wait,notify,notifyAll 메서드를 대체한다.
wait->await, notify->signal, notifyAll->signalAll 로 생각하면 된다.
Locks Interface의 구현체
-
ReentrantLock
- Lock의 구현체이며 임계 영역의 시작과 종료시점을 직접 명시할 수 있게 해준다
-
ReentrantReadWriteLock
- ReadWriteLock의 구현체
주요 메서드
- lock
- Lock 인스턴스에 잠금을 걸어둔다. Lock 인스턴스가 이미 잠겨있는 상태라면, 잠금을 걸어둔 쓰레드가 unlock()을 호출할 때까지 실행이 비활성화된다. - lockInterrputibly()
- 현재 쓰레드가 interrupted 상태가 아닐때 Lock 인스턴스에 잠금을 건다. 현재 쓰레드가 interrupted 상태면 InterruptedException을 발생시킨다. - tryLock()
- 즉시 Lock 인스턴스에 잠금을 시도하고 성공 여부를 boolean 타입으로 반환한다.- tryLock(long timeout, TimeUnit timeUnit)
- tryLock()과 동일하지만, 잠금이 실패했을때 바로 false를 반환하지 않고 인자로 주어진 시간동안 기다린다.
- unlock()
- Lock 인스턴스의 잠금을 해제한다. - newCondition()
- 현재 Lock 인스턴스와 연결된 Condition 객체를 반환한다.
Lock 미적용 예제
여러 쓰레드가 동일한 자원을 고유할 때 벌어지는 일을 확인하기 위한 간단한 예제를 만들어보자.
SharedData는 모든 쓰레드가 공유할 데이터를 정의한 클래스다.
여러개의 쓰레드가 하나의 SharedDate 인스턴슬르 공유하며 increase()메서드를 호출할것이다.
SharedData
package me.whiteship.livestudy.week10;

public class SharedData {
    private int value;

    public void increase(){
        value +=1;
    }

    public void print(){
        System.out.println(value);
    }
}
RunnableSample
package me.whiteship.livestudy.week10;

public class RunnableSample implements Runnable {
    private final SharedData sharedData;
    public RunnableSample(SharedData sharedData) {
        this.sharedData = sharedData;
    }

    @Override
    public void run() {
        for (int i = 0; i < 100; i++) {
             sharedData.increase();
        }
        sharedData.print();
    }
}
LockSample
package me.whiteship.livestudy.week10;

public class LockSample {
    public static void main(String[] args) {
        final SharedData sharedData = new SharedData();

        for (int i = 0; i < 10; i++) {
            new Thread(new RunnableSample(sharedData)).start();

        }
    }

}
output:
135
235
335
135
435
535
635
735
835
935
TestData 객체를 공유하는 10개의 쓰레드가 run() 블록에 정의된 작업을 시분할 방식으로 번갈아가며 실행하였다.
이로인해, 실행결과는 매번 조금씩 달라져 동일한 결과가 보장되지 않는다. 만약 개발자가 value가 순차적으로 100씩 증가하는 상황을 의도했따면 이는 잘못된 동작에 해당된다
이제 Lock 인스턴스를 사용해 이러한 동시성 문제를 해결할 수 있다
쓰레드들이 공유할 Lock인스턴스를 만들고, 동기화가 필요한 실행문의 앞 뒤로 lock(),unlock()을 호출하면 된다.
lock을 걸어놨다면 unlock()도 빼먹지 말고 반드시 호출해줘야 한다. 임계 영역 블록의 실행이 끝나더라도 unlock()이 호출되기 전까지는 쓰레드의 잠금 상태가 영원히 유지되기 때문이다. 어떤 예외가 발생하더라도 반드시 unlock()이 호출되도록 try-catch-finaly 형태를 사용하는 것이 권장된다.
Lock 적용예제
RunnableSample
package me.whiteship.livestudy.week10;

import java.util.concurrent.locks.Lock;

public class RunnableSample implements Runnable {
    private final SharedData sharedData;
    private final Lock lock;

    public RunnableSample(SharedData sharedData, Lock lock) {
        this.sharedData = sharedData;
        this.lock = lock;
    }

    @Override
    public void run() {
        lock.lock();
        try {
            for (int i = 0; i < 100; i++) {
                 sharedData.increase();
            }
            sharedData.print();

        } catch (Exception e) {
            e.printStackTrace();
        } finally {
        lock.unlock();
        }
    }
}
LockSample
package me.whiteship.livestudy.week10;

import java.util.concurrent.locks.Lock;
import java.util.concurrent.locks.ReentrantLock;

public class LockSample {
    public static void main(String[] args) {
        final SharedData sharedData = new SharedData();
        final Lock lock = new ReentrantLock();

        for (int i = 0; i < 10; i++) {
            new Thread(new RunnableSample(sharedData, lock)).start();

        }
    }

}
output
100
200
300
400
500
600
700
800
900
1000
synchronized와 Lock은 어떤 차이가 있는걸까?
이 두 예제는 synchronized로 대체가 가능하지만 이 둘을 구분짓는 키워드는 fairness(공정성)이다.
- 공정성: 모든 쓰레드가 자신의 작업을 수행할 기회를 공평하게 갖는것
공정한 방법에선 Queue 안에서 쓰레드들이 무조건 순서를 지켜가며 lock을 확보한다.
불공정한 방법에선 만약 특정 쓰레드에 lock이 필요한 순간 release가 발생하면 대기열을 건너뛰는 새치기 같은 일이 벌어지게 된다.
다른 쓰레들에게 우선순위가 밀려 자원을 계속해서 할당받지 못하는 쓰레드가 존재하는 상황을 startvation(기아상태) 라 부른다. 이러한 기아상태를 해결하기 위해 고엊ㅇ성이 필요하다.
synchronized는 공정성을 지원하지 않는다. 즉 후순위인 쓰레드는 실행이 안될수있다.
ReetrantLock은 생성자의 인자를 통해 Fair/NonFair 설정을 할수있다. ReetrantLock의 생성자는 아래와 같이 정의되어있다.
public ReetrantLock(){
	sync = new NofairSync();
}

public ReentrantLock(boolean fair){
	synce = fair ? new FiarSync() : new NonfairSync();
}
공정한 lock을 사용할 경우 경쟁이 발생했을 때 가장 오랫동안 기다린 쓰레드에게 lock을 제공한다. 락을 요청하는 시간 간격이 긴 경우가 아니라면, 쓰레드를 공정하게 관리하는 것보다 불공정하게 관리할때 성능이 더 우수하다. 그래서 일반적으로 불공정 방식이 더 사용되는것 같다.
정리
synchronized는 블록구조를 사용하고 메서드 안에 임계여역의 시작과 끝이 있다. Lock은 lock(), unlock()으로 시작과 끝을 명시하기 때문에 임계영역을 여러 메서드에서 나눠서 작성이 가능하다.
synchronized는 Lock과 같이 따로 unlock을 안하고 구문만 작성하여 코드를 간결하게 할수있다.
Thread Pool
기존 스레드의 문제점
스레드를 생성하는데 드는 비용이 많다. 스레드 생성과 스케줄링으로 인해 CPU가 바빠지고, 메모리 사용량이 늘어난다.
결국에는 스레드를 생성하고 죽이는 과정 자체가 컴퓨터의 CPU 그리고 어플리케이션에 무리가 간다.
-> 위의 문제점으로 인해 쓰레드를 미리 생성해놓고 각자 일을 부여시켜주면 되지 않을까? 라는 생각이 대두되었다.
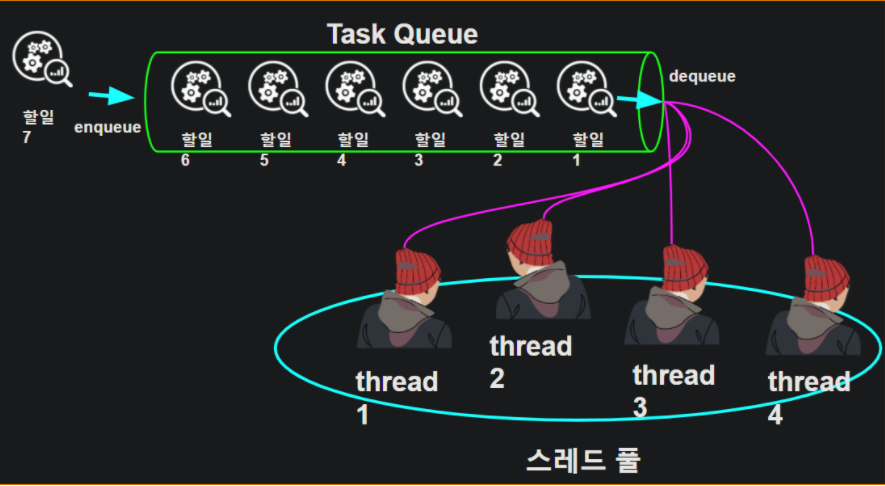
다음과 같이 해야할일을 task queue에 집어 넣어준다. 그리고 queue에 들어간 task를 각자의 쓰레드에게 부여해준다
특징
-
할일보다 쓰레드가 부족하다고 쓰레드를 더 생성하지 않는다.
-
쓰레드가 일이 끝났다고 종료하는것이 아니라 queue에 들어간 다른 작업을 할당받는다.
실제코드
package me.whiteship.livestudy.week10;

import java.util.concurrent.ExecutorService;
import java.util.concurrent.Executors;
import java.util.concurrent.ThreadPoolExecutor;

public class ThreadPoolSample {
    public static void main(String[] args) throws Exception{
        ExecutorService executorService = Executors.newFixedThreadPool(4);
        // 스레드개수 4개

        for(int i=0; i<10; i++){
            Runnable runnable = new Runnable() {
                @Override
                public void run() {
                    // 스레드 총 개수 및 작업 스레드 이름 출력
                    ThreadPoolExecutor threadPoolExecutor = (ThreadPoolExecutor) executorService;
                    int poolSize = threadPoolExecutor.getPoolSize();  // poolSize 총 스레드 개수
                    String threadName = Thread.currentThread().getName();
                    System.out.println("[총 스레드 개수 : " + poolSize + "] 작업 스레드 이름 : " + threadName);

                }
            };
            executorService.submit(runnable);

            Thread.sleep(10);
        }
        executorService.shutdown();
    }
}
output:
[총 스레드 개수 : 1] 작업 스레드 이름 : pool-1-thread-1
[총 스레드 개수 : 2] 작업 스레드 이름 : pool-1-thread-2
[총 스레드 개수 : 3] 작업 스레드 이름 : pool-1-thread-3
[총 스레드 개수 : 4] 작업 스레드 이름 : pool-1-thread-4
[총 스레드 개수 : 4] 작업 스레드 이름 : pool-1-thread-1
[총 스레드 개수 : 4] 작업 스레드 이름 : pool-1-thread-2
[총 스레드 개수 : 4] 작업 스레드 이름 : pool-1-thread-3
[총 스레드 개수 : 4] 작업 스레드 이름 : pool-1-thread-4
[총 스레드 개수 : 4] 작업 스레드 이름 : pool-1-thread-1
[총 스레드 개수 : 4] 작업 스레드 이름 : pool-1-thread-2

Process finished with exit code 0
실제로 쓰레드 개수가 4개로만 고정되어 있으며, 더이상 늘리지도 줄이지도 않는다.
쓰레드 풀을 선언하는 방법이 여러가지가 있는데 앞 선 코드는 쓰레드의 총 개수만 설정해두었지만, 직접 생성자를 호출하게 되면 세부적으로 설정할 수 있다.
 // 1번 방법
ExecutorService ex = new ThreadPoolExecutor(
    3, //코어 스레드 개수
    100,// 최대 스레드 개수
    120L,// 스레드 놀고 있는 시간
    TimeUnit.SECONDS,//시간 단위
    new SynchronousQueue<>()  // 작업큐
);
 // 2번 방법
public static ExecutorService newFixedThreadPool(int nThreads) {
        return new ThreadPoolExecutor(nThreads, nThreads,
                                      0L, TimeUnit.MILLISECONDS,
                                      new LinkedBlockingQueue<Runnable>());
}
1번 방법은 여러가지를 설정해 줄 수 있지만 그와 다르게 newFixedThreadPool 메서드는 스레드 개수와 최대 스레드 개수는 동일하며, 스레드의 대기시간은 없는것으로 자동 default가 된다.
