 # 선택문:
- 제어문: 코드의 실행 흐름(순서)를 제어하는 구문
- 조건문:
- if문: 간단한 의사 결정문. 명령문 또는 명령문 블록의 실행 여부를 결정하는데 사용한다. 주어진 조건이 참이면 명령문 블록이 실행되고, 그렇지 않으면 명령문 블록을 건너뜁니다. 조건을 실행하는 동안 조건이 참이면 해당 명령문이 실행되고 나머지 코드는 건너 뜁니다. 어떤 조건도 참이 아니면 마지막 else문이 실행된다.
      if(condition){
          if condition is true this block of statements will be executed
      } else if(condition){
          if condition is true this block of statements will be executed
      } else{
           if none of condition is true, then this block of statements will be executed
}- 선택문(swtich/case문): 다중 if문과 같은 조건문의 일종이다. switch 함수의 매개변수에 들어오는 값에 따라 코드를 실행한다. switch문은 조건에 기초한 다수의 블록 중 한 블록의 명령문을 실행한다. switch문에는 많은 선택 항목이 있고, 각 선택항목에 대해 다른 작업을 수행할수 있다.
-
switch문 표현식은 byte,short,int,long,enum 유형 ,String 및 Byte, Short, Int 및 Long과 같은 일부 Wrapper 유형일 수 있다.(단 switch 표현식에서만 wrapper를 허용하고, case에는 Wrapper를 허용하지 않는다.) switch() 대괄호 사이에는 변수 또는 표현식만 넣을수있다.
-
케이스값은 리터럴 또는 상수여야한다.
-
각 케이스는 고유해야한다. 중복 케이스 값을 생성하면 컴파일타임 오류가 발생한다.
-
각 케이스에는 선택적인 break문이 있다. switch 내부에서 명령문 시퀀스를 종료하고 switch 표현식 다음의 컨트롤로 점프하는데 사용된다.
-
어떤 경우에도 break문을 사용하지 않으면 break문에 도달할때까지 다음 case로 실행이 된다.
-
swtich case에 해당하는 경우가 없으면 default가 실행된다.
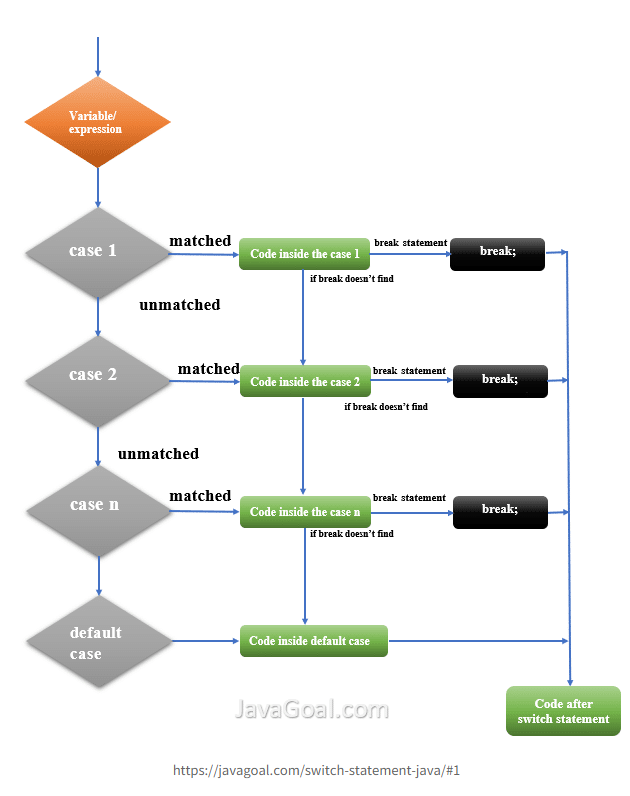
        switch(조건식):{
            case 값1:
                실행코드
                break;
            case 값2:
                실행코드
                break;
            case 값3:
                실행코드
                break;
            default: case에 해당하는 값이 없을때 실행할 코드
                break;
}- break문: 반복문이나 switch문 에서 프로그래머가 실행 순서를 중단하기 위해 사용한다.
반복문:
조건이 거짓이 될떄까지 블록을 반복적으로 실행한다.
1. for문: 사용자가 코드 블록을 여러번 실행하려는 경우 사용한다.
          for(initialization;condition;increment/decremetn){
          	//body of for loop
}- 초기화: 초기화는 루프의 시작점이며 한번만 발생한다. 여기에서 변수를 선언 및 초기화하거나 이미 초기화된 변수를 사용할수있다.
- 조건: 조건은 루프의 두번째 부분이며 bool값을 true 또는 false로 반환해야하는 조건을 제공/작성해야한다. 루프의 상태를 테스트하기 위해 매번 실행된다. 조건이 거짓이 될때까지 실행을 계속한다.
- for 루프의 본문: 조건이 참임을 확인한후 매번 실행되는 코드 블록
- 증가/감소: 변수의 인덱스 값을 업데이트하는데 사용됩니다.
- while문:
- 루프 상태 조건이 거짓이 될때까지 허용 코드가 반복하여 실행된다.
- 반복횟수가 고정되지 않은 while루프를 사용할수있다.(입력 제어 루프)
        while(condition){
        	// body of while loop
        }
- true를 반환하면 while 루프의 본문이 실행된다. while 루프의 본문에서 명령문은 다음 반복을 위해 처리되는 변수에 대한 업데이트 값을 포함한다.
- false를 반환하면 루프가 종료된다.
- do-while문:
- while 루프와 거의 유사하다. 루프 본문을 먼저 실행한후 조건을 확인한다.
- 루프 본문을 먼저 실행하기 때문에 조건에 관계없이 적어도 한번이상 반복문을 돈다는 특징을 가지고 있다.
- for-each문:
- J2SE 5.0부터 추가되었다.
- for each라는 키워드가 따로 있는것은 아니고 동일한 for를 이용한다.
- 하지만 조건식 부분이 조금 다르다.
- 루프를 돌릴 객체로는 루프를 돌릴수있는 형태인 Array 나 Collections이 가능하고
Iterable<E>를 상속받은 객체 또한가능 하다.
for(변수타입 변수명: 루프를 돌릴 객체){
// 실행코드
}

String[] tmp ={"귤","감","토마토"}
for(String e: tmp){
    System.out.println(e);
}- forEach와 for each의 차이:
- 아직 잘모르겠다. 나중에 다시 알아보도록 하자.
과제 0. JUnit 5를 학습하세요.
JUnit은 Java 에코 시스템에서 가장 인기있는 단위 테스트 프레임 워크 중 하나이다.
JUnit5 버전에는 Java 8 이상의 새로운 기능을 지원하고 다양한 스타일의 테스트를 가능하게 해준다.
JUnit5 아키텍처
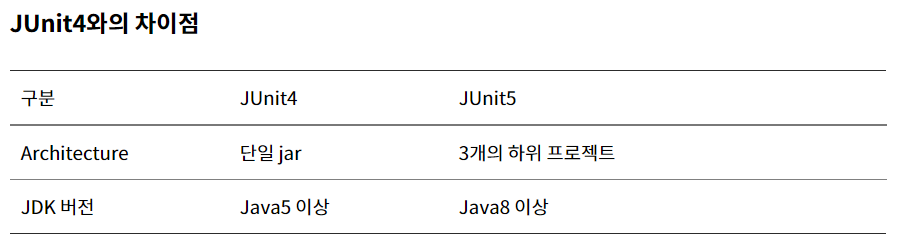
JUnit 5는 세가지 하위 프로젝트(junit platform + junit jupiter + junit vintage)의 여러 모듈로 구성된다.
Junit 4가 단일 jar였던 것에 반해, Junit5는 junit platform,junit jupiter,junit vintage 모듈 세가지로 구성되어 있다.
-
junit platform:
- JVM에서 동작하는 테스트프레임워크이다. 테스트를 발견하고 계획을 생성하고 결과를 보고하는 TestEngine 인터페이스를 정의한다.
-
junit jupiter:
- junit5 TestEngine의 실제 구현체이다. junit5 기반의 테스트를 실행시키기 위한 TestEngine을 Platform에 제공한다.
-
junit vintage:
- TestEngine에서 junit3 및 junit4 기반 테스트를 실행하기 위한 기능을 제공한다.
JUnit5 기본 테스트 케이스 형식 예시
  import org.junit.jupiter.api.Test;

  import static org.junit.jupiter.api.Assertions.*;

  import org.junit.jupiter.api.Test;

  class CalculatorTest {
      private final Calculator calculator = new Calculator();

      @Test
      void addition() {
          assertEquals(2,calculator.add(1,1));
      }
  }
JUnit5 Annotation
Junit5에서 제공하는 org.junit.jupiter.api 패키지 내의 어노테이션을 설명합니다.
-
@Test:
- 해당 메서드가 테스트 메서드임을 명시함.
@Test void test(){ //... } -
@BeforeEach:
- 각 테스트 실행 전에 한 번씩 실행
-
@AfterEach:
- 각 테스트 실행 후에 한 번씩 실행
-
@BeforeAll:
- 클래스에 있는 모든 테스트 전에 한 번 실행. static 함수로 생성.
-
@AfterAll:
- 클래스에 있는 모든 테스트 후에 한 번 실행. static 함수로 생성.
-
@ExtendWith:
- 확장을 선언적으로 등록하는데 사용됩니다. Extendtion 뒤에 인자로 확장할 Extension을 추가하여 사용합니다.
- spring을 사용할 경우 @ExtendWith(SpringExtension.class)와 같이 사용합니다.
-
@Disabled:
- 테스트클래스 또는 테스트 메소드를 비활성화 하는데 사용됩니다.
-
@ParameterizedTest:
- 매개변수가 있는 테스트 메서드임을 명시함.
	@ParameterizedTest
  	@ValueSource(Strings={"gildong})
  	void test(String name){
  		//...
}- @RepeatedTest:
- 반복되는 테스트임을 명시함.
    @RepeatedTest(3)
  	void test(){
  		//...
}- @TestFactory:
- 동적 테스트임을 명시함. 런타임에 생성되는 동적테스트. 그 자체가 테스트라기보다는 테스트 케이스를 위한 팩토리.
      @TestFactory
  Collection<DynamicTest> dynamicTestsFromCollection() {
        return Arrays.asList(dynamicTest("1st dynamic test", () -> assertEquals(6, 3 * 2)),
                           dynamicTest("2nd dynamic test", () -> assertEquals(4, 2 * 2)));
}-
@TestMethodOrder:
- 테스트 메소드 실행순서를 구성하는데 사용됩니다.
-
@DisplayName:
- 테스트 클래스 또는 테스트 메소드에 대한 사용자 지정 표시 이름을 정해줄때 사용됩니다.
-
@DisplayNameGeneration :
-
테스트 클래스에 사용자 지정 표기 이름을 명시.
-
예시:
-
import org.junit.jupiter.api.*;

public class HelloJavaTest {
   @BeforeAll
    static void beforeAll(){
       System.out.println("beforeAll");
   }

    @AfterAll
    static void afterAll(){
        System.out.println("afterAll");
    }

    @BeforeEach
    void beforeEach() {
        System.out.println("beforeEach");
    }

    @AfterEach
    void afterEach() {
        System.out.println("afterEach");
    }

    @Test
    void test1() {
        System.out.println("test1");
    }

    @Test
    void test2() {
        System.out.println("test2");
    }

    @Test
    void test3() {
        System.out.println("test3");
    }
}
JUnit4 vs JUnit5
JUnit 4와JUnit5는 일부 어노테이션에서도 차이가 있다.
이전에 junit4 기반으로 작성된 파일들은 위에서 설명했던 것과 같이 junit4-vingtage-engine이 있다면 자동으로 Junit Platform 런처에서 Junit3,4기반 테스트 코드를 선택한다. 이미 만들어진 junit 4 파일을 5버전으로 수정할 필요는 없다.
- Assertion 의 위치가 Junit5에서는 org.junit.jupiter.api.Assertions으로 변경되었습니다. AssertJ, Hamcrest, Trust에서 제공하는 org.junit.Assert는 그대로 사용할 수 있습니다.
- @Before과 @After 어노테이션이 사라지고, 각각 @BeforeEach와 @AfterEach로 변경되었습니다.
- @BeforeClass와 @AfterClass 어노테이션이 사라지고, @BeforeAll과 @AfterAll로 변경되었습니다.
- @Ignore이 사라지고, @Disabled로 변경되었습니다. 단, 이 경우 @EnableJUnit4MigrationSupport 어노테이션을 붙여줍니다.
- @Category가 사라지고, @Tag로 변경되었습니다.
- @RunWith이 사라지고 @ExtendWith으로 변경되었습니다.
- @Rule과 @ClassRule이 사라지고, @ExtendWith과 @RegisterExtention으로 대체되었습니다.
검증
- assertEquals(expect, actual) : 같은지 검증
- assertTrue(actual) : true인지 검증
- assertFalse(actual) : false인지 검증
- assertNull(actual) : null인지 검증
- assertNotNull(actual) : null이 아닌지 검증
- assertArrayEquals(expect, actual) : 배열 같은지 검증
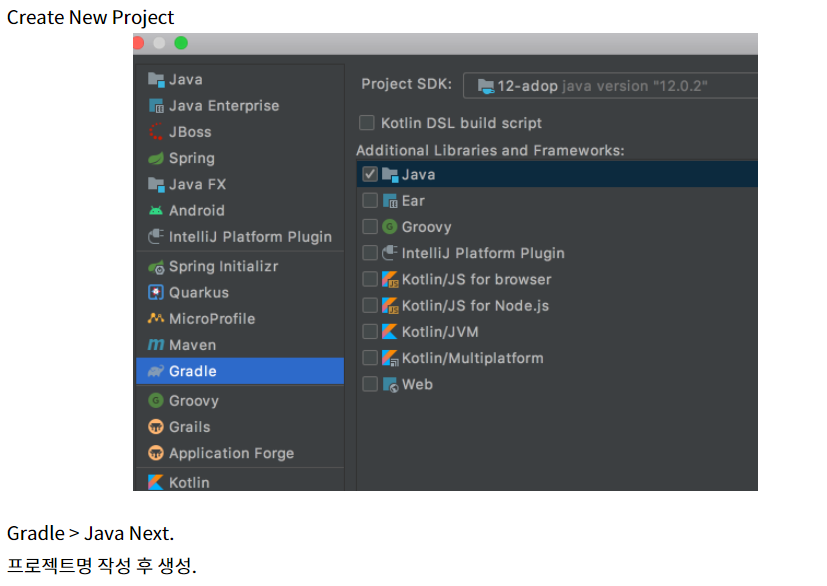
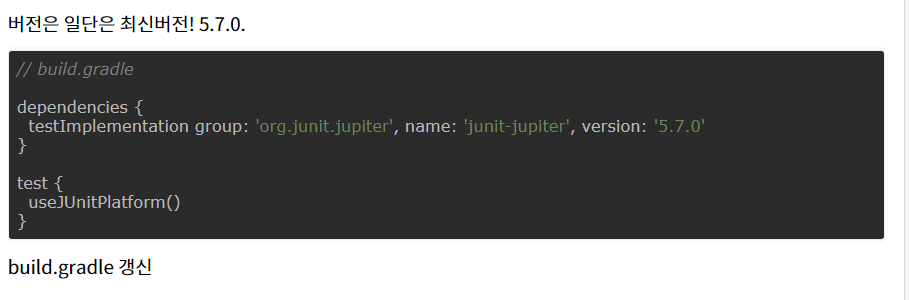
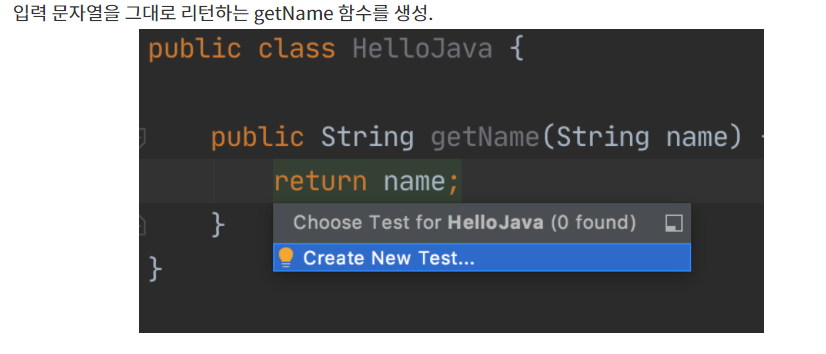
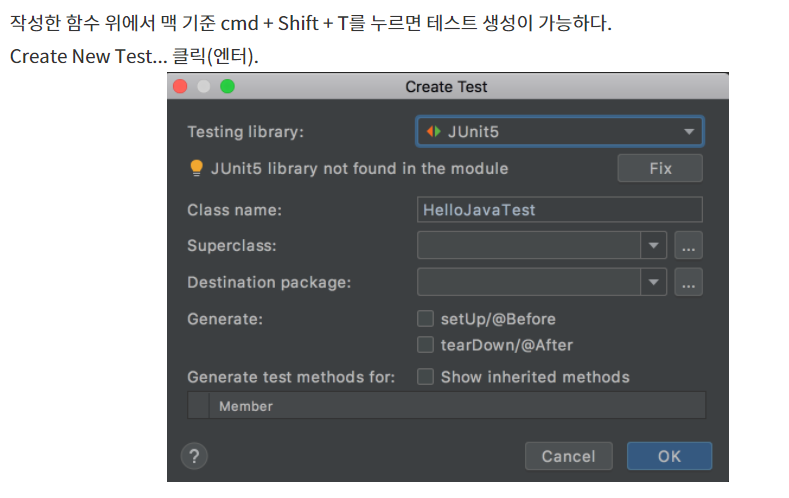
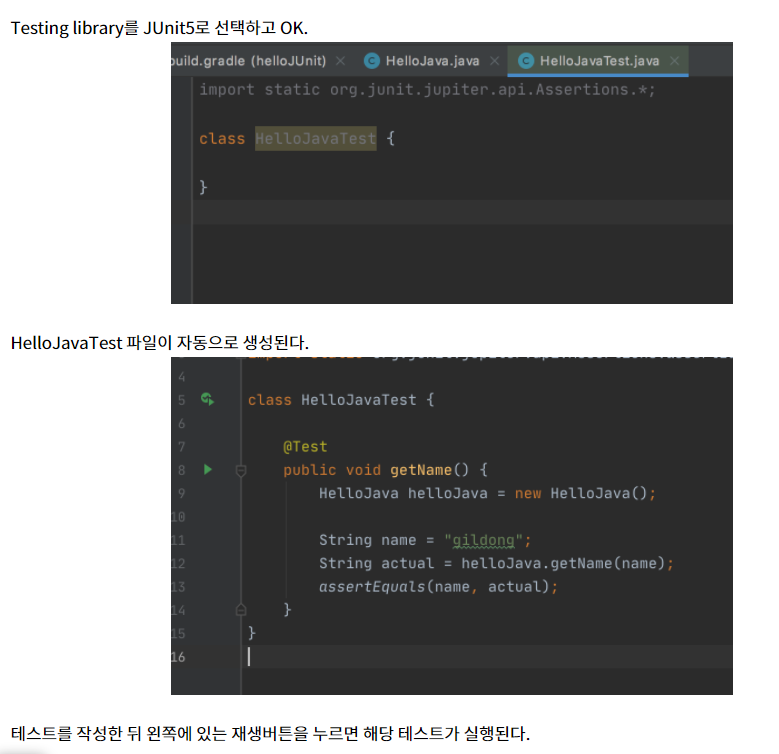
인텔리제이 Junit5 테스트환경 설정
1. live-study 대시보드를 만드는 코드를 작성하세요.
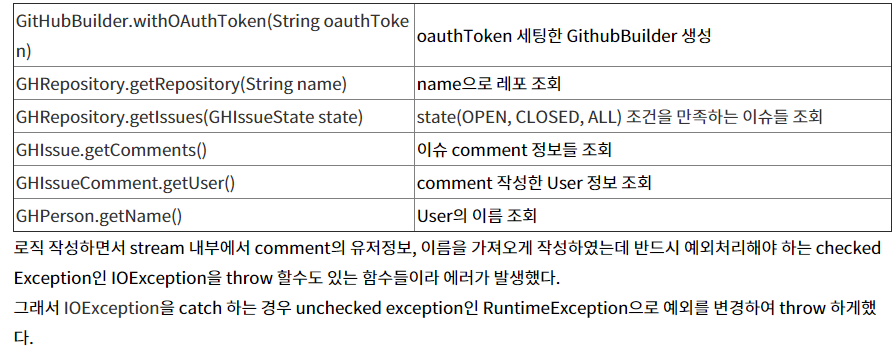
- 깃헙 이슈 1번부터 18번까지 댓글을 순회하며 댓글을 남긴 사용자를 체크 할 것.
- 참여율을 계산하세요. 총 18회에 중에 몇 %를 참여했는지 소숫점 두자리가지 보여줄 것.
- Github 자바 라이브러리(링크텍스트)를 사용하면 편리합니다.
- 깃헙 API를 익명으로 호출하는데 제한이 있기 때문에 본인의 깃헙 프로젝트에 이슈를 만들고 테스트를 하시면 더 자주 테스트할 수 있습니다.
-
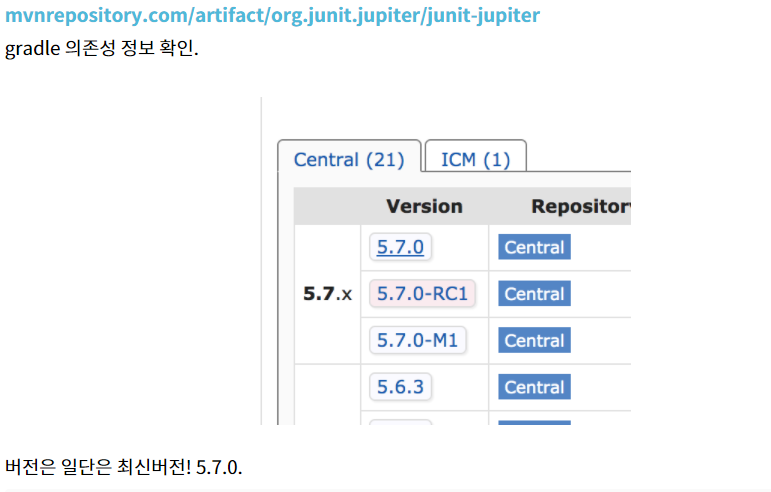
의존성추가:
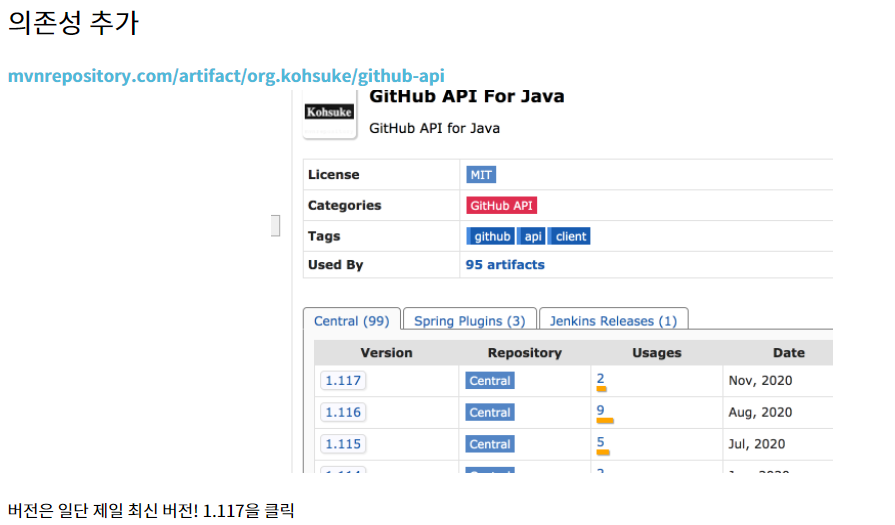
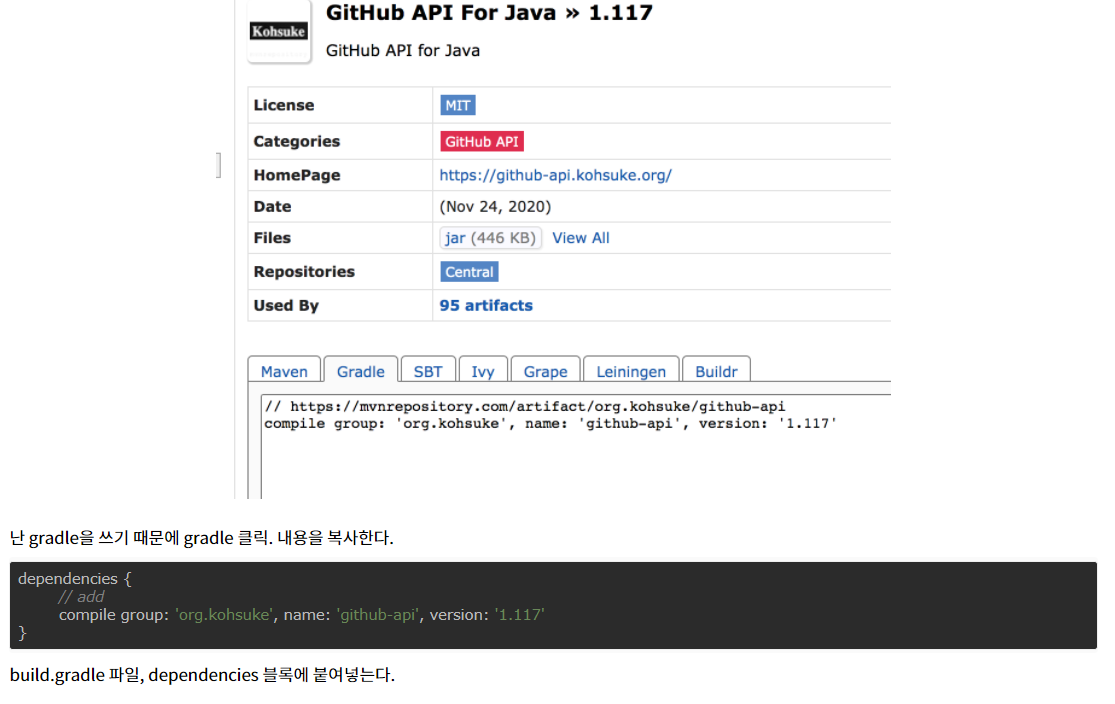
출처:링크텍스트 -
통신 확인
연결코드:
import org.kohsuke.github.GitHub;
import org.kohsuke.github.GitHubBuilder;
import java.io.IOException;

public class Application {
    public void connectGithub(String token) throws IOException{
        GitHub github = new GitHubBuilder().withOAuthToken(token).build();
        github.checkApiUrlValidity();

    }

}
테스트 코드 :
import org.junit.jupiter.api.Test;
import static org.junit.jupiter.api.Assertions.*;
class ApplicationTest {
Application githubApi = new Application();
@Test
void test(){
String token = "<Personal Access Token>";
try{
githubApi.connectGithub(token);
}catch (Exception e) {
fail();
}
}
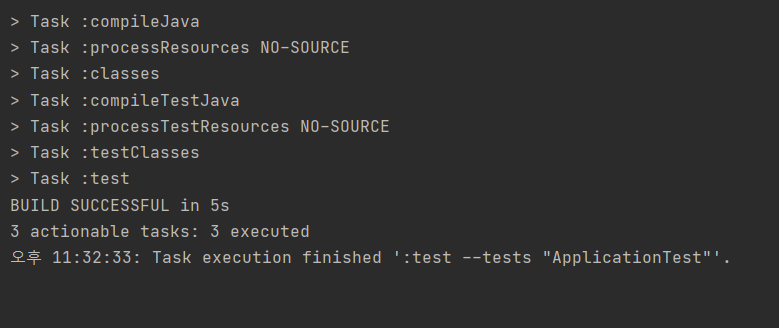
}테스트코드를 실행해보면 실패라고 나온다. token에 깃허브에서 직접 생성한 토큰을 넣자.
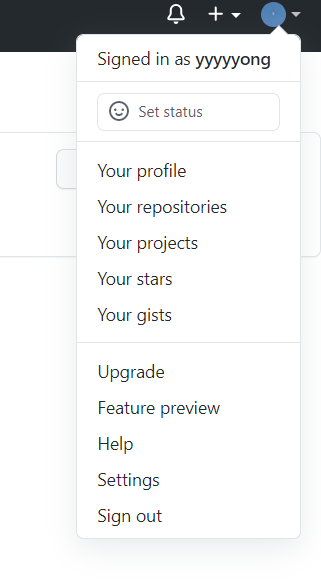
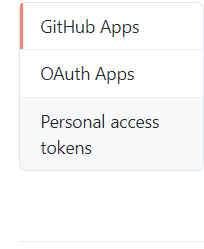
좌측하단에 developer settings를 클릭하자.
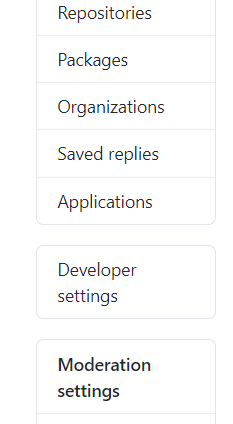
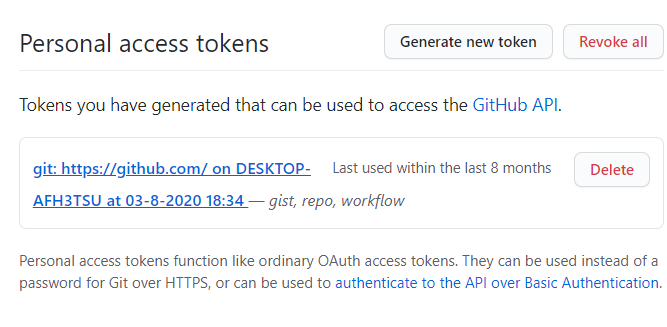
Personal access tokens 클릭.
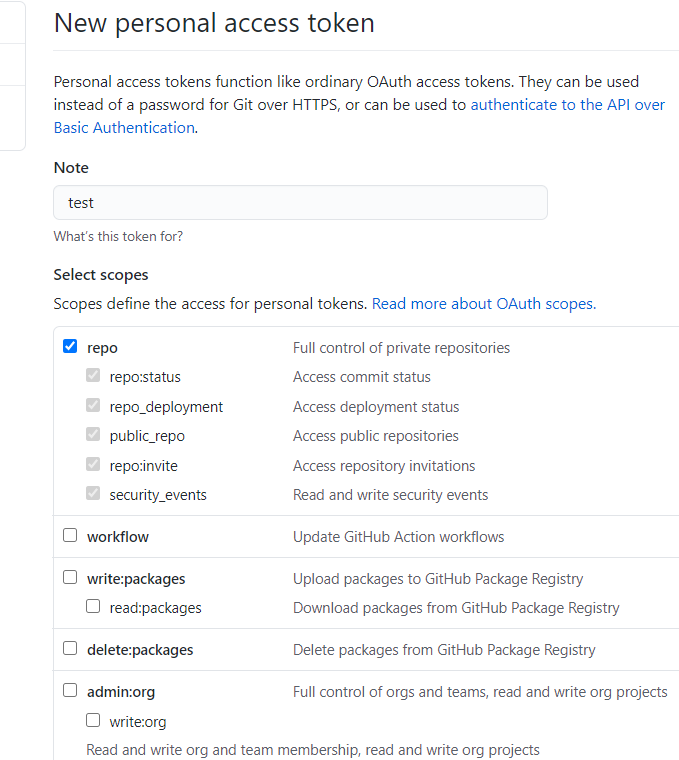
Persional access token > Generate new token.
repo에 대한 권한만 있으면 될것같으니 repo만 체크하고 생성
생성한 토큰을 복사하여 token 변수에 세팅한 뒤 테스트 통과
package javaStudy;
import org.apache.commons.lang3.tuple.Pair;
import org.kohsuke.github.*;
import java.io.IOException;
import java.util.ArrayList;
import java.util.HashMap;
import java.util.List;
import java.util.Map;
import java.util.stream.Collectors;

import static java.util.stream.Collectors.toList;

public class GithubApi {

    public List<Pair<String,Double>> getParticipationRates(String token,String repoName) throws  IOException{
        GitHub gitHub = new GitHubBuilder().withOAuthToken(token).build(); // 1
        gitHub.checkApiUrlValidity();

        GHRepository repo = gitHub.getRepository(repoName);  // 2
        List<GHIssue> issues = repo.getIssues(GHIssueState.ALL); // 3

        // key==name, value=cnt
        Map<String,Integer> memberCnts = new HashMap<>();
        for(GHIssue issue : issues){
           // get participants name
           List<String> participantsNames = issue.getComments().stream().map(comment ->{
               try{
                   return comment.getUser().getName();
               }catch (IOException e){
                   throw new RuntimeException(e);
               }
           }).distinct().collect(toList());

           participantsNames.forEach(name -> memberCnts.merge(name,1,Integer::sum));
        }

        int issueCnt = issues.size();
        List<Pair<String,Double>> participationRate = new ArrayList<>();
        for(String key: memberCnts.keySet()){
            participationRate.add(Pair.of(key,(double)memberCnts.get(key)/ issueCnt * 100));
        }
        return participationRate;
    }
}
사용한함수:
참고: 링크텍스트
테스트클래스:
package javaStudy;
import org.apache.commons.lang3.tuple.Pair;
import org.junit.jupiter.api.Test;
import java.lang.reflect.Array;
import java.util.ArrayList;
import java.util.List;
import static org.junit.jupiter.api.Assertions.*;
class GithubApiTest {
GithubApi githubApi = new GithubApi();
@Test
void githubConnetTest() {
String token = "<Personal token>";
String repoName = "whiteship/live-study";
List<Pair<String, Double>> rates = new ArrayList<>();
try {
rates = githubApi.getParticipationRates(token, repoName);
} catch (Exception e) {
fail();
}
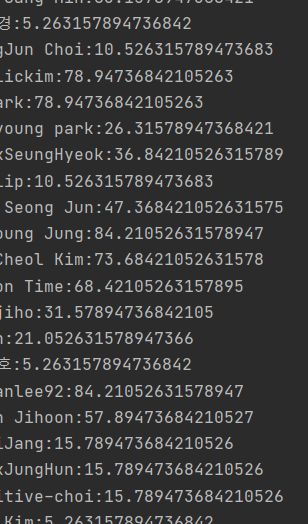
rates.forEach(rate -> System.out.println(rate.getLeft()+ ":" + rate.getRight()));
}
}
결과창:
2. Linkedlist를 구현하세요.
- LinkedList에 대해 공부하세요.
- 정수를 저장하는 ListNode 클래스를 구현하세요.
- ListNode add(ListNode head, ListNode nodeToAdd, int position)를 구현하세요.
- ListNode remove(ListNode head, int positionToRemove)를 구현하세요.
- boolean contains(ListNode head, ListNode nodeTocheck)를 구현하세요.
package me.whiteship.livestudy.Review4;

public class LinkedList {
    private ListNode head;
    private ListNode tail;
    private int size = 0;

    public class ListNode{
        private int data;
        private ListNode nextNode;

        public ListNode(int data) {
            this.data = data;
            nextNode = null;
        }

        @Override
        public String toString() {
            return String.valueOf(this.data);
        }
    }


    public void addFirst(int data){
        ListNode newNode = new ListNode(data);
        newNode.nextNode = head;
        head = newNode;
        size++;

        if(newNode.nextNode==null){
            tail = head;
        }
    }

    public void addLast(int data){
        ListNode newNode = new ListNode(data);
        if(size == 0 ){
            addFirst(data);
        }else{
            tail.nextNode=newNode;
            tail = newNode;
            size ++;
        }
    }

    public ListNode listNode(int index){
        ListNode x = head;
        for (int i = 0; i < index; i++) {
             x = x.nextNode;
        }
        return x;
    }

    public void add(int index,int data){
        if(index==0){
            addFirst(data);
        } else{
            ListNode tmp1 = listNode(index-1);
            ListNode tmp2 = tmp1.nextNode;

            ListNode newNode = new ListNode(data);

            tmp1.nextNode = newNode;
            newNode.nextNode= tmp2;
            size++;

            if(newNode.nextNode==null){
                tail = newNode;
            }
        }
    }

    public String toString(){
        if(head==null)
            return " ";
        ListNode tmp = head;
        String str ="";

        while(tmp.nextNode!=null){
            str += tmp.toString() + ",";
            tmp = tmp.nextNode;
        }

        str += tmp.toString();

        return str+" ";
    }

    public int removeFirst(){
        ListNode tmp = head;
        head = tmp.nextNode;

        int deleteData = tmp.data;
        tmp = null;
        size--;
        return deleteData;
    }

    public int remove(int index){
        if(index == 0) {
            return removeFirst();
        }

        ListNode tmp = listNode(index-1);

        ListNode toDoDelete = tmp.nextNode;
        tmp.nextNode = toDoDelete.nextNode;

        int deleteData = toDoDelete.data;

        if(toDoDelete == tail){
            tail = tmp;
        }
        toDoDelete = null;
        size--;
        return deleteData;
    }

    public int contain(int data){
        int index = -1;
        ListNode tmp = head;
        for (int i = 0; i < size; i++) {
             if(tmp.data==data){
                 return i;
             }
             tmp = tmp.nextNode;
        }
        return index;
    }

    public static void main(String[] args) {
        LinkedList numbers = new LinkedList();

        numbers.addFirst(1);
        numbers.addLast(3);
        numbers.add(1,2);
        numbers.addLast(4);

        System.out.println("삽입완료");
        System.out.println(numbers.toString());
        System.out.println();

        System.out.println("첫번째원소삭제");
        numbers.removeFirst();
        System.out.println(numbers.toString());
        System.out.println();

        System.out.println("1번 인덱스 원소삭제");
        numbers.remove(1);
        System.out.println(numbers.toString());
        System.out.println();

        System.out.println("0번 인덱스 원소삭제");
        numbers.remove(0);
        System.out.println(numbers.toString());


    }

}
3. Stack을 구현하세요.
- int 배열을 사용해서 정수를 저장하는 Stack을 구현하세요.
- void push(int data)를 구현하세요.
- int pop()를 구현하세요.
package me.whiteship.livestudy.Review4;

public interface stack {
    public void printStack();
    public boolean isFull();
    public boolean isEmpty();
    public void pop();
    public void push(int data);

}
package me.whiteship.livestudy.Review4;
public class ArrayStack implements stack {
private int size;
private int topIndex;
private int[] arr;
public ArrayStack(int size) {
this.size = size;
topIndex = -1;
arr = new int[size];
}
@Override
public void printStack() {
int index = topIndex;
while(index!=-1){
System.out.print(arr[index] + " ");
index--;
}
System.out.println();
}
@Override
public boolean isFull() {
if(topIndex == size-1){
return true;
}else{
return false;
}
}
@Override
public boolean isEmpty() {
if(topIndex==-1){
return true;
}
else{
return false;
}
}
@Override
public void pop() {
if(isEmpty()){
System.out.println("Stack Empty");
return;
}
arr[topIndex]=0;
topIndex--;
}
@Override
public void push(int data) {
if(isFull()){
System.out.println("Stack full");
return;
}
arr[++topIndex] = data;
}
public static void main(String[] args) {
ArrayStack array = new ArrayStack(10);
System.out.println("1번째");
System.out.println(array.isEmpty());
System.out.println(array.isFull());
System.out.println();
System.out.println("2번째");
array.push(1);
array.push(2);
array.push(3);
array.printStack();
System.out.println("3번째");
array.push(1);
array.push(2);
array.push(3);
array.pop();
array.printStack();
}
}4. 앞서 만든 ListNode를 사용해서 Stack을 구현하세요.
- ListNode head를 가지고 있는 ListNodeStack 클래스를 구현하세요.
- void push(int data)를 구현하세요.
- int pop()을 구현하세요.
package me.whiteship.livestudy.Review4;

public class LinkedListStack extends LinkedList implements stack {


    public LinkedListStack() {

    }

    @Override
    public void printStack() {
        System.out.println(this.toString());
    }

    @Override
    public boolean isFull() {
        return false;
    }

    @Override
    public boolean isEmpty() {
        return false;
    }

    @Override
    public void pop() {
        this.removeFirst();
    }

    @Override
    public void push(int data) {
        this.addFirst(data);
    }

    public static void main(String[] args) {
        LinkedListStack linkedListStack = new LinkedListStack();
        linkedListStack.push(1);
        linkedListStack.push(2);
        linkedListStack.push(3);
        linkedListStack.printStack();

        linkedListStack.pop();
        linkedListStack.pop();
        linkedListStack.printStack();

        System.out.println(linkedListStack.tail.toString());


    }
}
5. Queue를 구현하세요.
- 배열을 사용해서 한번
package me.whiteship.livestudy.Review4;

public interface queue {
    boolean isEmpty();
    boolean isFull();
    void push(int data);
    Object offer();
    Object remove();
    String toString();
}
package me.whiteship.livestudy.Review4;
public class ArrayQueue implements queue{
private int front;
private int rear;
private int max;
private int[] arr;
public ArrayQueue(int max) {
this.max = max;
this.front=0;
this.rear= 0;
arr = new int[this.max];
}
@Override
public boolean isEmpty() {
return (front>rear);
}
@Override
public boolean isFull() {
return (rear==(max-1));
}
@Override
public void offer(int data) {
if(isFull()) throw new ArrayIndexOutOfBoundsException();
arr[rear++] = data;
}
@Override
public Object peek() {
if(isEmpty()) throw new ArrayIndexOutOfBoundsException();
return arr[front];
}
@Override
public Object remove() {
Object item = peek();
front++;
return item;
}
public String toString(){
String str="";
int first = front;
int last = rear;
while(first<last){
str += arr[first] + " ";
++first;
}
return str;
}
public static void main(String[] args) {
ArrayQueue queue = new ArrayQueue(10);
queue.offer(1);
queue.offer(2);
queue.offer(3);
queue.offer(4);
String r = queue.toString();
System.out.println(r);
queue.remove();
queue.remove();
r = queue.toString();
System.out.println(r);
queue.remove();
r = queue.toString();
System.out.println(r);
}
}- ListNode를 사용해서 한번.
package me.whiteship.livestudy.Review4;

public class LinkedListQueue extends LinkedList implements queue {


    @Override
    public boolean isEmpty() {
        return false;
    }

    @Override
    public boolean isFull() {
        return false;
    }

    @Override
    public void offer(int data) {
        this.addLast(data);
    }

    @Override
    public Object peek() {
        return this.head.toString();
    }

    @Override
    public Object remove() {
        int deleteValue = removeFirst();
        return deleteValue;
    }

    public static void main(String[] args) {
        LinkedListQueue linkedListQueue = new LinkedListQueue();

        linkedListQueue.offer(1);
        linkedListQueue.offer(3);
        linkedListQueue.offer(5);
        linkedListQueue.offer(2);
        linkedListQueue.offer(4);
        System.out.println(linkedListQueue.toString());

        linkedListQueue.remove();
        linkedListQueue.remove();
        linkedListQueue.remove();
        System.out.println(linkedListQueue.toString());

        System.out.println(linkedListQueue.peek());
    }
}
큐 샘플:
package week4;

import java.util.LinkedList;
import java.util.Queue;

public class QueueSample {

    public static void main(String[] args) {

        Queue<Integer> queue = new LinkedList<>();

        queue.offer(1); // Queue의 사이즈가 찼을때, null값 리턴
        queue.add(1); // Queue의 사이즈가 찼을때, exception 리턴

        queue.peek();// Queue의 사이즈가 비어있을때 , null값 리턴
        queue.remove(); // Queue의 사이즈가 비어있을때 , exception 리턴
    }
}
