김영한 강사님의 스프링 MVC 2편 - 백엔드 웹 개발 활용 기술을 듣고 정리한 내용입니다. 자세한 내용은 강의를 참고해주세요
이전 프로젝트에서 열심히 html파일을 이용해 추가,수정,상품상세,상품목록 등등 간단한 웹 어플리케이션을 만들었다...
그런데 기획자님이
상품명이라는 단어를 모두상품이름으로 고쳐달라고 하면...?
- 모든 html 페이지를 다 수정해야되나...
- 물론 그렇게 할 수도 있지만, 화면 숫자가 수십 개 이상이라면 모두 하나씩 고치기 힘들 것이다
- 지금까지 spring을 공부하면서 느낀건 유지 보수를 위해 엄청난 노력을 해야된다는 것...!
메시지 기능을 이용해서 다양한 메시지들을 한 곳에서 관리한다!- 아까같은 기획자의 수정사항을, 모든 html 페이지에가서 고치는 것이 아니라 관리용파일을 수정해 모든 html페이지를 한번해 수정하는게 포인트다!
그렇다면 국제화는 뭘까?
- 말 그대로 우리나라의 언어로도 보이고, 내가 외국에서 들어오면 외국 언어로 페이지가 보이는 것이다!
- 이 부분도 메시지 기능의 확장이다
- 하나하나 알아보자
메시지
- 우리가 메시지 관리 기능을 사용하려면 스프링이 제공하는
MessageSource를 스프링 빈으로 등록하여야 한다 - MessageSource는 인터페이스이다
- 구현체 ResourceBundleMessageSource를 스프링 빈으로 등록해야 한다
@Bean
public MessageSource messageSource() {
	ResourceBundleMessageSource messageSource = newResourceBundleMessageSource();
	messageSource.setBasenames("messages", "errors");
	messageSource.setDefaultEncoding("utf-8");
	return messageSource;
}beanNames:설정 파일의 이름을 지정한다- messages 로 지정하면
messages.properties파일을 읽어서 사용한다. - 추가로 국제화 기능을 적용하려면
messages_en.properties,messages_ko.properties와 같
이 파일명 마지막에 언어 정보를 주면된다. 만약 찾을 수 있는 국제화 파일이 없으면messages.properties(언어정보가 없는 파일명)를 기본으로 사용한다.
- messages 로 지정하면
- 파일의 위치는 /resources/messages.properties 에 두면 된다.
여러 파일을 한번에 지정할 수 있다. 여기서는 messages , errors 둘을 지정했다. defaultEncoding: 인코딩 정보를 지정한다. utf-8 을 사용하면 된다
중요
그렇지만 스프링 부트에서는
MessgeSource를 자동으로 스프링 빈으로 등록해준다!!!
1. 스프링 부트를 실행하면 MessageSource를 스프링 빈으로 등록해준다
2. application.properties에spring.messages.basename=messages가 default로 지정되어있다
3. 스프링 부트가 의존성 주입을 통해, defalut로 지정된 message에 스프링 빈을의존성 주입해준다!
4. 그러면 의존성 주입이 되었으므로, 메시지 기능을 이용하면
/resources/아래 경로의properties파일들에 메시지 기능이 적용이된다!!!!
국제화
이렇게 /resources/아래에 저장된 메시지 기능에서 국제화까지 같이 일어난다!
뭔말이냐면... 저 경로에
messages.properties:기본 값으로 사용(한글)messages_en.properties: 영어 국제화 사용- 이렇게 파일들을 만들어 놓는다
- 그러면 우리가 요청 htttp 메시지를 보낼때! ->
Locale의 우선순위에 따라서 어떤 언어 메시지 파일을 이용할지 정하게 된다 ms.getMessage("hello", null, Locale.KOREA)이렇게 보내오면...message_ko를 찾는다- 없다? -> 그러면 default값
message.properties파일의 메시지를 사용한다! ms.getMessage("hello", null, Locale.ENGLISH)이렇게 오면 Locale의 정보가 Locale.English이므로messages_en을 찾아서 사용한다!
기존 파일에 적용
messages.properties 파일에 요렇게 적용해보자!
label.item=상품
label.item.id=상품 ID
label.item.itemName=상품명
label.item.price=가격
label.item.quantity=수량
page.items=상품 목록
page.item=상품 상세
page.addItem=상품 등록
page.updateItem=상품 수정
button.save=저장
button.cancel=취소- 타임리프에 메시지 기능을 사용하려면 :
"#{}"안에 변수 넣어줬었던 것처럼 넣어주면 된다 - 렌더링 전
<div th:text="#{label.item}"></h2>- 렌더링 후
<div>상품</h2>- 요렇게 된다
우리가 properties에 등록한것 처럼!!!
<h2 th:text="#{page.addItem}">상품 등록</h2>- 요렇게 넣어주면, 그페이지가 view에서 렌더링할때, 스프링 빈에서 등록된 MessageSources를 찾고, 기본값인 properties에서 값을 얻어서 thymeleaf가 적용시켜 화면을 렌더링해준다!!!
- 이렇게 addForm.html을 적용시켜 보자!!!
<!DOCTYPE HTML>
<html xmlns:th="http://www.thymeleaf.org">
<head>
    <meta charset="utf-8">
    <link th:href="@{/css/bootstrap.min.css}"
          href="../css/bootstrap.min.css" rel="stylesheet">
    <style>
        .container {
            max-width: 560px;
        }
    </style>
</head>
<body>

<div class="container">

    <div class="py-5 text-center">
        <h2 th:text="#{page.addItem}">상품 등록 폼</h2>
    </div>

    <form action="item.html" th:action th:object="${item}" method="post">
        <div>
            <label for="itemName" th:text="#{label.item.itemName}">상품명</label>
            <input type="text" id="itemName" th:field="*{itemName}" class="form-control" placeholder="이름을 입력하세요">
        </div>
        <div>
            <label for="price" th:text="#{label.item.price}">가격</label>
            <input type="text" id="price" th:field="*{price}" class="form-control" placeholder="가격을 입력하세요">
        </div>
        <div>
            <label for="quantity" th:text="#{label.item.quantity}">수량</label>
            <input type="text" id="quantity" th:field="*{quantity}" class="form-control" placeholder="수량을 입력하세요">
        </div>

        <hr class="my-4">

        <div class="row">
            <div class="col">
                <button class="w-100 btn btn-primary btn-lg" type="submit" th:text="#{button.save}">저장</button>
            </div>
            <div class="col">
                <button class="w-100 btn btn-secondary btn-lg"
                        onclick="location.href='items.html'"
                        th:onclick="|location.href='@{/message/items}'|"
                        type="button" th:text="#{button.cancel}">취소</button>
            </div>
        </div>

    </form>

</div> <!-- /container -->
</body>
</html>- 이렇게 메시지 적용부분을 thymeleaf의 메시지 문법
#{}으로 다 바꿔준다 - 이제 메시지 전체부분을 수정할 일이있다면???
/resources/부분의message.properties만 수정해준다면???- 전체 html의 thymeleaf의 메시지문법이 한번에 수정된다!!!
- 엄청난 유지보수의 장점이 있다!!!
이제 이렇게 문법 수정한 것을 addForm, editForm, item, items 의 html파일을 모두 수정해준다!!!
국제화는?
message_en.properties
label.item=Item
label.item.id=Item ID
label.item.itemName=Item Name
label.item.price=price
label.item.quantity=quantity
page.items=Item List
page.item=Item Detail
page.addItem=Item Add
page.updateItem=Item Update
button.save=Save
button.cancel=Cancel- 이렇게
/resources/경로에 국제화 파일을 만들어준다 - key값이 모두 동일!!
- 즉
#{}값을 통해 메시지를 사용하도록 설정만 바꾸면 됨 - Http메시지 header 부분의
Accept-Language부분만 변경되면 된다!!! - 한글에서-> 영어로
- 크롬 브라우저 설정 언어를 검색하고, 우선 순위를 변경 해주면~~~
- 영어로 페이지가 바뀌어서 국제화가 적용되서 화면이 렌더링 된다
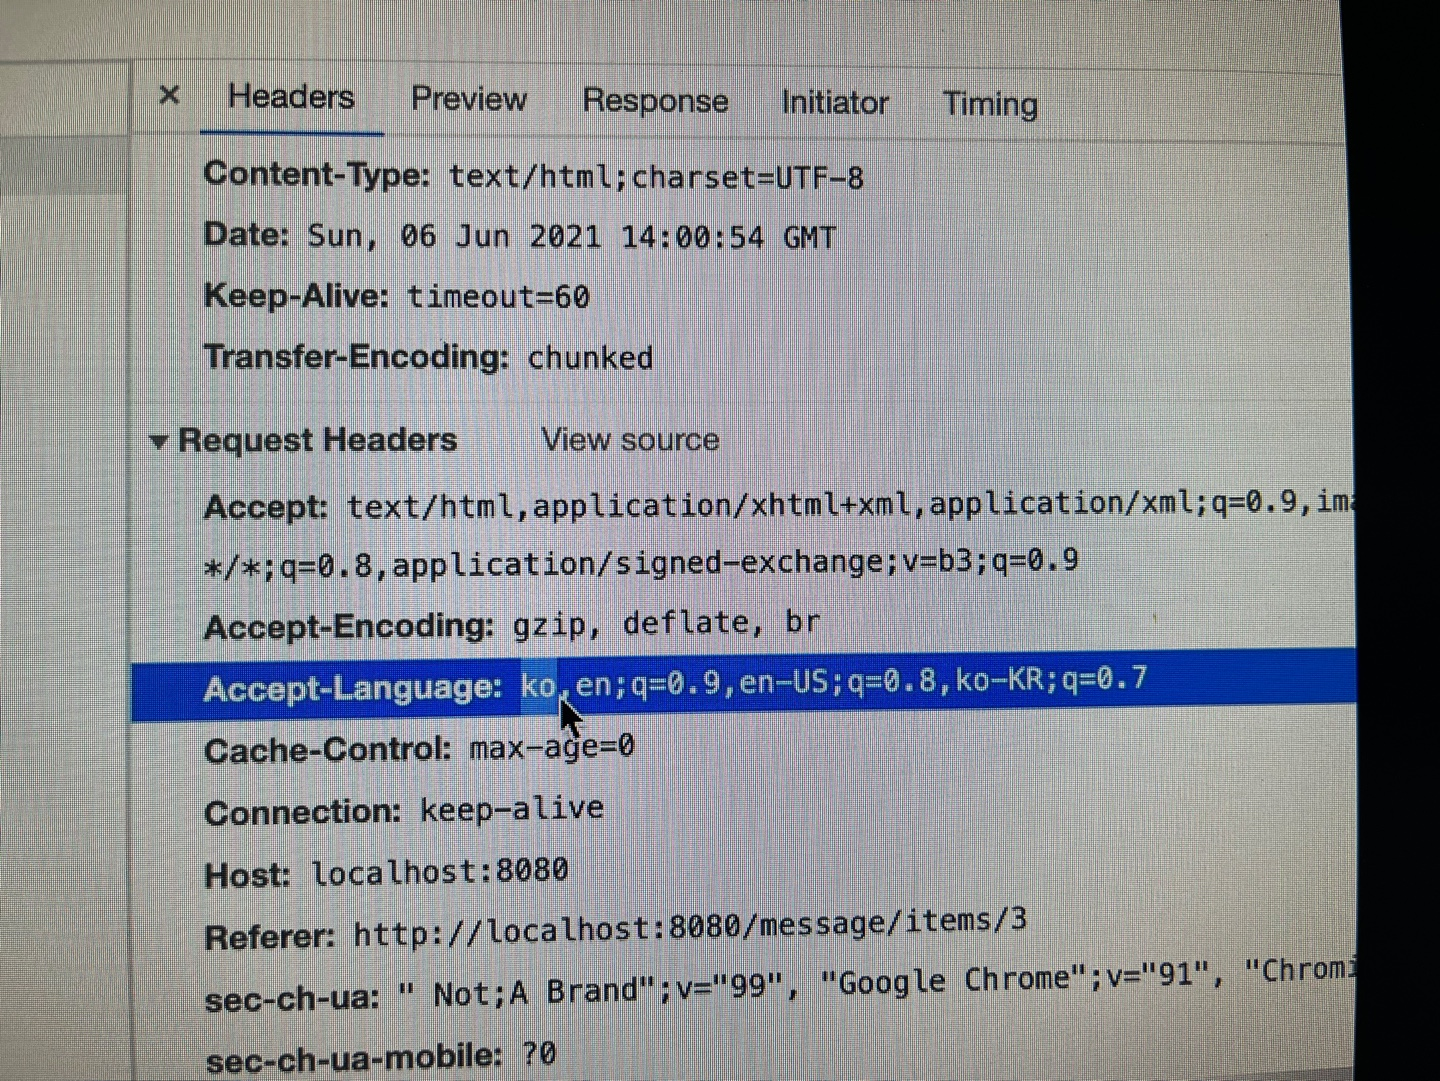
- 이부분이 지금은 설정이 ko로 되어있지만,, 설정을 바꾸면 우선순위가 바뀐다!!!
정리
- 메시지 기능을 사용한다면 html화면들을 유지보수 할 때 확장성을 높일 수 있을거같다.
- 프로젝트때 꼭 진행해보자
- 국제화는 많이 쓸 일이 있을까??
- 지금은 많이 사용하지는 않을 것같지만, 알아두자!!!

개발 공부,정리
자주 올게요~