TableView
https://developer.apple.com/documentation/uikit/uitableview
- 가장 많이 사용되는 형태의 인터페이스
- 리스트 형태의 데이터를 스크롤을 통해 확인이 가능하다
구성
만드는 과정
- tableView 선언하기
- tableView DataSource 채택
- tableView Delegate 채택
- tableView cell 생성 및 cell 등록
1. tableView 선언하기
우선 tableView를 화면에 나타내기 위해서는 View에 tableView를 삽입하여 표시할 수 있도록 해야한다. 또한 화면에 표시하는 것 뿐만 아니라 tableView의 속성(디자인 등)을 변경하기 위해서는 tableView를 변수에 저장할 필요가 있다.
let tableView = UITableView()2. tableView DataSource 채택
tableView를 화면에 표시하기 위해서는 필수적으로 2가지가 필요하다
만약 아래 2가지를 구현하지 않는다면 tableView를 구현할 수 없다
- tableView에서 표시할 행의 수
- tableView에서 나타낼 cell
예시 코드
tableView.dataSource = self// UITableViewDataSource 프로토콜 채택
extension ViewController: UITableViewDataSource {
// tableView에서 표시할 행의 수를 결정하는 함수
func tableView(_ tableView: UITableView, numberOfRowsInSection section: Int) -> Int {
return 1
}
// tableView에서 사용할 cell을 선언하는 함수
func tableView(_ tableView: UITableView, cellForRowAt indexPath: IndexPath) -> UITableViewCell {
// cell 변수에 tableView에서 재사용하게 될 cell을 지정
let cell = tableView.dequeueReusableCell(withIdentifier: "CalendarViewCell", for: indexPath) as! CalendarViewCell
return cell
}
}a. 행의 수
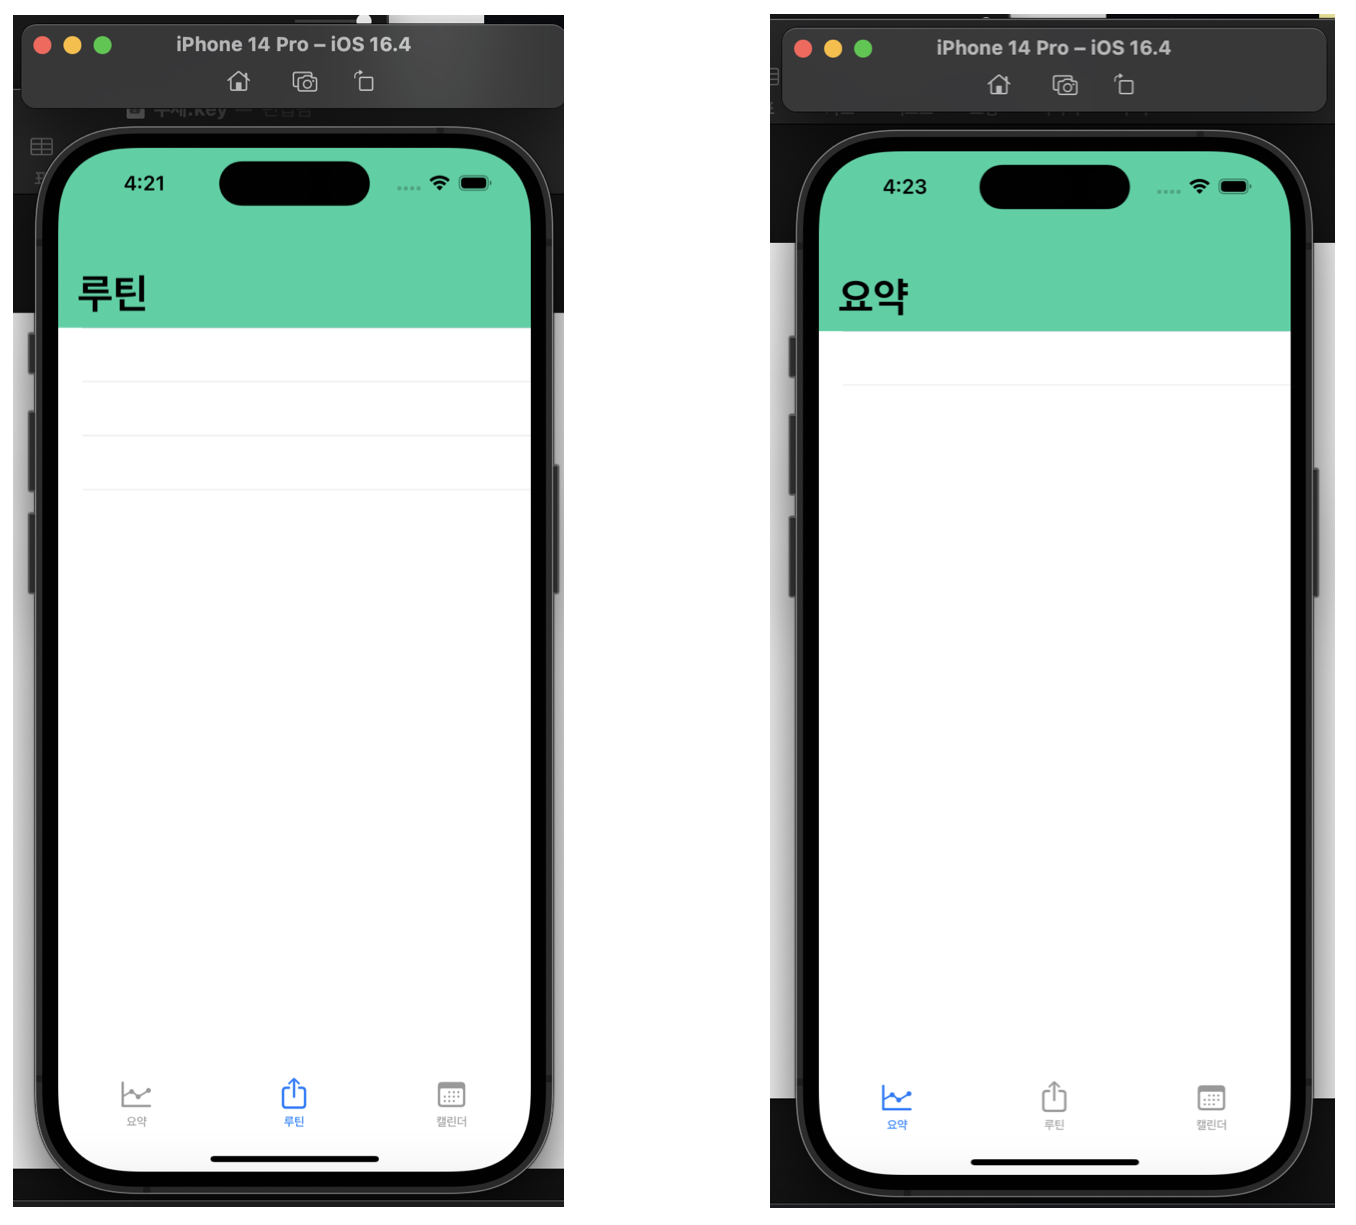
행의 수는 tableView에서 보여줄 데이터의 개수를 의미한다
아래 사진과 같이 요약은 행의 수를 1개로, 루틴은 행의 수를 3개로 설정한 결과다
tableView에서 표시할 행의 수를 결정해야 한다
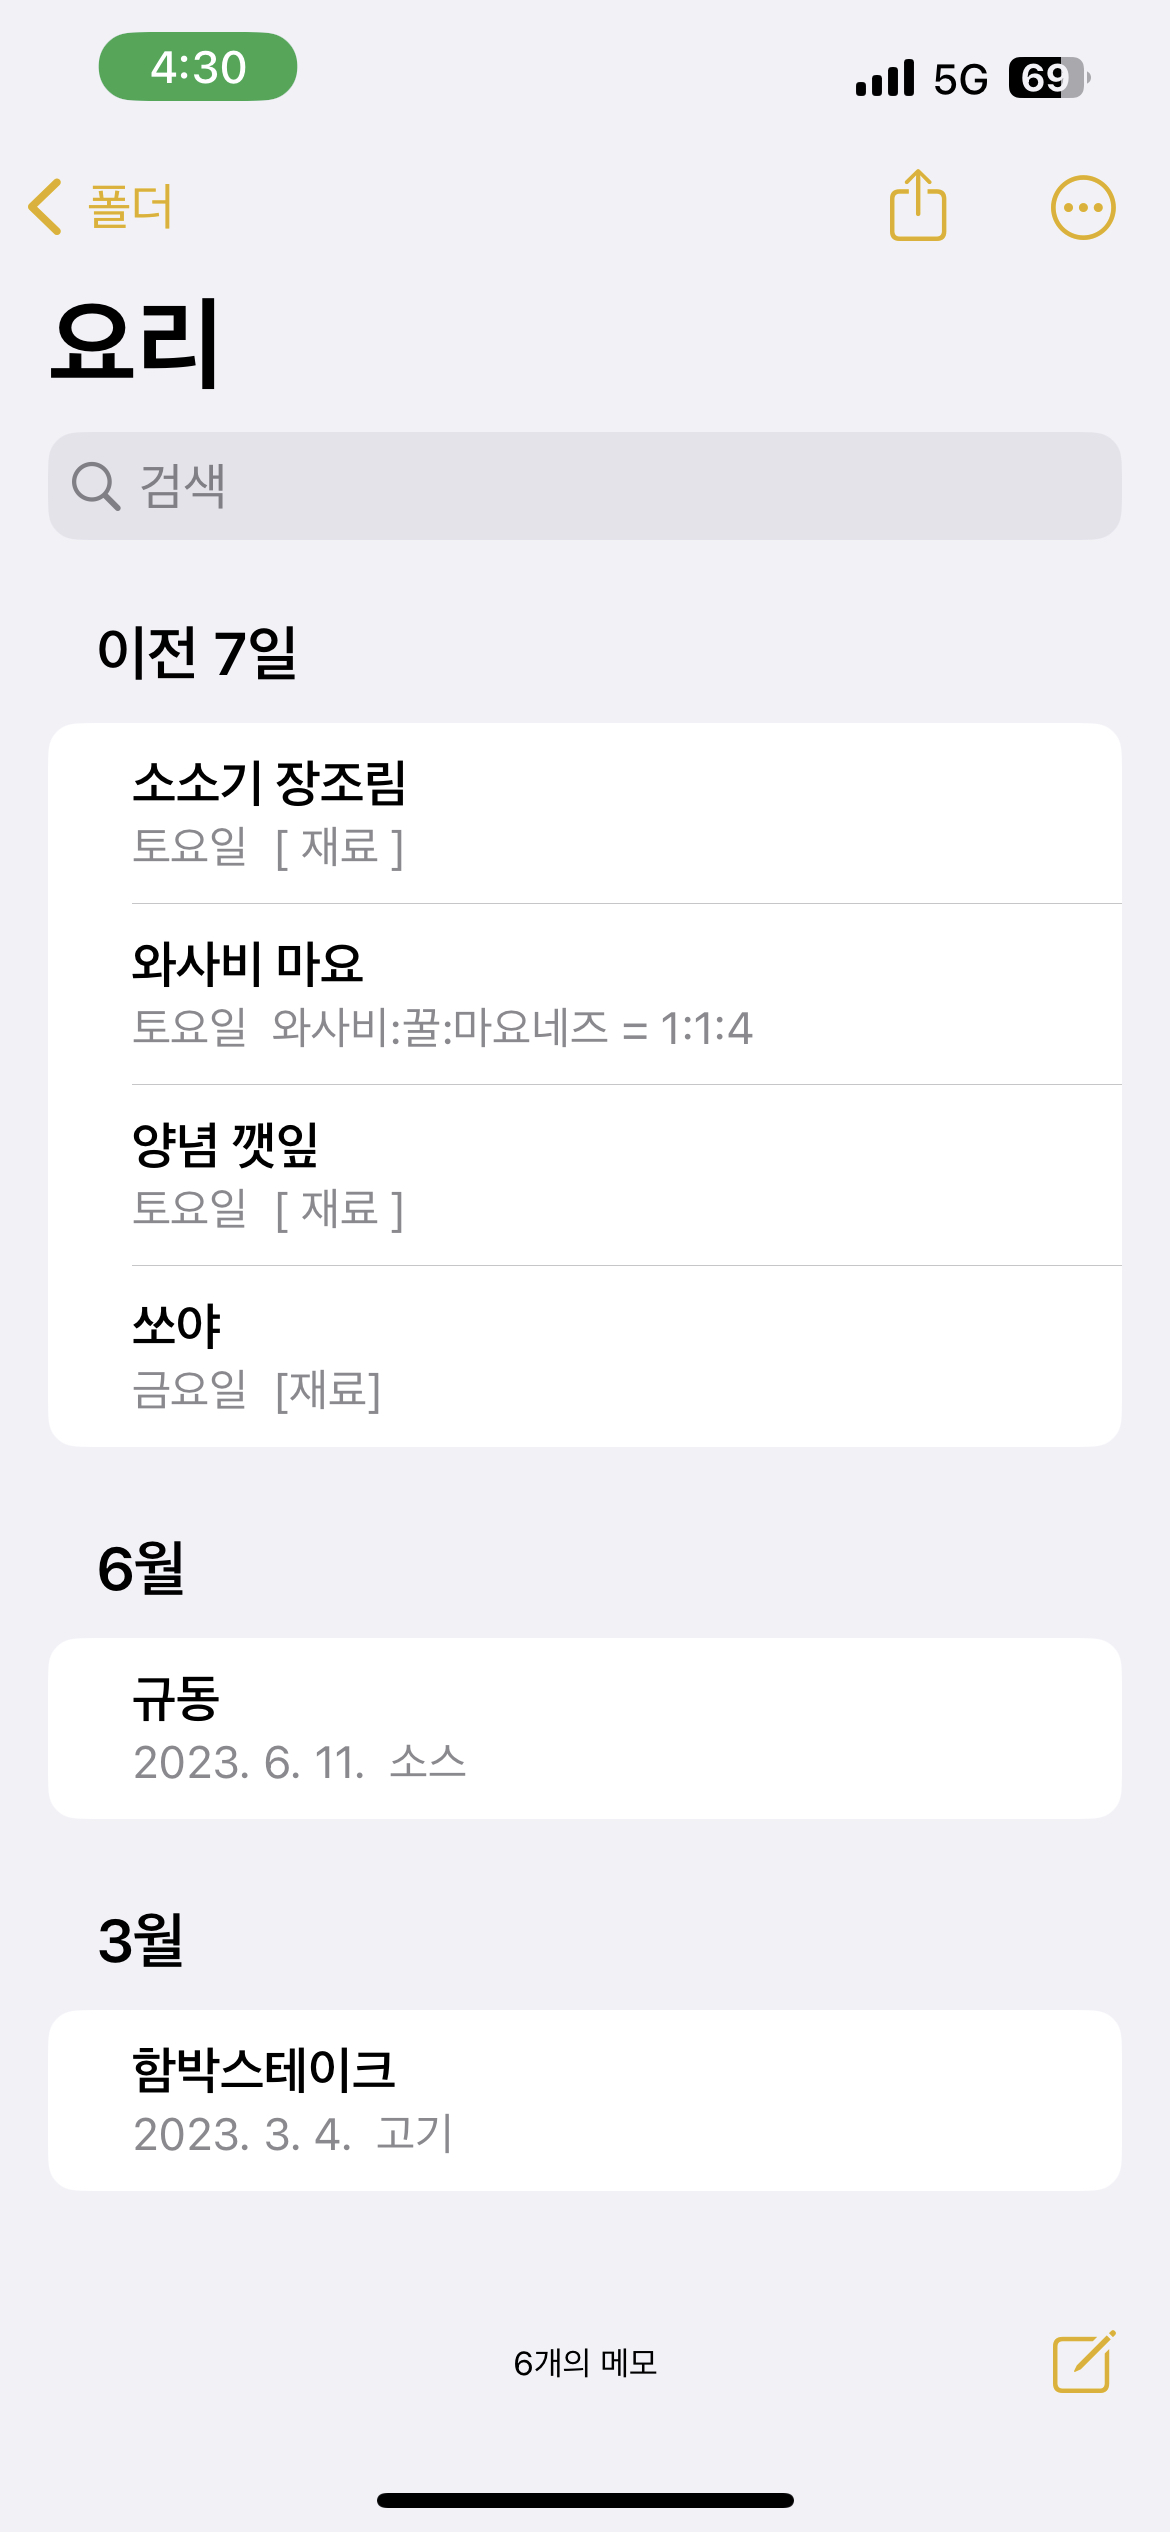
b. cell
cell은 tableView의 각 행에서 나타낼 데이터의 한 항목을 의미한다
tableView는 cell을 데이터를 표시하는데 사용되는 양식에 비유할 수 있다
tableView는 cell을 재활용 하여 데이터를 표시하게 되는데 cell을
<주제목>, <요일, 날짜>, <메모 내에서 적힌 첫번째 줄> 을 표시하는 형태로 설정하고 셀을 사용하면 아래 사진과 같이 tableView에서 표시할 데이터의 항목을 표시한다
cell에 관한 정보를 구현하기 위해서는 별도의 tableViewCell을 채택한 별도의 파일이 필요하며 해당 파일 내에서 cell을 구현해야 한다
tableViewCell을 구현한 경우 위의 예시코드처럼 cell을 가져와 반환하도록 해야 한다
3. tableView Delegate 채택
Delegate 패턴을 이용해 tableView에서 사용할 특정 조건에 따른 동작의 추가를 하는 증 과정을 위해 필요하다
tableView.delegate = selfextension ViewController: UITableViewDelegate {
}4. tableView cell 생성 및 cell 등록
별도의 tableViewCell 파일을 생성하여 해당 파일 cell을 선언해야 한다
아래 코드의 경우 cell에 캘린더를 넣는 것을 목적으로 만들어진 코드다
import UIKit
class CalendarViewCell: UITableViewCell {
// 캘린더 선언
let calendarVC = UICalendarView()
// 해당코드는 tableViewCell 파일을 만들때 기본적으로 들어있지 않는 코드다
// 만약 tableView를 스토리보드로 만든 경우가 아닌 코드로만 작성해 구현한 경우 필요로 하는 생성자다
// cell을 표시할때 cell을 초기화하는 역할을 한다
override init(style: UITableViewCell.CellStyle, reuseIdentifier: String?) {
super.init(style: style, reuseIdentifier: reuseIdentifier)
setupDelegate()
setupCalendar()
setupAutoLayout()
}
// tableViewCell 파일을 만들때 기본적으로 제공 되는 코드
required init?(coder: NSCoder) {
fatalError("init(coder:) has not been implemented")
}
// tableViewCell 파일을 만들때 기본적으로 제공되는 코드
// 해당 코드는 스토리보드를 사용하는 경우에 이용하는 부분이다
// 만약 코드를 이용해서만 구현을 하는 경우에는 수정할 필요가 없는 부분이다
override func awakeFromNib() {
super.awakeFromNib()
// Initialization code
}
//MARK: - 델리게이트 패턴
func setupDelegate(){
calendarVC.delegate = self
calendarVC.selectionBehavior = UICalendarSelectionSingleDate(delegate: self)
}
//MARK: - 캘린더 설정
func setupCalendar(){
calendarVC.calendar = .current
calendarVC.locale = .current
calendarVC.fontDesign = .rounded
calendarVC.layer.cornerRadius = 8
self.contentView.addSubview(calendarVC)
}
//MARK: - 오토레이이아웃 설정
func setupAutoLayout() {
calendarVC.translatesAutoresizingMaskIntoConstraints = false
NSLayoutConstraint.activate([
calendarVC.leadingAnchor.constraint(equalTo: self.contentView.leadingAnchor, constant: 15),
calendarVC.trailingAnchor.constraint(equalTo: self.contentView.trailingAnchor, constant: -15),
calendarVC.topAnchor.constraint(equalTo: self.contentView.safeAreaLayoutGuide.topAnchor, constant: 15),
])
}
}
//MARK: - 캘린더 델리게이트 확장
extension CalendarViewCell: UICalendarViewDelegate {
func calendarView(_ calendarView: UICalendarView, decorationFor dateComponents: DateComponents) -> UICalendarView.Decoration? {
return nil
}
}
extension CalendarViewCell: UICalendarSelectionSingleDateDelegate {
func dateSelection(_ selection: UICalendarSelectionSingleDate, didSelectDate dateComponents: DateComponents?) {
if let date = dateComponents?.day {
print(date)
}else {print("empty date")}
}
}
cell이 완성된 경우 cell을 표시할 ViewController에서 아래 코드를 통해 cell 등록을 해야 한다
tableView.register(CalendarViewCell.self, forCellReuseIdentifier: "CalendarViewCell")전체 예시 코드
ViewController
import UIKit
class ViewController: UIViewController {
let tableView = UITableView()
override func viewDidLoad() {
super.viewDidLoad()
createTableView()
}
func createTableView() {
tableView.dataSource = self
tableView.delegate = self
tableView.register(CalendarViewCell.self, forCellReuseIdentifier: "CalendarViewCell")
tableView.translatesAutoresizingMaskIntoConstraints = false
view.addSubview(tableView)
NSLayoutConstraint.activate([
tableView.leadingAnchor.constraint(equalTo: view.leadingAnchor,constant: 0),
tableView.trailingAnchor.constraint(equalTo: view.trailingAnchor,constant: 0),
tableView.topAnchor.constraint(equalTo: view.safeAreaLayoutGuide.topAnchor, constant: 0),
tableView.bottomAnchor.constraint(equalTo: view.bottomAnchor, constant: 0),
])
}
}
extension ViewController: UITableViewDataSource {
func tableView(_ tableView: UITableView, numberOfRowsInSection section: Int) -> Int {
return 1
}
func tableView(_ tableView: UITableView, cellForRowAt indexPath: IndexPath) -> UITableViewCell {
let cell = tableView.dequeueReusableCell(withIdentifier: "CalendarViewCell", for: indexPath) as! CalendarViewCell
return cell
}
}
extension ViewController: UITableViewDelegate {

}
CalendarViewCell
mport UIKit

class CalendarViewCell: UITableViewCell {

    // 캘린더 선언
    let calendarVC = UICalendarView()

    // 해당코드는 tableViewCell 파일을 만들때 기본적으로 들어있지 않는 코드다
    // 만약 tableView를 스토리보드로 만든 경우가 아닌 코드로만 작성해 구현한 경우 필요로 하는 생성자다
    // cell을 표시할때 cell을 초기화하는 역할을 한다
    override init(style: UITableViewCell.CellStyle, reuseIdentifier: String?) {
            super.init(style: style, reuseIdentifier: reuseIdentifier)
            setupDelegate()
            setupCalendar()
            setupAutoLayout()
        }

    // tableViewCell 파일을 만들때 기본적으로 제공 되는 코드
    required init?(coder: NSCoder) {
        fatalError("init(coder:) has not been implemented")
    }

    // tableViewCell 파일을 만들때 기본적으로 제공되는 코드
    // 해당 코드는 스토리보드를 사용하는 경우에 이용하는 부분이다
    // 만약 코드를 이용해서만 구현을 하는 경우에는 수정할 필요가 없는 부분이다
    override func awakeFromNib() {
        super.awakeFromNib()
        // Initialization code

    }

    //MARK: - 델리게이트 패턴
    func setupDelegate(){
        calendarVC.delegate = self
        calendarVC.selectionBehavior = UICalendarSelectionSingleDate(delegate: self)
    }

    //MARK: - 캘린더 설정
    func setupCalendar(){
        calendarVC.calendar = .current
        calendarVC.locale = .current
        calendarVC.fontDesign = .rounded
        calendarVC.layer.cornerRadius = 8

        self.contentView.addSubview(calendarVC)
    }

    //MARK: - 오토레이이아웃 설정
    func setupAutoLayout() {
        calendarVC.translatesAutoresizingMaskIntoConstraints = false

        NSLayoutConstraint.activate([
            calendarVC.leadingAnchor.constraint(equalTo: self.contentView.leadingAnchor, constant: 15),
            calendarVC.trailingAnchor.constraint(equalTo: self.contentView.trailingAnchor, constant: -15),
            calendarVC.topAnchor.constraint(equalTo: self.contentView.safeAreaLayoutGuide.topAnchor, constant: 15),

        ])
    }
}

//MARK: - 캘린더 델리게이트 확장

extension CalendarViewCell: UICalendarViewDelegate {
    func calendarView(_ calendarView: UICalendarView, decorationFor dateComponents: DateComponents) -> UICalendarView.Decoration? {
        return nil
    }

}
extension CalendarViewCell: UICalendarSelectionSingleDateDelegate {
    func dateSelection(_ selection: UICalendarSelectionSingleDate, didSelectDate dateComponents: DateComponents?) {
        if let date = dateComponents?.day {
            print(date)
        }else {print("empty date")}

    }
}