🐇 2021 Dev-Matching: 웹 프론트엔드 개발자(상반기)
※ Prettier로 인해 코드 라인스타일이 다를 수 있습니다.
※ 해당 포스팅은 작성자가 개발하던 순서대로 진행하여 문제의 원인이 되는 코드 및 문제 해결 코드, 완성된 코드가 포함됩니다.
컴포넌트 생성
src/ → main.js, App.js,
src/component → Breadcrumb.js, Nodes.js, ImageView.js, Loading.js
src/api → api.js
컴포넌트 구현 순서
※ 구현 순서는 작성자의 스타일을 더해 필수→옵션사항에 따라 다음과 같습니다.
- [필수] API 요청 구현
- [필수] 컴포넌트 구현 (State, Render)
- [필수] 첫 실행 테스트 (최상단 컴포넌트 초기화 설정)
- [필수] 컴포넌트 별 기본 Event 구현 및 이벤트 최적화
- [옵션] 캐시 데이터 활용, 로딩 UI 적용
main을 통해 App을 렌더링하고 화면에 추가합니다.
main.js
import App from "./App.js"

// DOM 가져오기
new App(document.querySelector(".App"));
index.html
<head>
  <title>고양이 사진첩!</title>
  <link rel="stylesheet" href="./src/styles/style.css" />
	<!-- main module 추가 -->
  <script type="module" src="./src/main.js"></script>
</head>
🐇 API 요청 구현
데이터를 먼저 받기 위해 api를 먼저 구현함으로서 추후 컴포넌트를 개발하며 소기능 테스트를 진행 했습니다.
api.js
const API_BASE_URL =
  "https://zl3m4qq0l9.execute-api.ap-northeast-2.amazonaws.com/dev";

// async - await 적용
export const request = async (nodeId) => {
  try {
		// nodeId 값에 따라 request URL 조정 : 코드중복 방지
    const res = await fetch(`${API_BASE_URL}/${nodeId ? nodeId : ""}`)
    if (!res.ok) {
      throw new Error("error");
    }
    return await res.json();
  } catch (e) {
    throw new Error(e.message);
  }
}
🐇 컴포넌트 구현
컴포넌트를 구현할 때 크게 세가지 항목을 주목하며 구현합니다.
- constructor
- new를 통해 생성
- DOM 변수를 파라미터로 받아 렌더링
- 컴포넌트가 표현될 때 element를 생성
- setState
- 포커싱된 컴포넌트의 state를 갱신합니다. state를 기준으로 렌더링 되기 때문에, state가 변경될 때 반드시 render를 호출하여 업데이트 해야 합니다.
- render
- 포커싱된 컴포넌트의 state를 기준으로 별도의 파라미터 없이 자신의 element를 렌더링 합니다.
위 세가지를 고려한 컴포넌트는 다음과 같은 기본적인 틀을 갖추게 됩니다.
// $dom         : DOM 변수
// initialState : 생성 시 초기 state 값
function example({ $dom, initialState }) {
  this.state = initialState;
  //this.$target : 컴포넌트를 렌더링 할 DOM
  this.$target = document.createElement("div");
  //DOM에 컴포넌트 렌더링
  $dom.appendChild(this.$target);

  //state를 재 전달 받으면 변경하고 리렌더링
  this.setState = (nextState) => {
    this.state = nextState;
    this.render();
  }

  //this.state를 기준으로 렌더링 시작
  this.render = () => {
    this.$target.innerHTML = `
      <div class="exmaple">${this.state}</div>
    `
  }

  //인스턴스화 후 render함수를 호출하여 new로 생성 시 바로 렌더링 됨
  this.render();
}
이를 고려해서 각 컴포넌트를 구현 시작했습니다.
🥕 App.js 구현
하지만 app은 하위 컴포넌트의 상태를 관리하고 렌더링하는 곳입니다.
렌더링 될 컴포넌트를 추가하고 상태 관리를 할 수 있도록 세팅 후 지속적으로 개발해 나갑니다.
import Breadcrumb from "./components/Breadcrumb.js";
import Nodes from "./components/Nodes.js";
import ImageView from "./components/ImageView.js";
import Loading from "./components/Loading.js";

export default function App({ $app }) {
  //전체 상태관리
  this.state = {}

  //컴포넌트 렌더링
  const breadcrumb = new Breadcrumb({});
  const nodes = new Nodes({});
  const imageview = new ImageView({});
  const loading = new Loading({});

  //상태가 변경될 때 마다 컴포넌트 리렌더링
  this.setState = (nextState) => {
		this.state = nextState;
    //breadcrumb.setState();
    //nodes.setState();
    //imageview.setState();
    //loading.setState();
  }

  //DOM 초기 설정
  const init = () => {}
  init();
}
🥕 Breadcrumb.js 구현
탐색중인 경로를 나타내기 위해 Node를 순서대로 저장할 공간이 필요합니다. 해당 공간은 depth로 선언해서 구현하겠습니다.
App.js
import Breadcrumb from "./components/Breadcrumb.js";
...

export default function App($app) {
  this.state = {
		//깊이 상태
    depth: [],
  }

  const breadcrumb = new Breadcrumb({
		//DOM 변수 전달
    $app,
		//초기 State 전달
    initialState: this.state.depth,
  });
	...

  this.setState = (nextState) => {
		//상태가 변할 때 Breadcrumb를 새롭게 렌더링 하며 State전달
    breadcrumb.setState(this.state.depth);
		...
  }

	...
}
Breadcrumb.js
API 요청시 DIRECTORY의 request와 index.js 그리고 위의 컴포넌트 구현부분을 참고하여 구현합니다.
export default function Breadcrumb({ $app, initialState }) {
  this.state = initialState;
	//index.js 참고
  this.$target = document.createElement("nav");
  this.$target.className = "Breadcrumb";
  $app.appendChild(this.$target);

  this.setState = (nextState) => {
    this.state = nextState;
    this.render();
  };

  this.render = () => {
		//root는 항상 고정
    this.$target.innerHTML = `
      <div class="nav-item">
				root
			</div>
      ${this.state.map((node) => {
				//request의 Node값의 name활용
        `<div class="nav-item">
					${node.name}
				</div>`;
      })}
    `;
  };

  this.render();
}
🥕 Nodes.js 구현
Breadcrumb와 마찬가지로 구현 진행합니다. 특정 Node의 값들을 가져갈 공간이 필요합니다. 해당 공간은 node로 선언해서 구현하겠습니다.
데이터 요청 시 root인 경우와 Node인 경우 request url이 다릅니다. 이를 판별할 수 있는 변수 isRoot를 선언하여 활용합니다.
데이터 전송 시 isRoot를 통해 root/Node여부를 판단하여 initialState에 알맞는 데이터를 전송합니다. 단, 데이터 요청 및 전송하는 시기는 사용자가 Node를 클릭했을 때 발생하므로 추후 개발합니다.
App.js
...
import Nodes from "./components/Nodes.js";
...

export default function App($app) {
  this.state = {
		isRoot: false,
		...
    node: [],
  };

	...
  const nodes = new Nodes({
    $app,
    initialState: this.state.node
  });
	...

  this.setState = (nextState) => {
		...
    nodes.setState(this.state.node);
		...
  };

	...
}
Nodes.js
Node는 여러개의 DIRECTORY와 FILE로 구분되어 있습니다. 두 경우를 고려하여 Node의 아이콘 및 추후 클릭이벤트를 구현합니다.
export default function Nodes({ $app, initialState }) {
  this.state = initialState;
  this.$target = document.createElement("div");
  this.$target.className = "Nodes";
  $app.appendChild(this.$target);

  this.setState = (nextState) => {
    this.state = nextState;
    this.render();
  };

  this.render = () => {
		//node에 값이 있을 때만 구성
    if (this.state) {
      this.state.map((node) => {
				//Node의 type에 따라 icon 변경
				const iconPath =
          node.type === "DIRECTORY"
            ? "./assets/directory.png"
            : "./assets/file.png";
        this.$target.innerHTML = `
	        <div class="Node">
	          <img src="${iconPath}" />
	          <div>${node.name}</div>
	        </div>
				`;
      });
    }
  };

  this.render();
}
🥕 ImageView.js 구현
Node에서 FILE을 클릭 한 경우, 이미지를 요청하기 때문에 이미지 경로를 담는 변수 imageFilePath를 선언하여 활용합니다.
Node에서 FILE을 클릭하는 경우 App의 nextState에 imageFilePath를 추가하여 넘겨주고 사용하면 되고 요청하지 않는 경우 이미지를 띄우면 안되기 때문에 App의 state에서 따로 관리하지않아도 됩니다.
App.js
...
import ImageView from "./components/ImageView.js";
...

export default function App($app) {
	...

  const imageview = new ImageView({
    $app,
    initialState: this.state.imageFilePath,
  });
	...

  this.setState = (nextState) => {
		...
    imageview.setState(this.state.imageFilePath);
		...
  };

	...
}
ImageView.js
//Node의 filePath를 참조하여 img src잘 설정 하도록 한다.
const IMAGE_BASE_URL =
  "https://fe-dev-matching-2021-03-serverlessdeploymentbuck-t3kpj3way537.s3.ap-northeast-2.amazonaws.com/public";

export default function ImageView({ $app, initialState }) {
  this.state = initialState;
  this.$target = document.createElement("div");
  this.$target.className = "Modal Loading";
  $app.appendChild(this.$target);

  this.setState = (nextState) => {
    this.state = nextState;
    this.render();
  };

	//이미지 값이 존재할 때만 요소 생성하고 보이도록 한다.
  this.render = () => {
    this.$target.innerHTML = `
      <div class="content">
        ${this.state ? `<img src="${IMAGE_BASE_URL}${this.state}" />` : ""}
      </div>
    `;

    this.$target.style.display = this.state ? "block" : "none";
  };

	this.render();
}
🥕 Loading.js 구현
로딩의 시작/끝을 관리할 변수 isLoading을 선언한다.
App.js
...
import Loading from "./components/Loading.js";

export default function App($app) {
  this.state = {
		...
    isLoading: false,
    ...
  };

	...
  const loading = new Loading({
    $app,
    initialState: this.isLoading,
  });

  this.setState = (nextState) => {
		...
    loading.setState(this.state.isLoading);
  };

	...
}
Loading.js
export default function Loading({ $app, initialState }) {
  this.state = initialState;
  this.$target = document.createElement("div");
  this.$target.className = "Modal Loading";
  $app.appendChild(this.$target);

  this.setState = (nextState) => {
    this.state = nextState;
    this.render();
  };

	//Loading 중일 때만 보이도록 설정
  this.render = () => {
    this.$target.innerHTML = `
      <div class="content">
        <img src="./assets/nyan-cat.gif" />
      </div>
    `;
    this.$target.style.display = this.state ? "block" : "none";
  };

  this.render();
}
🐇 첫 실행 테스트
기본 컴포넌트를 구성했으니, index.html을 정리하고 App의 초기 설정 init을 작성하고 결과를 확인합니다.
초기 설정은 root Node의 DIRECTORY 요청을 포함한 App의 state를 설정하는 단계입니다.
App.js
...
import { request } from "./api/api.js";

export default function App($app) {
  ...

  const init = () => {
    const rootNodes = request();
    this.setState({
      ...this.state,
      isRoot: true,
      node: rootNodes,
    });
  };
  init();
}
다음을 실행하면 다음 화면처럼 보입니다.
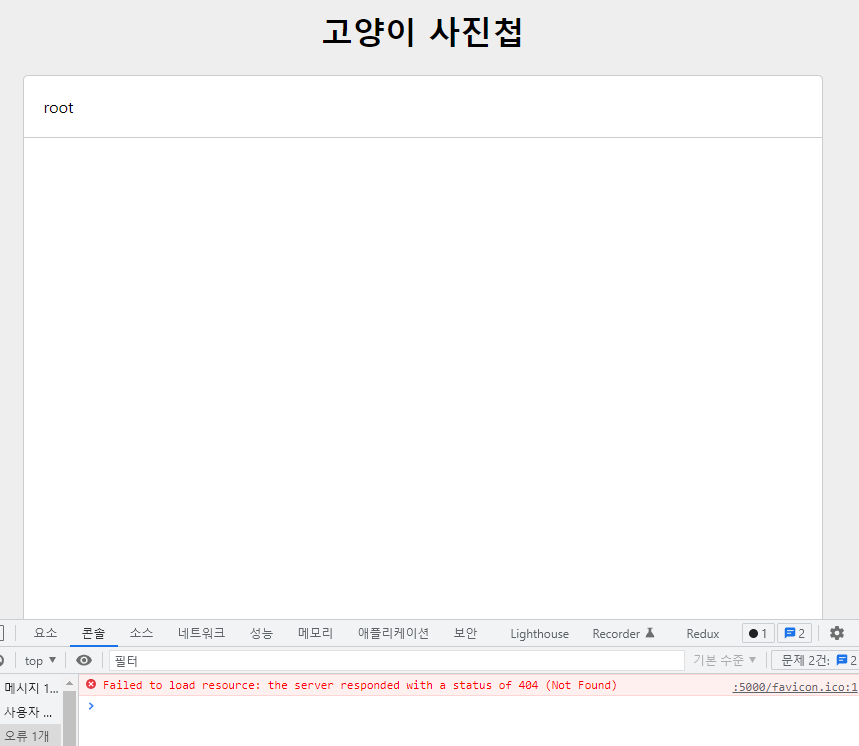
무언가 잘못되었습니다. 오류는 출력되지 않으며, api request url을 직접 사용하면 정상적으로 객체가 반환됩니다.
🥕 프로그래머스 고양이 사진첩 애플리케이션을 응시 중이어야 요청할 수 있습니다.문제 해결
요소를 렌더링 할 때 map()을 ES6문법에 맞춰 함수를 작성 한 것이므로 return문이 필요했습니다. 해당 부분이 누락 된 부분을 수정하여 재실행 합니다.
Breadcrumb.js
...
this.render = () => {
  this.$target.innerHTML = `
    <div class="nav-item">
			root
		</div>
    ${this.state.map((node, index) => {
      return `
				<div class="nav-item" data-index="${index}">
					${node.name}
			</div>
			`;
    })}
  `;
};
...
Node.js
...
this.render = () => {
  if (this.state) {
    this.state.map((node) => {
			...
	    return (this.$target.innerHTML = `
		    <div class="Node">
	        <img src="${iconPath}" />
	        <div>${node.name}</div>
	      </div>
	    `);
		});
	}
};
...
다음과 같이 수정하면 다음 화면을 얻을 수 있습니다.
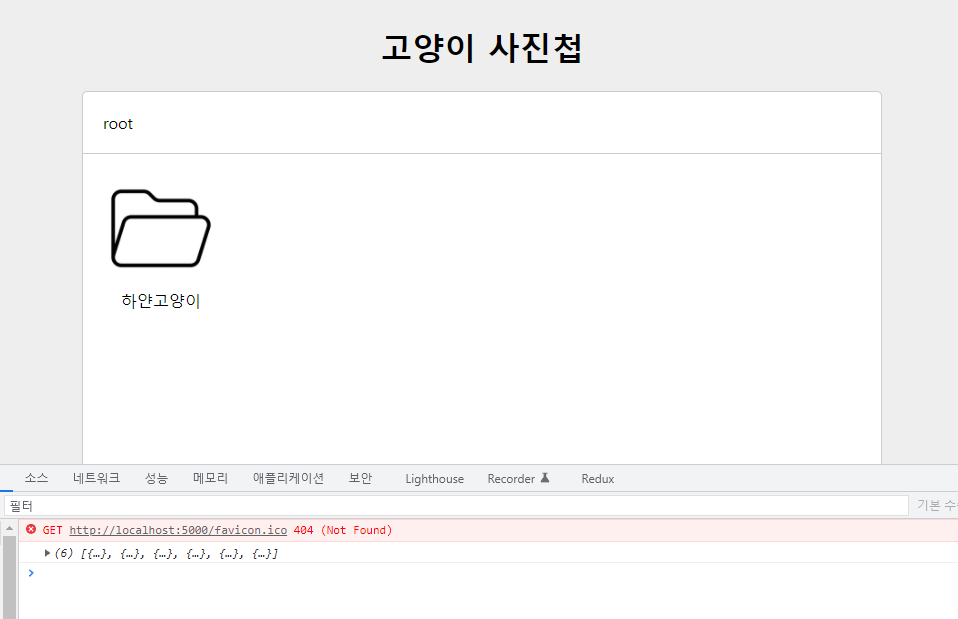
Nodes에 표현된 DIRECTORY가 하나 출력됩니다. 그러나 root request의 반환값에는 6개의 DIRECTORY가 포함되어 있습니다.
문제해결
Nodes에서 값을 반환할 때 마다 innerHTML로 요소를 변경하고 있었습니다. 해당 부분을 Template화 하여 요소가 전부 보이도록 설정 하였습니다.
Nodes.js
...
this.render = () => {
  if (this.state) {
    const nodesTemplate = this.state.map((node) => {
			...
      return `
	      <div class="Node">
	        <img src="${iconPath}" />
	        <div>${node.name}</div>
	      </div>
	    `;
    });
    this.$target.innerHTML = nodesTemplate;
  }
};
...
다음과 같이 수정하면 다음 화면을 얻을 수 있습니다.
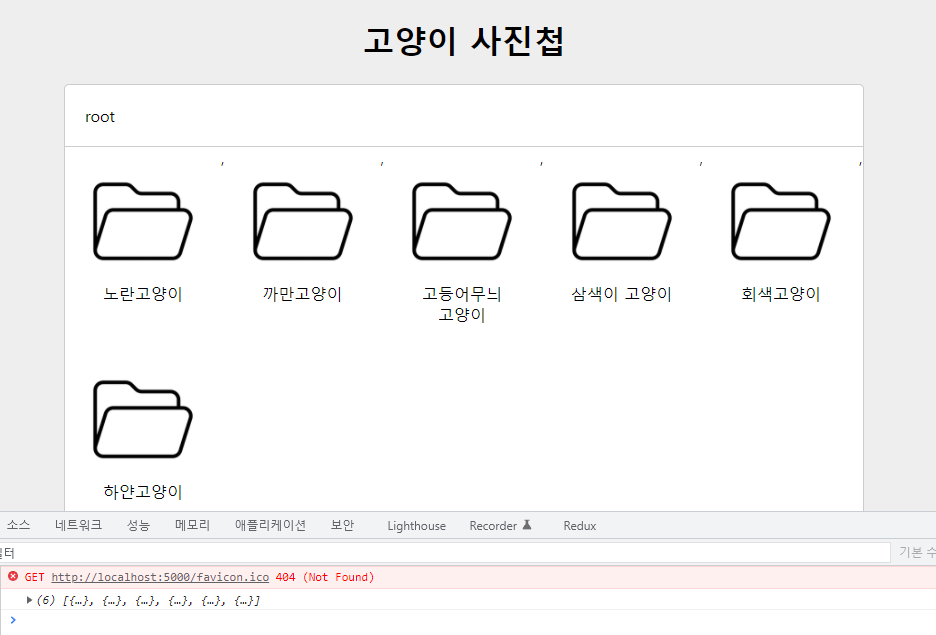
무언가 불편합니다. 요소와 요소사이에 ,가 존재합니다.
문제해결
map()은 template literals로 결합된 형태가 문자열 형태로 값이 리턴되는데, 기본적으로 ,쉼표로 묶어서 리턴합니다. join("")을 사용하여 해결합니다.
Breadcrumb.js
...
this.render = () => {
  this.$target.innerHTML = `
    <div class="nav-item">
			root
		</div>
    ${this.state
      .map((node, index) => {
        return `
					<div class="nav-item" data-index="${index}">
						${node.name}
					</div>
				`;
      })
      .join("")}
  `;
};
...
Nodes.js
...
this.render = () => {
if (this.state) {
const nodesTemplate = this.state
.map((node) => {
const iconPath =
node.type === "DIRECTORY"
? "./assets/directory.png"
: "./assets/file.png";
return `
<div class="Node">
<img src="${iconPath}" />
<div>${node.name}</div>
</div>
`;
})
.join("");
this.$target.innerHTML = nodesTemplate;
}
};
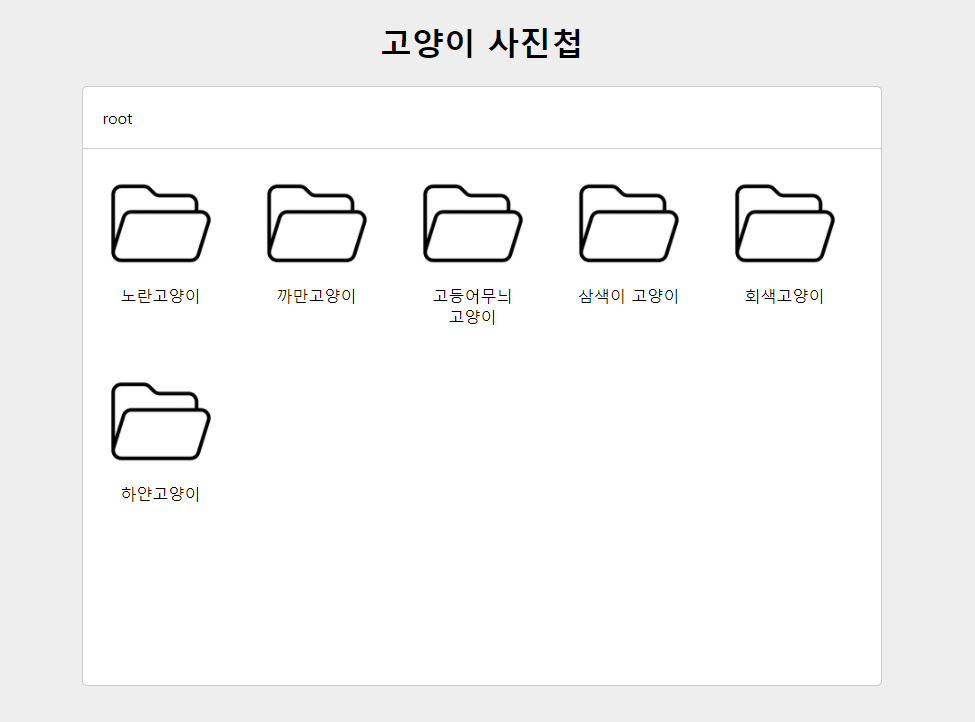
...다음과 같이 수정하면 다음 화면을 얻을 수 있습니다.
🐇 컴포넌트 별 기본 Event 구현
구현 할 이벤트와 순서를 다시 정리하면 다음과 같습니다.
- Nodes.js의 onClick, onBackClick
- onClick : Node의 DIRECTORY, FILE을클릭할 때
- onBackClick : Node의 뒤로가기(<)를 클릭할 때
- Node의 이벤트는 App의 nodes 상태를 변경하는 이벤트
- Breadcrumb.js 의 onClick
- onClick : navigation의 폴더 경로를 클릭할 때
- Breadcrumb의 이벤트는 App의 depth 상태를 변경하는 이벤트
- ImageView의 onClick
- onClick : 이미지를 닫기위해 클릭할 때
이를 참조해서 App.js를 수정하면 다음과 같습니다.
App.js
...
export default function App($app) {
	...
  const breadcrumb = new Breadcrumb({
    $app,
    initialState: this.state.depth,
    onClick: () => {},
  });
  const nodes = new Nodes({
    $app,
    initialState: this.state.nodes,
    onClick: () => {},
    onBackClick: () => {},
  });
  const imageview = new ImageView({
    $app,
    initialState: this.state.imageFilePath,
    onClick: () => {},
  });

  ...
}
🥕 Nodes의 Click Event 구현
Node에서 Type에 따라 클릭 이벤트를 구현하고 각각에 맞춰 데이터 요청 및 상태관리를 진행합니다.
상태가 변경되는 요소는 isRoot, depth, nodes입니다.
클릭 이벤트를 구현하는 시점 모두 테스트를 진행했습니다.
App.js
...
const nodes = new Nodes({
  $app,
	//클릭될 때 node데이터를 가져오므로 빈값으로 수정
  initialState: [],
  onClick: async (node) => {
		//node의 type판별
    try {
      if (node.type === "DIRECTORY") {
				//디렉토리인경우 다음 Nodes 데이터 요청
        const nextNodes = await request(node.id);
        this.setState({
          ...this.state,
					//루트에서 디렉토리를 선택하는 경우가 존재하므로 항상 false반환
          isRoot: false,
					//경로에 노드 추가
					depth: [...this.state.depth, node],
          nodes: nextNodes,
        });
    } else if (node.type === "FILE") {
        this.setState({
          ...this.state,
					//file인 경우 이미지의 filePath반환
          imageFilePath: node.filePath,
        });
      }
    } catch (e) {
      throw new Error(e.message);
    }
  },
  onBackClick: async () => {
		//depth의 마지막 요소 제거를 위한 깊은복사
    const nextState = { ...this.state };
		//depth의 마지막 요소 제거
    nextState.depth.pop();
		//이전 node의 id값 판별
    const prevNodeId =
      nextState.depth.length === 0
        ? null
        : nextState.depth[nextState.depth.length - 1].id;
    if (prevNodeId === null) {
			//node가 root인 경우
      const rootNodes = await request();
      this.setState({
        ...this.state,
        isRoot: true,
        nodes: rootNodes,
      });
    } else {
			//node인 경우
      const prevNodes = await request(prevNodeId);
      this.setState({
        ...this.state,
        nodes: prevNodes,
      });
    }
  },
});
...
this.setState = (nextState) => {
	...
  nodes.setState({
		isRoot: this.state.isRoot,
		nodes: this.state.nodes,
	});
	...
};
위를 통해 Nodes.js에도 onClick, onBackClick을 구현합니다.
App의 상태에 따라 렌더링 요소를 수정합니다. 수정할 렌더링 요소는 isRoot에 따른 뒤로가기 버튼 추가입니다.
Nodes.js
export default function Nodes({ $app, initialState, onClick, onBackClick }) {
  ...

	//onClick, onBackClick 할당
  this.onClick = onClick;
  this.onBackClick = onBackClick;

  this.render = () => {
    if (this.state.nodes) {
      const nodesTemplate = this.state.nodes
        .map((node) => {
          const iconPath =
            node.type === "DIRECTORY"
              ? "./assets/directory.png"
              : "./assets/file.png";
					//node를 찾을 수 있도록 id 정보를 추가
          return `
            <div class="Node" data-node-id="${node.id}">
              <img src="${iconPath}" />
              <div>${node.name}</div>
            </div>
          `;
        })
        .join("");

      this.$target.innerHTML = !this.state.isRoot
        ? `<div class="Node">
            <img src="./assets/prev.png" />
          </div>
          ${nodesTemplate}`
        : nodesTemplate;
    }

		//요소들이 렌더링 될 때마다 이벤트 갱신
    this.$target.querySelectorAll(".Node").forEach(($node) => {
      $node.addEventListener("click", (e) => {
				//dataset을 통해 요소의 data-로 시작하는 Attribute를 가져올 수 있음
        const { nodeId } = e.target.dataset;
				//prev 버튼을 누르는 경우 뒤로가기 처리
        if (!nodeId) {
          this.onBackClick();
        }
				//노드를 누른경우 전체노드에서 일치하는 노드를 찾고 전달
        const selectedNode = this.state.nodes.find(
          (node) => node.id === nodeId
        );
        if (selectedNode) {
          this.onClick(selectedNode);
        }
      });
    });
  };

  this.render();
}
여기서 작성한 이벤트 처리는 모든 노드를 불러와 처리하기 때문에 최적화 되어있지 않습니다. this.$target인 Nodes에서 하나의 Node 요소만 불러와 id를 얻고 이벤트를 처리하여 최적화 시킵니다.
이를 위해선 JavsScript의 버블링(bubble) 기법이 있는데요. 하위요소에서 이벤트가 발생하면 상위 요소까지
이벤트가 계속 전파되는 기법입니다. 이를 이용해 $target에서 하나의 Node 요소를 closest를 이용해 찾고 이벤트 처리를 진행하면 됩니다.
Node.js
export default function Nodes({ $app, initialState, onClick, onBackClick }) {
  ....

  this.render = () => {
    if (this.state.nodes) {
      const nodesTemplate = this.state.nodes
        .map((node) => {
          const iconPath =
            node.type === "DIRECTORY"
              ? "./assets/directory.png"
              : "./assets/file.png";
          return `
            <div class="Node" data-node-id="${node.id}">
              <img src="${iconPath}" />
              <div>${node.name}</div>
            </div>
          `;
        })
        .join("");

      this.$target.innerHTML = !this.state.isRoot
        ? `<div class="Node">
            <img src="./assets/prev.png" />
          </div>
          ${nodesTemplate}`
        : nodesTemplate;
    }
  };

	this.onClick = onClick;
  this.onBackClick = onBackClick;

	//render 내 binding code는 삭제하고 끄집어냅니다.
  this.$target.addEventListener("click", (e) => {
		//클릭된 요소에서 제일 근접한 Node요소를 가져옴
    const $node = e.target.closest(".Node");
    if ($node) {
      const { nodeId } = $node.dataset;
      if (!nodeId) {
        this.onBackClick();
      }

      const selectedNode = this.state.nodes.find((node) => node.id === nodeId);
      if (selectedNode) {
        this.onClick(selectedNode);
      }
    }
  });

  this.render();
}
이 최적화 방식으로 Breadcrumb와 ImageView도 구현 해줍니다.
🥕 Breadcrumb의 Click Event 구현
root 이동, 특정 node이동, 자기자신 이동 세 가지 경우를 확인하고 구현해줍니다.
Nodes.js
...
const breadcrumb = new Breadcrumb({
  $app,
  initialState: this.state.depth,
  onClick: async (index) => {
		//root로 이동하는 경우
    if (index === null) {
      const rootNodes = await request();
      this.setState({
        ...this.state,
        isRoot: true,
        depth: [],
        nodes: rootNodes,
      });
    return;
	  }
		//자기 자신을 클릭하는 경우
    if (index === this.state.depth.length - 1) {
	    return;
    }
		//특정 노드로 이동하는 경우,
		//특정 노드까지 depth를 설정하고 id를 찾아 Node를 찾습니다.
    const indexState = { ...this.state };
    const indexDepth = indexState.depth.slice(0, index + 1);
    const indexNodeId = indexState.depth[index].id;
    const indexNode = await request(indexNodeId);

    this.setState({
      ...indexState,
      depth: indexDepth,
      nodes: indexNode,
    });
  },
});
...
Breadcrumb.js
export default function Breadcrumb({ $app, initialState, onClick }) {
  ...

  this.onClick = onClick;

	//이벤트 최적화 적용
  this.$target.addEventListener("click", (e) => {
    const $navItem = e.target.closest(".nav-item");
    if ($navItem) {
      const { index } = $navItem.dataset;
			//dataset 값은 string이므로 int 변환, root 클릭 시 null
      this.onClick(index ? parseInt(index, 10) : null);
    }
  });

  this.render();
}
🥕 ImageView의 Click Event 구현
이미지가 보이지 않도록 하기 위해 ImageView의 state값을 없애주면 됩니다.
App.js
...
const imageview = new ImageView({
  $app,
  initialState: this.state.imageFilePath,
  onClick: () => {
    this.setState({
      ...this.state,
      imageFilePath: null,
    });
  },
});
...
ImageView.js
...
export default function ImageView({ $app, initialState, onClick }) {
  ...

	this.onClick = onClick;

  this.$target.addEventListener("click", () => {
    this.onClick();
  });

  this.render();
}
🐇 캐시 데이터 활용, 로딩 UI 적용
🥕 캐시 데이터 활용
현재 디렉토리를 이동할 때 마다 매번 요청하고있습니다. App에 전역으로 cache를 선언하여 Node의 정보를 관리합니다.
중복되지 않도록 데이터를 관리하려면 Node의 id를 활용하여 방지합니다.
단, root의 경우 id가 존재하지 않으니, cache.root로 따로 관리합니다.
App.js
[ 요청유지 ] : root를 처음 요청할 때, node를 처음 찾아갈 때
[ 요청삭제 ] : 이미 요청된 node를 찾아가는 경우
...
const cache = {};

export default function App($app) {
  ...

  const breadcrumb = new Breadcrumb({
    $app,
    initialState: this.state.depth,
    onClick: async (index) => {
      if (index === null) {
        //초기 설정된 root 노드 데이터 활용
        this.setState({
          ...this.state,
          isRoot: true,
          depth: [],
          nodes: cache.root,
        });
        return;
      }
      if (index === this.state.depth.length - 1) {
        return;
      }
      const indexState = { ...this.state };
      const indexDepth = indexState.depth.slice(0, index + 1);
      const indexNodeId = indexState.depth[index].id;

      //무조건 방문했으므로 cache 데이터 활용
      this.setState({
        ...indexState,
        depth: indexDepth,
        nodes: cache[indexNodeId],
      });
    },
  });
  const nodes = new Nodes({
    $app,
    initialState: [],
    onClick: async (node) => {
      console.log(node);
      try {
        if (node.type === "DIRECTORY") {
          //다음 디렉토리를 방문했는지 판별
          if (cache[node.id]) {
            //방문한 경우 cache 데이터 활용
            this.setState({
              ...this.state,
              isRoot: false,
              depth: [...this.state.depth, node],
              nodes: cache[node.id],
            });
          } else {
            //방문하지 않는경우 요청
            const nextNodes = await request(node.id);
            this.setState({
              ...this.state,
              isRoot: false,
              depth: [...this.state.depth, node],
              nodes: nextNodes,
            });
            cache[node.id] = nextNodes;
          }
        } else if (node.type === "FILE") {
          this.setState({
            ...this.state,
            imageFilePath: node.filePath,
          });
        }
      } catch (e) {
        throw new Error(e.message);
      }
    },
    onBackClick: async () => {
      const nextState = { ...this.state };
      nextState.depth.pop();
      const prevNodeId =
        nextState.depth.length === 0
          ? null
          : nextState.depth[nextState.depth.length - 1].id;
      if (prevNodeId === null) {
        this.setState({
          ...this.state,
          isRoot: true,
          //초기 설정된 root 노드 데이터 활용
          nodes: cache.root,
        });
      } else {
        this.setState({
          ...this.state,
          //이전 노드를 무조건 방문 했으므로 활용
          nodes: cache[prevNodeId],
        });
      }
    },
  });
  const imageview = new ImageView({
    $app,
    initialState: this.state.imageFilePath,
    onClick: () => {
      this.setState({
        ...this.state,
        imageFilePath: null,
      });
    },
  });
  const loading = new Loading({
    $app,
    initialState: this.isLoading,
  });

  this.setState = (nextState) => {
    this.state = nextState;
    breadcrumb.setState(this.state.depth);
    nodes.setState({
      isRoot: this.state.isRoot,
      nodes: this.state.nodes,
    });
    imageview.setState(this.state.imageFilePath);
    loading.setState(this.state.isLoading);
  };

  const init = async () => {
    const rootNodes = await request();
    this.setState({
      ...this.state,
      isRoot: true,
      nodes: rootNodes,
    });
    //root 노드 데이터 저장
    cache.root = rootNodes;
  };
  init();
}
🥕 로딩 UI 적용
데이터가 요청되는 시점에 로딩UI를 적용시킵니다. App.js에서 적용되는 항목과 방법은 다음과 같습니다.
- 데이터를 받아오는 모든 시점
//데이터 요청이 일어나는 시작점
this.setState({
	//기존state복사
	...this.state,
	//Loading 시작
	isLoading: true,
})
...
//데이터 요청 완료시 설정
this.setState({
	//state변경 내용
	...
	//Loading 멈춤
	isLoading: false,
})
App.js
...

export default function App($app) {
  ...

  const breadcrumb = new Breadcrumb({
    $app,
    initialState: this.state.depth,
    onClick: async (index) => {
      //경로를 통해 노드를 찾아갈 때
      this.setState({
        ...this.state,
        **isLoading: true,**
      });
      if (index === null) {
        this.setState({
          ...this.state,
          isRoot: true,
          **isLoading: false,**
          depth: [],
          nodes: cache.root,
        });
        return;
      }
      if (index === this.state.depth.length - 1) {
        return;
      }
      const indexState = { ...this.state };
      const indexDepth = indexState.depth.slice(0, index + 1);
      const indexNodeId = indexState.depth[index].id;

      this.setState({
        ...indexState,
        **isLoading: false,**
        depth: indexDepth,
        nodes: cache[indexNodeId],
      });
    },
  });
  const nodes = new Nodes({
    $app,
    initialState: [],
    onClick: async (node) => {
      //디렉토리를 통해 노드를 찾아갈 때
      this.setState({
        ...this.state,
        **isLoading: true,**
      });
      try {
        if (node.type === "DIRECTORY") {
          if (cache[node.id]) {
            this.setState({
              ...this.state,
              isRoot: false,
              **isLoading: false,**
              depth: [...this.state.depth, node],
              nodes: cache[node.id],
            });
          } else {
            const nextNodes = await request(node.id);
            this.setState({
              ...this.state,
              isRoot: false,
              **isLoading: false,**
              depth: [...this.state.depth, node],
              nodes: nextNodes,
            });
        	cache[node.id] = nextNodes,
          }
        } else if (node.type === "FILE") {
          this.setState({
            ...this.state,
            **isLoading: false,**
            imageFilePath: node.filePath,
          });
        }
      } catch (e) {
        throw new Error(e.message);
      }
    },
    onBackClick: async () => {
      //이전 노드를 찾아갈 때
      this.setState({
        ...this.state,
        **isLoading: true,**
      });
      const nextState = { ...this.state };
      nextState.depth.pop();
      const prevNodeId =
        nextState.depth.length === 0
          ? null
          : nextState.depth[nextState.depth.length - 1].id;
      if (prevNodeId === null) {
        this.setState({
          ...this.state,
          isRoot: true,
          **isLoading: false,**
          nodes: cache.root,
        });
      } else {
        this.setState({
          ...this.state,
          **isLoading: false,**
          nodes: cache[prevNodeId],
        });
      }
    },
  });
  const imageview = new ImageView({
    $app,
    initialState: this.state.imageFilePath,
    onClick: () => {
      this.setState({
        ...this.state,
        imageFilePath: null,
      });
    },
  });
  const loading = new Loading({
    $app,
    initialState: this.isLoading,
  });

  this.setState = (nextState) => {
    this.state = nextState;
    breadcrumb.setState(this.state.depth);
    nodes.setState({
      isRoot: this.state.isRoot,
      nodes: this.state.nodes,
    });
    imageview.setState(this.state.imageFilePath);
    loading.setState(this.state.isLoading);
  };

  const init = async () => {
    //초기 렌더링 시점
    this.setState({
      ...this.state,
      **isLoading: true,**
    });
    const rootNodes = await request();
    this.setState({
      ...this.state,
      isRoot: true,
      **isLoading: false,**
      nodes: rootNodes,
    });
    cache.root = rootNodes;
  };
  init();
}
다음과 같이 설정하였을 때, Breadcrumb의 경로를 선택 중 자기자신을 선택하는 경우 계속 Loading 중으로 표기되게 됩니다. 해당 오류를 해결하기 위해 App.js의 Breadcrumb 부분을 다음과 같이 수정합니다.
문제해결
...
export default function App($app) {
  ...

  const breadcrumb = new Breadcrumb({
    $app,
    initialState: this.state.depth,
    onClick: async (index) => {
	  //자기자신을 클릭하는 경우 바로 리턴
      if (index === this.state.depth.length - 1) {
        return;
      }
      this.setState({
        ...this.state,
        **isLoading: true,**
      });
      if (index === null) {
        this.setState({
          ...this.state,
          isRoot: true,
          **isLoading: false,**
          depth: [],
          nodes: cache.root,
        });
        return;
      }
      const indexState = { ...this.state };
      const indexDepth = indexState.depth.slice(0, index + 1);
      const indexNodeId = indexState.depth[index].id;

      this.setState({
        ...indexState,
        **isLoading: false,**
        depth: indexDepth,
        nodes: cache[indexNodeId],
      });
    },
  });
	...
}
🐇 마무리
이상 모든 구현이 끝났습니다! 테스팅을 통해 누락되거나 잘못 구현 된곳이 없는지 확인하고 수정하면 완벽합니다.
※ 내용 관련 수정사항이 있는경우 댓글로 알려주세요!
