복습
IoC(제어 역전)
- 컨트롤의 제어권이 개발자가 아니라 프레임워크에 있다는 뜻
BEAN
- IOC를 통해서 만든 객체를 의미
- Spring 주도하에 생성된 객체
DI(의존성 주입)
- 개발자가 직접 객체를 생성하지 않고 Spring Container가 만들어둔 객체(bean)를 필요한 위치에서 주입함.
템플릿 엔진
결과 페이지를 만들어주는 엔진
- JSP
- 타임리프
⇒ templates 폴더에 모아둠
- src/main/resources의 templates 혹은 static에 index.html 이라는 이름의 파일이 존재하면 메인페이지로 바로 매핑해준다.
Controller
- @Controller 어노테이션이 붙으면 IoC가 일어남
- 즉, 개발자가 아닌 Spring이 관리하게 되는 객체가 되는 것
- IoC와 밀접관 관련이 있는 것
RequestMapping
- Servlet에서는 WebServlet을 사용함
- Spring에서는 RequestMapping 어노테이션으로 바뀜
- class, 메서드쪽에도 붙일 수 있음
- 해당 메서드에 대한 요청을 처리
- 하나의 요청만 처리하는게 아닌 메서드별로 처리할 수 있음
- class
- 공통 주소를 의미
- 메서드
@RequestMapping("/test")
public class TestController{
	@RequestMapping("/insert")
	public void methodA(){

	}
}- GET, POST 방식 상관없이 요청을 받음
@RequestMapping(value = "/test", method = RequestMethod.GET)
@RequestMapping(value = "/test", method = RequestMethod.POST)
⇒ 위처럼 get, post 방식을 지정할 수도 있음
GetMapping & PostMapping
@Controller
public class ExampleController {

	@GetMapping("example1")
	public String exampleMethod1() {
	}
	@PostMapping("example2")
	public String exampleMethod2() {
	}
	@PutMapping("example3")
	public String exampleMethod3() {
	}
	@DeleteMapping("example4")
	public String exampleMethod4() {
	}
}- 반환 타입은 String으로 지정해줘야 함.
public class TestController {

}
⇒ Controller 메서드의 반환형이 String인 이유!
⇒ 메서드에서 반환되는 문자열이 forward할 html 파일의 경로가 되기 때문!
 * classpath : == src/main/resources
 * 접두사 : classpath:/templates/ ⭐⭐⭐
 * 접미사 : .html
⇒ src/main/resources/templates/파일명.html 형식이 됨
Spring에서 Redirect(재요청) 하는 방법
return "redirect:/param/main";

* - Controller 메서드 반환값에
* "redirect:재요청주소"; 작성
* => 어노테이션에 들어가는 요청 주소를 작성하라는 의미
* redirect는 get방식
@RequestParam
@RequestParam 어노테이션 - 낱개 파라미터 얻어오기
/*
	 * 2. @RequestParam 어노테이션 - 낱개 파라미터 얻어오기
	 *
	 * - request 객체를 이용한 파라미터 전달 어노테이션 - 매개변수 앞에 해당 어노테이션을 작성하면, 매개변수에 값이 주입됨. -
	 * 주입되는 데이터는 매개변수의 타입에 맞게 형변환이 자동으로 수행됨.
	 *
	 * [기본 작성법]
	 *
	 * @RequestParam("key") 자료형 매개변수명
	 *
	 * [속성 추가 작성법]
	 *
	 * @RequestParam(value="key", required=false, defaultValue="1") required=true가
	 * 기본값 => 즉, 필수적으로 매개변수가 넘어와야 한다는 의미 => 안오면 400에러가 나옴
	 *
	 * value : 전달받은 input 태그의 name 속성값(파라미터 key) required : 입력된 name 속성값 파라미터 필수 여부
	 * 지정(기본값 true) -> required=true인 파라미터가 존재하지 않는다면 400(Bad Request) 에러 발생 -> ""
	 * (빈문자열)일 때는 에러 발생 X (파라미터가 존재하지 않는것이 아니라 name속성값="" 로 넘어오기 때문에)
	 *
	 * defaultValue : 파라미터 중 일치하는 name속성값이 없을 경우에 대입할 값 지정. -> required=false 인 경우
	 * 사용 => 기본값을 의미
	 *
	 */
	 @PostMapping("test2") // /param/test2 POST 방식 요청 매핑
	public String paramTest2(@RequestParam("title") String title, @RequestParam("writer") String writer,
			@RequestParam("price") int price,
			@RequestParam(value = "publisher", required = false, defaultValue = "1") String publisher) {
		log.debug("title : " + title);
		log.debug("writer : " + writer);
		log.debug("price : " + price);
		log.debug("publisher : " + publisher);
		// 만약 publisher의 name값이 없이 넘겨오면 다음과 같은 에러가 발생한다.
		// There was an unexpected error (type=Bad Request, status=400).
		// Required parameter 'publisher' is not present.

		return "redirect:/param/main";
	}
- publisher에 name이 없이 전달될 때, publisher에 defaultValue가 1이기 때문에 1로 출력
- required=false이기 때문에, 에러가 발생하지 않음
- required=true(기본값)면 전달인자가 전달되지 않으면 에러 발생
- 아무 값을 넣지 않고 제출하면 에러 발생
- Method parameter 'price': Failed to convert value of type 'java.lang.String' to required type 'int'; For input string: "”
- int형으로 자동 형변환을 하는데, 비어있기 때문에, 빈문자열로 넘어와서 int로 바꿀려고 할 때 문제가 발생
@RequestParam 여러개 파라미터 얻어오기
@PostMapping("test3")
	public String paramTest3(@RequestParam("color") String[] colorArr, @RequestParam("fruit") List<String> fruitList,
			@RequestParam Map<String, Object> paramMap) {

		log.debug("colorArr : " + Arrays.toString(colorArr));
		log.debug("fruitList: " + fruitList);
		log.debug("paramMap : " + paramMap);
		// @RequestParam Map<String, Object> paramMap
		// -> 제출된 모든 파라미터가 Map에 저장된다
		// -> 같은 name 속성을 가진 파라미터는 배열이나 List 형태가 아님!!!
		// -> 첫번째로 제출된 valeu값만 저장이 됨
		return "redirect:/param/main";
	}
@ModelAttribute를 이용한 파라미터 얻어오기
- @ModelAttribute
- DTO (또는 VO)와 같이 사용하는 어노테이션
- 전달받은 파라미터의 name속성값이
- 함께 사용되는 DTO의 필드명과 같으면 자동으로 setter를 호출해서 필드에 값을 저장
// ⭐⭐⭐ (자주 사용) ModelAttribute를 이용한 파라미터 얻어오기
	// @ModelAttribute
	// - DTO (또는 VO)와 같이 사용하는 어노테이션

	// ⭐ 전달받은 파라미터의 name속성값이
	// 함께 사용되는 DTO의 필드명과 같으면
	// 자동으로 setter를 호출해서 필드에 값을 저장

	// id, pw, name, age는 db에 저장하기위해서 사용자에게 입력 받음

	// *** 주의 사항 ***
	// - DTO에 기본 생성자가 필수로 존재해야 함
	// - DTO에 setter가 필수로 존재해야 함

	// ⭐ @ModelAttribute를 이용해 값이 필드에 세팅된 객체를
	// "커맨드 객체"라고 부름
	// @ModelAttribute는 생략 가능!
	// -> 커맨드 객체라고 생각함

	@PostMapping("test4")
	public String paramTest4(/* @ModelAttribute */Member inputMember) {
		// name값과 필드명이 같다면, setter가 자동으로 진행됌
		// 또한, DTO(Member)는 기본생성자가 필요
		// Member inputMember = new Member(); => 내부적으로 자동으로 일어남
		// 그리고, Setter가 진행되기 때문에, Setter 또한 정의되어 있어야 한다.

		// ModelAttribute로 만들어진 Member 객체인 inputMember는 커맨드 객체로 불림
		log.debug("inputMember : " + inputMember);
		return "redirect:/param/main";
	}
demoProject2(thymeleaf)
클라이언트가 브라우저 주소창에 localhost
‘/’로 요청이 가면 → index.html 받아서 응답
‘/’로 요청이 가면 → Controller가 받도록 함 → DB → 응답(forward)
⇒ 따라서, 메인 페이지에 대한 컨트롤러를 만들어줄 것
⇒ jsp/servlet에서는 다음과 같이 진행함
- index.jsp에서 <jsp:forward /> → Servlet → DB → 응답(forward)
MainController.java
package edu.kh.demo.controller;

import org.springframework.stereotype.Controller;
import org.springframework.web.bind.annotation.RequestMapping;

@Controller // 요청/응답 제어 역할 명시 + Bean 등록
public class MainController {

	// "/" 주소로 요청 시 main.html 파일로 forward
	@RequestMapping("/")
	public String mainPage() {

		// forward : 요청 위임
		// thymeleaf : Spring Boot에서 사용하는 템플릿 엔진(html 파일 사용)

		// thymeleaf를 이용한 html로 forward시
		// 사용되는 접두사, 접미사 존재

		// 접두사 : classpath:/templates/
		// 접미사 : .html

		// -> classpath:templates/common/main.html
		return "common/main";
	}
}
<!DOCTYPE html>
<html lang="en">
  <head>
    <meta charset="UTF-8" />
    <meta name="viewport" content="width=device-width, initial-scale=1.0" />
    <title>thymeleaf</title>
  </head>
  <body>
    <h1>thymeleaf</h1>
  </body>
</html>
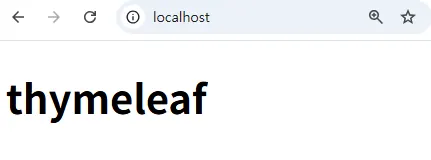
⇒ main 페이지가 index.html이 아닌, “/”에 대한 요청을 MainController가 받아서 main.html로 forward하게끔 수정
⇒ 이렇게 구성을 해야 DB에 대한 데이터를 뿌려줄 수 있게 됌
thymeleaf
1. 템플릿 엔진
  템플릿 양식과 특정 데이터 모델에 따른 입력 자료를 합성하여
  결과 문서(응답 화면)를 출력하는 것
  -> 만들어둔 화면(html)에 데이터를 추가하여 하나의 html로 만들어서 응답
  (JSP도 템플릿 엔진!)
타임리프 홈페이지
2. Thymeleaf
  웹 및 독립 실행형 환경을 모두 지원하는 최신 서버 측 Java 템플릿 엔진
  -> 웹 실행    == 요청 시 포워드 되는 화면
  -> 독립 실행  == html 파일만 실행
  HTML 파일에서 th(Thymeleaf) 속성을 이용해
  컨트롤러로 부터 전달 받은 데이터를 이용해 동적 페이지를 만들 수 있음.
  Spring Boot에서는 JSP가 아닌 Thymeleaf 사용을 권장하고 있음.
model
@Controller
public class ExampleController {

	/*
	 * Servlet 내장 객체 범위 : page < request < session < application
	 *
	 *
	 * Model (org.springframework.ui.Model) - Spring에서 데이터 전달 역할을 하는 객체
	 *
	 * - 기본 scope : request
	 *
	 * - @SerssionAttribute와 함께 사용시 session scope로 변환이 가능
	 *
	 * [기본 사용법] model.addAttribute(key, value)
	 */
	@GetMapping("ex1") // /example/ex1 GET 방식 요청 매핑
	public String ex1(HttpServletRequest request, Model model) {
		// src/main/resources/templates/example/ex1.html로 forward
		request.setAttribute("test1", "HtppServletRequest로 전달한 값"); // request scope
		model.addAttribute("test2", "Model로 전달한 값");// request scope

		// 단일 값(숫자, 문자열)을 Model을 이용해서 html로 전달
		model.addAttribute("productName", "마이크");
		model.addAttribute("price", 20000);

		return "example/ex1";
	}
}
타임리프 예제
 Spring EL(스프링 표현 언어)
	 - ${key} : 변수, Model 등을 이용해서 세팅한 값 출력

	th:text 속성 = "속성값"
	- 타임리프를 이용해서 속성값을 작성된 태그의 내용으로 출력
	=> innerText로 출력해준다는 의미

	** th 속성은 출력된 화면에서 보여지지 않는다 ! **
	-> 해석된 후 사라짐
	-> 즉, th:text="${test1} 해당 속성이 사라진것처럼 개발자 도구에 찍힘
사용법
<h4 th:text="${test1}">test1 값</h4>
1) 단일 값 출력
	 th:block 태그
	 - 타임리프에서 제공하는 유일한 태그 형식

	 - th 속성을 작성할 html 태그가 마땅히 존재하지 않다고 생각될 때 사용
	 - 조건문, 반복문과 같이 사용되는 경우가 많음
사용법
<th:block th:text="${productName}">상품명</th:block>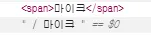
2) 복수값 출력
   List 와 같은 복수값 출력하는 방법
   - 1) 인덱스번호로 요소 하나하나 접근해서 출력
   - 2) th:each="item : ${List 또는 배열}"
   -> 향상된 for 문 형태
   -> List 또는 배열 길이 만큼 반복
   -> 매 반복 시 마다 List 또는 배열의 요소를 차례대로 꺼내어
item 변수에 저장(item 변수명은 자유롭게 작성!)<ul>
<li th:text="${fruitList}">과일목록</li>
<li th:text="${fruitList[0]}">0번 인덱스 과일</li>
<li th:text="${fruitList[1]}">1번 인덱스 과일</li>
<li th:text="${fruitList[2]}">2번 인덱스 과일</li>
</ul>th:each
<ul>
		<th:block th:each="fruit : ${fruitList}">
			<li th:text="${fruit}">과일 목록</li>
		</th:block>
	</ul>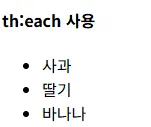
DTO 객체 출력하기
<ul>
		<li th:text="${std}">std 객체</li>
		<li th:text="${std.studentNo}">학번</li>
		<li th:text="${std.name}">이름</li>
		<li th:text="${std.age}">나이</li>
	</ul>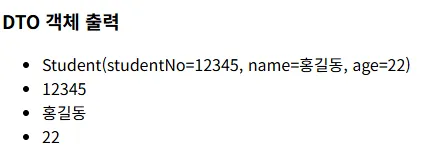
주의💥
- Spring EL 같은 경우 DTO 객체 출력할 때 getter가 필수 작성되어 있어야 함
-> ${Student.name} == ${Student.getName()}과 같기 때문이다.
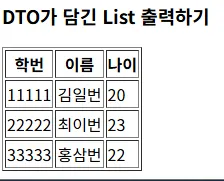
DTO가 담긴 List 출력하기(th:object)
<table border="1">
		<thead>
			<tr>
				<th>학번</th>
				<th>이름</th>
				<th>나이</th>
			</tr>
		</thead>
		<tbody>
			<tr th:each="std : ${stdList}" th:object="${std}">
				<td th:text="*{studentNo}">학번</td>
				<td th:text="*{name}">이름</td>
				<td th:text="*{age}">나이</td>
			</tr>
		</tbody>
	</table>
⇒ 단순히 key값으로 쓰고 싶을 때, th:object로 향상된 for문에서 하나씩 건내주는 변수값으로 등록하고 *${필드명}을 작성해주면 됌