오늘은 TypeScript 공부를 시작한지 2일차가 되었다. 오늘 공부한 내용을 정리해보려고 한다.
3.0 Call Signatures
복습
화살표 함수에서의 typescript 사용법
type Add = (a: number, b: number) => number;

const add: Add = (a, b)=> a + b;
3.1 Overloading
Overloading
함수가 서로 다른 여러 개의 call signatures를 가지고 있을 때 발생 시킨다.
⇒ call signatures란? 우리가 타입스크립트에게 이 함수가 어떻게 호출되는지 설명해주는 부분, 즉 위 코드에서 (a: number, b: number ⇒ number) 이렇게 선언해주는 부분처럼 파라미터의 타입은 무엇인지, 리턴 타입은 무엇인지 선언해주는 부분을 의미한다.
잘못된 예시
type Add = {
    (a:number, b: number): number,
    (a:number, b: string): number
}
const add: Add = (a, b) => a + b;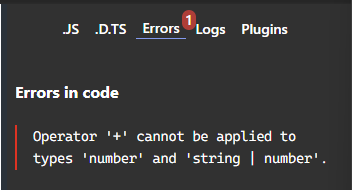
그냥 위 코드처럼 작성해주면 b는 number, 혹은 string이 될 수도 있어서 number 와 string은 “+” 를 할 수 없다고 해준다.
옳은 예시
type Config = {
    path: string,
    state: object
}

type Push = {
    (path: string) : void,
    (config: Config) : void
}
const push: Push = (config) =>{
    if(typeof config === "string") {
        console.log(config);
    }
    else {
        console.log(config.path)
    }
}
config가 string인지, Config 타입인지 확인해주고, 해당하는 타입을 선택할 수 있다.
if문에서 string은 string 타입을, else문에서는 config 타입을 선택할 수 있다.
다른 개수의 파라미터를 가질 때
type Add = {
    (a: number, b: number) : number,
    (a: number, b: number, c: number) : number
}

const add: Add = (a, b, c) => {
    return a + b
}
Add 타입을 부를 때, a, b 혹은 a, b, c를 부를 수 있기 때문에 타입 스크립트는 에러 메시지를 보내준다.
type Add = {
    (a: number, b: number) : number,
    (a: number, b: number, c: number) : number
}

const add: Add = (a, b, c?:number) => {
    if(c) return a + b + c;
    return a + b
}

add(1, 2)
add(1, 2, 3)
따라서, c는 optional하다는 것을 선언해주면 된다.
3.2 Polymorphism(다형성)
polymorphism은 여러가지 다른 구조들을 의미한다.
type SuperPrint = {
    (arr: number[]) : void
    (arr: boolean[]) :void
    (arr: string[]) : void
}
const superPrint: SuperPrint = (arr)=>{
    arr.forEach(i => console.log(i));
}
superPrint([1, 2, 3, 4]);
superPrint([true, false, true, true]);
superPrint(["a", "b", "c"]);
위 코드에서 문제점은 call signatures가 3개다.
만약 superPrint([1, 2, true, false]) 와 같은 코드를 쓰고 싶으면 위 코드는 작동하지 않는다.
→ 어떤 타입이든 동작하게 하고싶을 때는 어떻게 할까?
type SuperPrint = {
    (arr: number[]) : void,
    (arr: boolean[]) :void,
    (arr: string[]) : void,
    (arr: (number | boolean)[]) : void
}
const superPrint: SuperPrint = (arr)=>{
    arr.forEach(i => console.log(i));
}
superPrint([1, 2, 3, 4]);
superPrint([true, false, true, true]);
superPrint(["a", "b", "c"]);
superPrint([1, 2, true, false])
위와 같이 number | boolean 조건을 추가해주면 된다.
하지만, 위와 같이 작성을 하게 된다면 모든 가능성을 다 조합해서 만들어야 하기 때문에 좋은 방법이 아니다.
그래서 generic 방식을 채택한다.
generic 방식은 타입스크립트가 그 타입이 뭔지 유추한다.
generic을 사용하는 이유는?
call signature를 작성할 때, 들어올 확실한 타입을 모를 때 generic을 사용한다.
혹은 call signature를 작성하는데 concrete type을 알 수 없을 때 사용한다.
⇒ concrete type란? number, string, boolean 등 타입을 의미한다.
generic 사용 방법
type SuperPrint = {
    <TypePlaceholder>(arr: TypePlaceholder[]) : void
}
위와 같이 <> 안에 제네릭 이름을 선언해주면 된다. 그리고 number 타입을 TypePlaceholder로 바꿔줘야 한다.
type SuperPrint = {
    <TypePlaceholder>(arr: TypePlaceholder[]) : void
}
const superPrint: SuperPrint = (arr)=>{
    arr.forEach(i => console.log(i));
}
superPrint([1, 2, 3, 4]);
superPrint([true, false, true, true]);
superPrint(["a", "b", "c"]);
superPrint([1, 2, true, false])
따라서, 타입 스크립트는 유추한 타입으로 call signature를 보여준다.
3.3 Generics Recap
제네릭 타입 추가하기
type SuperPrint = {
    <T, M>(a: T[], b: M) : T
}
const superPrint: SuperPrint = (arr) => arr[0];

const a = superPrint([1, 2, 3, 4], "x");
위 코드와 같이 타입 스크립트는 제네릭을 처음 인식했을 때와 제네릭의 순서를 기반으로 제네릭의 타입을 알게 된다.
3.4 Conclusions
type 선언이 아닌 함수로 선언하는 방법
function superPrint<T>(a: T[]){
    return a[0];
}

const a = superPrint([1, 2, 3, 4]);
const b = superPrint([true, false, true, true]);
const c = superPrint(["a", "b", "c"]);
const d = superPrint([1, 2, true, false])
이전에는 type을 선언해서 구현했었지만, 위와 같이 함수로 선언할 수도 있다.
제네릭을 쓰는 또 다른 경우
제네릭을 사용해서 타입을 생성할 수도 있고 어떤 경우는 타입을 확장할 수도 있다.
예시
type Player<E> = {
    name: string,
    extraInfo: E
}
type NicoExtra = {
    favFood:string
}
type NicoPlayer = Player<NicoExtra>

const nico :NicoPlayer ={
    name: "nico",
    extraInfo:{
        favFood: "kimchi"
    }
}
위와 같이 타입을 생성하고 그 타입을 또 다른 타입에 넣어서 사용할 수도 있다.
즉, 타입끼리 재사용이 가능해진다.