BLE Profile안의 Service, Characteristic은 어떻게 동작할까 ?
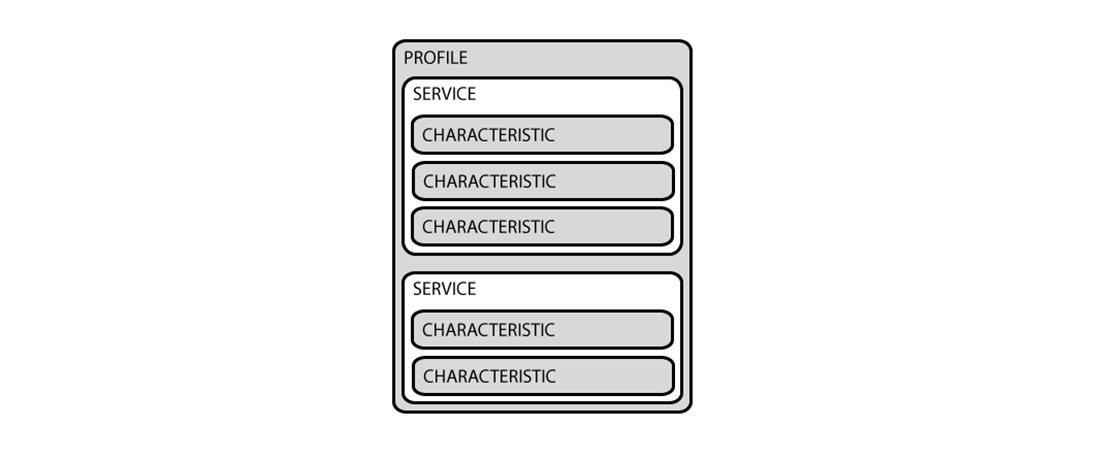
BLE는 Profile의 전달을 통해 통신이 이루어지는데 Profile, Service, Characteristic 등의 용어를 이해하기는 했는데 그냥 뜬 구름으로만 보여서 Android 소스를 통해 어떻게 보이는지 어떻게 이용하면 되는지를 조사
기본 소스는 https://github.com/android/connectivity-samples/tree/main/BluetoothLeGatt
시작은 DeviceScanActivity.java 파일의 onCreate에서 BluetoothManager로부터 mBluetoothAdapter 객체를 생성한 후 이 객체의 Method를 사용한다.

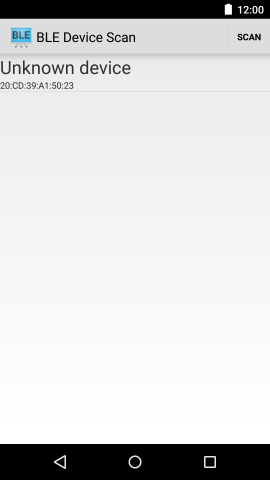
Scan 동작 시작 (스캔 과정은 알 수 없음. Android OS가 수행)
- Scan 버튼을 누르거나 onResume 상태일 때 startLeScan 호출
- 스캔 결과는 mLeScanCallback 함수로 전달
mLeScanCallback 함수 내용
// Device scan callback.
private BluetoothAdapter.LeScanCallback mLeScanCallback =
       new BluetoothAdapter.LeScanCallback() {

   @Override
   public void onLeScan(final BluetoothDevice device, int rssi, byte[] scanRecord) {
       runOnUiThread(new Runnable() {
           @Override
           public void run() {
               Log.d(TAG, "onLeScan addDevice");
               mLeDeviceListAdapter.addDevice(device);
               mLeDeviceListAdapter.notifyDataSetChanged();
           }
       });
   }
};
내용을 보면 BLE device (BluetoothDevice 객체, 정보를 저장할 수 있는 객체) LeDeviceListAdapter 에 저장함.
class LeDeviceListadapter 는 method는 아래와 같다.
- addDevice
- getDevice
- clear
- getCount
- getItem
- getItemId
- getView
스캔 된 리스트 중 하나를 선택하면 (onListItemClick)
- 선택된 리스트의 BluetoothDevice 정보를 DeviceControlActivity 로 전달하면서
- 새로운 Activity 실행

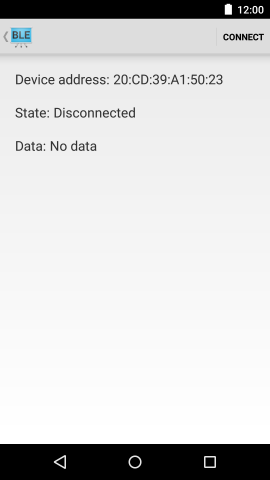
- Layout에 따라 Scan된 Device 아래와 같이 정보를 표시
((TextView) findViewById(R.id.device_address)).setText(mDeviceAddress);
mGattServicesList = (ExpandableListView) findViewById(R.id.gatt_services_list);
mGattServicesList.setOnChildClickListener(servicesListClickListner);
mConnectionState = (TextView) findViewById(R.id.connection_state);
mDataField = (TextView) findViewById(R.id.data_value);
아직까지 BLE 장치간에 어떤 데이터를 전달하는지 즉 Profile 내용은 알 수 없음
Profile 내용을 알기 위해서는 BLE Peripheral 과 추가의 동작이 필요하다.
(장치간에는 아직 연결이 되지 않았다)
이후의 과정 (BLE 장치와 연결) 을 위해 Bluetooth Service를 준비한다.
Intent gattServiceIntent = new Intent(this, BluetoothLeService.class);
bindService(gattServiceIntent, mServiceConnection, BIND_AUTO_CREATE);
서비스간 연결이 되면 onServiceConnected() 가 호출된다.
서비스 호출하기 전에 먼저 필요한 과정이 있는데 서비스가 호출 (callback) 할 내용 (intent)을 등록의 과정이 필요한데 아래와 같다.
private static IntentFilter makeGattUpdateIntentFilter() {
   final IntentFilter intentFilter = new IntentFilter();
   intentFilter.addAction(BluetoothLeService.ACTION_GATT_CONNECTED);
   intentFilter.addAction(BluetoothLeService.ACTION_GATT_DISCONNECTED);
   intentFilter.addAction(BluetoothLeService.ACTION_GATT_SERVICES_DISCOVERED);
   intentFilter.addAction(BluetoothLeService.ACTION_DATA_AVAILABLE);
   return intentFilter;
}
서비스와 연결 이후 서비스에 디바이스 정보(mDeviceAddress)를 알린다.
mBluetoothLeService.connect(mDeviceAddress);
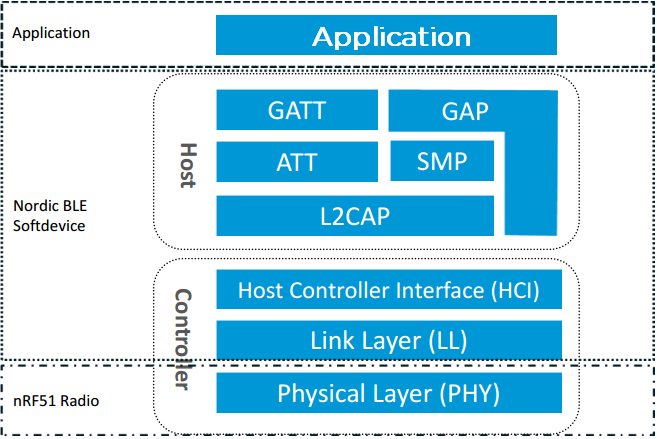
BLE Stack 그림으로 이해하면 지금까지는 GAP의 과정이고 이후부터는 GATT 과정이다.
장치간 연결을 위해 Connect 버튼을 클릭
- mBluetoothLeService.connect(mDeviceAddress); 가 동작
- 연결을 위해서는 Bluetooth Service를 이용해야 하기 때문에 소스코드
Bluetooth Service(소스코드는 BluetoothLeService.java)에 Device 정보를 알려준다. (Profile을 요청하는 의미) - 이 후 서비스는 앞에서 언급한 intent 를 기준으로 동작한다.
mBluetoothGatt = device.connectGatt(this, true, mGattCallback);
mGattCallback이 호출된다.
BluetoothLeService와 연결이 되면 callback(mGattCallback)으로 확인 할 수 있는 것들이다. (intent로 등록한 내용만)
- mGattCallback은
- onConnectionStateChange
- onServicesDiscovered
Profile에 포함된 Service List를 ACTION_GATT_SERVICES_DISCOVERED intent를 통해 알 수 있다.(displayGattServices)
- onCharacteristicRead
서비스를 클릭하면 (readCharacteristic 이 수행)
ACTION_DATA_AVAILABLE intent를 수신
- onCharacteristicChanged
등을 처리한다.
BluetoothGattCallback 동작을 정리하면 아래와 같다.
| 동작 | 결과 |
|---|---|
| connectGatt 호출 | onConnectionStateChange |
| discoverServices 호출 | onServiceDiscovered |
| writeCharacteristic 호출 | onCharacteristicWrite |
| readCharacteristic 호출 | onCharacteristicRead |
| setCharacteristicNotification 호출 | onCharacteristicChanged |
감사합니다. 덕분에 BLE 공부에 도움이 많이 되었어요 ㅎㅎ