1. 인스턴스와 클래스
어떤 공통된 속성을 지니는 구체적인 대상들을 인스턴스라고 하고 이 인스턴스들의 공통속성을 모은 추상적인 개념을 클래스라고합니다.
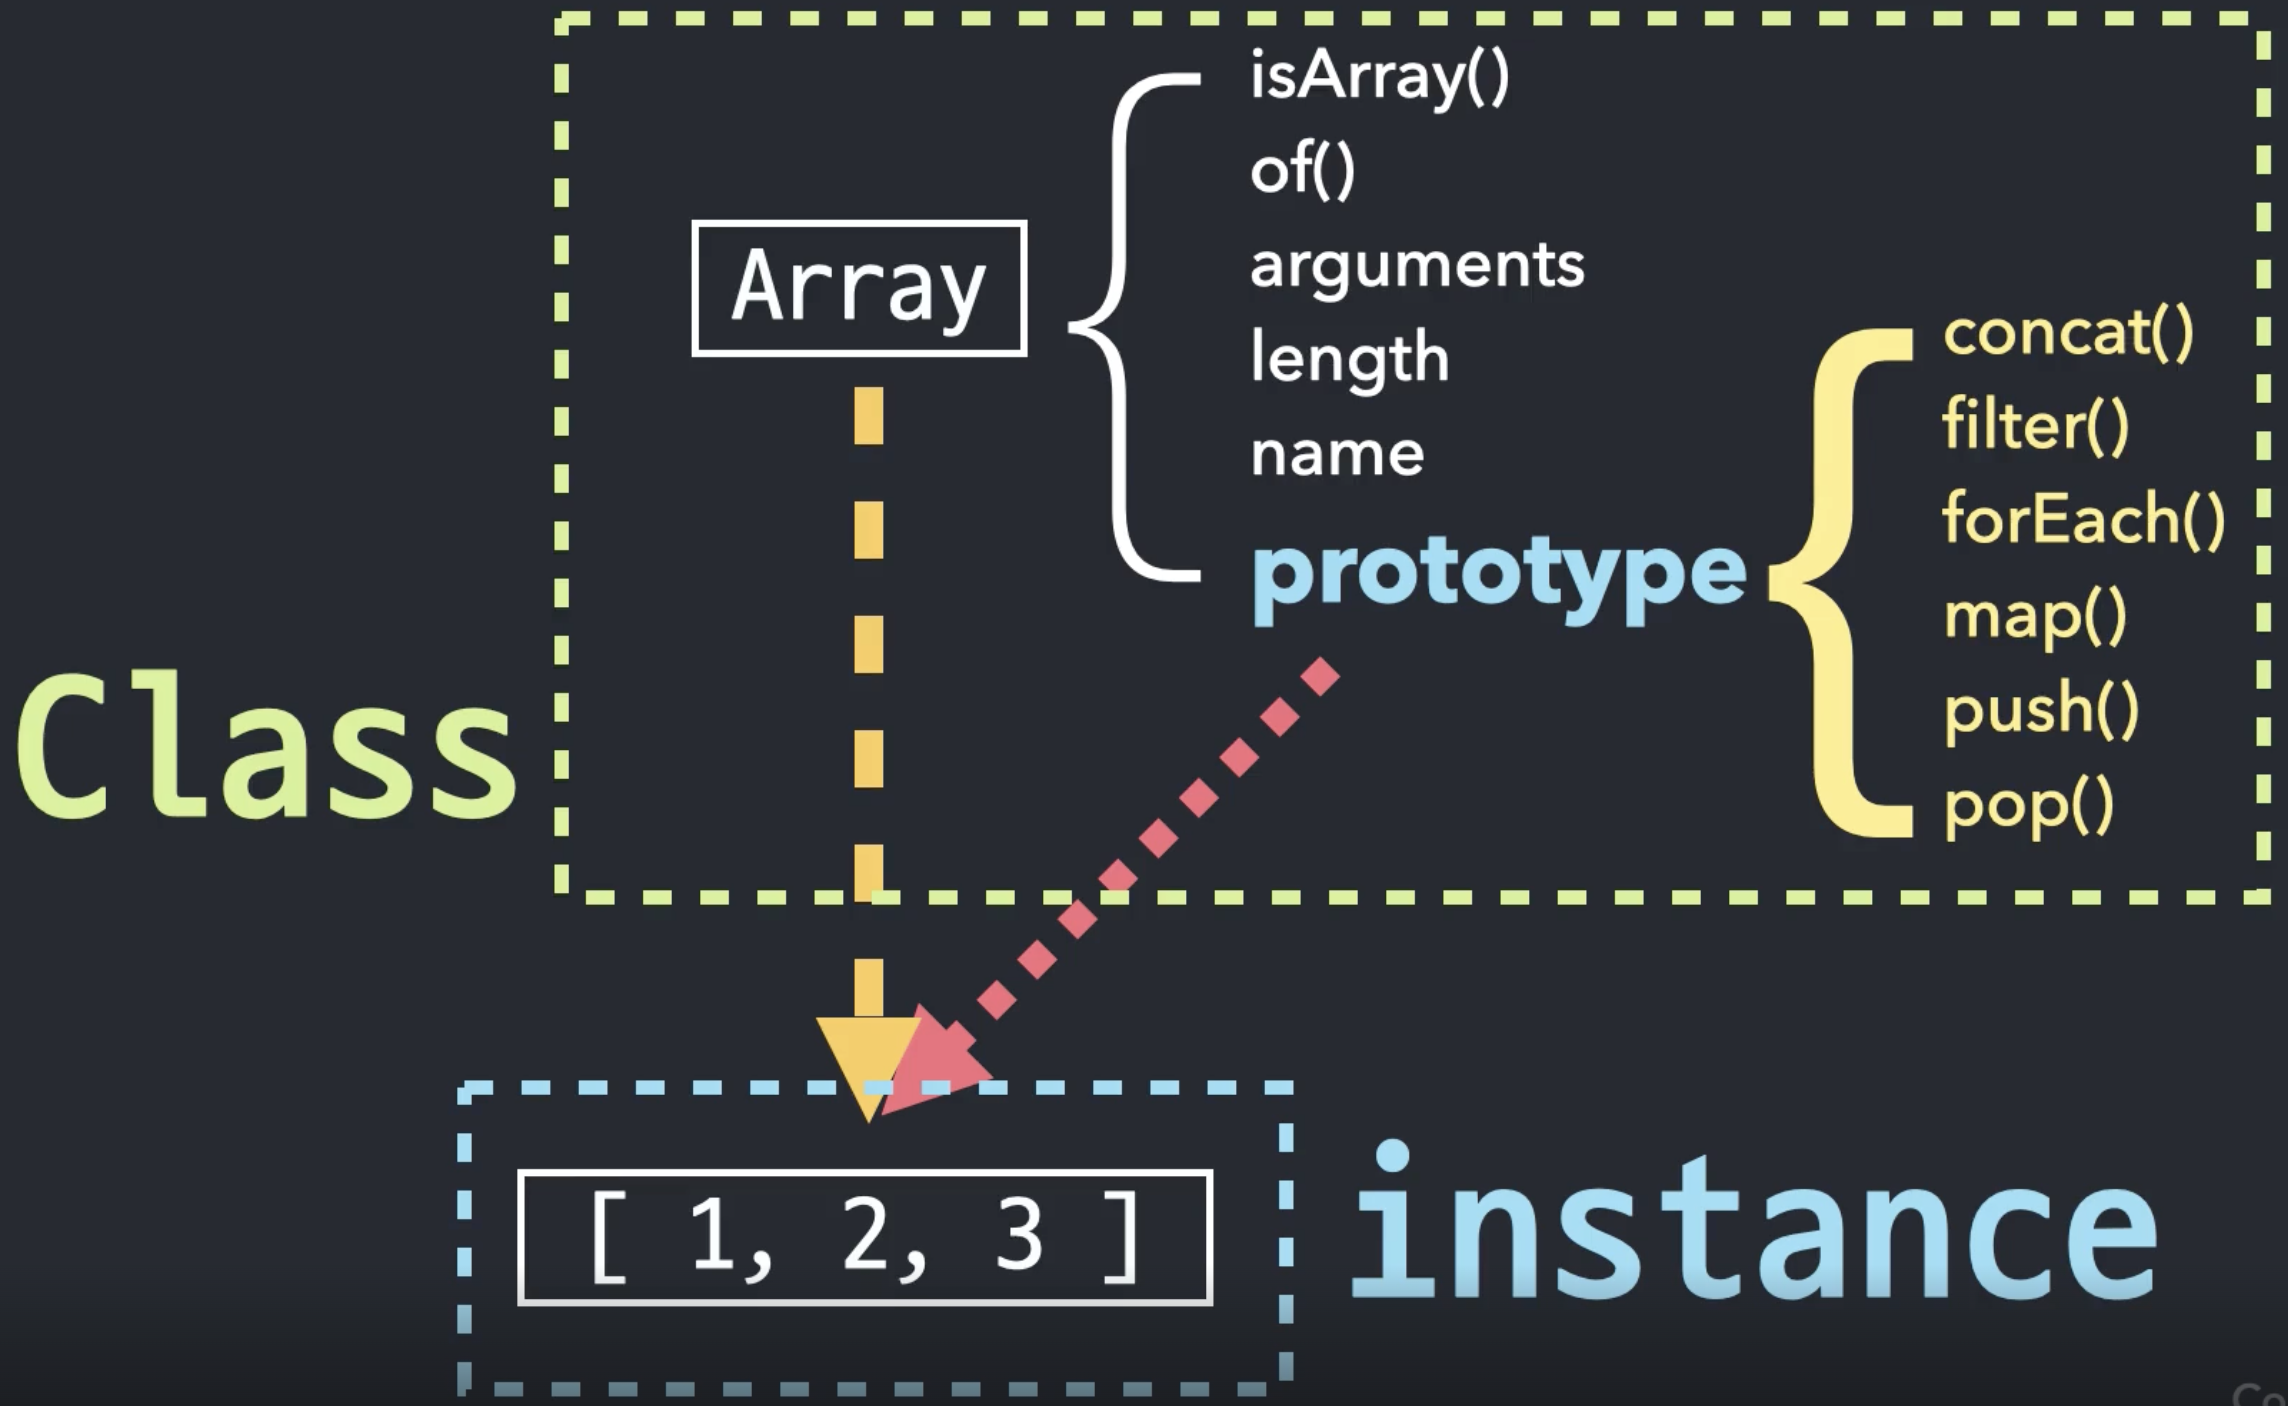
아래는 Array 생성자 함수와 배열 리터럴에 대한 이미지입니다.
Array라는 생성자 함수는 그 자체로 어떤 특별한 역할을 수행하기보다는 주로 생성한 배열 객체들(인스턴스)의 기능을 정의하는 데에 주력하고 있기 때문에 Array 생성자 함수는 개념상의 클래스 역할을 합니다.
이미지 출처: 코어 자바스크립트
클래스는 재사용하고 싶은 논리가 있는 경우라던가 동일한 구조와 논리를 가진 같은 유형의 객체를 계속해서 재생성 하는 경우에 사용하면 좋습니다.
2. Class Field
클래스에서 속성(property)은 필드라고 부릅니다.
클래스의 정의 안에서 값은 콜론(:)이 아닌 등호(=)로 지정하며,
필드 줄의 끝을 반점(,)이 아니라 세미콜론(;)으로 끝냅니다.
class Product {
  title = "DEFAULT";
}
3. Constructor Method (생성자)
클래스의 새 인스턴스를 만들면 JavaScript가 자동으로 new를 호출해서 새로운 인스턴스를 생성하고 실행하는 함수입니다.
생성자가 받은 인자는 this 키워드를 사용해 클래스의 필드에 인자를 지정할 수 있습니다.
class Product {
  title = "DEFAULT";
  imageUrl;
  description;
  price;

  constructor(title, image, desc, price) {
    this.title = title;
    this.imageUrl = image;
    this.description = desc;
    this.price = price;
  }
}
4. 필드 vs. 프로퍼티
클래스에서 속성(property)은 필드라고 부르지만,
객체가 생성되는 과정에서 생성자가 호출되기 때문에 생성자 함수 또는 객체에서는 속성이라고 부릅니다.
class Product {
  // (Public) Class Field
  title = "DEFAULT";

  constructor(title) {
    // (Public) Class Property
  	this.title = title;
  }

  // (Public) Class Method
  printInfo() {
    // (Public) Class Property
    this.num = 1;
  	console.log(this.title, this.category, this.num);
  }
}
또한 클래스 필드는 필수가 아닙니다.
프로퍼티만 사용해도 됩니다.
class Product {
  constructor(title) {
  	this.title = title;
  }


  printInfo() {
  	console.log(this.title, this.category);
  }
}
5. Static (정적 프로퍼티와 메서드)
"prototype"이 아닌 클래스 함수 자체에 메서드를 설정할 수도 있습니다.
정적 프로퍼티와 메서드는 new 키워드로 클래스를 인스턴스화할 필요가 없이 클래스 자체에서 액세스합니다.
class App {
  static init() {
	console.log(this === App)
  }
}

// new 키워드 없이 init 메서드 사용
App.init();
// true

// 인스턴스로 init 메서드 사용시 에러
const app = new App();
app.init()
정적 메서드는 메서드를 프로퍼티 형태로 직접 할당하는 것과 동일한 일을 합니다.
위의 예시 코드와 아래의 예시 코드는 동일합니다.
class App {}

App.init = function() {
  console.log(this === App)
}

// new 키워드 없이 init 메서드 사용
App.init();
// true

// 인스턴스로 init 메서드 사용시 에러
const app = new App();
app.init()
static을 사용하지 않으면 instance를 통해 "prototype"으로 접근하여 메서드를 사용합니다.
class App {
  init() {
	console.log(this === App)
  }
}

// new 키워드 없이 init 메서드 사용
App.init();
// Uncaught TypeError: App.init is not a function


const app = new App();
app.init()
// false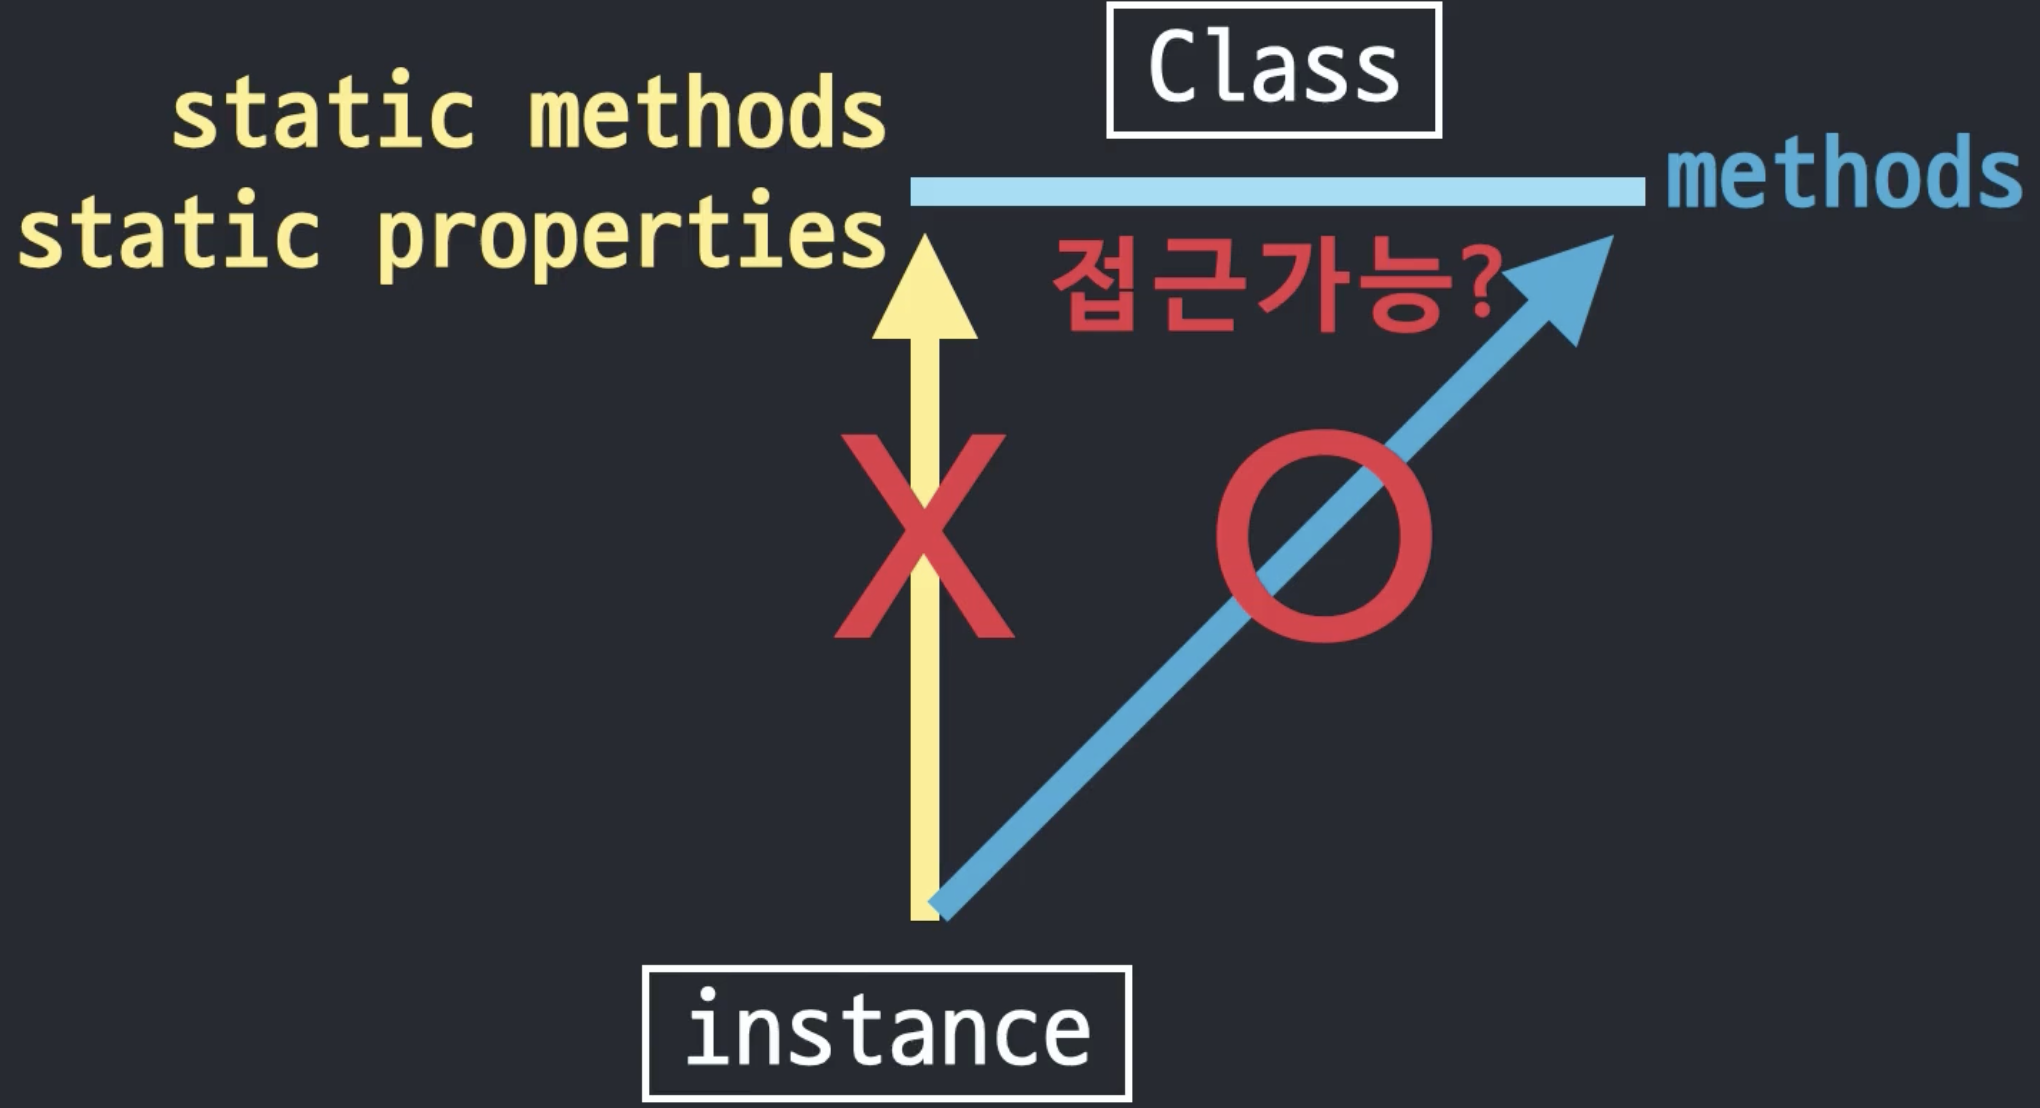
이미지 출처: 코어 자바스크립트
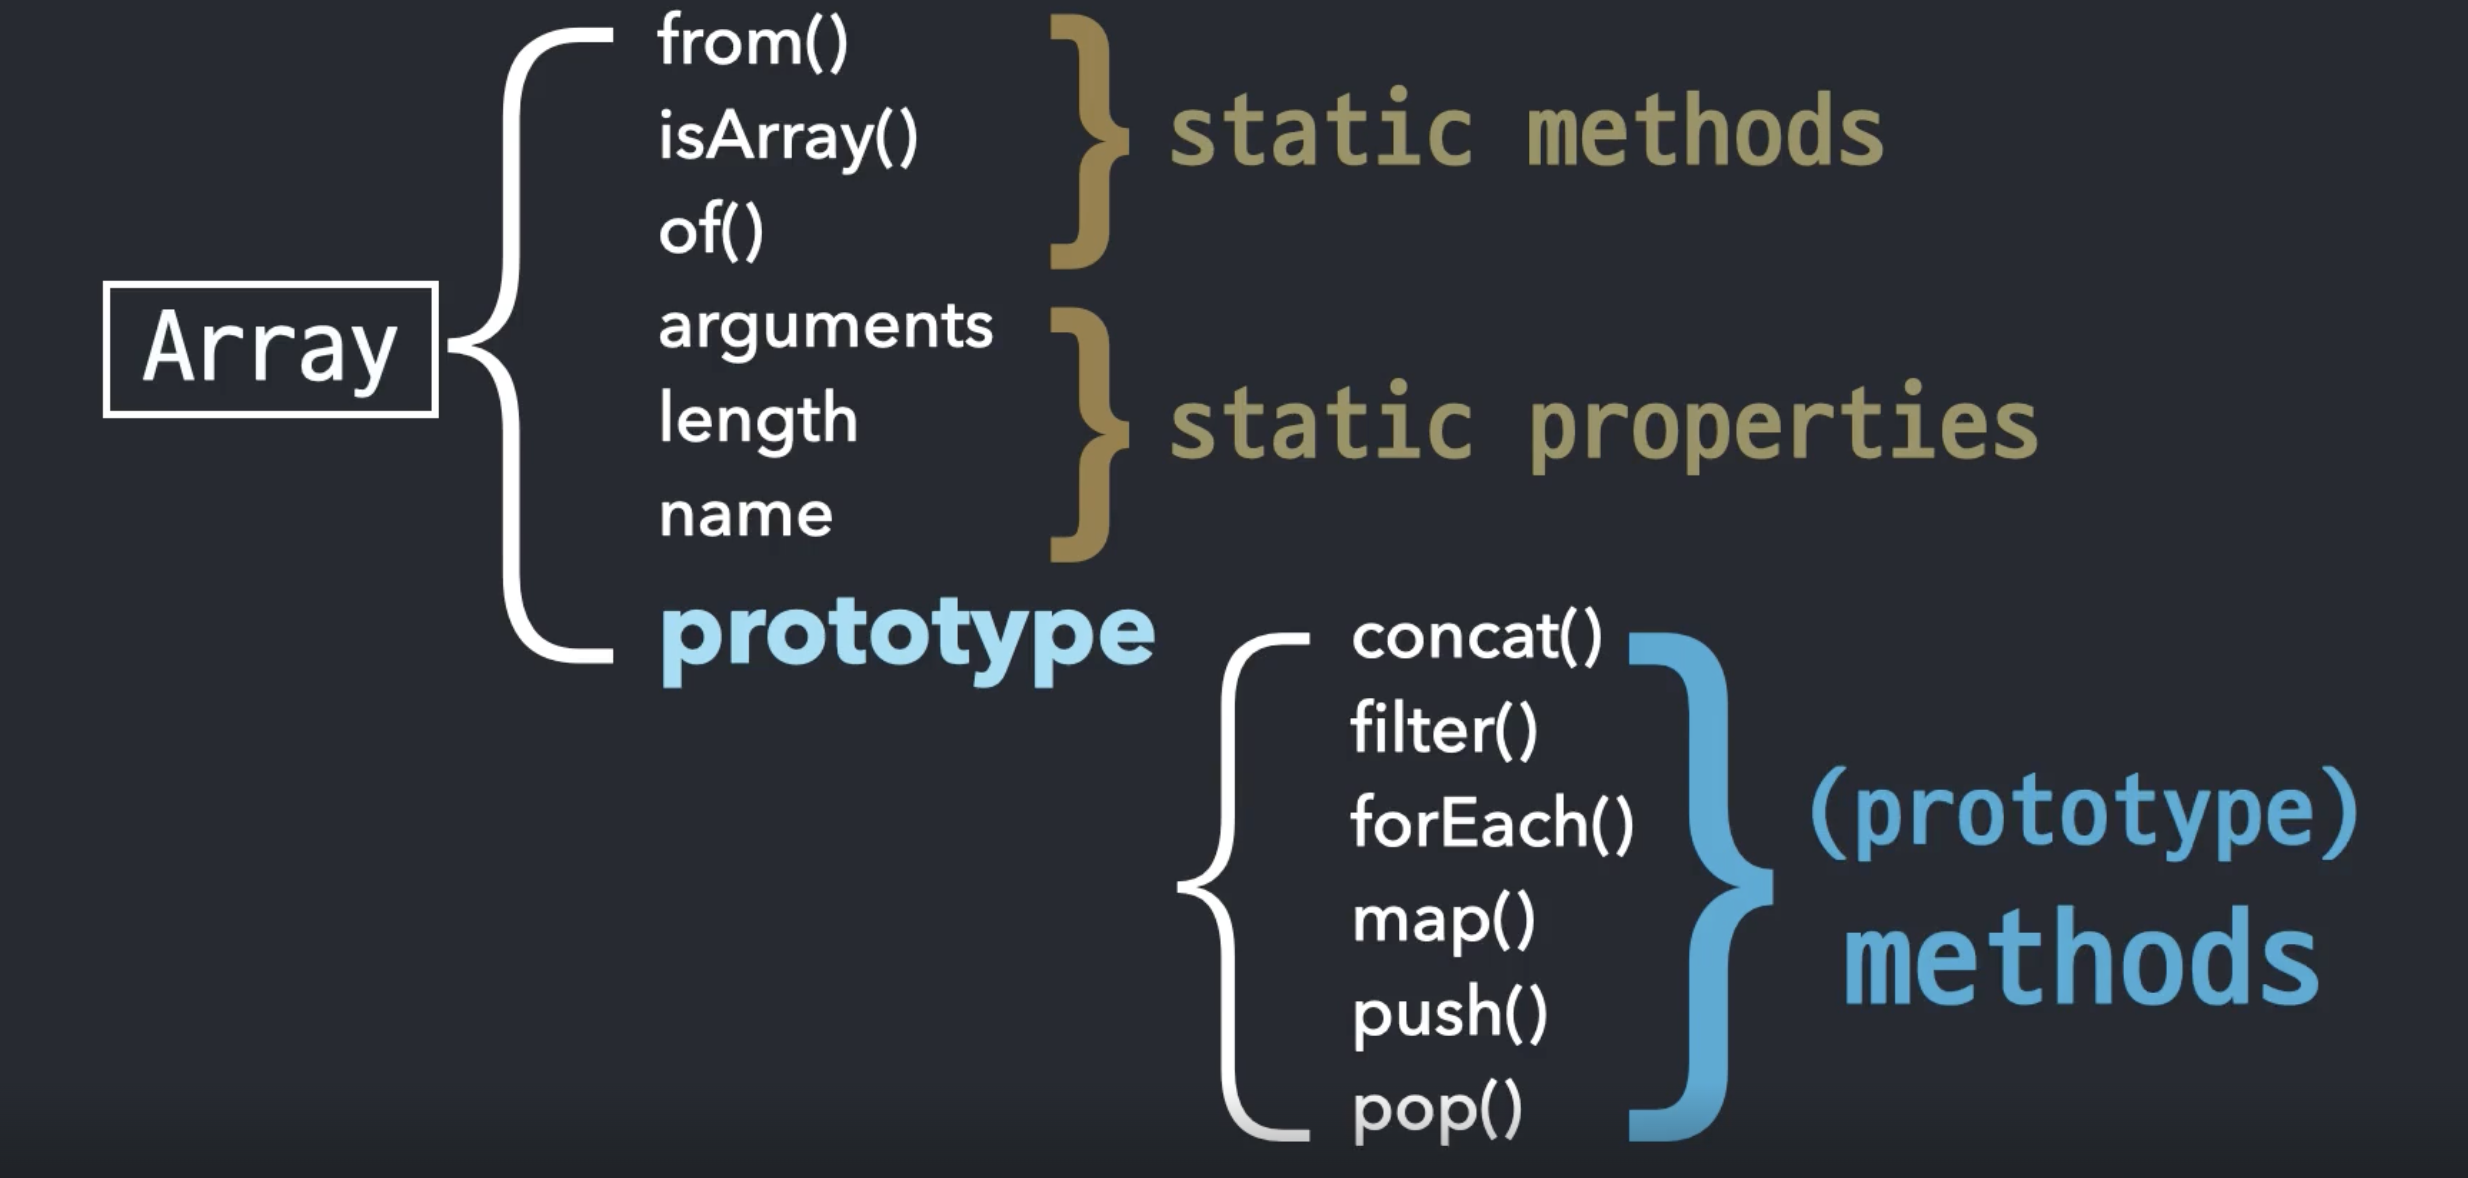
Array 생성자 함수로 예시를 들면 인스턴스에서 사용가능한 메서드가 아닌 Array 생성자 함수로 사용하는 메서드와 프로퍼티에 static을 붙여서 사용합니다.
이미지 출처: 코어 자바스크립트
// array instance가 아닌 Array에 붙여 static 메서드 사용
Array.from([1, 2, 3], (x) => x + x)
Array.isArray([1, 2, 3]);
Array.of(1, 2, 3);
// 배열 리터럴에 붙여 prototype 메서드 사용
const words = ['spray', 'limit', 'elite', 'exuberant', 'destruction', 'present'];

const result = words.filter((word) => word.length > 6);
6. 클래스 상속
사용법만 알고 싶다면 아래의 ES6에서의 상속만 보시길 바랍니다.
상속 원리
예시
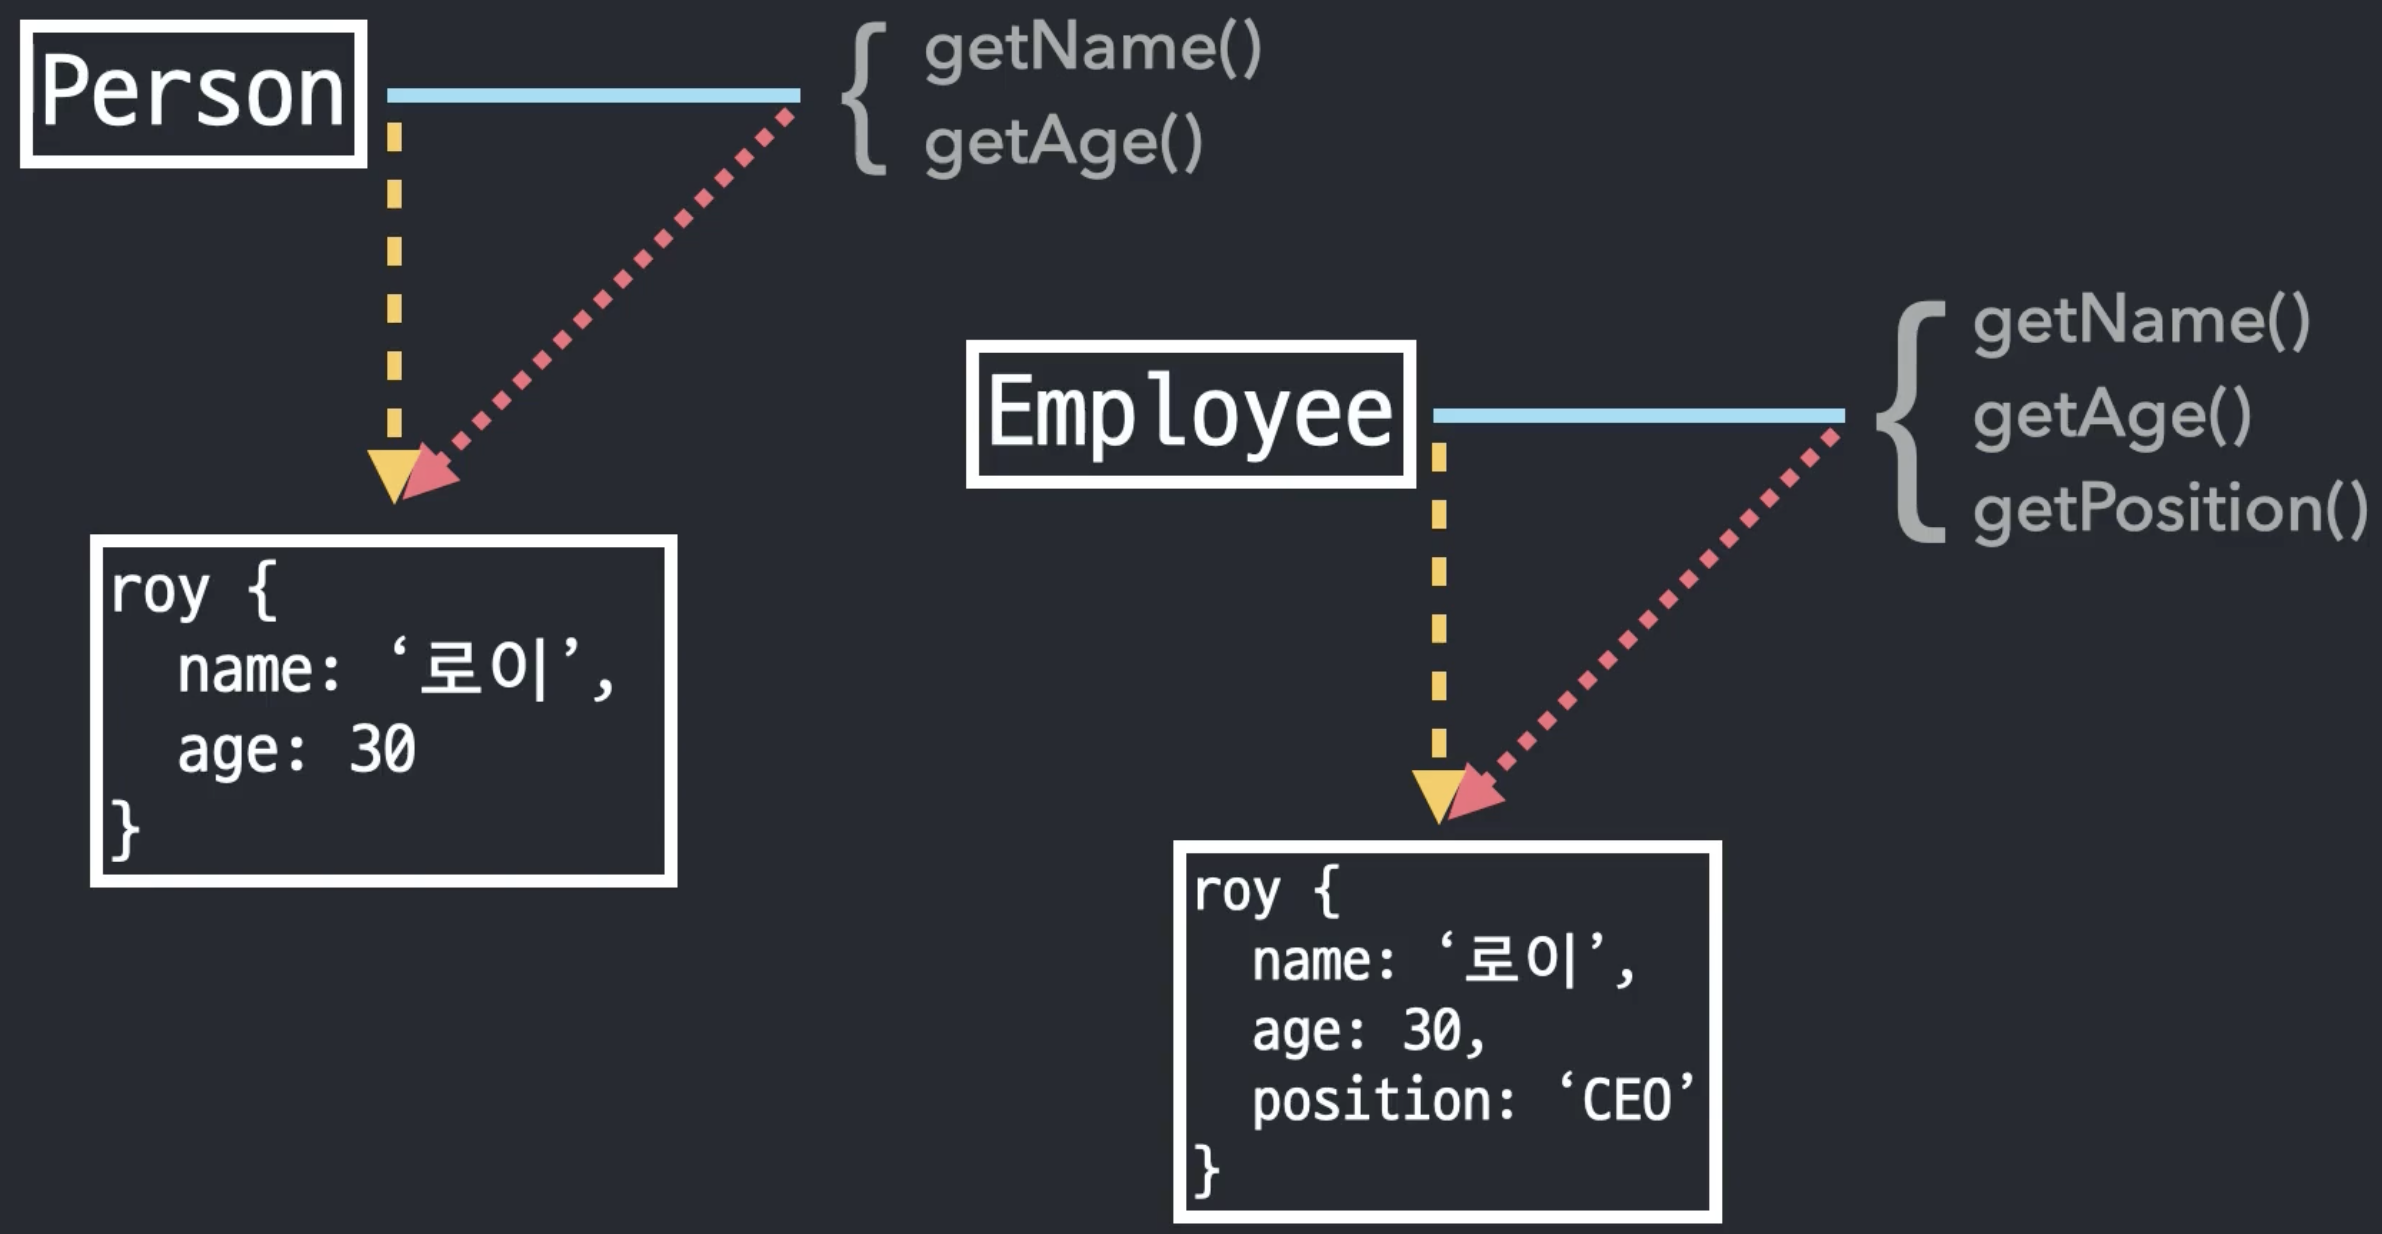
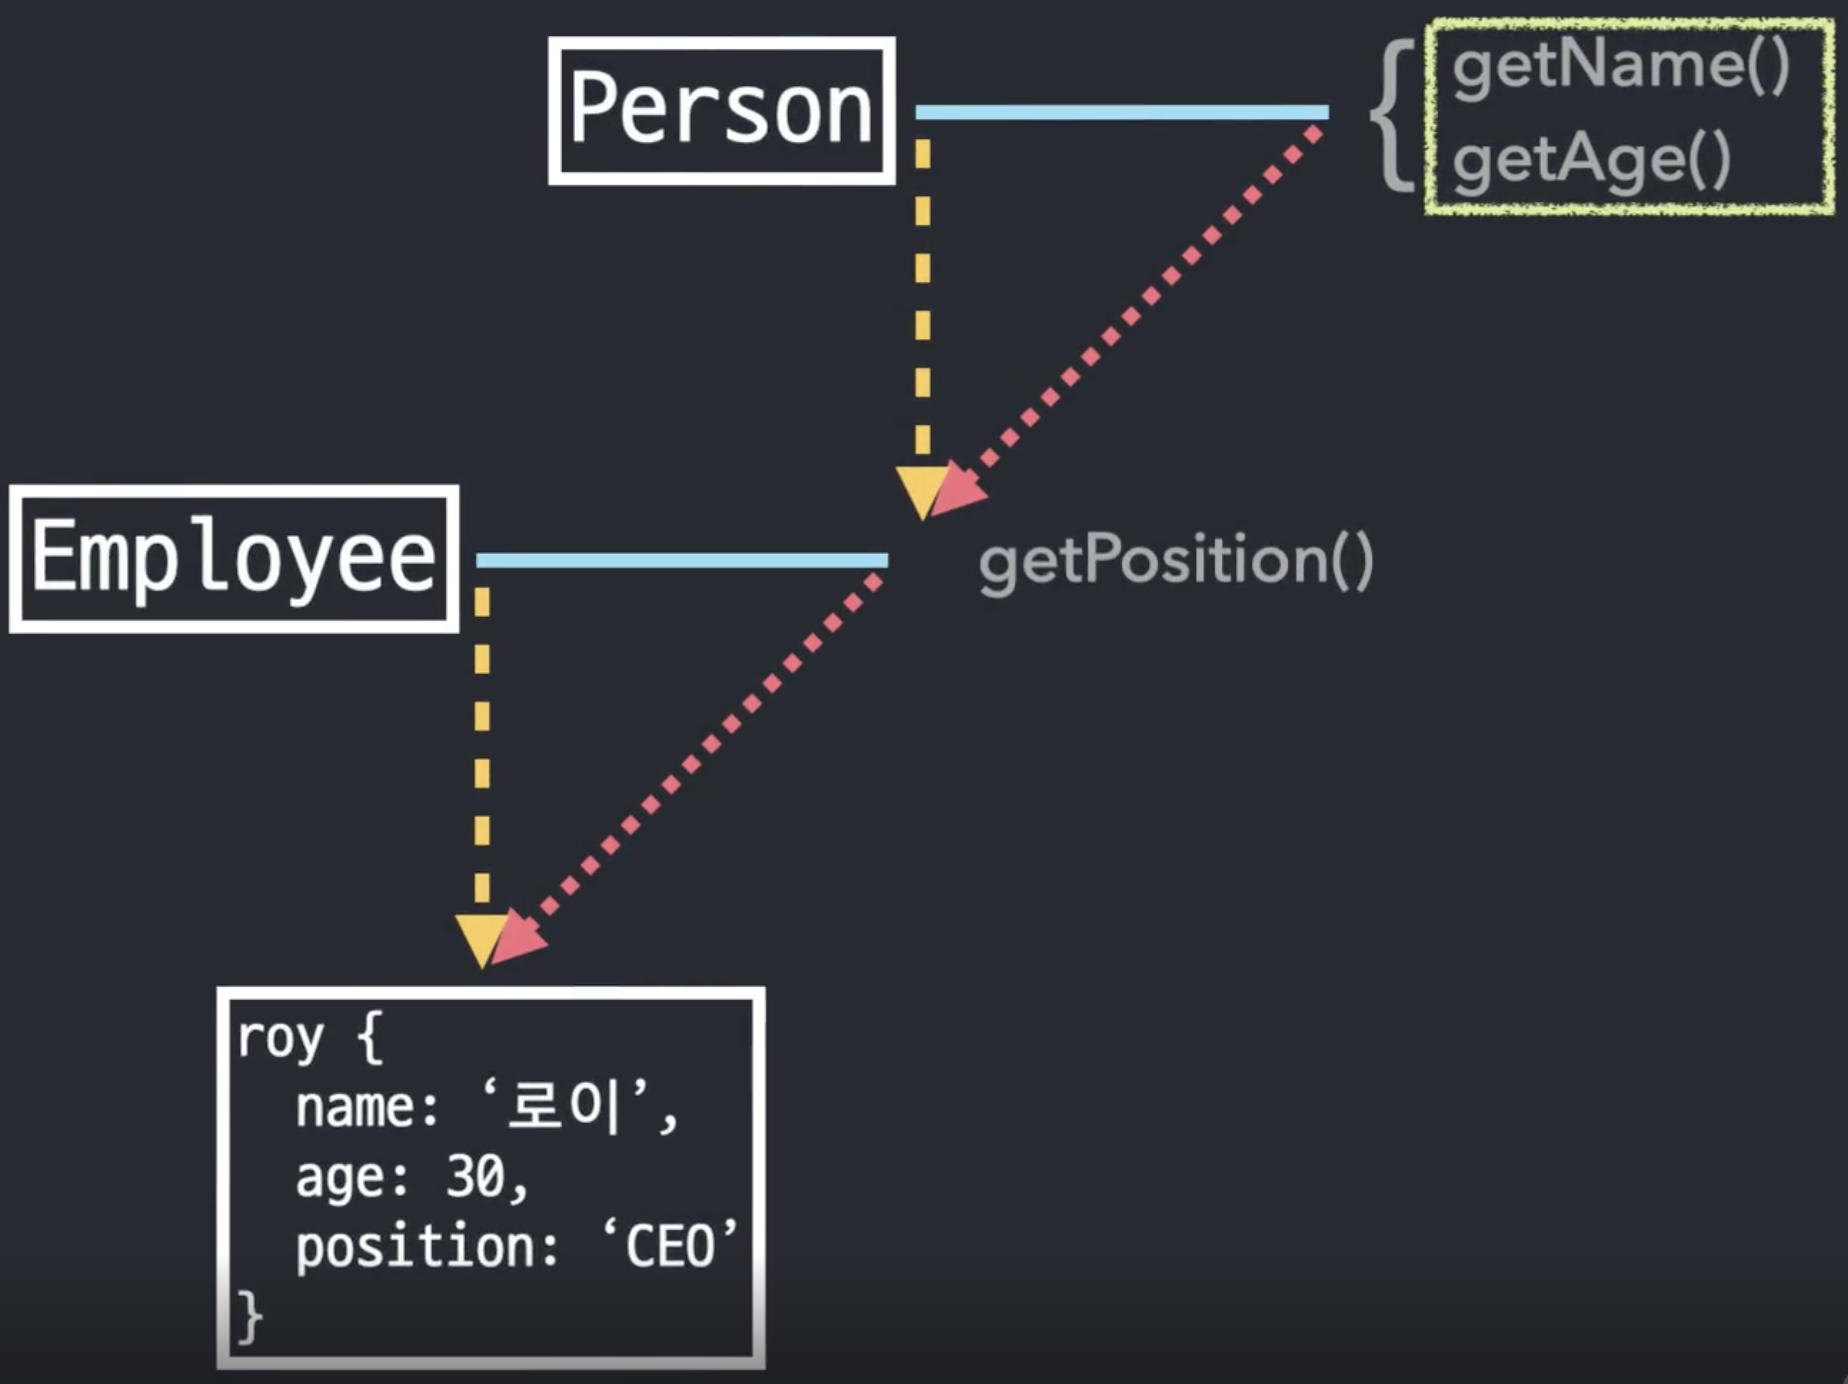
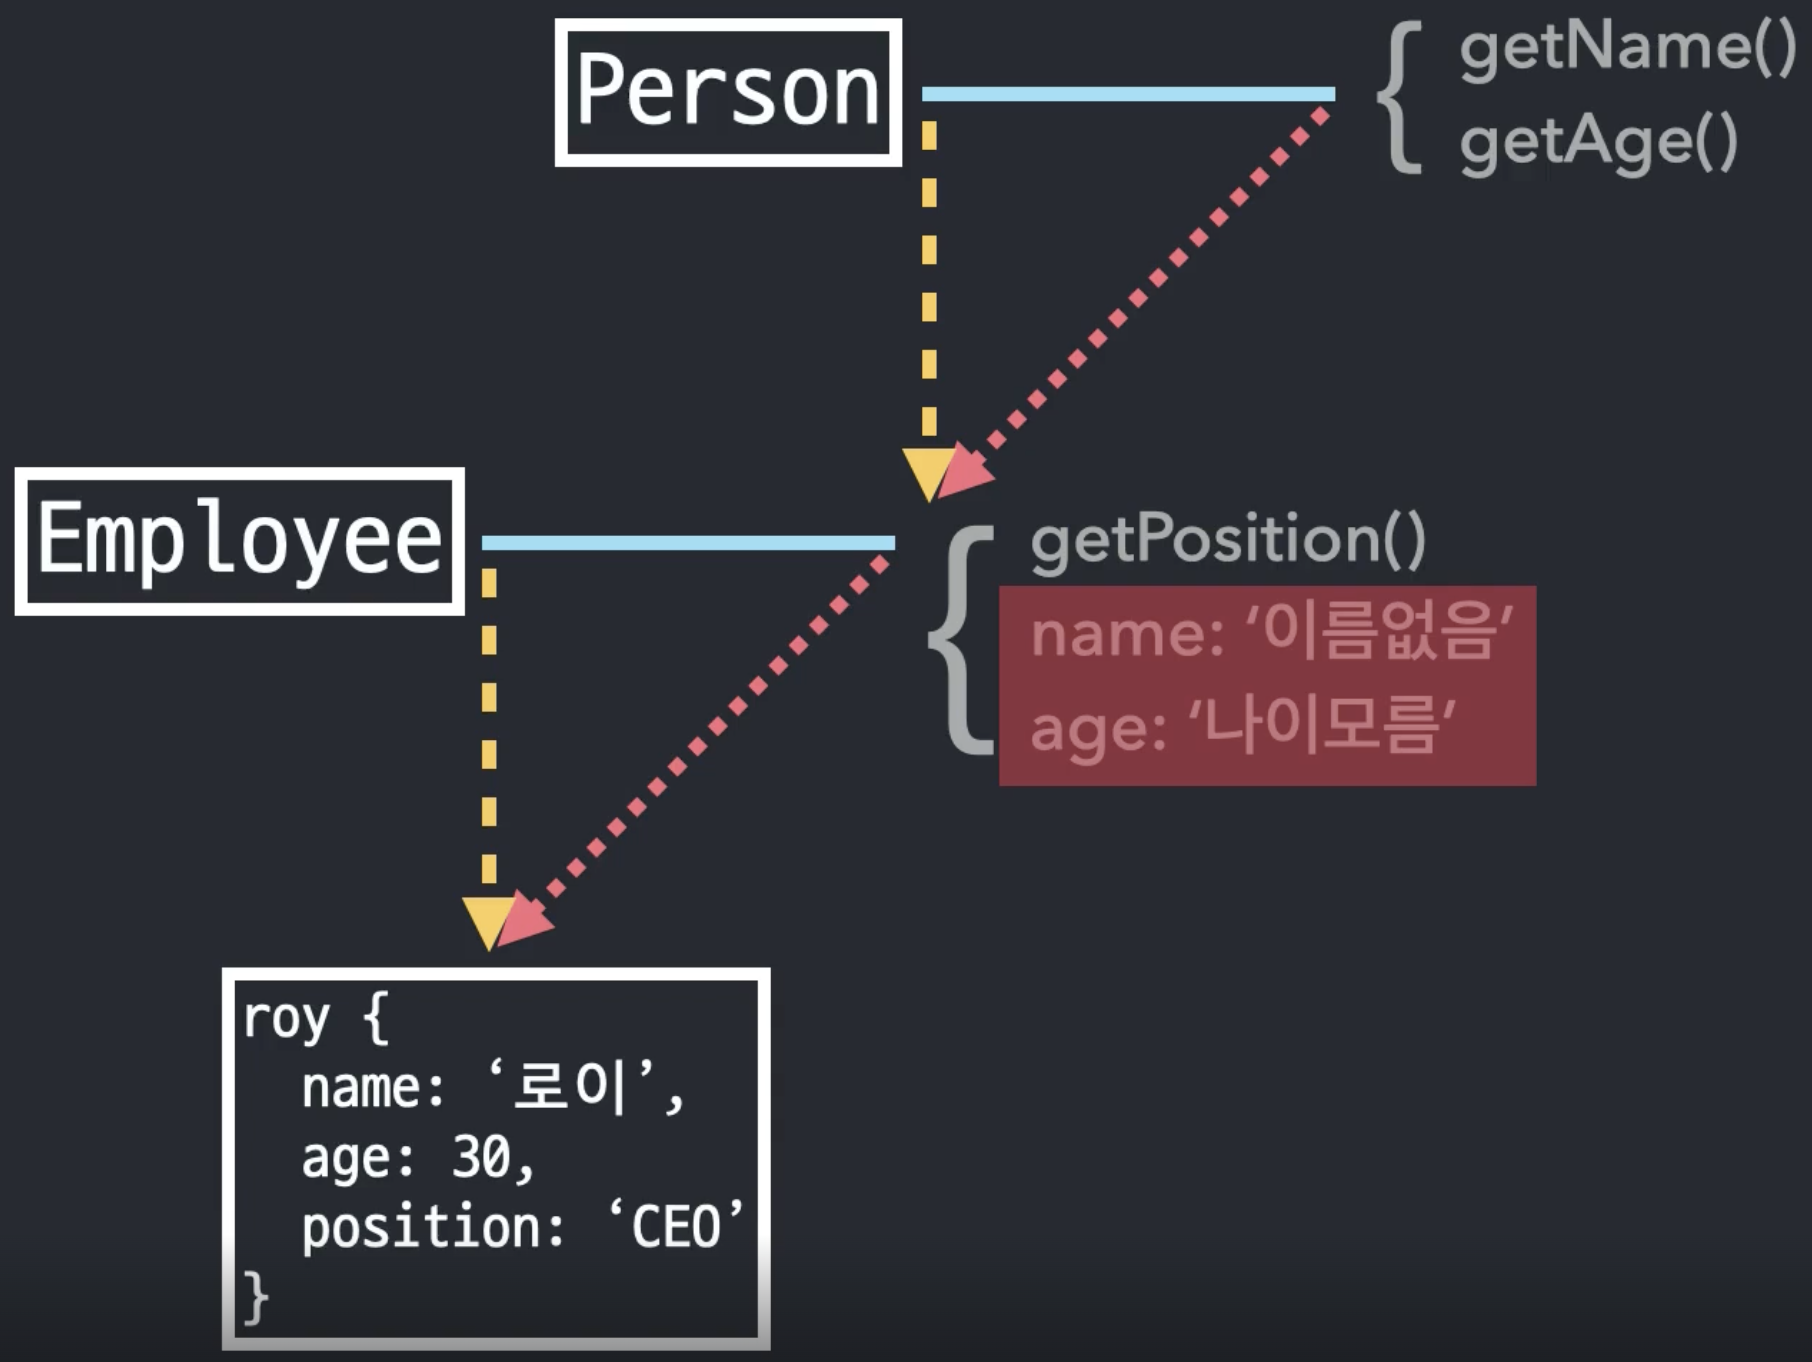
Person 클래스는 prototype에 getName()과 getAge() 메서드를 가지고 있고, Employee 클래스는 prototype에 getName()과 getAge(), getPosition() 메서드를 가지고 있습니다.
이미지 출처: 코어 자바스크립트
두 클래스는 getName()과 getAge() 메서드를 공통적으로 가지고 있기 때문에 Person 클래스의 하위에 Employee 클래스가 위치하는 다중 상속 구조가 될 수 있습니다.
이미지 출처: 코어 자바스크립트
위의 이미지와 같은 구조가 되면 Employee의 인스턴스(roy)는 프로토타입 체이닝을 타고 Employee의 getPosition() 메서드를 사용할 수 있습니다.
또한 한 단계 더 위로 체이닝을 타서 person의 getName()과 getAge() 메서드도 사용할 수 있습니다.
다중 상속 구조 만들기
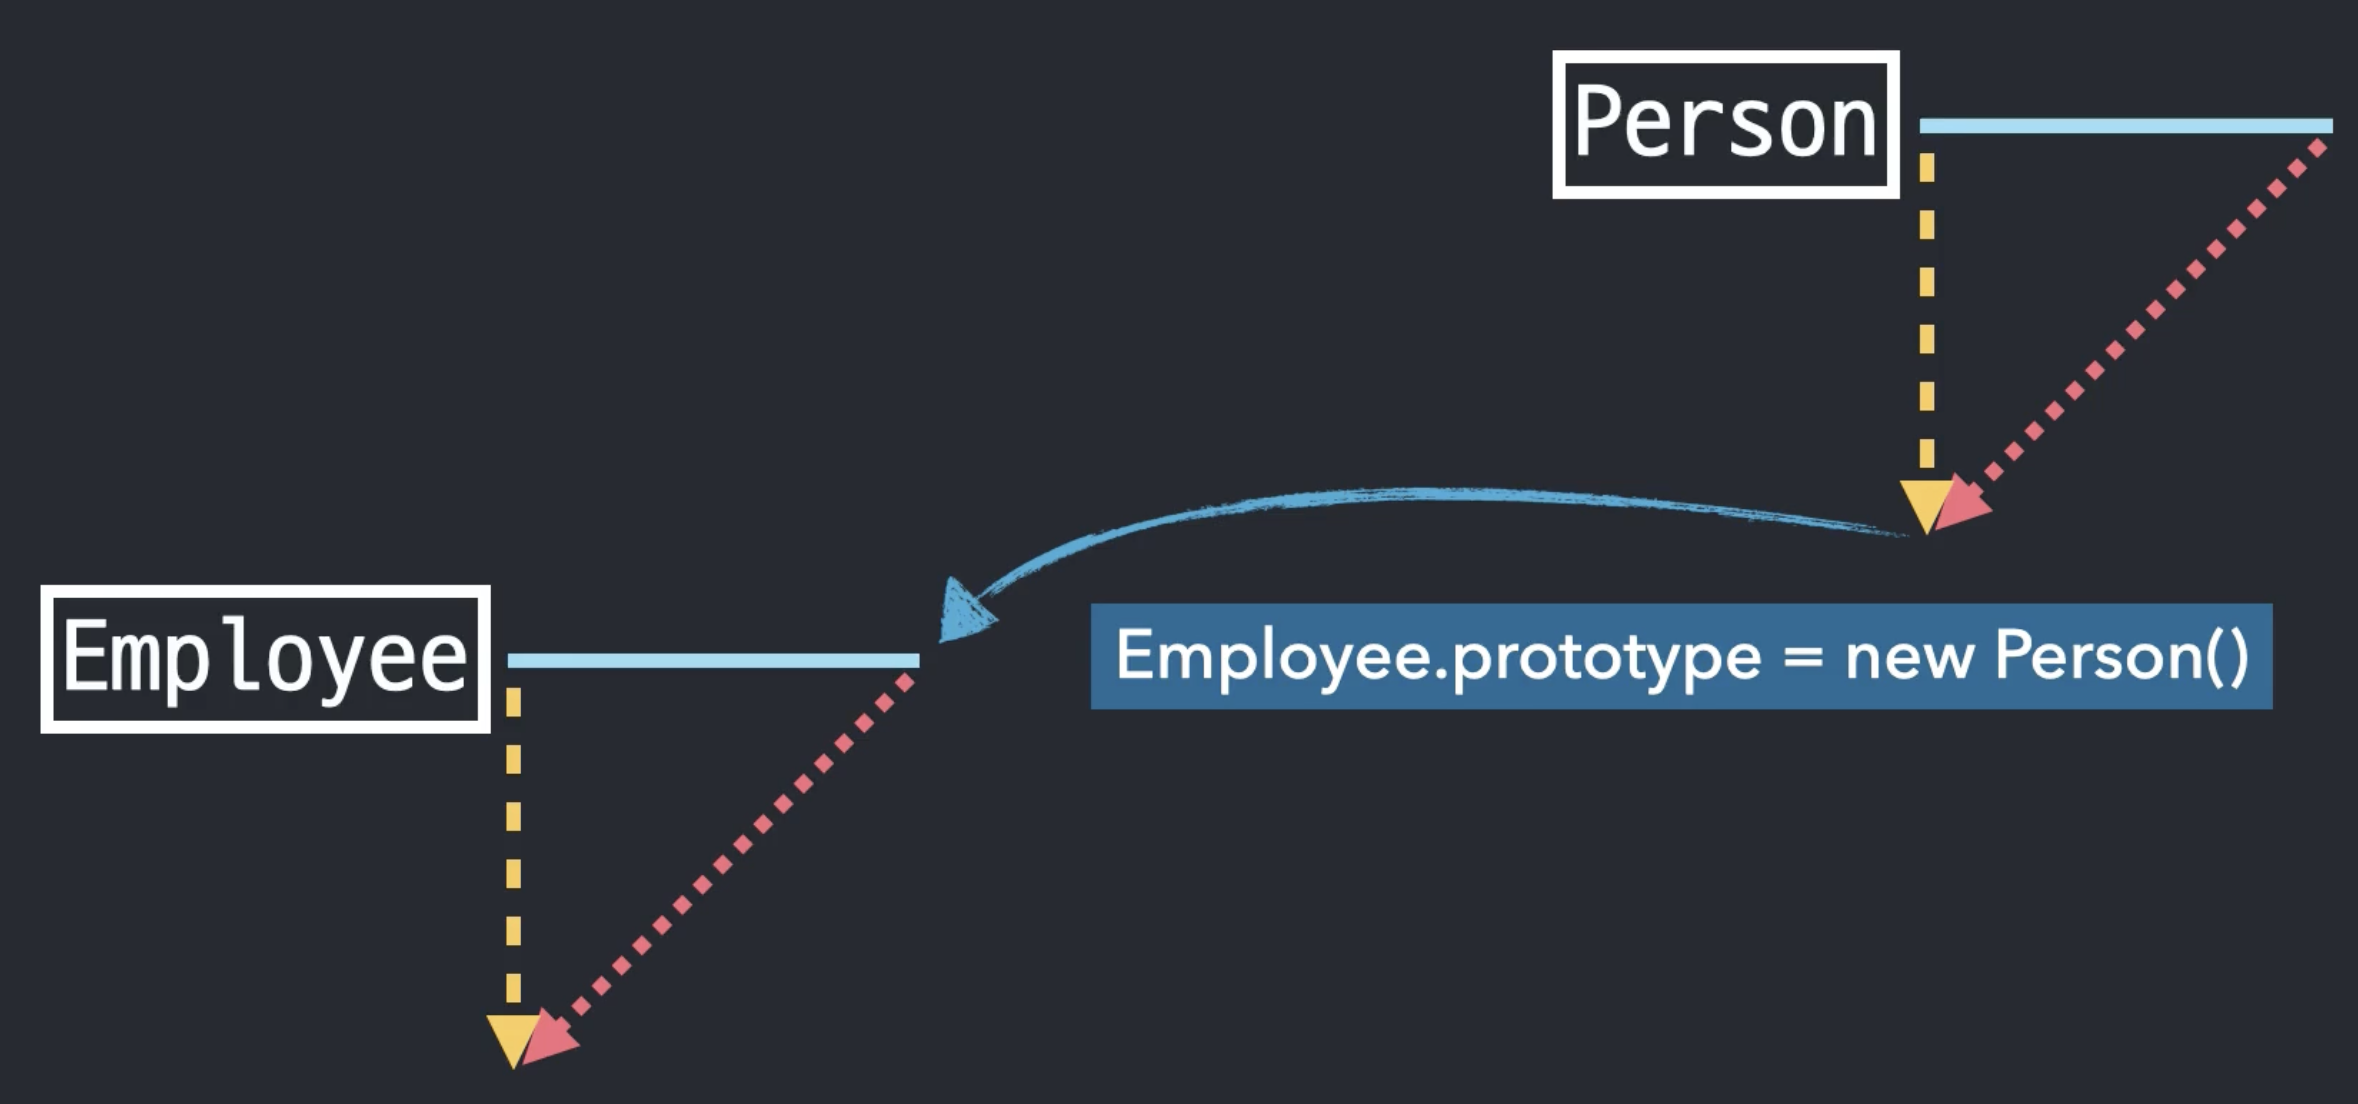
다중상속 구조를 만들기 위해서는 Employee의 prototype에 Person의 인스턴스를 할당하면 됩니다.
이미지 출처: 코어 자바스크립트
코드로 표현하면 아래와 같은 코드를 추가하면 됩니다.
// Employee의 Prototype에 Person의 인스턴스를 할당
Employee.Prototype = new Person()

// prototype의 constructor는 해당 생성자 함수를 가리키게
Employ.prototype.constructor = Employee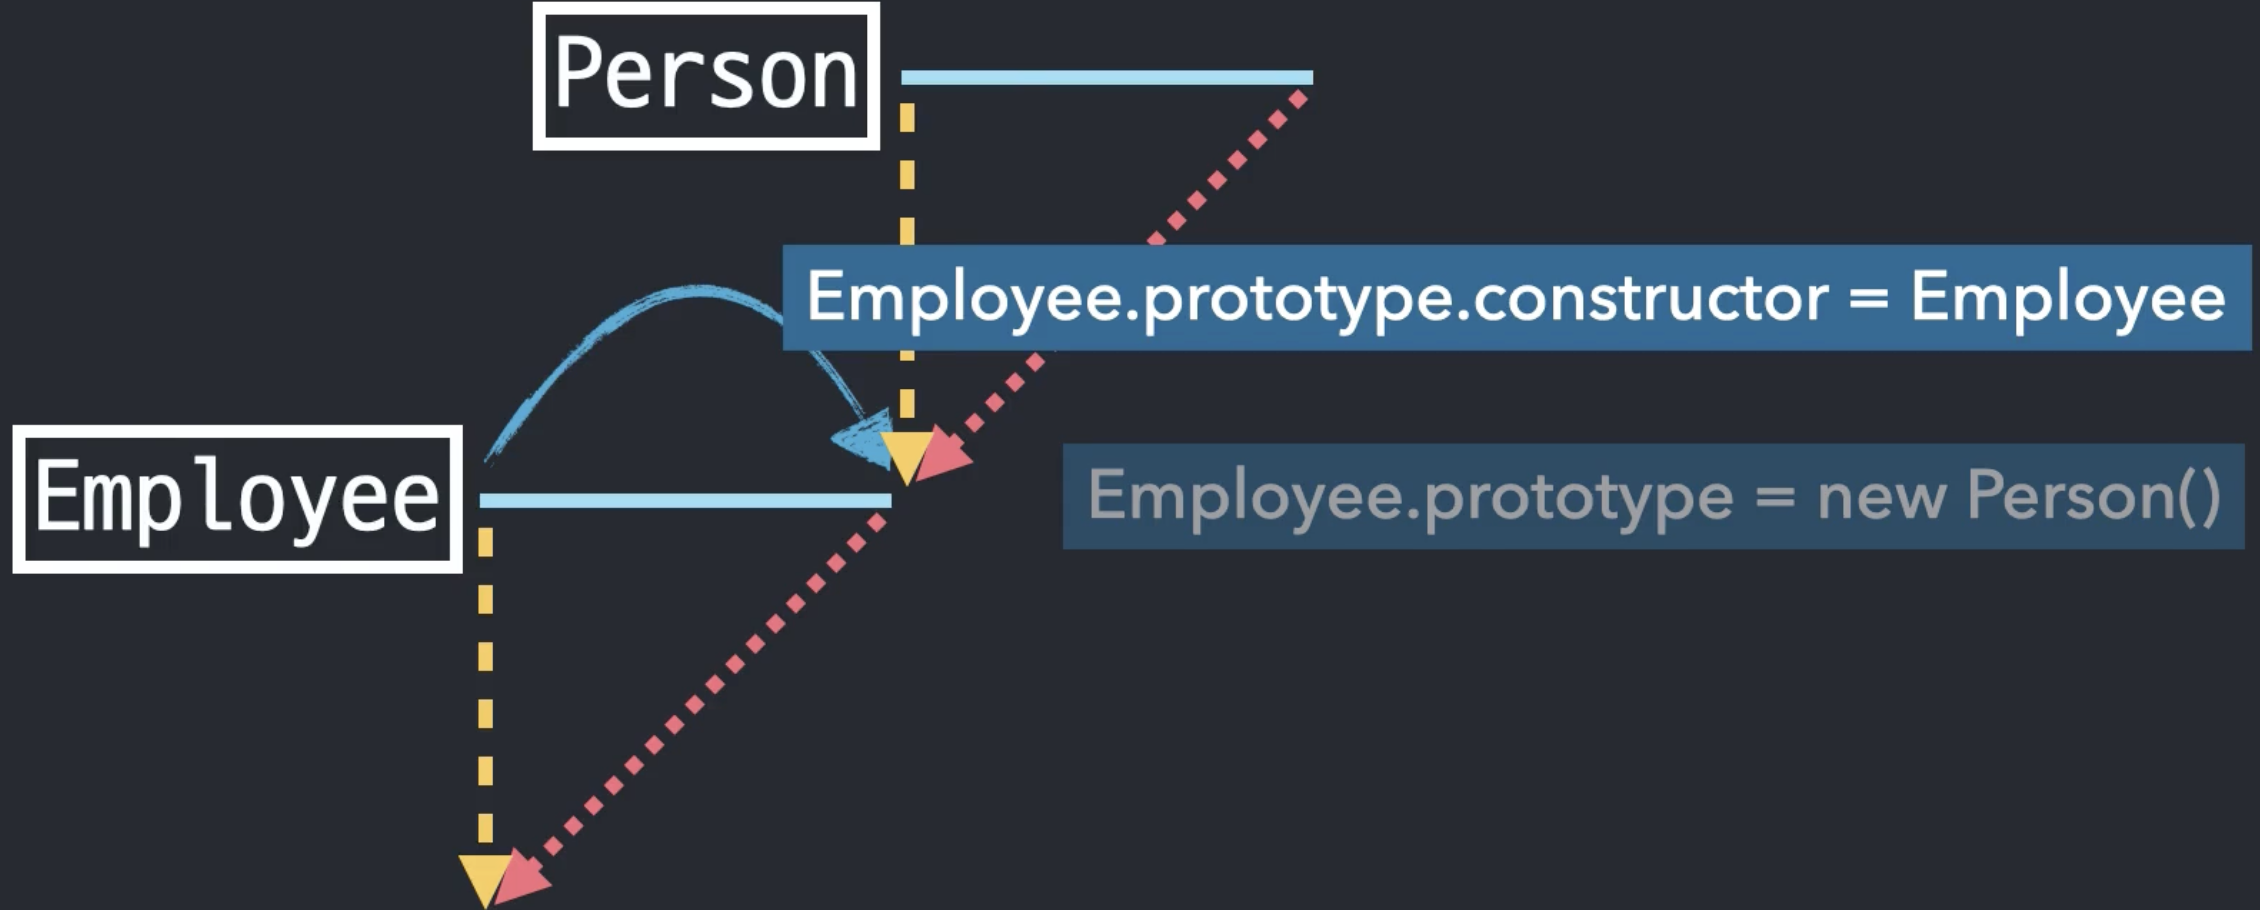
이미지 출처: 코어 자바스크립트
다중 상속 구조 전체 코드입니다.
// Person 생성자 함수
function Person(name, age) {
  this.name = name || "이름없음"
  this.age = age || "나이모름";
}

// Person의 메서드 등록
Person.prototype.getName = function() {
  return this.name;
}
Person.prototype.getAge = function() {
  return this.age;
}

// Employee 생성자 함수
function Employee(name, age, position) {
  this.name = name;
  this.age = age;
  this.position = position
}

// 다중 상속 구조 만들기
Employee.prototype = new Person();
Employee.prototype.constructor = Employee;

// Employee의 메서드 등록
Employee.prototype.getPosition = function() {
  return this.position;
}

// Employee의 instance 생성
const roy = new Employee('로이', 30, 'CEO');Employee의 instance인 roy를 출력해보면 아래와 같습니다.
console.dir(roy)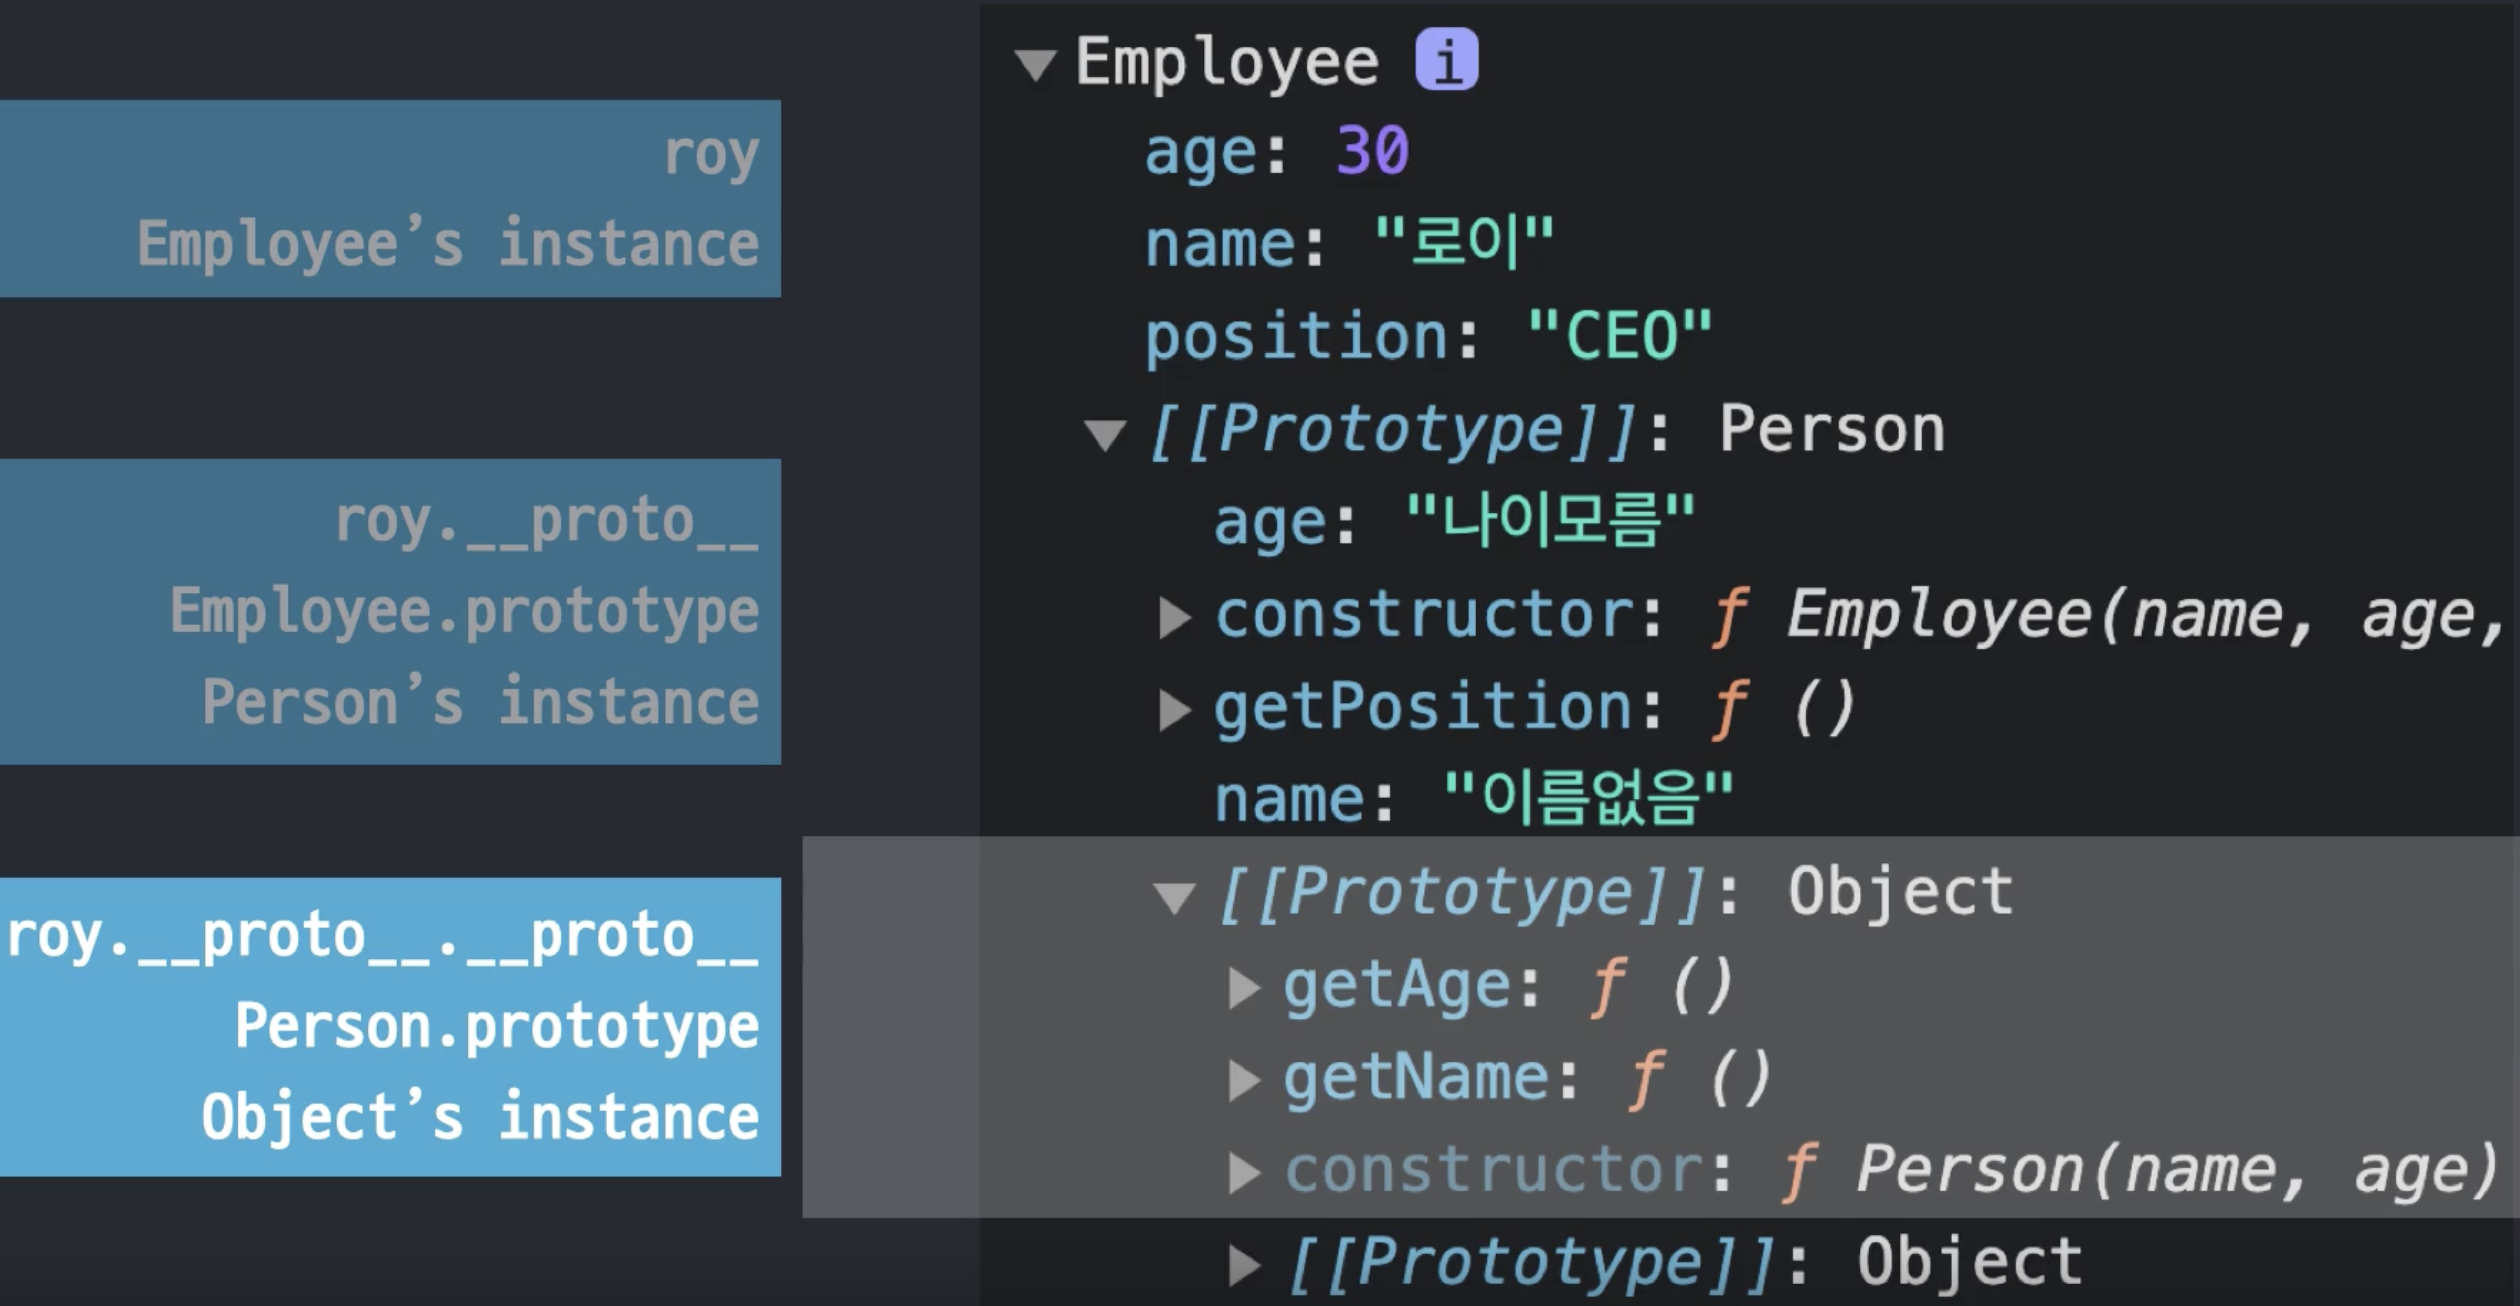
이미지 출처: 코어 자바스크립트
-
Employee의 instance인roy는age,name,position프로퍼티를 갖습니다. -
roy의 프로토([[Prototype]])와 연결되어 있는 생성자 함수Employee의 prototype에는Employee에 등록한 메서드getPosition()이 있습니다.
Employee의 prototype은Person의 instance를 할당했기 때문에Person의 값인age: "나이모름"과name: "이름없음"도 있습니다. -
Employee의 prototype 이자Person의 instance의 프로토([[Prototype]])는Person의 prototype과 연결되어 있습니다.
따라서Person의 메서드인getName()과getAge()가 있습니다.
다중 상속 구조를 만들었을 때 문제점
2번에 Person의 값인 age: "나이모름" 과 name: "이름없음"이 문제가 될 수 있습니다.
만약 Employee의 instance인 roy에 name또는 age가 비어있을 경우 자바스크립트는 프로토 체이닝을 통해 age: "나이모름" 과 name: "이름없음"을 사용할 수 있습니다.
따라서 Employee의 prototype 에는 age: "나이모름" 과 name: "이름없음"가 없어야 합니다.
이미지 출처: 코어 자바스크립트
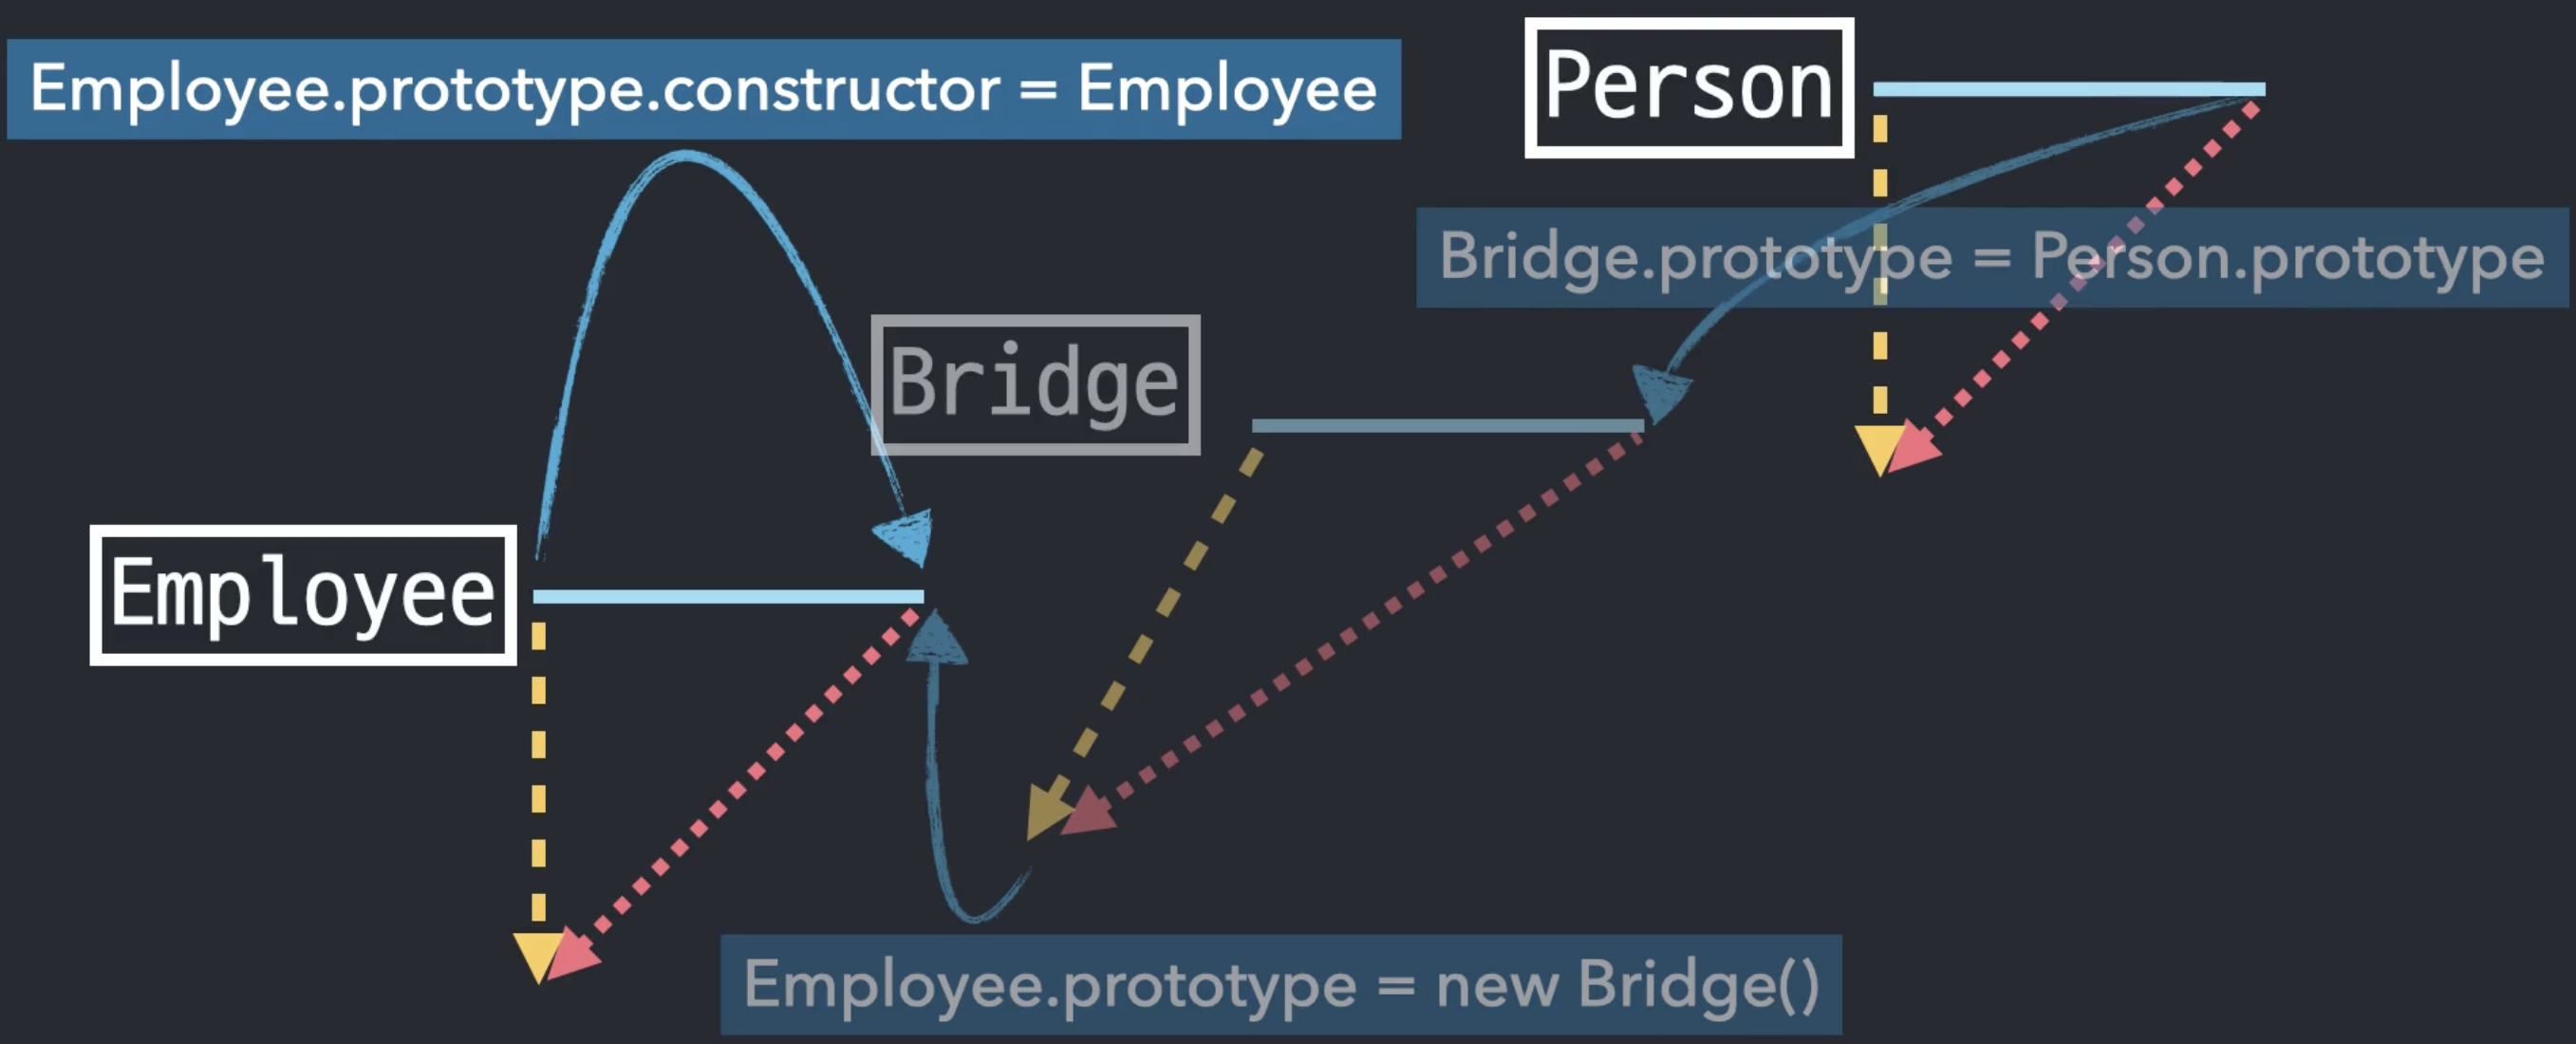
해결 방법
Person의 인스턴스와 Employee의 prototype을 바로 연결하지 않고 중간에 age: "나이모름" 과 name: "이름없음"을 걸러줄 객체(bridge)를 추가하는 것입니다.
이미지 출처: 코어 자바스크립트
// Person 생성자 함수
function Person(name, age) {
  this.name = name || "이름없음"
  this.age = age || "나이모름";
}

// Person의 메서드 등록
Person.prototype.getName = function() {
  return this.name;
}
Person.prototype.getAge = function() {
  return this.age;
}

// Employee 생성자 함수
function Employee(name, age, position) {
  this.name = name;
  this.age = age;
  this.position = position
}


function Bridge() {}
// 필요한 Person의 prototype만 뽑기
Bridge.prototype = Person.prototype;
// 다중 상속 구조 만들기
Employee.prototype = new Bridge();
Employee.prototype.constructor = Employee;
// Employee의 메서드 등록
Employee.prototype.getPosition = function() {
  return this.position;
}

// Employee의 instance 생성
const roy = new Employee('로이', 30, 'CEO');
생성자 함수 Employee의 prototype에 age: "나이모름" 과 name: "이름없음"이 사라졌습니다.
console.dir(roy)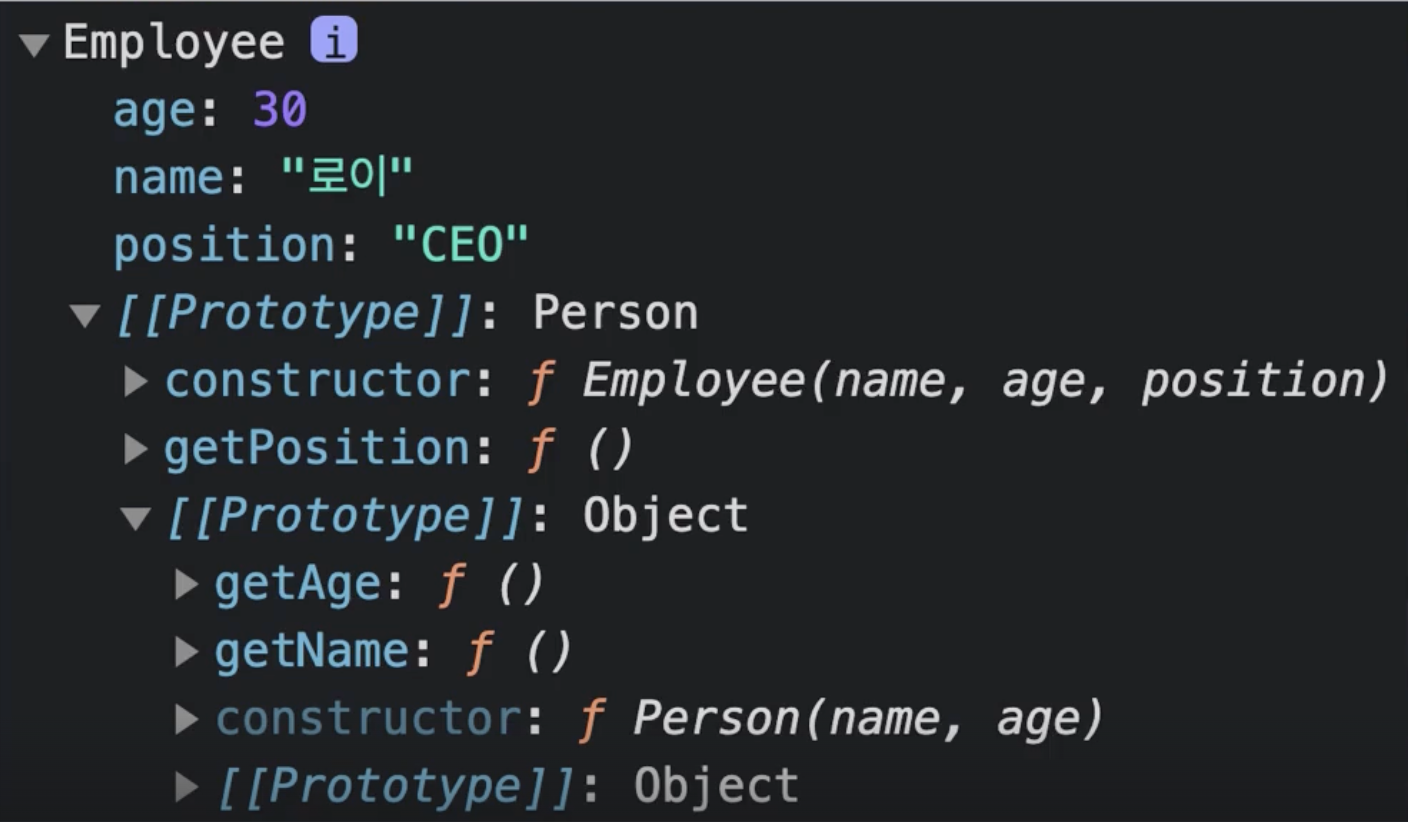
이미지 출처: 코어 자바스크립트
ES5에서는 상속을 어떻게 구현했을까
ES5에서는 위의 과정을 함수화해서 재활용하여 사용했습니다.
const extendClass = (function() {
  function Bridge() {}
  return function(Parent, Child) {
  	Bridge.prototype = Parent.prototype;
    Child.prototype = new Bridge();
    Child.prototype.constructor = Child;
    // 클래스에서 중복되는 프로퍼티 상속
    Child.prototype.superClass = Parent;
  }
})();
재활용 함수화한 Bridge를 적용시킨 전체코드는 아래와 같습니다.
// 다중 상속 구조로 연결
const extendClass = (function() {
  function Bridge() {}
  return function(Parent, Child) {
  	Bridge.prototype = Parent.prototype;
    Child.prototype = new Bridge();
    Child.prototype.constructor = Child;
    // 클래스에서 중복되는 프로퍼티 상속
    Child.prototype.superClass = Parent;
  }
})();

// Person 생성자 함수
function Person(name, age) {
  this.name = name || "이름없음"
  this.age = age || "나이모름";
}

// Person의 메서드 등록
Person.prototype.getName = function() {
  return this.name;
}
Person.prototype.getAge = function() {
  return this.age;
}

// Employee 생성자 함수
function Employee(name, age, position) {
  this.superClass(name, age);
  this.position = position || "직책모름";
}

extendClass(Person, Employee)

// Employee의 메서드 등록
Employee.prototype.getPosition = function() {
  return this.position;
}

// Employee의 instance 생성
const roy = new Employee('로이', 30, 'CEO');
ES6에서의 상속
ES6에서는 별도의 재활용 함수를 만들 필요없이 extends와 super() 키워드를 사용하면 됩니다.
// Person 생성자 함수
class Person {
  constructor (name, age) {
    this.name = name || "이름없음";
  	this.age = age || "나이모름";
  }
  // Person의 메서드 등록
  getName () {
  	return this.name;
  }
  getAge () {
  	return this.name;
  }
}

// Employee 생성자 함수
// extends 키워드를 사용하여 다중 상속 구조로 연결
class Employee extends Person {
  constructor (name, age) {
    // 클래스에서 중복되는 프로퍼티 상속
    super(name, age)
  	this.position = age || "직책모름";
  }
  // Employee의 메서드 등록
  getPosition () {
  	return this.position;
  }
}