
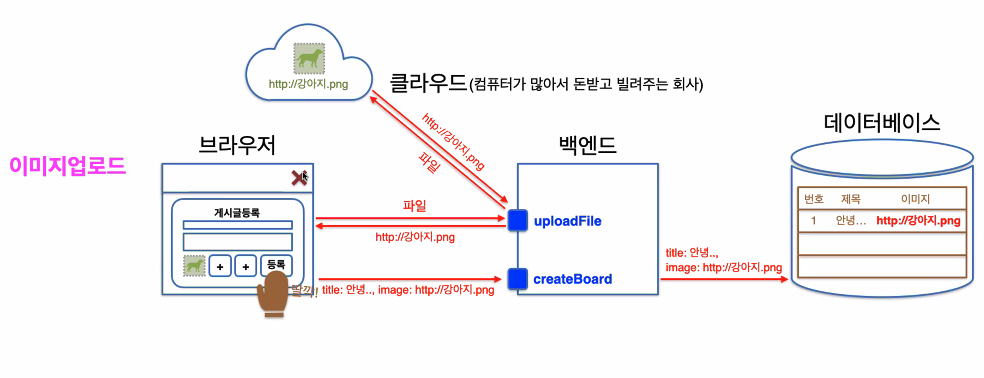
✔️ 기존 이미지업로드방식의 문제점
- 이미지 경로(주소)를 상대주소 ‘../../’와 같은 형식으로 사용하는데,
다른 사람 컴퓨터에 해당 이미지가 없을 경우에는 오류가 뜬다.- 클라우드를 통해 주소를 전달받는 과정에서 미리보기가 느리다.
- 등록버튼을 눌러야 디비에 저장이 되서 언제든지 다운로드주소를 사용할 수 있게끔 해야하는데, 만약 등록을 중단하게 되면 클라우드에는 쓰이지 않는 이미지찌꺼기가 남아있게 된다.
=> 데이터 낭비 / 서버과부하
순서를 바꾸자!
등록 시 2가지를 요청한다.
uploadfile api -> 클라우드에 저장
createboard api -> 다운로드 url,제목,내용을 합쳐서 요청다만 등록속도는 조금 떨어질 수 있음.
[실습 section31-07]
1️⃣ 가짜URL 생성하는 방법
import { ChangeEvent, useState } from "react";
import { wrapAsync } from "../../../src/commons/libraries/asyncFunc";
export default function ImageUploadPage(): JSX.Element {
  // imageUrl은 미리보기를 위한 주소이므로 해당 Url을 스토리지나, DB에 넣어서는 안된다.
  const [imgUrl, setImgUrl] = useState<string | undefined>(""); //빈문자열 넣는 순간 스트링 타입이라고 추론할 수 있다!
  const onChangeFile = async (
    event: ChangeEvent<HTMLInputElement>
  ): Promise<void> => {
    const file = event.target.files?.[0]; //배열로 들어오는 이유: <input type="file" multiple /> 일 때, 여러개 드래그 가능
    console.log(file);
    if (file === undefined) return;
    // 1. 임시 URL생성 =>(가짜URL - 내브라우저에서먼 접근 가능)
     const result = URL.createObjectURL(file);
     console.log(result, "result");
내컴퓨터에만 작동됨!
- createObjectURL 이란?
createObjectURL과 fileReader 둘 다 이미지 업로드 시 이미지를 불러와 미리보기를 할 수 있다.
createObjectURL을 사용하게 되면 소스코드가 짧아져 작성하기 쉽고 좋겠지만, fileReader와는 다르게 createObjectURL은 blob 객체로 이미지를 생성하기 때문에 해당 데이터를 서버와 통신할 때 사용할 수 없다.
또한, createObjectURL보다는 fileReader가 브라우저 호환성이 좋기 때문에 사용자 편의를 생각한다면 fileReader를 사용하시는 것이 더 바람직해 보인다.
createObjectURL은 최신 기능이므로 브라우저마다 지원가능여부가 달라짐
2️⃣ 진짜 URL 생성하는 방법
- new FileReader() :
파일 객체를 이용해 내용을 읽고 사용자 컴퓨터에 저장하는 것을 가능하게 해주는 브라우저에서 지원해주는 기능// 2. 임시 URL생성 => (진짜 URL - 다른 브라우저에서도 접근 가능) const fileReader = new FileReader(); fileReader.readAsDataURL(file); console.log(fileReader, "fileReader"); fileReader.onload = (event) => { //게시판에서 event.target.id를 쓰면 eslint가 잡았던 이유 // : event.target은 태그만을 가리키지 않음. console.log(event.target?.result); if (typeof event.target?.result === "string") setImgUrl(event.target?.result); }; }; return ( <> <input type="file" onChange={wrapAsync(onChangeFile)} /> <img src={imgUrl} /> {/* <img src={`https://storage.googleapis.com/${imgUrl}`} /> */} {/* 사진요청을 하게 됨 */} </> ); }
데이터베이스에 저장하지 않음!
업로드파일을 통해 다운로드 주소를 받아서 저장한다.readAsDataURL(넣은 파일)을 사용하면 Data URL을 얻을 수 있게 된다.
파일 읽기에 성공하게 되면 onload가 실행된다.
onload에서는 파일을 읽고 생성된 Data URL이 target.result에 담긴다.해당 결과를 img태그의 src에 값으로 넣어준다.


Blob(BinaryLargeObject) 이란?
→ Blob 객체는 파일류의 불변하는 미가공 데이터를 나타낸다.
텍스트와 이진 데이터의 형태로 읽을 수 있으며,
ReadableStream으로 변환한 후 스트림 메서드를 사용해 데이터를 처리할 수 있다.
✔️ Promise & Promise.all()
<!DOCTYPE html>
<html lang="ko">
  <head>
    <title>PROMISE / PROMISE ALL</title>
    <script>
      const onClickPromise = async () => {
        console.time("=== 개별 Promise 각각 ===");
        const result1 = await new Promise((resolve, reject) => {
          setTimeout(() => {
            resolve("downloadURL");
          }, 3000); //3초뒤 result1에 downloadURL 저장됨
        });
        const result2 = await new Promise((resolve, reject) => {
          setTimeout(() => {
            resolve("downloadURL");
          }, 2000); //2초뒤 result1에 downloadURL 저장됨
        });
        const result3 = await new Promise((resolve, reject) => {
          setTimeout(() => {
            resolve("downloadURL");
          }, 1000); //1초뒤 result1에 downloadURL 저장됨
        }); //총 6초
        console.timeEnd("=== 개별 Promise 각각 ===");
      };
    </script>
  </head>
  <body>
    <button onclick="onClickPromise()">Promise</button>
    <button onclick="onClickPromiseAll()">Promise all</button>
  </body>
</html>
result1 이 실행되고 난 후에 result2가 실행이 되고, result2가 실행된 후에, result3이 실행
 const onClickPromiseAll = async () => {
        // await	Promise.all([promise, promise,promise, ...])
        //실제사용
        console.time("=== 한방 Promise.all ===");
        const results = await Promise.all([
          new Promise((resolve, reject) => {
            setTimeout(() => {
              resolve("downloadURL");
            }, 3000); //3초뒤 result1에 downloadURL 저장됨
          }),
          new Promise((resolve, reject) => {
            setTimeout(() => {
              resolve("downloadURL");
            }, 2000); //2초뒤 result1에 downloadURL 저장됨
          }),
          new Promise((resolve, reject) => {
            setTimeout(() => {
              resolve("downloadURL");
            }, 1000); //1초뒤 result1에 downloadURL 저장됨
          }),
        ]);
        console.log(results);
        console.timeEnd("=== 한방 Promise.all ===");
};
Promise.all()에 포함되어 있는 함수들을 동시에 실행한다.
따라서 약 3초의 시간이 소요된다.Promise보다 시간을 단축하지만, 결과값은 같도록 해주는 기능

✔️ Promise.all()을 사용한 다중 이미지 업로드
import { useState } from "react";
import type { ChangeEvent } from "react";
import { wrapAsync } from "../../../src/commons/libraries/asyncFunc";
import { gql, useMutation } from "@apollo/client";
import type {
  IMutation,
  IMutationUploadFileArgs,
} from "../../../src/commons/types/generated/types";
const CREATE_BOARD = gql`
  mutation createBoard($createBoardInput: CreateBoardInput!) {
    createBoard(createBoardInput: $createBoardInput) {
      _id
    }
  }
`;
const UPLOAD_FILE = gql`
  mutation uploadFile($file: Upload!) {
    uploadFile(file: $file) {
      url
    }
  }
`;
export default function ImageUploadPage(): JSX.Element {
  // const [imageUrl, setImageUrl] = useState("");
  // const [file, setFile] = useState<File>();
  const [imageUrls, setImageUrls] = useState(["", "", ""]);
  const [files, setFiles] = useState<File[]>([]);
  const [uploadFile] = useMutation<
    Pick<IMutation, "uploadFile">,
    IMutationUploadFileArgs>
(UPLOAD_FILE);
  const [createBoard] = useMutation(CREATE_BOARD);
  const onClickSubmit = async (): Promise<void> => {
    // 1. uploadFile
    // 1-1) 안좋은예제 - await를 매번 기다림 => for문 사용해도 마찬가지(이유: i값에 의존하기 때문에...)
    // const resultFile0 = await uploadFile({ variables: { file: files[0] } });
    // const resultFile1 = await uploadFile({ variables: { file: files[1] } });
    // const resultFile2 = await uploadFile({ variables: { file: files[2] } });
    // const url0 = resultFile0.data?.uploadFile.url;
    // const url1 = resultFile1.data?.uploadFile.url;
    // const url2 = resultFile2.data?.uploadFile.url;
    // const resultUrls = [url0, url1, url2];
    // 1-2) 좋은예제 - Promise.all 사용
    // const results = await Promise.all([
    //   uploadFile({ variables: { file: files[0] } }),
    //   uploadFile({ variables: { file: files[1] } }),
    //   uploadFile({ variables: { file: files[2] } }),
    // ]);
    // console.log(results); // [resultFile0, resultFile1, resultFile2]
    // const resultUrls = results.map((el) => el.data?.uploadFile.url); // [url0, url1, url2]
    // 1-3) 좋은예제 - Promise.all 사용 => 리팩토링
    // const files = [File0, File1, File2]
    // files.map(el => uploadFile({ variables: { file: el } }))
     // const results = await Promise.all([
     //   uploadFile({ variables: { file: files[0] } }),
     //   uploadFile({ variables: { file: files[1] } }),
     //   uploadFile({ variables: { file: files[2] } }),
     // ]);
    //======================> Promise.all 썼을 때
    const results = await Promise.all(
      files.map(async (el) => await uploadFile({ variables: { file: el } }))
    );
    console.log(results); // [resultFile0, resultFile1, resultFile2]
    const resultUrls = results.map((el) => el.data?.uploadFile.url); // [url0, url1, url2]
    // 2. createBoard
    const result = await createBoard({
      variables: {
        // variables 이게 $ 역할을 함
        createBoardInput: {
          writer: "작성자",
          password: "1234",
          title: "제목",
          contents: "내용",
           // images: [imgUrl], //state에 저장된 url(string)을 백엔드에 보내기
           // images: [url],
          images: resultUrls,
        },
      },
    });
    console.log(result);
  };
  const onChangeFile =
    (index: number) =>
    async (event: ChangeEvent<HTMLInputElement>): Promise<void> => {
      const file = event.target.files?.[0]; // 배열로 들어오는 이유: <input type="file" multiple /> 일 때, 여러개 드래그 가능
      if (file === undefined) return;
      console.log(file);
      // const result = await uploadFile({ variables: { file } });
      // console.log(result.data?.uploadFile.url);
      // setImageUrl(result.data?.uploadFile.url ?? "");
      // 1. 임시URL 생성 => (가짜URL - 내 브라우저에서만 접근 가능)
      // const result = URL.createObjectURL(file);
      // console.log(result);
      // 2. 임시URL 생성 => (진짜URL - 다른 브라우저에서도 접근 가능)
      const fileReader = new FileReader();
      fileReader.readAsDataURL(file);
      fileReader.onload = (event) => {
        console.log(event.target?.result); // 게시판에서 event.target.id를 쓰면 eslint가 잡았던 이유: event.target은 태그만을 가르키지 않음
        if (typeof event.target?.result === "string") {
          // setImageUrl(event.target?.result);
          // setFile(file);
          const tempUrls = [...imageUrls];
          tempUrls[index] = event.target?.result;
          setImageUrls(tempUrls);
          const tempFiles = [...files];
          tempFiles[index] = file;
          setFiles(tempFiles);
        }
      };
    };
  return (
    <>
      <input type="file" onChange={wrapAsync(onChangeFile(0))} />
      <input type="file" onChange={wrapAsync(onChangeFile(1))} />
      <input type="file" onChange={wrapAsync(onChangeFile(2))} />
      <img src={imageUrls[0]} />
      <img src={imageUrls[1]} />
      <img src={imageUrls[2]} />
      {/* <img src={`https://storage.googleapis.com/${imageUrl}`} /> */}
      <button onClick={wrapAsync(onClickSubmit)}>게시글 등록하기</button>
    </>
  );
}

JUST DO WHATEVER