한영변환
한영 변환을 해주는 기능을 웹 페이지에서 가끔 볼 수 있을 것이다.
항상 어떻게 만든 거지 궁금했었는데, 이번 회사 소개 페이지 작업을 하게 되면서 관련 라이브러리를 사용하게 되어 사용 방법 및 type 추론 하는 방법을 정리해보고자 한다.
잠깐,
이 글은 CRA - typescript 템플릿을 이용해 프로젝트 기본 세팅이 되어있다는 전제하에 시작합니다.
{
	"react": "^17.0.2",
	"typescript": "^4.5.5",
}
제가 작업한 내용은 링크로 걸어두었습니다.
https://github.com/minsoo-web/react-i18next-practice
라이브러리 설치
i18next 라는 라이브러리와
이를 react에서 사용하기 쉽도록 만든 react-i18next를 설치합니다.
공식 문서
https://react.i18next.com/
# npm 사용시
npm install react-i18next i18next

# yarn 이용시
yarn add react-i18next i18next
폴더 구조
./src
├── @types
│   └── react-i18next.d.ts
├── App.tsx
├── components
├── index.tsx
├── locales
│   ├── en
│   │   ├── about.json
│   │   ├── index.ts
│   │   └── main.json
│   ├── i18n.ts
│   ├── index.ts
│   └── ko
│       ├── about.json
│       ├── index.ts
│       └── main.json
├── react-app-env.d.ts
├── reportWebVitals.ts
└── setupTests.ts
제가 사용한 폴더 구조는 다음과 같습니다.
워낙 다 찢어서 사용하는 걸 좋아하다보니 단순한 예제 프로젝트인데 꽤.. 뭐가 많네요
하나 하나 뭐하는 애들인지 어떻게 쓰는지 살펴보겠습니다.
How to Use
flow는 다음과 같습니다.
- 마크업을 json으로 언어별로 정리합니다.
- 어떤 언어를 사용할 것인지와 모듈별 네임스페이스를 지정해줍니다.
- 컴포넌트 별로 사용해야하는 네임스페이스를 가져와 타입추론을 통해 사용합니다.
마크업 정리
예제는 국문과 영문 두 가지를 사용합니다.
저는 locales 폴더를 만들고 그 안에 ko 폴더와 en 폴더를 만들었습니다.
사실 이 언어별로 폴더 안에서도 json 폴더를 따로 만들어 관리할까 했지만 너무 복잡해질 것 같아 한 폴더로 관리하게 되었습니다.
사실 폴더 구조라는게 정답이 없어서.. 사용하기 편하신 방법대로 커스텀하시는 게 최고라고 생각합니다.
{
  "test": "안녕"
}
/src/locales/ko/main.json 파일을 다음과 같이 작성해줍니다.
일반 json 형식 적어주듯 key, value 형식으로 적어주시면 됩니다.
💬 en 폴더와 ko 폴더는 한-영 만 다르고 동일합니다!
저는 index.ts 파일을 통해 import, export 하는 부분을 간소화하는 것을 좋아하기 때문에 index.ts 파일을 통해 작업을 하나 더 해주겠습니다.
import main from "./main.json";
import about from "./about.json"; // about 파일도 마찬가지로 json 형식으로 작성해주시면 됩니다!

export { main, about };
i18n.ts
이제 작성된 마크업을 불러다 i18next한테 이런 애들을 쓸거야~ 라고 알려주는 과정을 거치면 됩니다.
import i18n, { Resource } from "i18next";
import { initReactI18next } from "react-i18next";
// 작성된 마크업을 불러옵니다. import 를 간소화하기 위해 *를 사용했습니다.
import * as en from "./en";
import * as ko from "./ko";

const resources: Resource = {
  "en-US": {
    ...en // 비구조화 할당을 통해 간소화했습니다.
  },
  "ko-KR": {
    ...ko
  }
} as const;

i18n.use(initReactI18next).init({
  resources,
  lng: "ko-KR", // 초기 설정 언어
  fallbackLng: {
    "en-US": ["en-US"], // 한국어 불러오는 것이 실패했을 경우 영문을 써라 라는 말입니다.
    default: ["ko-KR"]
  },
  debug: true,
  keySeparator: false,
  interpolation: {
    escapeValue: false
  },
  react: {
    useSuspense: false
  }
});

export default i18n;
i18n 파일 또한 import를 간소화하기 위해 index.ts 파일을 하나 더 만들어주었습니다.
import i18n from "./i18n";

export default i18n;
src/locales/index.ts
적용
react 전체 app을 렌더링하는 index.tsx 파일을 열어줍니다.
import React from "react";
import ReactDOM from "react-dom";
import App from "./App";
import reportWebVitals from "./reportWebVitals";
import "./locales"; // 저희가 설정한 locales를 import 해주면 끝!

ReactDOM.render(
  <React.StrictMode>
    <App />
  </React.StrictMode>,
  document.getElementById("root")
);

// If you want to start measuring performance in your app, pass a function
// to log results (for example: reportWebVitals(console.log))
// or send to an analytics endpoint. Learn more: https://bit.ly/CRA-vitals
reportWebVitals();
i18n.ts 파일을 import 해주는 것으로 모든 설정은 끝났습니다!
Usage
import { useTranslation } from "react-i18next";

function App() {
  const { t } = useTranslation();

  return (
    <div className="App">
      {
      /*"{namespace}:{key}" 구조입니다!*/
      }
      {t("main:test")}
    </div>
  );
}

export default App;
끝났습니다.
How easy...
따라해보신 분들은 아시겠지만 "main:test" 를 작성하시면서 이 부분을 ts처럼 ts답게 사용할 수는 없을까... 하는 생각이 드셨을 겁니다.
너무나도 잘 쓰여진 공식문서 덕분에 슈루룩 따라해볼 수 있었습니다.
type 확장을 통해 마크업을 타입추론하기
tsconfig에 src/@types/ 안에 있는 *.d.ts 파일을 읽어올 수 있도록 설정을 해줍니다.
{
	"compilerOptions": {
      // ...
      "typeRoots": ["./node_modules/@types/", "./src/@types/"]
    }
}
이제 react-i18next.d.ts 파일을 src/@types 폴더 안에 생성해줍니다.
// import the original type declarations
import "react-i18next";
// import all namespaces (for the default language, only)
import * as ko from "../locales/ko";

// react-i18next versions higher than 11.11.0
declare module "react-i18next" {
  // and extend them!
  interface CustomTypeOptions {
    // custom namespace type if you changed it
    // defaultNS: "main";
    // custom resources type
    resources: {
      main: typeof ko.main;
      about: typeof ko.about;
      //   about: typeof ko
    };
  }
}
사실 이 부분은 공식 문서 복붙이랑 다를바가 없긴한데
이해를 돕기 위해 부연설명을 조금 더 해드리자면,
- 언어별로 다 타입 설정을 할 필요는 없습니다. -> 언어별로 네임스페이스와 키 값은 동일할 것이기 때문인듯
- 네임스페이스를 등록한 뒤 해당 모듈에 어떤 키값들이 있는지
typeof를 통해 등록해줍니다. - 모듈 확장 타입 선언을 통해 따로 타입 import를 해주지 않아도 됩니다.
타입 추론 Usage
import React, { useCallback } from "react";
import { useTranslation } from "react-i18next";

const About = () => {
  const { t } = useTranslation("about");

  return (
    <div>
      <h1>{t("about_text")}</h1>
    </div>
  );
};

function App() {
  const { t, i18n } = useTranslation("main");

  /* 주된 내용이 아니여서 따로 설명을 첨부하지는 않았지만
   * changeLanguage 메소드를 통해 언어 변환을 하시면 됩니다.
   * 글로벌하게 적용되는 방식이라 따로 관리를 해주지 않아도 됩니다.
   */
  const toggleLocales = useCallback(
    (locale: string) => {
      i18n.changeLanguage(locale);
    },
    [i18n]
  );

  return (
    <div className="App">
      <button onClick={() => toggleLocales("en-US")} title="영어로 바꾸기">
        en
      </button>
      <button onClick={() => toggleLocales("ko-KR")} title="한글로 바꾸기">
        ko
      </button>
      {t("test")}

      <hr />
      <About />
    </div>
  );
}

export default App;
useTranslation 훅의 인자에 네임스페이스를 넣어주면 됩니다.
만약 한 컴포넌트에서 여러 네임스페이스를 사용하실 경우 네임스페이스를 넣지 않고 "namespace:key" 를 넣어주면 됩니다. 이 또한 타입추론이 될 겁니다.
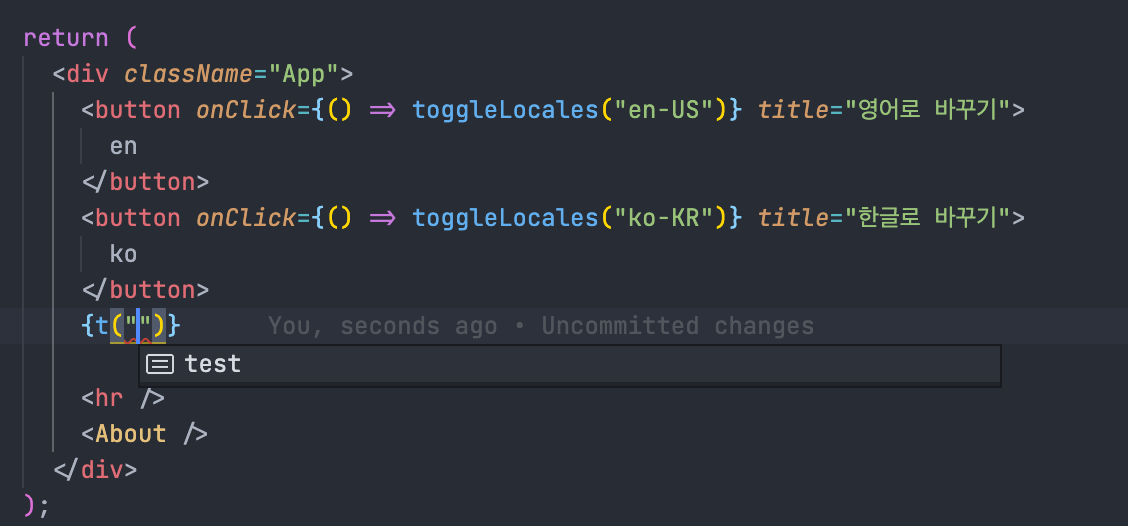
적용된 화면 스크린샷을 첨부하겠습니다.

네임 스페이스를 가져오는 영롱한 모습...

적용된 네임스페이스의 key만 추천해주는 아름다운 모습...
끝으로
또 이렇게 하나의 지식이 늘었습니다.
여러분 모두 행복한 개발생활 하세요!


좋은 글 감사합니다!