저번에 적은 html전역속성에 관한 글이 너무 엉망이어서 다시 적고싶어졌다. 물론 내용이 복붙인 것은 아니고, 추가해서 공부를 더 넣어둘 것이다.
우선 전역속성은 어느 태그든 사용할 수 있는 속성들을 말한다. 속성이라는 것은
<form>
<label>고양이<input type="radio" name="animal" checked></label>
<lable>강아지<input type="radio" name="animal"></lable></form>고양이 강아지
일때 여기서 나오는 input 속성에는 type과 name, checked같은 것이 하위속성이다.
html 전역속성의 종류
- accesskey
- autocapitalize
1) off(none)
2) on(sentences)
3) words
4) characters
- class
- contenteditable
- data-*
- dir
- draggable
- hidden
- id
- inputmode
- is
- itemid
- itemprop
- itemref
- itemscope
- lang
- part
- slot
- spellcheck
- style
- tabindex
- title
- translate
이 존재한다.
우선 저번에 썼던 글부터 다시 적어보도록 하겠다.
6.dir속성
<div dir="auto">자동</div>자동
<div dir="ltr">왼쪽</div>왼쪽
<div dir="rtl">오른쪽</div>오른쪽
dir속성은 텍스트의 방향을 지정하는 속성이다.
7.draggable
<div draggable="true">드래그해보세요</div>드래그해보세요
<div draggable="false">이건 못할껄?</div>이건 못할껄?
draggable속성은 드래그의 여부를 설정할 수 있다.
참고로 기본값은 draggable="false"이다.
8.hidden속성
<div hidden>안보임</div>안보임
hidden속성은 html로 조정하는 보이지 않게 만드는 속성이다. 유사한 방법으로는
<div id="hidden">안보임</div>
<style> #hidden{ display:none; } </style>또는
<style> #hidden{ oppacity:0; } </style>이 존재한다.
단, 마지막에 적은<style> #hidden{ oppacity:0; } </style>는 존재는 하되, 투명도를 높여서 보이지 않는 것이므로 여전히 공간을 차지하고 있다.
20.style속성
<div style="background-color:yellow";>노란색을 보면 은행이 떠올라요</div>노란색을 보면 은행이 떠올라요
style은 css와 동일하다고 보면 된다. 하지만 html에서 style을 제어하는 것은 권장되지 않는다.
또한 html에서 style을 제어한다면 우선순위가 높아지므로, css에서 제어하려고 해도 제어되지않는다.
- accesskey
- autocapitalize
1) off(none)
2) on(sentences)
3) words
4) characters
- class
- contenteditable
- data-*
dirdraggablehidden- id
- inputmode
- is
- itemid
- itemprop
- itemref
- itemscope
- lang
- part
- slot
- spellcheck
style- tabindex
- title
- translate
까지가 우리가 저번에 배웠던 내용이다.
1. accesskey속성
<a href="http://naver.com" accesskey="n">네이버</a>
이게 뭘까, 하실 것이다. 이 속성은 단순히 보는 것으로는 알 수 없다. 여러분은 alt + n 버튼을 눌러보라. 그러면 페이지가 이동될 것이다.
accesskey속성은 페이지 내에 단축키를 생성할 때 사용되는 속성이었던 것이다!
브라우저에 따라서, 그리고 버전에 따라서 함께 사용되는 단축키가 다르니 밑에 표를 참고해주시길 바란다.
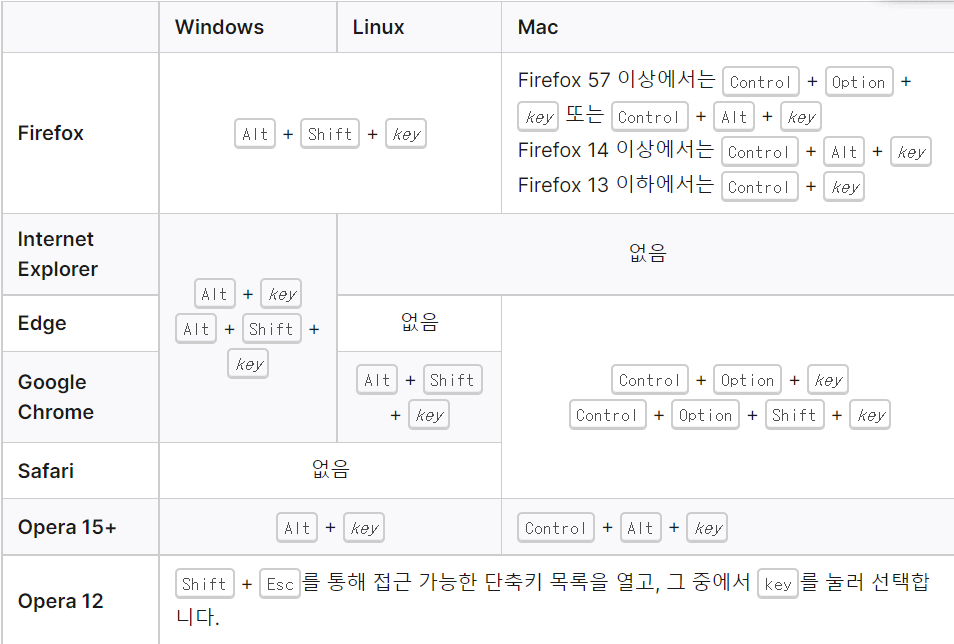
출처:https://developer.mozilla.org/ko/docs/Web/HTML/Global_attributes/accesskey
https://www.habonyphp.com/2019/02/html-accesskey.html
2. autocapitalize속성
이 속성을 알기 위해서는 우선적으로 해야할 일이 있다.
이 블로그를 스마트폰이나 태블릿으로 보는 것이다. 이 속성은 그 경우에 적용된다.
<input autocapitalize="characters" type="text" />
이때, 노트북이나 데스크탑으로는 적용되지 않지만, 모바일로는 모든 문자가 대문자로 입력되도록 될 것이다.
가끔 우리가 스마트폰으로 입력을 할 때, 몇몇 input에서 강제적으로 대문자로 변환되는 경우를 볼 수 있을 것이다. 그게 바로 이 속성을 사용한 결과인 것이다.
속성 값에 따라,
1) off(none) : 대문자로 변환적용이 되지 않음
2) on(sentences) : 문장에서 첫 글자가 대문자로 변함
3) words : 단어에서 첫 글자가 대문자로 변함
4) characters : 모든 철자가 대문자로 변함
이 된다.
3. class속성
모를 수가 없는 속성이다.
이 속성은 그룹으로 특정짓기 위해 사용된다.
<div class="yellow important">노는게</div>
<div>제일</div>
<div class="yellow">좋아</div>
<div class="yellow">친구들</div>
<div class="important">모여라</div>
<style> .yellow{ background-color:yellow; } .important{ font-weight:800; } </style>노는게제일좋아친구들모여라
class속성이 yellow는 .yellow{background-color:yellow;}에 따라 배경색이 노란색이 되고(background-color이 배경색을 나타내는 style속성이다),
important는 .important{font-weight:800;}에 따라 글씨의 굵기가 굵어졌다.
이처럼 class속성은 그룹으로 묶어서 관리할 수 있다.
class속성을 2개 넣고 싶을 때는 띄어쓰면 된다.
4. contenteditable속성
이 속성을 위해서는 우선 div가 어느 부위인지 알아야 할 필요성이 있다. 따라서 style태그가 들어가겠지만, 너무 그것에 주의를 기울이지 않기를 바란다.
<style> .inner{ heigth:30px; width:50px; border:1px solid; } </style>
<div class="inner" contenteditable="true"> </div>
div로 이루어진 상자를 클릭하고, 키보드를 누르면, div상자에 글이 써진다는 것을 알 수 있을 것이다.
contenteditable속성은 원래는 div에 글을 쓸 수 없었지만, 글을 쓸 수 있게 바꿔주는 속성이다.
오늘까지 배운 것
accesskeyautocapitalize
1) off(none)
2) on(sentences)
3) words
4) characters
classcontenteditable- data-*
dirdraggablehidden- id
- inputmode
- is
- itemid
- itemprop
- itemref
- itemscope
- lang
- part
- slot
- spellcheck
style- tabindex
- title
- translate
출간을 하는 순간, 옆에서 미리보기로 보이던 것들이 보이지 않으면 서럽다. 하지만, 그럴까봐 코드도 다 집어넣었으니, 필요하다면, 코드를 vs코드에 넣어서 확인해보는 것을 권장드린다.
