DefaultSecurityFilterChain에 기본적으로 등록되는 필터로, 여덟 번째에 위치하는 UsernamePasswordAuthenticationFilter에 대해 알아보자.
목적
이 필터가 등록되는 목적은 POST : “/login” 경로에서 Form 기반 인증을 진행할 수 있도록 multipart/form-data 형태의 username/password 데이터를 받아 인증 클래스에게 값을 넘겨주는 역할을 수행한다.
커스텀 SecurityFilterChain을 생성하면 자동 등록이 안되기 때문에 아래 구문을 통해서 필터를 활성화시켜야 한다.
http
        .formLogin(Customizer.withDefaults());
UsernamePaswordAuthenticationFilter 클래스

해당 클래스를 살펴보다보면 앞서 봐왔던 필터들과 다른 점을 찾을 수 있다.
doFilter가 없다?
doFilter 메소드가 보이지 않는다. 어디 있을까?
AbstractAuthenticationProcessingFilter를 상속 받는다?
GenericFilterBean이나 OncePerRequestFilter를 상속 받지 않았다.
우선 doFilter의 경우, 바로 부모 클래스인 AbstractAuthenticationProcessingFilter 클래스에 존재한다. 왜?
UsernamePasswordAuthenticationFilter는 Form 로그인 방식에 대한 필터이다. Form 데이터를 받은 후 인증 과정은 아래와 같다.
사용자에게 데이터를 받아 인증 → 인증 결과 → 성공/실패 핸들
사용자가 보낸 데이터 형식이 다르다고 위 과정은 변하지 않는다.
따라서 위 과정에 대한 추상 클래스인 AbstractAuthenticationProcessingFilter를 정의하고 각각의 방식에 따라 필터를 구현해서 사용하는 것이다.
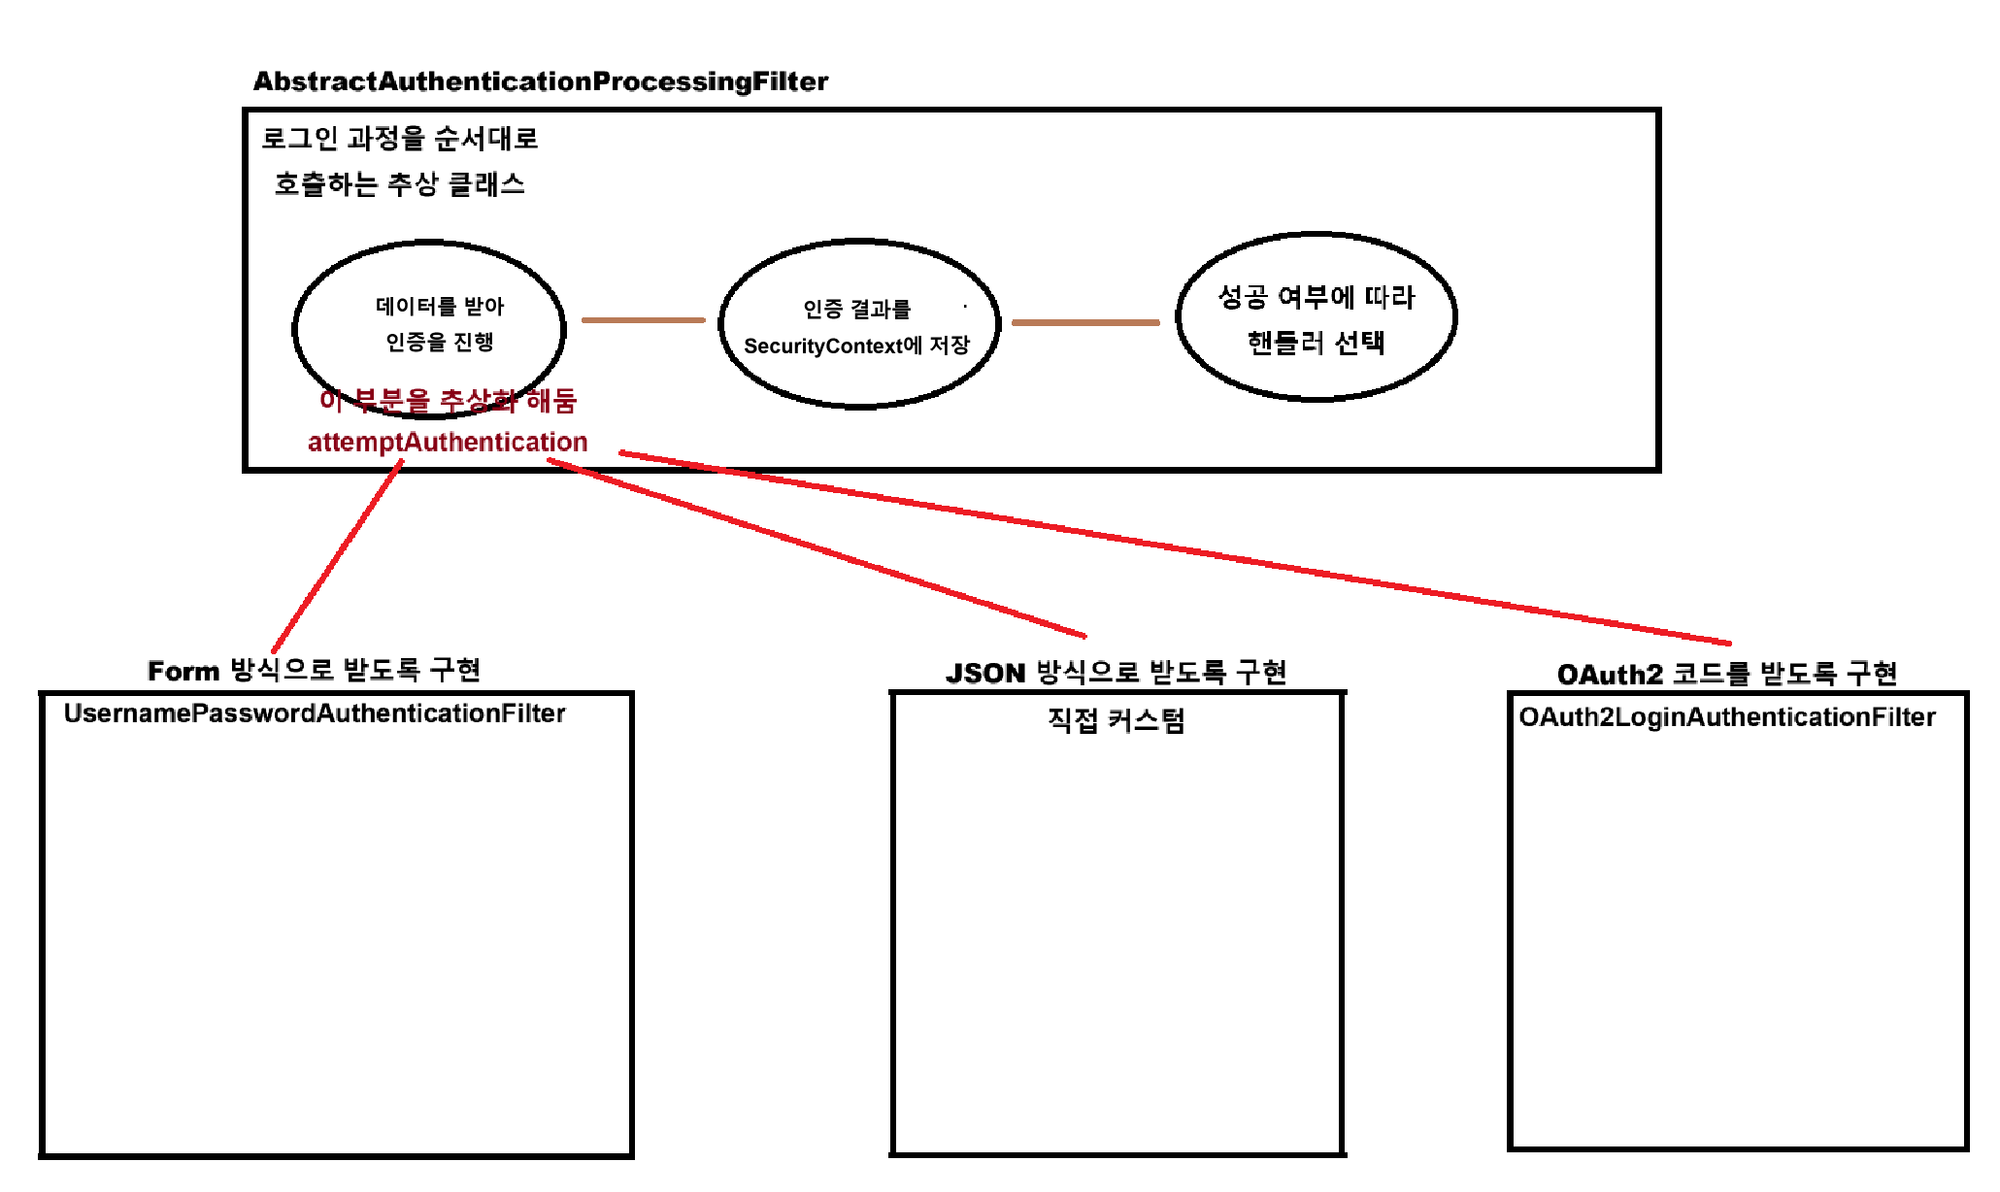
attemptAuthentication 부분을 추상화한다고 적혀있는데, 더 자세히 알아보자.
AbstractAuthenticationProcessingFilter
public abstract class AbstractAuthenticationProcessingFilter extends GenericFilterBean
		implements ApplicationEventPublisherAware, MessageSourceAware {

    ...

    private void doFilter(HttpServletRequest request, HttpServletResponse response, FilterChain chain)
            throws IOException, ServletException {

        // 로그인 경로 요청인지 확인
        if (!requiresAuthentication(request, response)) {
            chain.doFilter(request, response);
            return;
        }

        // 로그인 과정 시도
        try {
            // 사용자로 부터 데이터를 받아 상황에 맞는 인증을 진행 (!!! 이 부분을 구현 !!!)
            Authentication authenticationResult = attemptAuthentication(request, response);

            if (authenticationResult == null) {
                return;
            }
            // 인증 결과가 존재하면 세션 전략에 따라 SecurityContext에 저장
            this.sessionStrategy.onAuthentication(authenticationResult, request, response);

            // 아래 값이 설정되어 있으면 다음 필터로 넘김
            if (this.continueChainBeforeSuccessfulAuthentication) {
                chain.doFilter(request, response);
            }

            // 로그인 성공 핸들러
            successfulAuthentication(request, response, chain, authenticationResult);
        }
        // 로그인 실패 핸들러
        catch (InternalAuthenticationServiceException failed) {
            this.logger.error("An internal error occurred while trying to authenticate the user.", failed);
            unsuccessfulAuthentication(request, response, failed);
        }
        catch (AuthenticationException ex) {
            unsuccessfulAuthentication(request, response, ex);
        }
    }

    ...

}
그리고 아래는 AbstractAuthenticationProcessingFilter의 추상 메소드 attemptAuthentication()이다
public abstract Authentication attemptAuthentication(HttpServletRequest request, HttpServletResponse response)
		throws AuthenticationException, IOException, ServletException;
데이터를 받아 인증을 진행하는 부분을 추상화하여 상황에 따라 구현할 수 있도록 만들어 두었다.
AbstractAuthenticationProcessingFilter 추상 클래스를 상속하는 필터들
UsernamePasswordAuthenticationFilterOAuth2LoginAuthenticationFilterSaml2WebSsoAuthenticationFilterCasAuthenticationFilter
아래는 UsernamePasswordAuthenticationFilter에서 attempAuthentication() 메소드이다.
@Override
public Authentication attemptAuthentication(HttpServletRequest request, HttpServletResponse response)
		throws AuthenticationException {

	// 로그인 경로 요청인지 확인
	if (this.postOnly && !request.getMethod().equals("POST")) {
		throw new AuthenticationServiceException("Authentication method not supported: " + request.getMethod());
	}

	// 요청으로부터 multipart/form-data로 전송되는 username, password 획득
	String username = obtainUsername(request);
	username = (username != null) ? username.trim() : "";
	String password = obtainPassword(request);
	password = (password != null) ? password : "";

	// 인증을 위해 위 데이터를 인증 토큰에 넣음
	UsernamePasswordAuthenticationToken authRequest = UsernamePasswordAuthenticationToken.unauthenticated(username,
			password);
	// Allow subclasses to set the "details" property
	setDetails(request, authRequest);

	// username/password 기반 인증을 진행하는 AuthenticationManager에게 인증을 요청 후 응답
	return this.getAuthenticationManager().authenticate(authRequest);
}
로그인이 수행되는 과정
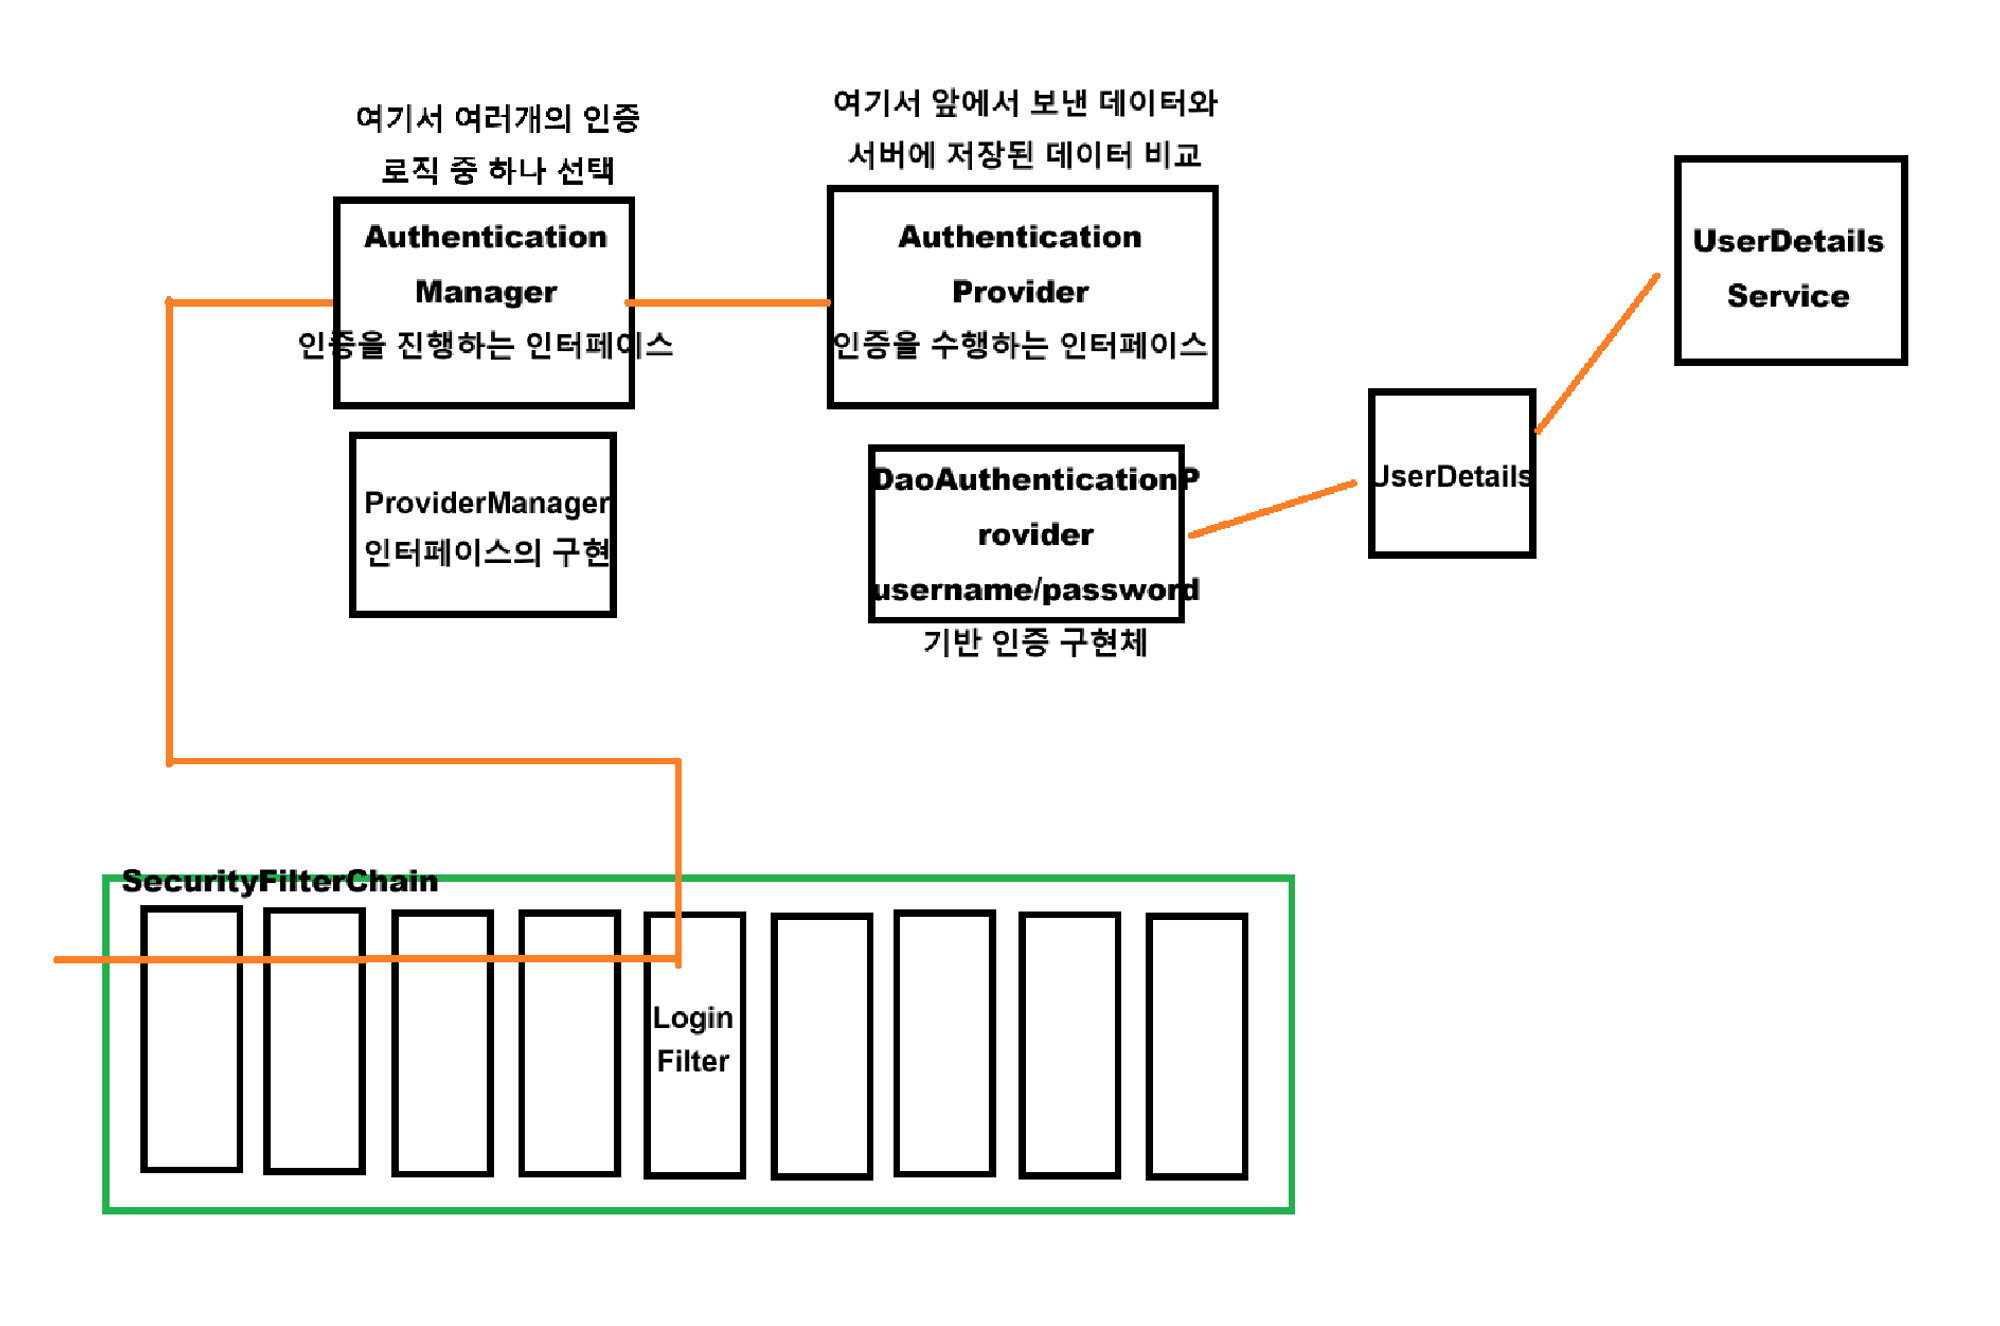
위 attemptAuthentication() 메소드에서 유저가 보낸 정보를 받아 (맨 아랫 부분에서) AuthenticationManager에게 넘기는데 해당 클래스들은 어떻게 구성되어 있고 어떤 과정을 거쳐서 로그인이 수행될까?
username/password 기반으로 국한시켜 살펴보면 아래와 같다.