[데브코스] Spring Boot 인증·인가(Auth) (23강) - Authorization 헤더로 apiKey 인증 처리하기
[데브코스] Spring Boot 인증·인가(Auth) 기초
목록 보기
20/49
이번 강의에서는 인증 정보를 URL 파라미터가 아닌 HTTP Header로 옮기는 작업을 진행했다.
실무에서 왜 인증 정보를 Header에 담는지, 그리고 스프링에서는 이를 어떻게 받는지까지 정리해보자.
1️⃣ 기존 방식의 문제점 (Query Parameter 인증)
이전까지는 글 작성, 댓글 조회 등 API 요청 시 아래처럼 인증 정보를 URL 파라미터로 전달했다.
POST /api/v1/posts?apiKey=xxxx-xxxx이 방식도 동작은 하지만 몇 가지 문제가 있다.
- URL에 인증 정보가 그대로 노출됨
- 로그, 히스토리, 브라우저 기록에 남기 쉬움
- 실무에서 거의 사용하지 않는 방식
그래서 인증 정보는 Header로 옮기는 것이 일반적이다.
2️⃣ HTTP Header란?
HTTP Header는 키-값(key-value) 형태의 데이터 구조이다.
사실상 해시맵(HashMap) 과 거의 동일한 개념이다.
예시:
Authorization: Bearer token123
Content-Type: application/json
📌 HTTP 헤더 특징
- 키-값 쌍 구조
- 대소문자 구분하지 않음 (RFC 표준)
- 요청(Request)과 응답(Response) 모두 포함 가능
- 같은 이름의 헤더가 여러 개 있을 수도 있음
3️⃣ 인증 정보는 왜 Authorization 헤더에 담을까?
관례적으로 인증 정보는 Authorization 헤더에 담는다.
Authorization: Bearer {apiKey}Bearer 의미
- Bearer = 소지자
- 토큰을 소지한 사람은 누구든지 접근 가능
- 현금을 들고 있는 사람이 누구든지 사용하는 것과 같은 개념
👉 즉, 토큰 기반 인증의 핵심 개념이다.
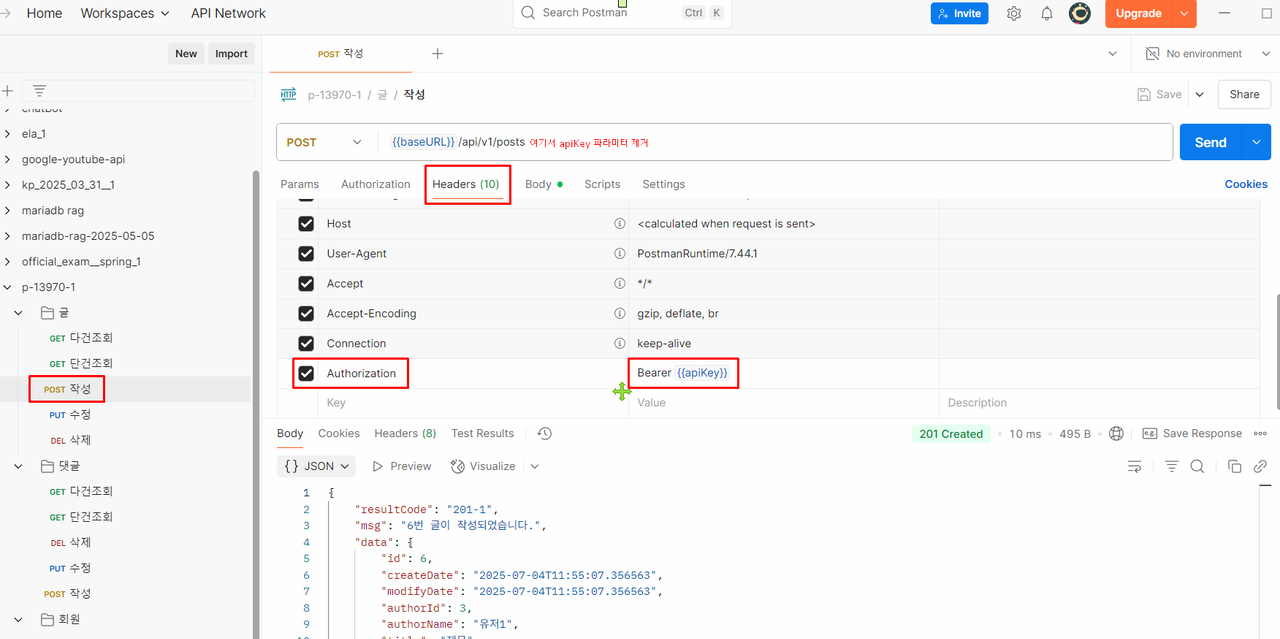
4️⃣ Postman에서 Authorization Header 설정
✔ Postman 설정 방법
- Headers 탭 이동
- Key:
Authorization - Value:
Bearer {{apiKey}}
이제 URL 뒤에 ?apiKey=... 를 붙일 필요가 없다.
5️⃣ 스프링에서 Header 값 받기 (@RequestHeader)
스프링에서는 HTTP 헤더 값을 아래 어노테이션으로 받을 수 있다.
@RequestHeader("Authorization") String authorization사용 예시
@PostMapping
public RsData<PostDto> write(
    @Valid @RequestBody PostWriteReqBody reqBody,
    @RequestHeader("Authorization") String authorization
) {
    String apiKey = authorization.replace("Bearer ", "");

    Member actor = memberService.findByApiKey(apiKey)
        .orElseThrow(() -> new ServiceException("401-1", "존재하지 않는 apiKey 입니다."));

    Post post = postService.write(actor, reqBody.title, reqBody.content);

    return new RsData<>("201-1", "글이 작성되었습니다.", new PostDto(post));
}
🔍 핵심 포인트
- Header 전체 값은
"Bearer xxxx"형태 - 실제 apiKey만 필요하므로
"Bearer "제거 - 인증 로직이 훨씬 명확해짐
6️⃣ 테스트 코드도 함께 수정
기존 테스트 코드:
post("/api/v1/posts?apiKey=" + actorApiKey)변경 후:
post("/api/v1/posts")
    .header("Authorization", "Bearer " + actorApiKey)
👉 실제 API 사용 방식과 동일해졌다.
7️⃣ 왜 Header 방식이 더 좋은가?
- URL 노출 방지
- 로그/히스토리 노출 감소
- 실무 표준 방식
- 이후 JWT, OAuth2로 확장하기 쉬움
✅ 정리
- 인증 정보는 URL 파라미터보다 HTTP Header가 적절
- Authorization 헤더는 인증을 위한 표준 위치
@RequestHeader로 간단하게 값 수신 가능- Bearer 토큰 방식은 토큰 기반 인증의 기본 구조