Nest.js와 Spring
Nest.js는 스프링과 굉장히 유사하다.
사실 타입스크립트 필드의 스프링이라고 생각이 든다.
Nest.js 개발자들이 실제로 스프링과 같은 구조를 지향하며 개발했다는 인터뷰가 있다는데, 나는 찾아보지 못했다.
Controller, Service 등의 클래스와 DI, IoC의 개념 또한 매우 유사하다.
스프링의 구조를 그대로 타입스크립트 언어로 만들었다고 생각하고 문서를 읽으면 굉장히 수월하다.
실제로 스프링을 한 번 공부해봤다면 공식문서를 읽는데 큰 어려움은 없으리라 생각된다.
(영어가 문제다...)
Intro
Nest는 Node.js server-side application을 효과적이고 scalable하게 구축하도록 돕는 프레임워크이다.
Express 같은 경우는 별다른 구조 없이 개발을 할 수 있었다.
개발 컨벤션에서 완전히 자유로울 수 있다는 이야기이다.
하지만 이러한 자유로움은 Express의 장점이 아닌 단점으로 대두되었다.
너무나도 자유로웠기 때문에 협업 시 프로젝트 코드의 구조를 쉽게 파악하기 힘들고, 저마다 각기 다른 습관이 코드에 베어있기 때문이다.
그래서 Nest는 구조를 제공한다.
Nest에서 제공하는 구조에 맞춰서 작업하고 협업한다.
NestFactory
NestFactory,,, Factory,,, Factory 익숙하다.
import { NestFactory } from '@nestjs/core';
import { AppModule } from './app.module';

async function bootstrap() {
  const app = await NestFactory.create(AppModule);
  await app.listen(3000);
}

bootstrap();
위 코드를 보면 스프링부트를 사용해서 프로젝트를 만들었을 당시의 메인 메서드와 매우 유사하다.
@Configuration
public class AppConfig {

	@Bean
	public MemberService memberService() {
    	return new MemeberServiceImpl(memberRepository());
    }

    @Bean
    public OrderService orderService() {
    	return new OrderServiceImpl(memberRepository(), discountPolicy());
    }

    @Bean
    public MemberRepository memberRepository() {
    	return new MemoryMemberRepository();	// 구현체 결정
    }

    @Bean
    public DiscountPolicy discountPolicy() {
    	return new FixDiscountPolicty();
    }
}


public static main(String[] args) {
	ApplicationContext applicationContext
    = new AnnotationConfigApplicationContext(AppConfig.class);

    ...
}
이것은 내 블로그의 스프링 챕터 첫 번째 글에서 따온 코드이다.
AppConfig 파일에는 스프링 빈으로 등록될 컨트롤러와 서비스, 레포지토리 등의 클래스가 명시되어있다.
이들은 각각 스프링 컨테이너에 싱글톤으로 보관되고, IoC 컨테이너에 의해 DI 된다.
ApplicationContext와 NestFactory가 무슨 상관이냐고?
ApplicationContext는 BeanFactory를 상속 받은 클래스이다.
ApplictionaContext는 다양한 형식의 정보를 받아들일 수 있도록 유연하게 설계되어 있기 때문에 주로 ApplicationContext를 사용하는 것 뿐이다.
Nest도 마찬가지이다.
AppModule 클래스에 등록된 정보를 NestFactory에 등록하고 DI 하는 것이다.
NestFactory 클래스를 사용해서 Nest application instance를 생성한다.
Controllers
컨트롤러는 클라이언트로부터 들어오는 요청을 핸들링하고, 응답을 반환하는 책임을 갖고 있다.
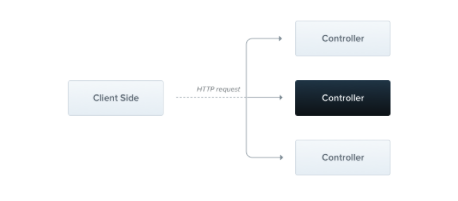
컨트롤러의 목적은 어플리케이션으로의 특정한 요청을 받는 것이다.
Routing mechanism은 어떤 컨트롤러가 어떤 요청을 받을지를 조정한다.
컨트롤러를 생성하기 위해선 Decorator가 사용되는데, 스프링에서의 어노테이션이라고 생각하면 된다.
Decorator는 클래스를 필요한 메타데이터와 연관 짓고, Nest가 rounting map을 생성하도록 돕는다.
요청과 컨트롤러를 묶는 것이다.
Routing
import { Controller, Get } from '@nestjs/common';

@Controller('cats')
export class CatsController {
  @Get()
  findAll(): string {
    return 'This action returns all cats';
  }
}
컨트롤러를 만들기 위한 가장 기본적인 것은 @Controller()라는 Decorator이다.
우리는 위의 예제에서 cats라는 prefix를 특정했다.
@Controller() decorator에 path prefix를 사용해서 우리는 연관된 라우트들을 하나로 쉽게 묶을 수 있고, 중복되는 코드를 최소화할 수 있다.
우리는 /cats로의 GET 요청에 대해 findAll()이라는 함수를 호출할 수 있게 된다.
함수는 기본적으로 200을 status code로 응답할 것이다.
(Post에 대해선 201 기본)
물론 응답값은 @Res decorator를 사용하거나 해서 바꿀 수 있다.
Request Object
핸들러는 클라이언트의 요청의 세부사항에 접근해야할 때가 있다.
Nest는 Express를 기반으로 한 request object로의 접근을 제공한다.
import { Controller, Get, Req } from '@nestjs/common';
import { Request } from 'express';

@Controller('cats')
export class CatsControlelr {
  @Get()
  findAll(@Req() request: Request): string {
    return 'This action returns all cats';
  }
}
request 객체는 HTTP 요청을 나타내며, query string/query parameters/HTTP headers/body 속성을 가지고 있다.
물론 대부분의 경우에 @Body, @Query, @Headers, @Params와 같은 더 세부적인 Decorator를 쓰곤 한다.
Http 관련 Decorator
@Request(), @Req()
@Response(), @Res()
@Next()
@Session()
@Param(key?: string)
@Body(key?: string)
@Query(key?: string)
@Headers(name? string)
@Ip()
@HostParam()
응답
Status Code
@Res() decorator를 사용해서 동적으로 HttpStatusCode를 변경할 수 있다.
@Res() response: Response
...
response.status(200).send()
동적이기보다 조금 더 간단하게 응답 코드를 바꾸는 방법은 @HttpCode() Decorator를 사용하는 것이다.
@Post()
@HttpCode(204)
create() {
	...
}
헤더
응답 헤더에 값을 추가하는 방법도 두가지이다.
@Res() Decorator를 사용해서 헤더를 추가할 수 있다.
res.header()마찬가지로 동적이기보다 고정된 헤더를 노출하고 싶다면 아래와 같은 방법을 사용할 수 있다.
@Post
@Header('Cache-Control', 'none')
create() {
  	...
}
리다이렉션
@Redirection() Decorator는 url과 statusCode, 2개의 인자를 받는다.
기본 statusCode는 302(found)이다.
@Get()
@@Redirect('https://nestjs.com', '301')
...
만약 HTTP status code나 redirect URL을 동적으로 결정하고 싶다면, 아래의 객체를 반환해라.
{
	"url": string,
    'statusCode": number
}
Library-specific approach
위에서는 Decorator를 활용해 응답을 하는 경우가 중심이었는데, 이번에는 response object를 직접 활용해서 응답하는 방법을 살짝 알아보자.
import { Controller, Get, Post, Res, HttpStatus } from '@nestjs/common';
import { Response } from 'express';

@Controller('cats')
export class CatsController {
  @Post()
  create(@Res() res: Response) {
    res.status(HttpStatus.CREATED).send();
  }

  @Get()
  findAll(@Res() res: Response) {
    res.status(HttpStatus.OK).json([]);
  }
}
요청
query parameter
요청 path에 동적으로 data를 추가하는 경우가 있다.
GET /cats/1, GET /cats/2, ... 와 같은 경우, url의 마지막 값은 동적으로 변하는 '변수'이다.
해당 변수를 뽑아내기 위해서 @Param() Decorator를 사용할 수 있다.
@Get(':id')
findOne(@Param() params): string {
  console.log(params.id);
  return 'This action returns a ${params.id} cat';
}
조금 더 직관적으로 쿼리 파라미터를 뽑아내고 싶다면 아래의 방법을 활용할 수 있다.
@Get(':id')
findOne(@Param('id) id: number): string {
  returns 'This action returns a ${id} cat';
}
DTO
요청 Body를 조회해야하는 경우가 있다.
예를 들어, Post 요청의 경우에는 어떤 정보의 객체를 데이터베이스에 생성해달라는 경우가 많다.
이 때에는 @Body Decorator를 사용한다.
DTO를 사용해야하는 이유에 대해서는 따로 언급하지 않고 넘어가도록 하겠다.
export class CreateCatDto {
  name: string;
  age: number;
  breed: string;
}

@Post()
async create(@Body() createCatDto: CreateCatDto): Promise<string> {
  return 'This action adds a new cat';
}
async 함수는 Promise를 반환해야 한다.
CRUD 정리
import { Controller, Get, Query, Post, Body, Put, Param, Delete } from '@nestjs/common';
import { CreateCatDto, UpdateCatDto, ListAllEntitiees } from './dto';

@Controller('cats')
export class CatsController {
  @Post()
  async create(@Body createCatDto: CreateCatDto): Promise<string> {
    return 'This action adds a new cat';
  }

  @Get()
  async findAll(@Query() query: ListAllEntities): Promise<string> {
    return 'This returns all cats (limit: ${query.limit} items)';
  }

  @Get(':id')
  async findOne(@Param('id') id: number): Promise<string> {
    return 'This action returns a ${id} cat';
  }

  @Put(':id')
  async update(@Param('id') id: number): Promise<string> {
    return 'This action updates a ${id} cat';
  }

  @Delete(':id')
  async delete(@Param('id') id: number): Promise<string> {
    return 'This action removes a ${id} cat';
  }
}
Providers
Provider는 Nest의 근본적인 개념이다.
Service, Repository, Factory, Helper 등의 많은 Nest의 기본적인 클래스는 Provider로 취급된다.
Provider의 핵심 아이디어는 의존성으로 주입될 수 있다는 것이다.
이는 객체간에 다양한 관계가 생성될 수 있음을 의미한다.
그리고 객체들의 인스턴스들을 엮는 기능은 Nest runtime system에 위임된다.
Provider의 생명주기(스코프)는 일반적으로 application의 생명주기와 동기화 되어 있다.
application이 bootstrap되면 모든 의존성이 주입되고, 따라서 모든 Provider가 인스턴스화된다.
이와 유사하게, appliationdl shut down되면 각 Provider들은 destroy 된다.
물론 provider의 생명주기를 바꿀 수 있다.
Service
서비스는 데이터를 저장하고 검색하는 책임을 갖는다.
서비스는 주로 컨트롤러가 사용하기 위해 고안된다.
import { Injectable } from '@nestjs/common';
import { Cat } from './interfaces/cat.interface';

@Injectable()
export class CatsService {
  private readonly cats: Cat[] = [];

  create(cat: Cat) {
    this.cats.push(cat);
  }

  findAll(): Cat[] {
    return this.cats;
  }
}
@Injectable()이라는 새로운 Decorator가 등장한다.
Inject 될 의향이 있다는 거겠지 뭐...
@Injectable(): NestIoC 컨테이너에 의해 관리될 클래스임을 명시하는 Decorator이다.
CatsService를 활용하는 컨트롤러는 그럼 코드를 어떻게 작성할 수 있을까?
export interface Cat {
  name: string;
  age: number;
  breed: string;
}
왜 Cat을 interface를 쓴 것인지는 살짝 의문이다.
그냥 class로 만들었어도 될 것 같은데 굳이? interface?
클래스로 만들어서 인스턴스들을 뽑아서 써도 되는 것 아닌가?
인스턴스로 만들면, 인스턴스를 구현한 클래스도 만들고 그 클래스의 인스턴스를 써야하는 거 아닌가...
게다가 Cat 인스턴스는 구현해야할 메서드도 없고, 필드 속성만 있는디...
import { Controller, Get, Post, Body } from '@nestjs/common';
import { CreateCatDto } from './dto/create-cat.dto';
import { CatsService } from './cats.service';
import { Cat } from './interface/cat.interface';

@Controller('cats')
export class CatsController {
  constructor(private catsService: CatsService) {}

  @Post()
  async create(@Body() createCatDto: CreateCatDto) {
    this.catsService.create(createCatDto);
  }

  @Get()
  async findAll(): Promise<Cat[]> {
    return this.catsService.findAll();
  }
}
CatsService는 CatsController에 의존성이 주입된다.
@Injectable() Decorator를 통해 CatsService 클래스의 인스턴스가 생성되어 싱글톤으로 NestIoC 컨테이너에 등록된다.
@Controller 또한 IoC 컨테이너에 등록되어 관리될 것이다.
의존관계는 언제 맺어지냐?
컨트롤러 인스턴스 생성 시점에 의존관계가 주입된다.
어떻게?
생성자를 보면 답이 나온다.
생성 시점에 딱 한 번! 의존관계가 주입된다.
생성자를 통한 의존관계 주입은 스프링에서도 중요하게 다뤄졌던 문제이다.
컨트롤러는 http 요청 라우팅에 대한 책임만 가진다.
그리고 http 응답을 내보낸다.
이외의 책임은 서비스에 위임한다.
서비스는 데이터를 가공한다.
데이터를 생성한다든지, 조회한다든지, 변경한다든지, 삭제한다든지 등의 작업은 서비스 계층의 책임이다.
그리고 실제 Sql을 날리는 것은 Reposioty 계층의 책임이다.
발 달 살 말 날 알 칼 탈
잘 갈
Module
Module은 @Module Decorator가 달린 클래스이다.
@Module Decorator는 Nest가 application 구조를 구축하기 위해 사용할 메타데이터를 제공한다.
모든 application은 root module이라고 하는 module을 최소 하나 이상 가지고 있다.
Nest가 application graph를 구축하기 위해 사용하는 starting point가 바로 root module이다.
@Module Decorator의 속성은 4가지가 있다.
1. providers: Nest injector에 의해 인스턴스화되고, 최소 이 모듈 내에서 공유됨.
2. controllers: 인스턴스화 되어야 할 컨트롤러 집합
3. imports: 이 모듈에서 필요로 하는 provider를 export하는 모듈을 import하는 리스트
4. exports: 이 모듈 뿐만 아니라 다른 모듈에서도 import해서 사용해야하는 provider 부분집합,
			provider 그 자체로도 사용할 수 있고 그냥 토큰으로 사용할 수도 있다.
모듈은 기본적으로 provider를 encapsulate한다.
따라서 export되어서 import된 모듈을 사용하지 않는 한, 외부의 provider를 주입하는 것은 불가능하다.
Controller 등록
컨트롤러를 위와 같이 정의했지만, Nest는 여전히 CatsController의 존재를 알지 못한다.
따라서 해당 클래스의 인스턴스를 생성하지 않을 것이다.
스프링 컨테이너와 같이 Nest에도 IoC 컨테이너가 존재한다.
IoC 컨테이너는 클래스의 객체를 생성해서 하나의 인스턴스만 보관한다. (싱글톤)
그리고 각 인스턴스들의 의존관계를 주입한다. (DI)
따라서 우리는 컨테이너가 클래스를 인지할 수 있도록 해야하는데, 해당 기능을 하기 위해 module이 존재한다.
import { Module } from '@nestjs/common';
import { CatsController } from './cats/cats.controller';

@Module({
  controllers: [CatsController],
})
export class AppModule {}
우리는 module 클래스에 @Module() Decorator를 활용해서 메타데이터를 첨부했다.
그럼 Nest는 이제 어떤 컨트롤러가 구축되어야 하는지를 쉽게 반영할 수 있다.
자세한 건 추후 추가...
Provider 등록
우리는 CatsService라는 Provider를 정의했고, 이에 대한 소비자로 CatsController가 있다.
우리는 injection을 위해 이를 Nest에 등록해야 한다.
import { Module } from '@nestjs/common';
import { CatsController } from './cats/cats.controller';

@Module({
  controllers: [CatsController],
  providers: [CatsService],
})
export class AppModule {}
Nest는 이제 CatsController의 의존성을 해결할 수 있다.
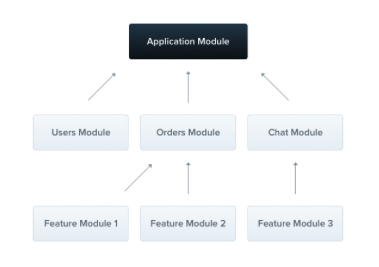
Feature Module
CatsController와 CatsService는 같은 도메인에 속한다.
그들은 밀접한 관련이 있기 때문에, feature module로 쪼갤 수 있다.
SOLID 원칙을 따르는 설계라 볼 수 있다.
import { Module } from '@nestjs/common';
import { CatsController } from './cats.controller';
import { CatsService } from './cats.service';

@Module({
  controllers: [CatsController],
  providers: [CatsService],
})
export class CatsModule {}
위와 같이 CatsModule이라는 Feature Module 을 정의하고 이것을 AppModule에서 Import 하면 된다.
import { Module } from '@nestjs/common';
import { CatsModule } from './cats/cats.module';

@Module({
  imports: [CatsModule],
})
export class AppModule {}
Nest에서 모듈은 기본적으로 싱글톤으로 관리된다.
따라서 많은 모듈들은 모든 provider의 같은 인스턴스를 공유한다.
Export, Import
모든 module은 자동적으로 shared module이다.
한 번 생성되면 어느 모듈에서건 재사용될 수 있다.
만약 우리가 CatsService를 다른 어떤 모듈에서 사용하고 싶어한다고 가정해보자.
그럼 우리는 CatsService Provider를 export 해서 내보내야할 것이다.
import { Module } from '@nestjs/common';
import { CatsController } from './cats.controller';
import { CatsService } from './cats.service';

@Module({
  controllers: [CatsController],
  providers: [CatsService],
  exports: [CatsService],
})
export class CatsModule {}
이렇게 되면, CatsModule을 import하는 모든 모듈은 CatsService에 접근이 가능하다.
물론 모두 같은 하나의 인스턴스를 공유할 것이다.
CoreModule
코어 모듈은 공통된 모듈들을 import해서 다시 export하는 모듈이다.
외부에서 자주 사용되는 모듈이라면 CoreModule에서 import해서 export하여, 사용자들은 CoreModule만 import해서 사용할 수 있도록 할 수 있다.
@Module({
  imports: [CommonModules, ...],
  exports: [CommonModules, ...],
})
export class CoreModule {}-
@Global() decorator를 사용할 수 있다.
-
Dynamic Modules에 관한 내용도 있지만 지금은 다루지 않겠다!!
Middleware
Middleware는 route hanlder 이전에 호출되는 함수이다.
스프링의 인터셉터와 비슷한 개념이라고 보면 좋을 것 같다.

Middleware는 request와 response 객체에 접근할 수 있다.
middleware는 체인으로 구성되어, 반드시 next()를 호출해야한다.
더이상 실행해야할 next()가 없다면 route hanlder가 호출된다.
Nest middleware는 기본적으로 express middleware와 같다.
express 공식 문서에 작성된 middleware의 기능은 아래와 같다.
Middleware functions can perform the following tasks:

    - execute any code.
    - make changes to the request and the response objects.
    - end the request-response cycle.
    - call the next middleware function in the stack.
    - if the current middleware function does not end the request-response cycle,
    	it must call next() to pass control to the next middleware function.
        Otherwise, the request will be left hanging. (그렇지 않으면 요청이 중단될 것이다.)
@Injectable() decorator를 사용해서, NestMiddleware를 구현히면 custom middleware를 만들 수 있다.
import { Injectable, NestMiddleware } from '@nestjs/common';
import { Request, Reseponse, NextFunction } from 'express';

@Injectable()
export class LoggerMiddleware implements NestMiddleware {
  use(req: Request, res: Response, next: NextFunction) {
    console.log('Request...');
    next();
  }
}
Nest middleware는 DI를 완전히 지원한다.
provider와 controller처럼, 모듈을 통해 의존성을 주입할 수 있다.
의존성 주입은 일반적으로 constructor를 통해 이루어진다.
Applying Middleware
@Module decorator에는 middleware를 위치할 공간이 없다.
대신 우린 module class에 configure() 메서드를 사용해서 세팅할 수 있다.
middleware를 포함하는 module은 NestModule 인터페이스를 구현해야한다.
import { Module, NestModule, MiddlewareConsumer } from '@nestjs/common';
import { LoggerMiddleware } from './common/middleware/logger.middleware';
import { CatsModule } from './cats/cats.module';

@Module({
  imports: [CatsModule],
})
export class AppModule implements NestModule {
  configure(consumer: MiddlewareConsumer) {
    consumer
    	.apply(LoggerMiddleware)
    	.forRoutes('cats');
  }
}
위의 예시는 /cats route handler에 LoggerMiddleware를 설정한 것을 나타낸다.
만약 middleware가 적용될 route의 Http method까지 건들고 싶다면 아래와 같은 방법으로 할 수 있다.
import { Module, NestModule, MiddlewareConsumer } from '@nestjs/common';
import { LoggerMiddleware } from './common/middleware/logger.middleware';
import { CatsModule } from './cats/cats.module';

@Module({
  imports: [CatsModule],
})
export class AppModule implements NestModule {
  configure(consumer: MiddlewareConsumer) {
    consumer
    	.apply(LoggerMiddleware)
    	.forRoutes({
      		path: 'cats',
      		method: RequestMethod: GET
    	});
  }
}
Middleware consumer
MiddlewareConsumer는 Helper class이다.
이는 middleware를 관리하기 위한 몇몇 built-in 메서드를 제공한다.
메서드들은 모두 체이닝 될 수 있다.
그 중 forRoutes() 메서드는 a single string, multiple string, a RouteInfo object, a controller class 그리고 심지어는 multiple controller classes를 인자로 취할 수 있다.
대부분의 경우에 ,(comma)로 구분된 controller list를 인자로 넣을 것이다.
import { Module, NestModule, MiddlewareConsumer } from '@nestjs/common';
import { LoggerMiddleware } from './common/middleware/logger.middleware';
import { CatsModule } from './cats/cats.module';

@Module({
  imports: [CatsModule],
})
export class AppModule implements NestModule {
  configure(consumer: MiddlewareConsumer) {
    consumer
    	.apply(LoggerMiddleware)
    	.forRoutes(CatsController);
  }
}
Excluding routes
특정 route에 대해 middleware가 적용되지 않기를 바랄 수 있다.
우리는 exclude()라는 메서드를 통해 쉽게 이를 해낼 수 있다.
해당 메서드는 a single string, multiple strings, or a RouteInfo object를 인자로 취할 수 있다.
consumer
	.apply(LoggerMiddleware)
	.exclude(
  { path: 'cats', method: RequestMethod.GET },
  { path: 'cats', method: RequestMethod.POST },
  'cats/(.*)',
  )
	.forRoutes(CatsController);
LoggerMiddleware는 exclude() 메서드에 담긴 주소를 제외하고, CatsController에 적용될 것이다.
Functional Middleware
앞서 우리가 작성한 middleware는 너무나도 간단했다.
딱히 member도 없고, method도 정의되어 있지 않고, 의존성도 없다.
굳이 class로 작성하지 않고 간단하게 function으로 middleware를 작성할 수는 없을까?
해서 나온 것이 functional middleware이다.
import { Request, Response, NextFunction } from 'express';

export function logger(req: Request, res: Response, next: NextFunction) {
  console.log('Request...');
  next();
};
// logger.middleware.ts


consumer
	.apply(logger)
	.forRoutes(CatsController);
// app.module.ts
Multiple Middleware
consumer
	.apply(cors(), helmet(), logger)
	.forRoutes(CatsController);
Global Middleware
등록된 모든 route에 대해 middleware를 적용하고 싶다면 INestApplication 인스턴스에서 use()메서드를 사용하면 된다.
const app = await NestFactory.create(AppModule);
app.use(logger);
await app.listen(3000);
Exception Filters
Nest는 application 전역에 걸쳐 처리되지 않은 예외를 처리하는 책임을 가진 exceptions layer를 내장하고 있다.
application code에서 예외를 처리하지 못했다면, 해당 layer에 의해 catch되어 자동으로 응답이 보내질 것이다.
내장된 global exception filter는 HttpException과 그를 상속하는 하위 클래스들 모두를 처리한다.
인지되지 않은 예외에 대해서 내장 exception filter는 아래와 같은 JSON응답을 생성한다.
{
	"statusCode": 500,
    "message": "Interneal server error"
}
Throwing standard exceptions
Nest는 @nestjs/common 패키지에서 제공하는 HttpExeption 클래스를 내장하고 있다.
만약 CatsController의 findAll() 메서드에서 예외를 던지고자 한다면 아래와 같이 코드를 작성할 수 있을 것이다.
@Get()
async findAll() {
  throw new HttpException('Forbidden', HttpStatus.FORBIDDEN);
}- HttpStatus는 @nestjs/common 패키지로부터 따온 helper enum이다.
위의 코드는 아래와 같은 JSON 객체를 생성해 응답할 것이다.
{
	"statusCode": 403,
    "message": "Forbidden"
}
HttpException 생성자는 두개의 argument를 받는다.
- response argument: defines the JSON response body. It can be a string or an object as described below.
- status argument: defines the HTTP status code
위의 두개의 인자를 바탕으로 JSON 객체가 생성되고, JSON 객체는 아래와 같은 두개의 속성을 가지고 있다.
- statusCode: defaults to the HTTP status code provided in the status argument
- message: a short description of the HTTP error based on the status
HttpException의 첫 번째 인자로 object를 보내는 경우는 아래와 같다.
@Get()
async findAll() {
  throw new HttpException({
    status: HttpsStatus.FORBIDDEN,
    error: 'This is a custom message',
  }, HttpStatus.FORBIDDEN)
{
"status": 403,
"error": "This is a custom message"
}Built-in HTTP exceptions
Nest는 HttpExcetpion을 상속하는 standard exception을 제공한다.
대표적으로는 아래와 같은 것들이 있다.
* BadRequestException
* UnauthorizedException
* NotFoundException
* ForbiddenException
* NotAcceptableException
* InternalServerErrorException
* MethodNotAllowedException
위에 작성된 것 말고도 많이 있으니 참고하자!
Custom Exceptions
custom exception을 만들고자 한다면 HttpExcetpion을 상속 받아서 만들면 된다.
그러면 Nest가 custom exception을 인지하고 자동적으로 error 응답을 관리할 것이다.
export class ForbiddenException extends HttpException {
  constructor() {
    super('Forbidden', HttpStatus.FORBIDDEN);
  }
}@Get()
async findAll() {
throw new ForbiddenException();
}Exception Filters
내장 exception filter가 많은 경우의 에러를 처리하겠지만, 이는 그저 응답을 JSON 객체로 바꿔주기만 한다.
만약 로그를 한 줄 남기고 싶다던가 하는 추가적인 로직을 원할 수 있다.
Exception Filter는 error에 대한 full control을 지원하기 위한 layer이다.
import { ExceptionFilter, Catch, ArgumentsHost, HttpException } from '@nestjs/common';
import { Request, Response } from 'express';

@Catch(HttpException)
export class HttpExceptionFilter implements ExceptionFilter {
  catch(exception: HttpException, host: ArgumentsHost) {
    const ctx = host.switchToHttp();
    const response = ctx.getResponse<Response>();
    const request = ctx.getRequest<Request>();
    const status = exception.getStatus();

    response
    	.status(status)
    	.json({
      		statusCode: status,
      		timestamp: new Date().toISOString(),
      		path: request.url,
	    });
  }
}
모든 exception filter는 generic ExceptionFilter T 인터페이스를 구현해야 한다.
구현 시, catch(exception: T, host: ArgumnetsHost) 메서드를 구현해야 한다.
@Catch(HttpException) decorator는 Nest가 HttpException 타입만을 걸러내는 filter임을 알려주는 메타데이터를 묶는 역할을 한다.
@Catch() decorator는 a single parameter나 comma-separated list를 받을 수 있다.
Catch everything
만약 @Catch() decorator에 아무런 인자도 주지 않는다면, 해당 filter는 모든 타입의 예외를 받아 처리할 것이다.
혹은 BaseExceptionFilter를 extend해서 상속된 catch()메서드를 호출해서 모든 exception에 대한 filter를 만들 수도 있다.
import { Catch, ArgumentsHost } from '@nestjs/common';
import { BaseExceptionFilter } from '@nestjs/core';

@Catch()
export class AllExceptionsFilter extends BaseExceptionFilter {
  catch(exception: unknown, host: ArgumentsHost) {
    super.catch(exception, host);
  }
}
BaseExceptionFilter를 extend한 Method-scoped filter나 Controller-scoped filter는 new 연산자로 인스턴스화 되면 안된다고 한다.
대신, 프레임워크가 자동으로 그들을 인스턴스화 하도록 해야한다고 한다.
scope가 application 전역이라면 아래와 같이 등록할 수 있다.
async function bootstrap() {
  const app = await NestFactory.create(AppModule);

  const { httpAdapter } = app.get(HttpAdapterHost);
  app.useGlobalFilters(new AllExceptionsFilter(httpAdapter));

  await app.listen(3000);
}
bootstrap();
Arguments host
catch() 메서드의 파라미터를 살펴보자.
exception은 지금 처리되고 있는 exception 객체를 의미한다.
host 파라미터는 ArgumentsHost 객체이다.
ArgumentsHost는 강력한 utility 객체이다.
위의 예제 코드 상에서 우리는 Request와 Response 객체에 대한 참조를 얻기 위해 사용했다.
더 자세히 배우고 싶다면... 공식문서에 나와있다고 한다.
Binding Filters
Controller에서 뱉는 Error를 filter가 잡을 수 있도록 해야할 것이다.
@Post()
@UseFilters(new HttpExceptionFilter())
async create(@Body() createCatDto: CreateCatDto) {
  throw new ForbiddenException();
}
@UseFilters() decorator는 @nestjs/common 패키지에서 import 되었다.
@Catch() decorator와 비슷하게도, a single filter insance 혹은 comma-separated list of fliter instance를 받을 수 있다.
가능하다면 인스턴스를 넘기는 것보다는 클래스를 넘기는 것이 좋다고 본다.
인스턴스화의 책임을 프레임워크에 맡기고, dependency injection을 가능케한다.
또한 Nest가 쉽게 같은 클래스의 인스턴스들을 재사용할 수 있어서 memory usage가 감소한다.
@Post()
@UseFilters(HttpExceptionFilter)
async create(@Body() createCatDto: CreateCatDto) {
  throw new ForbiddenException();
}
위의 예제에서는 CatsController의 create 메서드에만 filter가 적용되었다.
filter의 scope를 controller, 혹은 appliction 전역의 범위로 늘리고 싶다면 아래와 같이 코드를 작성할 수 있다.
@UseFilters(new HttpExceptionFilter())
export class CatsController {
  ...
}
async funtion bootstrap() {
const app = await NestFactory.create(AppModule);
app.useGlobalFilters(new HttpExceptionFilter());
await app.listen(3000);
}
bootstrap();위에서 useGlobalFilters() 메서드를 사용해서 HttpExceptionFilter()를 global하게 등록했다.
하지만 이는 의존성을 주입할 수 없다.
이러한 문제를 해결하기 위해서는 아래와 같이 module에 filter를 등록하면 된다.
import { Module } from '@nestjs/common';
import { APP_FILTER } from '@nestjs/core';

@Module({
  providers: [
    {
      provide: APP_FILTER,
      useClass: HttpExceptionFilter,
    },
  ],
})
export class AppModule {}
filter에 대해 의존성을 주입하기 위해 이러한 접근법을 사용했을 때, 어느 모듈에 이러한 코드를 작성했건 해당 filter는 global함을 명심하라.
따라서 굳이 AppModule에 등록하지 않고, filter가 작성된 곳의 module에 등록하면 된다.
Pipes
pipe는 PipeTransform 인터페이스를 구현한, @Injectable() decorator가 붙은 클래스이다.
Pipe가 사용되는 이유는 주로 두 가지이다.
* transformation: transform input data to the desired form (e.g, from string to integer)
* validation: evaluate input data and if valid, simply pass it through unchanged;
    		otherwise, throw an exception when the data is incorrect.
두 가지 경우 모두, pipe는 controller route handler에 의해 처리되는 argument에 대해 동작한다.
Nest는 pipe를 method가 invoke(호출) 되기 전에 끼워넣는다.
그리고 해당 pipe는 해당 method로 보내지는 인자를 받는다.
그러면 받은 인자에 대해서 transformation 또는 validation 작업이 발생한다.
이후에 (potentially) 변환된 인자와 함께 route handler가 호출된다.
Nest에는 즉시 사용할 수 있는 수많은 내장 pipe들이 있다.
물론 custom pipe를 작성할 수도 있다.
Pipe는 exception zone 내부에서 실행된다.
즉, pipe가 던지는 exception은 exceptions layer에서 처리된다는 의미이다.
따라서 pipe에서 예외가 발생하면 이후에 controller method가 실행되지 않는다.
Built-in pipes
Nest는 9개의 즉시 실행 가능한 pipe를 제공한다.
* ValidationPipe
* PasreIntPipe
* ParseFloatPipe
* ParseBoolPipe
* ParseArrayPipe
* ParseUUIDPipe
* ParseEnumPipe
* DefaultValuePipe
* ParseFilePipe
(from @nestjs/common)
ParseIntPipe를 살펴보자.
이는 transformation 관련 예제이다.
pipe는 method handler parameter가 Javascript 정수로 변환되도록 한다. (만약 변환에 실패하면 에러를 던질 것이고, method handler가 실행되지 않을 것이다.)
Parse* pipe는 위와 같은 방식으로 동작한다.
Binding Pipees
Pipe를 한 번 직접 사용해보자.
@Get(':id')
async findOne(@Param('id', ParseIntPipe) id: number) {
  return this.catsService.findOne(id);
}
위의 코드는 우리에게 두 가지를 보장해줄 것이다.
findOne() 메서드가 받는 parameter가 number일 것이라는 것, 그리고 만약 아니라면 route handler가 호출되기 전에 exception을 던져줄 것이라는 것.
@Query에도 마찬가지로 적용될 수 있다.
@Get()
async findOne(@Query('id', ParseIntPipe) id: number) {
  return this.catsServce.findOne(id);
}
아래와 같은 요청에 대해 Nest는 예외를 던질 것이다. (당연히 route handler의 method는 호출되지 않는다.)
GET localhost:3000/abc{
"statusCode": 400,
"message": "Validation failed (numeric string is expected)",
"error": "Bad Request"
}exception은 findOne() 메서드의 호출을 막을 것이다.
위의 예제에서 우리는 ParseIntPipe 클래스를 넘겨주었다.
인스턴스를 넘겨주지 않고, 인스턴스화에 대한 책임을 프레임워크에 위임하여 dependency injection이 가능하게 했다.
만약 우리가 내장된 pipe에 customize를 하고 싶다면, 인스턴스를 넘기는 것이 useful하다. (guard에 대해서도 마찬가지)
@Get(':id')
async findOne(
  @Param('id', new ParseIntPipe({ errorHttpStatusode: HttpStatus.NOT_ACCEPTABLE }))
  id: number) {
  return this.catsService.findOne(id);
}
Guard
Guard는 CanActivate 인터페이스를 구현한, @Injectable decorator가 annotated된 클래스이다.
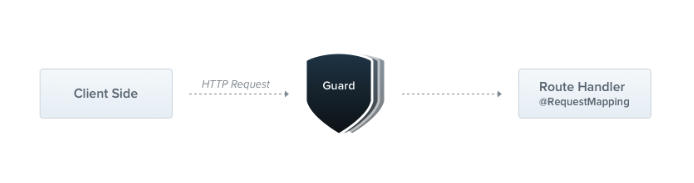
Guard는 single responsibility가 있다.
그들의 책임은 특정 조건(permissions, roles, ACLS, ... 등)에 따라 주어진 요청이 핸들러에 의해 조작될지 말지를 결정하는 것이다.
이들은 종종 authorization을 위해 참고되기도 한다.
전통적인 Express application들에서 Authorization, Authentication은 주로 middleware에 의해 처리되었다.
middleware는 authentication을 위한 좋은 선택지이다.
토큰 유효성 검사 및 요청 객체에 속성 연결과 같은 작업이 특정 경로 컨텍스트(및 해당 메타데이터)와 강력하게 연결되어 있지 않기 때문입니다.
그러나 미들웨어는 본질적으로 멍청하다. (is dumb라는 문구가 공식문서에 작성되어 있다.)
미들웨어는 next() 함수가 호출된 이후, 어떤 핸들러가 실행될지 모른다.
반면, Guard는 ExecutionContext 인스턴스로의 접근을 가지고 있고, 따라서 정확히 다음에 무엇이 실행될지를 알고 있다.
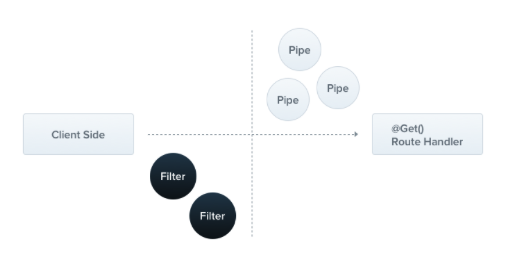
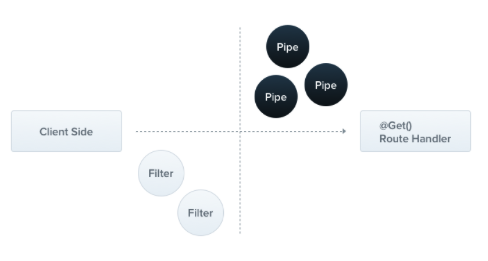
exception filter나 Pipe, interceptor와 마찬가지로, request/response cycle의 정확한 지점에 processing logic을 삽입하고, 선언적으로 처리할 수 있도록 설계되었다.
(They're designed, much like exception filters, pipes, and interceptors, to let you interpose processing logic at exactly the right point in the request/response cycle, and to do so declaratively.)
- Guard는 모든 middleware다음, 그리고 interceptor나 pipe에 앞서 실행된다.
즉, 실행순서 middleware -> guard -> interceptor, pipe
Authorization guard
Authorization은 Guard 사용의 굉장히 좋은 예시이다.
특정 route는 caller가 충분한 permission을 갖췄을 때만 사용가능해야하기 때문이다.
소개된 AuthGuard는 authenticated된 user라고 가정한다.
즉, token이 request header에 붙어있는 것이다.
토큰을 추출해서 검증할 것이고, 요청이 처리될 수 있는 것인지 아닌지 판별할 것이다.
import { Injectable, CanActivate, ExecutionContext } from '@nestjs/common';
import { Observable } from 'rxjs';

@Injectable()
export class AuthGuard implements CanActivate {
  canActivate(
    context: ExecutionContext,
  ): boolean | Promise<boolean> | Observable<boolean> {
      const request = context.switchToHttp().getRequest();
      return validateRequest(request);
    }
}
validationRequest() 함수는 필요에 따라 간단할 수도 있고, 복잡할 수도 있다.
이 예제의 핵심은 guard가 어떻게 request/response cycle에 fit into 하느냐 이다.
모든 guard는 canActicate() 함수를 구현해야 한다.
이 함수는 현재 요청이 허용되는지 여부를 나타내는 boolean을 return 해야만 한다.
응답을 동기적으로 혹은 비동기적으로 return 할 수 있다. (Promise or Observable)
Nest는 return값을 다음의 행동을 처리하기 위해 사용한다.
- if it returns true, the request will be processed.
- if it returns false, Nest will deny the request.
Execution Context
canActivate() 함수는 ExecutionContext 인스턴스를 single argument로 받는다.
ExecutionContext는 ArgumentsHost를 상속 받는다.
우리는 이전에 ArgumentsHost를 이전에 exception filter에서 봤다.
우리는 위의 예제에서 request 객체에 대한 참조를 얻기 위해, 앞선 것과 같은 helper method를 사용했다.
ArgumentsHost를 extend(확장)해서 ExecutionContext는 current execution process에 대한 추가적인 세부정보를 제공하는 새로운 helper metho를 추가했다.
이러한 세부사항은 generic guard를 구축하는데에 도움이 될 수 있다.
Role-based Authentication
특정 role의 user만 접근을 허용하는 더욱 기능적인 guards를 구축해보자.
import { Injectable, CanActivate, ExecutionContext } from '@nestjs/common';
import { Observable } from 'rxjs';

@Injectable()
export class RolesGuard implements CanActivate {
  canActivate(
  	context: ExecutionContext,
  ): boolean | Promise<boolean> | Observable<boolean> {
      return true;
    }
}
위의 코드는 모든 요청을 허락한다.
Binding guards
pipe나 exception filter와 같이, guard 또한 controller-scoped, method-scoped, or global-scoped 될 수 있다.
아래 예제는 @UseGuards(0 decorator를 사용해서 controller-scoped guard를 세팅하는 것이다.
decorator는 a single argument, or a comma-separated list of arguments를 받는다.
@Controller('cats')
@UseGuards(RolesGuard)
export class CatsController {
  ...
}
우리는 인스턴스가 아닌 RolesGuard타입을 넘겼다.
인스턴스화의 책임을 프레임워크에 위임하여 DI가 가능하게 한 것이다.
물론 인스턴스를 넘길 수도 있다.
위의 예제는 Controller에 정의된 모든 핸들러에 guard가 붙게 된다.
만약 single method에만 적용하고 싶다면 @UseGuards() decorator를 method level에 붙이면 된다.
만약 global guard를 세팅하고 싶다면 Nest application instance의 useGlobalGuards() 메서드를 사용하면 된다.
...
const app = await NestFactory.create(AppModule);
app.useGlobalGuards(new RolesGuard());
Global guard는 application 전역으로 모든 controller와 모든 route handler에서 사용된다.
DI 관점에서, global guard는 모든 module 외부에서 등록되었기 때문에 의존성을 주입할 수 없다.
이를 해결하기 위해 아래와 같은 구조로 어느 모듈에서든 guard를 세팅해주어야한다.
import { Module } from '@nestjs/common';
import { APP_GUARD } from '@nestjs/core';

@Module({
  providers: [
    {
      provide: APP_GUARD,
      useClass: RolesGuard.
    },
  ],
})
export class AppModule {}- 위와 같은 접근법으로 guard에 대한 의존성을 주입하려 할 때, 위와 같은 구조의 코드가 어느 module에 작성되는지 상관없이 guard는 global하다.
guard가 작성된 곳의 module에 등록하는 것을 추천한다.
Setting roles per handler
RolesGuard는 동작하겠지만, 아직 똑똑하지 않다.
모든 요청에 대한 처리를 허용하기 때문이다.
Guard 기능의 가장 중요한 이점은 execution context이다.
아직 어떤 role을 handler마다 허용해야할지를 알지 못한다.
CatsController를 에를 들어, 해당 컨트롤러는 다른 route마다 스키마에 대해 각기 다르게 허가를 낸다.
몇몇은 admin user에만 사용가능하고, 나머지는 모두에게 허용된다.
Nest는 @SetMetadata() decorator를 통해 route handler에 custom metadata를 첨부할 수 있게 한다.
@Post()
@SetMetadata('roles', ['admin'])
async create(@Body() createCatDto: CreateCatDto) {
  this.catsService.create(createCatDto);
}
create 메서드에 roles 메타데이터를 첨부했다. (roles가 key, ['admin']이 particular value)
하지만 @SetMetadata() decorator를 직접 사용하는 것은 좋은 사용법이 아니다.
decorator를 직접 만들어보자.
impor { SetMetadata } from '@nestjs/common';

export const Roles =
      (...roles: string[]) => SetMetadata('roles', roles);
훨씬 cleaner하고 readable하고 strongly typed하다.
custom @Roles() decorator를 create() 메서드에 활용해보자.
@Post()
@Roles('admin')
async create(@Body() createCatDto: CreateCatDto) {
  this.catsService.create(createCatDto);
}
roles.guard.ts
import { Injectable, CanActivate, ExecutionContext } from '@nestjs/common';
import { Observable } from 'rxjs';

@Injectable()
export class RolesGuard implements CanActivate {
  canActivate(
  	context: ExecutionContext,
  ): boolean | Promise<boolean> | Observable<boolean> {
      return true;
    }
}
현재 작성된 코드는 단순하게 모든 경우에 대해 true를 반환한다.
따라서 모든 요청이 정상적으로 처리될 것이다.
우리는 roles가 matching하느냐에 따라 조건부적인 반환을 하고 싶다.
route의 role에 접근하기 위해 (custom metadata), Reflector라는 helper class를 사용할 것이다.
import { Injectable, CanActivate, ExecutionContext } from '@nestjs/common';
import { Reflector } from '@nestjs/core';

@Injectable()
export class RolesGuard implements CanActivate {
  constructor(private reflector: Reflactor) {}

  canActivate(context: ExecutionContext): boolean {
    const roles = this.reflactor.get<string[]>('roles', context.getHandler());
    if (!roles) {
      return true;
    }
    const request = context.switchToHttp().getRequest();
    const user = request.user;
    return matchRoles(roles, user.roles);
  }
}
만약 user의 role이 적합하지 않담면, Nest는 자동적으로 아래와 같은 응답을 반환할 것이다.
{
	"statusCode": 403,
    "message": "Forbidden response",
    "error": "Forbidden"
}
마무리
아직 정리하지 못한 많은 개념들이 남아있다.
pipe 중에서도 custom pipe라거나, schema based validation, object schema validation, 등...
그리고 Interceptors 등이 있으나, 그런 개념들은 추후에 필요할 때, 그 때 그 때 정리하도록 하겠다.
이번 포스팅은 여기서 마무리 ~

정리 대마왕!!