객체형 프로퍼티
객체는 여러 값을 저장할 수 있는 자료형이다. 아래 예제를 보자.
// ChildComponent2.jsx

import React from 'react';
import PropTypes from 'prop-types';

function ChildComponent2 (props) {
    const {
        objValue,
        requiredStringValue,
    } = props;

    return (
        <div>
            <h1>ChildComponent2</h1>
            <div>
                <p> 객체값 모음 : {String (Object.entries(objValue))}</p>
                <p> 이름 :  {objValue.name} </p>
                <p> 나이 : {objValue.age} </p>
            </div>
            <div>
                필수값 : {requiredStringValue}
            </div>
        </div>
    )
}

ChildComponent2.propTypes = {
    //객체 프로퍼티
    objValue : PropTypes.shape({
        name: PropTypes.string,
        age: PropTypes.number,
    }),
    requiredStringValue: PropTypes.string.isRequired,
}

export default ChildComponent2

// 특정 컴포넌트에 꼭 전달되어야 하는 프로퍼티가 있다면 해당 프로퍼티를 필수 프로퍼티로 저장한다.
-
객체값 모음 : {String (Object.entries(objValue))}
=> 내장 함수 String 과 Object.entries 를 사용하여 객체를 문자열로 변환하여 출력 -
objValue : PropTypes.shape({~~})
=> PropTypes.shape 를 사용하여 객체 프로퍼티를 정의하면 객체 목록을 한눈에 확인할 수 있어 편리하다. -
requiredStringValue: PropTypes.string.isRequired
=> PropTypes에 정의된 변수(string, object, bool, ~~ )안의 특수 변수 isRequired를 이용하여 requiredStringValue를 필수 프로퍼티로 지정한다.
App.js 를 통해 실행 결과를 보자.
// App.js
import './App.css';
import React from 'react';
import MyComponent from './03/MyComponent';
import ColorComponent from './03/ColorComponent';
import ChildComponent2 from './03/ChildComponent2'
import DefaultPropsComponennt from './03/DefaultPropsComponent'
import ChildProperty from './03/ChildProperty'
function App() {
return (
<div>
<MyComponent name="서지원 존잘"/>
<h1>ColorComponent</h1>
<div><b>지루할 때 :</b>
<ColorComponent name="seojiwon" color="red" bored />
</div>
<div><b>즐거울 때 :</b>
<ColorComponent name="seowjion"/>
</div>
<div>
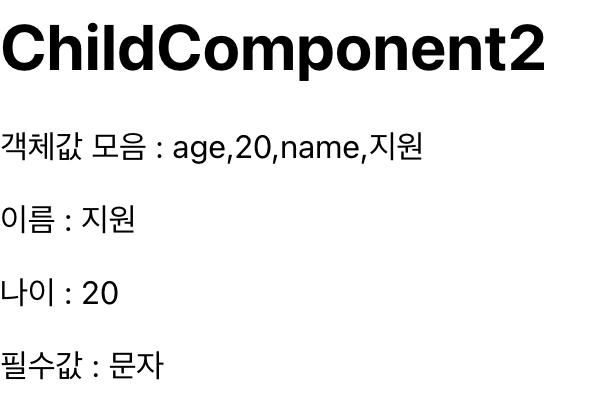
<ChildComponent2
objValue={{age : 20, name : "지원"}}
requiredStringValue ="문자"
/>
</div>
</div>
);
}
export default App;ChildComponent2 내부에서 만약 age를 문자열(age : '20')로 값을 넘겨주면 경고문이 나온다.
Failed prop type : Invalid prop , 'objValue.age of type 'string' supplied to 'ChildComponent2', expected number
또한 필수 프로퍼티인 requiredStringValue에도 값을 안주면 경고문 나온다.
Failed prop type : the prop 'requiredStringValue' is marked as required in 'ChildComponent2', but its value is 'undefined'
실행 결과
프로퍼티에 기본값 지정하기
만약 프로퍼티에 기본값을 지정하고 싶다면 기본값을 지정할 컴포넌트의 defaultProps 값을 이용하면 된다.
//DefaultComponent.jsx

import React from 'react';
import PropTypes from 'prop-types';

function DefaultPropsComponennt (props) {

    let message1 = '';
    if (props.boolValue === false) {
        message1 = 'boolValue 기본값이 false 입니다.';
    }

    let message2 = '';
    if (props.boolValueWithoutDefault === false) {
        message2 = 'boolValueWithoutDefault 기본값이 false 입니다.';
    }
    // undefined로 전달되니까 === false 에서 걸려 조건 만족 x
    // 출력 안되겠지
    return (
        <div>
            <h1>DefaultPropsComponent</h1>

            <p>{message1}</p>
            {/* 프로퍼티를 생략하면 undefined가 전달된다. */}
            {/* boolValue 만 false 로 기본값이 설정되어 있으니 message1만 나오겠네? */}
            <p>{message2}</p>
        </div>
    );
}

DefaultPropsComponennt.propTypes = {
    boolValue : PropTypes.bool,
    boolValueWithoutDefault : PropTypes.bool,
};

DefaultPropsComponennt.defaultProps = {
    boolValue : false,
};

export default DefaultPropsComponennt;- import PropTypes from 'prop-types';
=> prop-types : 컴포넌트에 전달되는 props의 타입 검사 - DefaultPropsComponennt.defaultProps = { boolValue : false, };
=> 기본값 지정하기, DefaultPropsComponennt 의 defaultProps 라는 특수 변수를 사용하여 프로퍼티의 기본값을 정의한다.
위의 코드에서
<p>{message1}</p>
<p>{message2}</p>
프로퍼티를 생략하면 undefined가 전달된다. boolValue 만 false 로 기본값이 설정되어 있으니 결과는 message1만 나올 것임을 예상할 수 있다.
실행 결과

자식 프로퍼티
마크업 방식 중에서
<div>
  <button>
  	버튼!!!!!!!!!!!!!!!!!
  </button>
</div>
과 같이 코드 중간에 노드를 배치하는 표현식이 있다. JSX도 마크업 표현식을 모두 사용할 수 있다.
JSX에서는 컴포넌트 하위에 배치한 노드(또는 컴포넌트)를 하위 컴포넌트에서 프로퍼티로 접근할 수 있게 해준다.
// App.js

<div>
	<ChildProperty>
		<div><span>자식 노드</span></div>
	</ChildProperty>
</div>
위의 코드와 같이 App 컴포넌트에 포함시킨 ChildProperty 컴포넌트 하위에 자식 노드를 배치했다고 해보자.
// ChildProperty.jsx

import React from 'react';
import PropTypes from 'prop-types';

function ChildProperty (props) {

    return (
        <div>
            <h1>ChildProperty</h1>
            <div>
                <p>밑에 뭐가 나오나? </p>
                <p>{props.children}</p>
            </div>
        </div>
    );
}

ChildProperty.propTypes = {
    children : PropTypes.node,
}

export default ChildProperty;
ChildProperty 컴포넌트에서 {props.children} 과 같은 방법으로
<div><span>자식 노드</span></div> 를 쉽게 받을 수 있다!!
실행결과

위의 방식대로 안하고 별도의 프로퍼티를 통해 자식 노드를 전달해도 된다.
<ChildProperty children = {<div><span>자식 노드</span></div>} />
