[SpringCloud MSA]User Microservice(Login)
이 글은 인프런 강의 "Spring Cloud로 개발하는 마이크로서비스 애플리케이션(MSA)" 기반으로 공부하여 정리한 글입니다. 문제/오류가 있을 시 댓글로 알려주시면 감사드리겠습니다
강의의 모든 부분을 정리하는 것이 아니고 비슷한 부분은 생략하고 정리하며, 강의의 내용 뿐만 아니라 개인적으로 공부한 내용도 포함되어 있습니다
JWT를 이용한 로그인을 구현한다
| JWT
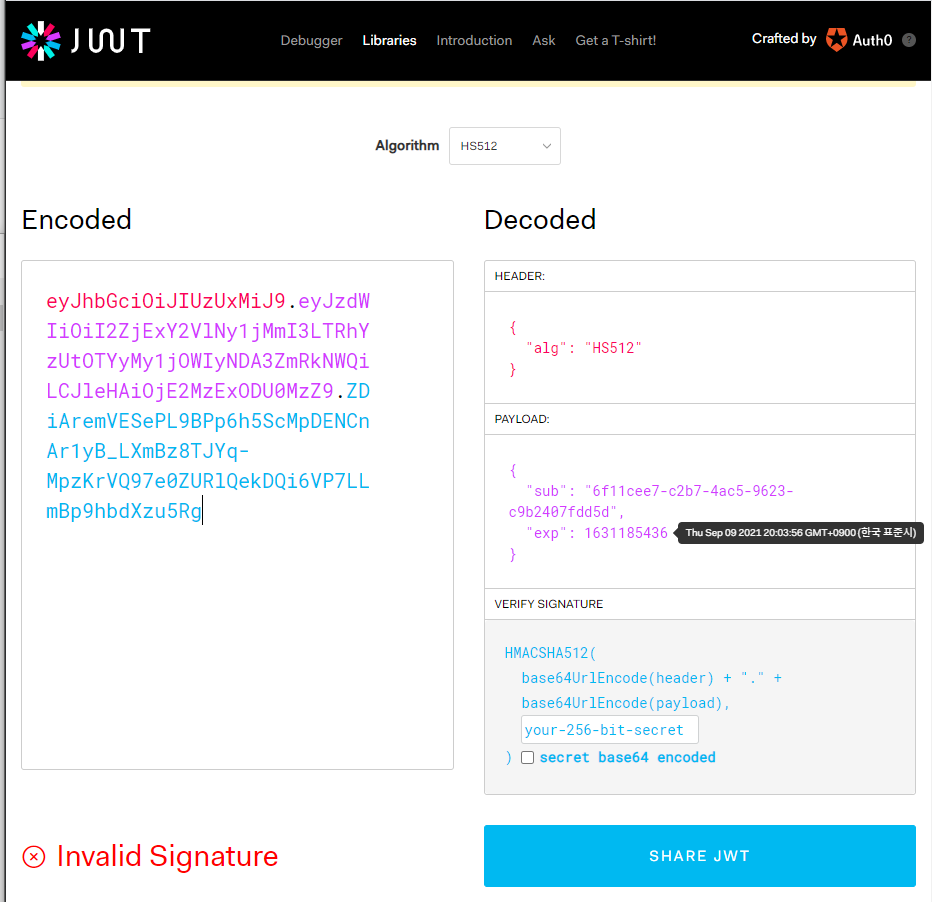
- 특정 값(sub)을 알고리즘(alg) 와 키값을 이용해 암호화하여 JWT 생성
- exp(expire) 시간이 있는 것을 확인할 수 있다
사용하는 이유
- 클라이언트 독립적인 서비스(Java 환경이 아니더라도 사용이 가능하다)
- CDN
- No Cookie-Session(No CSRF)
- 지속적인 토큰 저장
User Service
pom.xml
        <dependency>
            <groupId>io.jsonwebtoken</groupId>
            <artifactId>jjwt</artifactId>
            <version>0.9.1</version>
</dependency>- login 기능을 구현하기 위해 JWT 토큰 발행
- JWT 관련 dependency 추가
application.yml
logging:
  level:
    com.zzarbttoo.userservice: DEBUG


#token 관련 작업
token:
  expiration_time: 86400000 #하루
secret: user_token #필요한 임의의 값- token의 expiration_time 지정(하루, milisecond 단위)
- token을 발급할 때, 키값을 필요로 하는데 그 키 값을 지정(user_token)
WebSecurity
... 생략

@Configuration //configuration은 우선순위가 높다
@EnableWebSecurity //webSecurity로 등록한다는 얘기
public class WebSecurity extends WebSecurityConfigurerAdapter {

...

    @Override
    protected void configure(HttpSecurity http) throws Exception {

...


        //인증이 된 상태에서만 permit
        http.authorizeRequests().antMatchers("/**")
                .hasIpAddress("192.168.0.20") //특정 ip에 대해서만 permit
                .and()
                .addFilter(getAuthenticationFilter()); //filter을 통과해야만 permit

...

    }

    private AuthenticationFilter getAuthenticationFilter() throws Exception{
        AuthenticationFilter authenticationFilter = new AuthenticationFilter(authenticationManager(), userService, env);

        return authenticationFilter;

    }

    //인증과 관련된 configure
    //select pwd from user where email = ?
    // db_pwd(encrypted) == input_pwd(encrypted)
    @Override
    protected void configure(AuthenticationManagerBuilder auth) throws Exception {

        auth.userDetailsService(userService).passwordEncoder(bCryptPasswordEncoder); //select는 userService
        //변환처리는 이전에 등록해놓은 bCryptPasswordEncoder bean 이용


        super.configure(auth);
    }
}
- 아무 곳에서나 요청을 했을 때 응답이 오면 안되므로 특정 ip에 대해서만 요청을 허용할 수 있도록 설정함(hasIpAddress)
- Authentication Filter을 거쳐서 로그인을 할 수 있도록 함
- configure(AuthenticationManagerBuild) 를 이용 -> AuthenticatoinMangerBuild
->UserDetailService -> passwordEncoder 설정을 통해 패스워드 암호화 정보 전달 - super.configure을 이용해 AuthenticationMangerBuilder 설정만 바꿔서 부모의 것 사용
- WebSecurityConfigurerAdapter에서 authenticationManager()를 사용할 수 있으므로 직접 선언해서 AuthenticationFilter로 인자로 넘겨준다
UserDetailsService
...생략
org.springframework.security.core.userdetails.UserDetailsService;

public interface UserService extends UserDetailsService {

...
    UserDto getUserDetailsByEmail(String userName);
}
- WebSecurity에서 사용하기 위해 UserDetailsService 상속
UserDetailsServiceImpl
package com.zzarbttoo.userservice.service;

import com.zzarbttoo.userservice.dto.UserDto;
import com.zzarbttoo.userservice.jpa.UserEntity;
import com.zzarbttoo.userservice.jpa.UserRepository;
import com.zzarbttoo.userservice.vo.ResponseOrder;
import org.modelmapper.ModelMapper;
import org.modelmapper.convention.MatchingStrategies;
import org.springframework.beans.factory.annotation.Autowired;
import org.springframework.security.core.userdetails.User;
import org.springframework.security.core.userdetails.UserDetails;
import org.springframework.security.core.userdetails.UsernameNotFoundException;
import org.springframework.security.crypto.bcrypt.BCryptPasswordEncoder;
import org.springframework.stereotype.Service;

import java.util.ArrayList;
import java.util.List;
import java.util.UUID;

@Service
public class UserServiceImpl implements UserService{

    UserRepository userRepository;
    BCryptPasswordEncoder passwordEncoder;

    @Override
    public UserDetails loadUserByUsername(String userName) throws UsernameNotFoundException {

        //email로 찾는다
        UserEntity userEntity = userRepository.findByEmail(userName);

        //해당하는 사용자가 없다
        if (userEntity == null){
            throw new UsernameNotFoundException(userName); //spirng security에서 제공
        }

        //맨 마지막에는 권한을 넣어주면 된다
        return new User(userEntity.getEmail(), userEntity.getEncryptedPwd(),
                true, true, true, true,
                new ArrayList<>()); //검색-> password -> 반환
    }

... 생략

    @Override
    public UserDto getUserDetailsByEmail(String email) {
        UserEntity userEntity = userRepository.findByEmail(email);

        if (userEntity == null) {
            throw new UsernameNotFoundException(email);
        }

        UserDto userDto = new ModelMapper().map(userEntity, UserDto.class);


        return userDto;
    }
}
- loadUserByUsername을 override
- userName(여기서는 email)을 이용해 UserEntity를 찾으며 없을 경우에는 spring security에서 제공하는 UsernameNotFoundException을 일으켜 로그인을 실패하도록 함
- UserDetails를 상속받은 User객체에 값들을 넣어서 return
- Email로도 UserEntity를 찾을 수 있는 함수 생성
AuthenticationFilter
package com.zzarbttoo.userservice.security;

import com.fasterxml.jackson.databind.ObjectMapper;
import com.zzarbttoo.userservice.dto.UserDto;
import com.zzarbttoo.userservice.service.UserService;
import com.zzarbttoo.userservice.vo.RequestLogin;
import io.jsonwebtoken.Jwts;
import io.jsonwebtoken.SignatureAlgorithm;
import lombok.extern.slf4j.Slf4j;
import org.springframework.core.env.Environment;
import org.springframework.security.authentication.AuthenticationManager;
import org.springframework.security.authentication.UsernamePasswordAuthenticationToken;
import org.springframework.security.core.Authentication;
import org.springframework.security.core.AuthenticationException;
import org.springframework.security.core.userdetails.User;
import org.springframework.security.web.authentication.UsernamePasswordAuthenticationFilter;

import javax.servlet.FilterChain;
import javax.servlet.ServletException;
import javax.servlet.http.HttpServletRequest;
import javax.servlet.http.HttpServletResponse;
import java.io.IOException;
import java.util.ArrayList;
import java.util.Date;

@Slf4j
public class AuthenticationFilter extends UsernamePasswordAuthenticationFilter {

    //생성하는 곳에서 직접 userService를 생성해서 쓰기 때문에 주입하지 않아도 된다
    private UserService userService;
    private Environment env; //토큰 만료 기간, 토큰 생성 알고리즘 등을 application.yml에 작성할 것이다

    public AuthenticationFilter(AuthenticationManager authenticationManager,
                                UserService userService,
                                Environment env) {
        super.setAuthenticationManager(authenticationManager); // super(authenticationManger);
        this.userService = userService;
        this.env = env;
    }

    @Override
    public Authentication attemptAuthentication(HttpServletRequest request,
                                                HttpServletResponse response) throws AuthenticationException {

        try {

            //post형태로 전달되는 것은 requestParameter로 받을 수 없기 때문에 inputstream으로 처리
            RequestLogin credential = new ObjectMapper().readValue(request.getInputStream(), RequestLogin.class);

            //인증 정보를 매니저에 넘긴다(id, password 비교)
            return getAuthenticationManager().authenticate(
            //인증정보로 만든다
            new UsernamePasswordAuthenticationToken(credential.getEmail(),
                    credential.getPassword(),
                    new ArrayList<>()) //authentication 할 것들 목록
            );
        } catch (IOException e) {
            e.printStackTrace();
            throw new RuntimeException(e);
        }
    }

    //로그인 성공 시 정확하게 어떤 처리를 해줄 것인지(ex Token 생성/만료 시간 등, 사용자 반환값 등)
    @Override
    protected void successfulAuthentication(HttpServletRequest request, HttpServletResponse response,
                                            FilterChain chain,
                                            Authentication authResult) throws IOException, ServletException {

        //User객체는 login 성공 후 email과 encrypted 된 password, 권한들을 가진 객체
        //log.debug(((User) authResult.getPrincipal()).getUsername()); //성공한 email 출력
        String userName = ((User) authResult.getPrincipal()).getUsername();

        UserDto userDetails = userService.getUserDetailsByEmail(userName);

        //JWT token
        String token = Jwts.builder()
                .setSubject(userDetails.getUserId()) //userId로 토큰 생성
                .setExpiration(new Date(System.currentTimeMillis() +
                        Long.parseLong(env.getProperty("token.expiration_time")))) //현재 시간 + 24시간
                .signWith(SignatureAlgorithm.HS512, env.getProperty("token.secret")) //알고리즘 + key 값
                .compact();

        response.addHeader("token", token);
        response.addHeader("userId", userDetails.getUserId());

    }
}- UsernamePasswordAuthenticationFilter을 상속받아 로그인을 진행할 수 있도록 함

- /login을 controller에 선언하지 않아도 요청할 수 있도록 미리 구현이 되어있다
- Email, Password라고 전달된 것을 받기 위해 attemptAuthentication을 override 하여 이용함
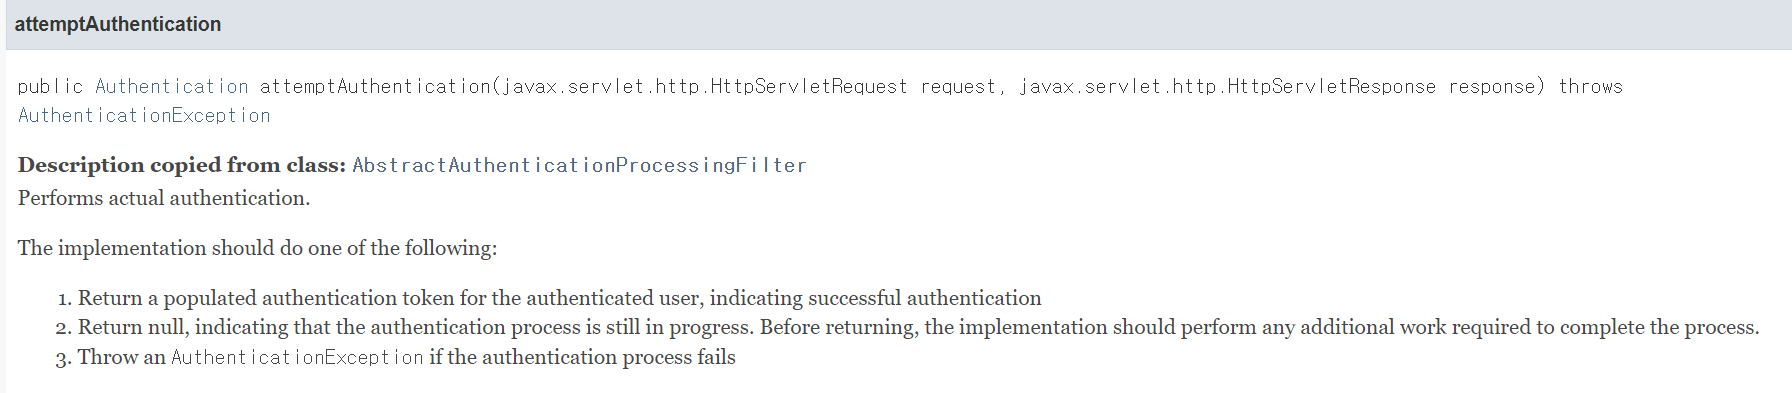
- POST방식으로 요청을 하도록 되어있으며, request를 inputStream으로 받아 requestLogin으로 변환
- AuthenticationManger -> authenticate -> UserNamePasswordAuthenticatoinToken
- successfulAuthentication을 이용해 성공 후 처리를 진행
- Id를 이용해 token 값을 만들며, 암호화에 application.yml에 선언된 키를 이용
- 특정시간 후에 token이 만료되도록 함
- 복호화를 위해 header에 token 값과 Id 값을 함께 보냄
| Gateway-service
token이 정상적인 token인지 아닌지 gateway에서도 확인할 필요가 있다
pom.xml
        <dependency>
            <groupId>io.jsonwebtoken</groupId>
            <artifactId>jjwt</artifactId>
            <version>0.9.1</version>
        </dependency>
        <dependency>
            <groupId>javax.xml.bind</groupId>
            <artifactId>jaxb-api</artifactId>
</dependency>- jwt 관련 dependency 추가
- javax.xml.bind를 추가하지 않으면 에러 발생
java.lang.NoClassDefFoundError: javax/xml/bind/DatatypeConverter
	at io.jsonwebtoken.impl.Base64Codec.decode(Base64Codec.java:26) ~[jjwt-0.9.1.jar:0.9.1]
	at io.jsonwebtoken.impl.DefaultJwtParser.setSigningKey(DefaultJwtParser.java:151) ~[jjwt-0.9.1.jar:0.9.1]
application.yml
... 생략
        - id: user-service
          uri: lb://USER-SERVICE
          predicates:
            - Path=/user-service/login
            - Method=POST
          filters:
            - RemoveRequestHeader=Cookie
            - RewritePath=/user-service/(?<segment>.*), /$\{segment} #/user-service/~~~ 형태로 들어오면 /~~~만 보내주겠다
        - id: user-service
          uri: lb://USER-SERVICE
          predicates:
            - Path=/user-service/users
            - Method=POST
          filters:
            - RemoveRequestHeader=Cookie
            - RewritePath=/user-service/(?<segment>.*), /$\{segment}
        - id: user-service
          uri: lb://USER-SERVICE
          predicates:
            - Path=/user-service/**
            - Method=GET
          filters:
            - RemoveRequestHeader=Cookie
            - RewritePath=/user-service/(?<segment>.*), /$\{segment}
            - AuthorizationHeaderFilter #GET으로 요청할 때는 권한 필요
        - id: order-service
          uri: lb://ORDER-SERVICE
          predicates:
            - Path=/order-service/**
          filters:

#user-service에 있는 값과 같아야한다
token:
secret: user_token- user-service에서 login, 회원가입 등 post로 호출되는 것들은 특별한 인가 없이도 사용이 가능하다
- 그 외 get으로 호출되는것에 대해서만 token, id를 확인하면 된다(회원가입, login은 token, id를 발급하는 과정들)
- get으로 호출하는 것에 대해서는 AuthorizationHeaderFilter 추가
- api-gateway로 서비스 호출 시 ip주소:8000/서비스이름/path 이런식으로 요청이 됐고 그에 따라 서비스 controller 부분에 RequestMapping("/서비스이름") 이런식으로 작성해야 했다
- api-gatewate way로 요청을 해도 서비스 이름이 중간에 들어가지 않아도 되도록 RewritePath를 했다
- 그에 따라 서비스 controller도 모두 다음과 같이 변경했다

- user-service에서 JWT 생성 시 이용했던 key 값을 저장
AuthorizationHeaderFilter
package com.example.apigatewayservice.filter;

import io.jsonwebtoken.*;
import lombok.extern.slf4j.Slf4j;
import org.apache.http.HttpHeaders;
import org.springframework.cloud.gateway.filter.GatewayFilter;
import org.springframework.cloud.gateway.filter.factory.AbstractGatewayFilterFactory;
import org.springframework.core.env.Environment;
import org.springframework.http.HttpStatus;
import org.springframework.http.server.reactive.ServerHttpRequest;
import org.springframework.http.server.reactive.ServerHttpResponse;
import org.springframework.stereotype.Component;
import org.springframework.web.server.ServerWebExchange;
import reactor.core.publisher.Mono;

@Component
@Slf4j
public class AuthorizationHeaderFilter extends AbstractGatewayFilterFactory<AuthorizationHeaderFilter.Config> {

    Environment env;

    public AuthorizationHeaderFilter(Environment env) {
        super(Config.class);  //없으면 class cast exception 발생
        this.env = env;
    }

    //login -> token -> users(with token) -> header(include token)
    //Token의 유효성을 확인한 후 통과시킴
    @Override
    public GatewayFilter apply(Config config) {
        return ((exchange, chain) -> {
            ServerHttpRequest request = exchange.getRequest();


            //인증정보가 포함되어있지 않다면 통과시키지 않는다
            if (!request.getHeaders().containsKey(HttpHeaders.AUTHORIZATION)) {
                return onError(exchange, "no authorization header", HttpStatus.UNAUTHORIZED);
            }

            //배열이기 때문에 0번째 data를 들고온다 -> authorization 에는 Bearer Token 값이 들어가게 된다
            String authorizationHeader = request.getHeaders().get(org.springframework.http.HttpHeaders.AUTHORIZATION).get(0);

            // Beraer token 형태로 오기 때문에 Bearer을 ""로 변환하고 순수 token 값을 얻어낸다
            String jwt = authorizationHeader.replace("Bearer", "");

            //JWT가 정상적인 값일 경우 통과
            if (!isJwtValid(jwt)) {
                return onError(exchange, "JWT token is not valid", HttpStatus.UNAUTHORIZED);
            }

            return chain.filter(exchange);

        });
    }

    private boolean isJwtValid(String jwt) {
        boolean returnValue = true;

        String subject = null;

        try {
            //subject(sub)를 token으로부터 추출한다 -> 정상적인 계정 값인지 판별
            subject = Jwts.parser().setSigningKey(env.getProperty("token.secret"))
                    .parseClaimsJws(jwt).getBody()
                    .getSubject();
                    //.parseClaimsJws(jwt).getBody().getSubject();
        } catch (Exception ex){
        returnValue = false;
        }


        if(subject == null || subject.isEmpty()){
            returnValue = false;
        }

        return returnValue;

}

    //(반환시켜주는 데이터 타입) Mono(단일), Flux(여러개) -> Spring WebFlux
    private Mono<Void> onError(ServerWebExchange exchange, String error, HttpStatus httpStatus) {

        ServerHttpResponse response = exchange.getResponse();
        response.setStatusCode(httpStatus);

        log.error(error);
        return response.setComplete();
    }

    public static class Config{

    }

}
- autherization(권한) 정보에 아무것도 전달하지 않는다면 오류가 뜨게 된다(401 error)
- Bearer Token이라는 값으로 오기 때문에 Bearer을 뺀 나머지 순수 token 값을 얻어낸다(JWT)
- 그 JWT 값이 있는지 판별하고 없을 경우 에러 발생
| 실행
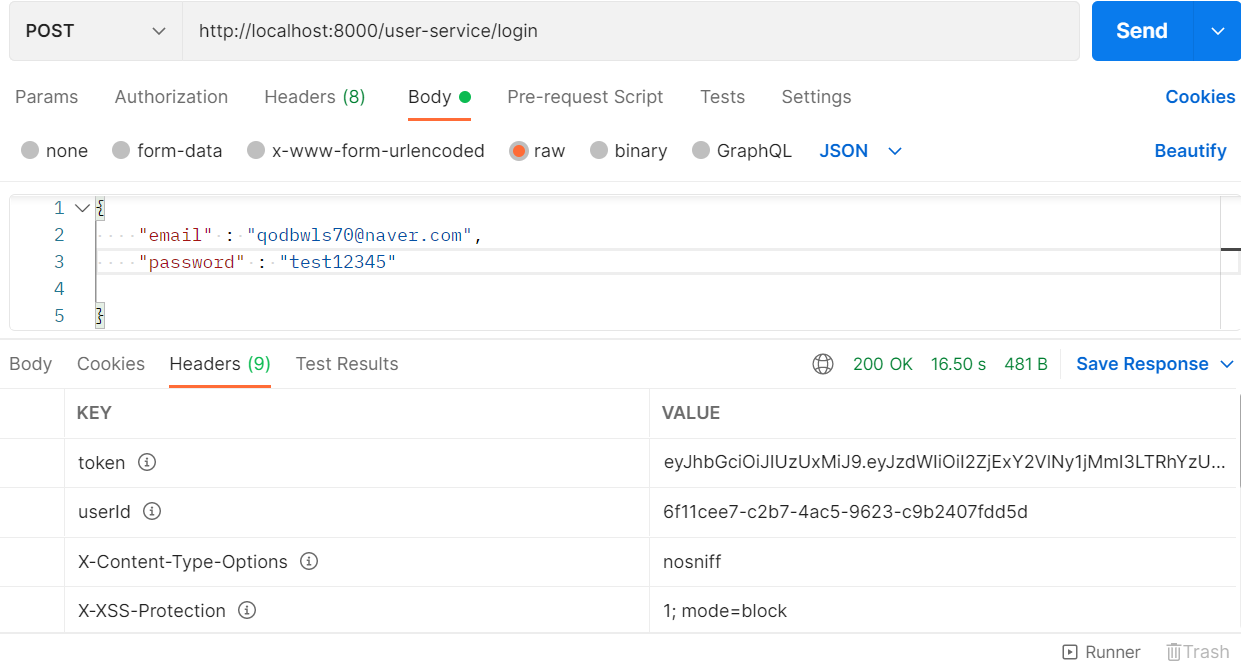
- 회원 가입 후 로그인 시 token과 userId가 header에 추가되어있음
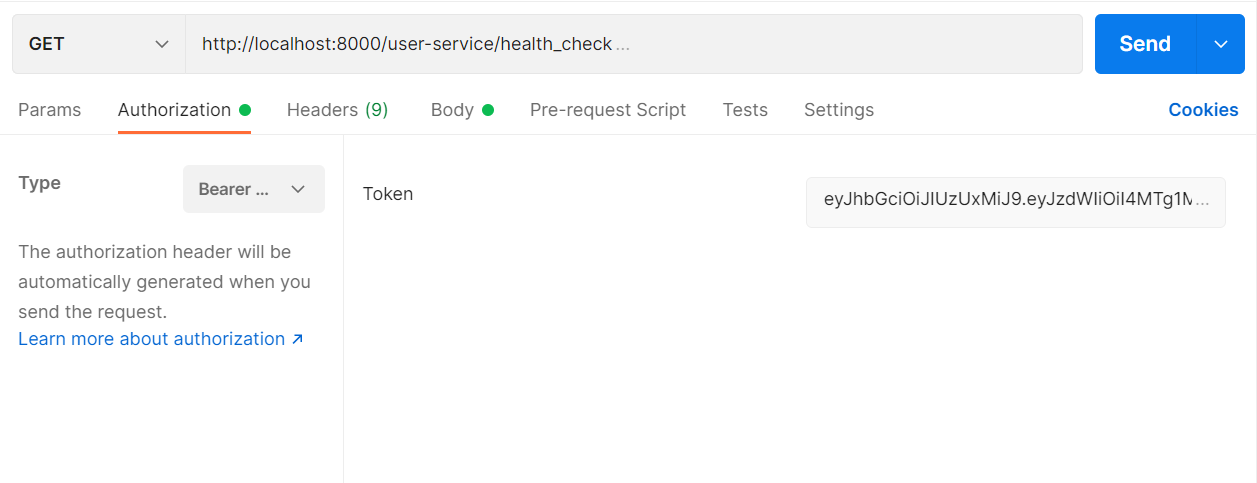
- 위와 같이ㅣ Bearer Token에 JWT 값을 추가해야 실행가능하게 된다

나는야 누워있는 개발머신