[SpringCloud MSA]Users MicroService(로그인 제외)
이 글은 인프런 강의 "Spring Cloud로 개발하는 마이크로서비스 애플리케이션(MSA)"를 정리한 글입니다. 문제/오류가 있을 시 댓글로 알려주시면 감사드리겠습니다
Ecommerce 어플리케이션 microservice로 만들기
- Catalog, User, Order 3개의 서비스를 만든다
- Eureka, API Gateway Server 사용
- 마이크로서비스간 메시지 발행 및 구독을 위해 Kafka 사용(Queueing)
- Configuration 도 외부에서 관리할 것이다(Config Server)
User Microservice
pom.xml
<?xml version="1.0" encoding="UTF-8"?>
<project xmlns="http://maven.apache.org/POM/4.0.0" xmlns:xsi="http://www.w3.org/2001/XMLSchema-instance"
         xsi:schemaLocation="http://maven.apache.org/POM/4.0.0 https://maven.apache.org/xsd/maven-4.0.0.xsd">
    <modelVersion>4.0.0</modelVersion>
    <parent>
        <groupId>org.springframework.boot</groupId>
        <artifactId>spring-boot-starter-parent</artifactId>
        <version>2.4.8-SNAPSHOT</version>
        <relativePath/> <!-- lookup parent from repository -->
    </parent>
    <groupId>com.zzarbttoo</groupId>
    <artifactId>user-service</artifactId>
    <version>0.0.1-SNAPSHOT</version>
    <name>user-service</name>
    <description>Demo project for Spring Boot</description>
    <properties>
        <java.version>11</java.version>
        <spring-cloud.version>2020.0.3</spring-cloud.version>
    </properties>
    <dependencies>
        <dependency>
            <groupId>org.springframework.boot</groupId>
            <artifactId>spring-boot-starter-web</artifactId>
        </dependency>
        <dependency>
            <groupId>org.springframework.cloud</groupId>
            <artifactId>spring-cloud-starter-netflix-eureka-client</artifactId>
        </dependency>
        <dependency>
            <groupId>org.springframework.boot</groupId>
            <artifactId>spring-boot-devtools</artifactId>
            <scope>runtime</scope>
            <optional>true</optional>
        </dependency>
        <dependency>
            <groupId>org.projectlombok</groupId>
            <artifactId>lombok</artifactId>
            <optional>true</optional>
        </dependency>
        <dependency>
            <groupId>org.springframework.boot</groupId>
            <artifactId>spring-boot-starter-test</artifactId>
            <scope>test</scope>
        </dependency>

        <!-- https://mvnrepository.com/artifact/com.h2database/h2 -->
        <dependency>
            <groupId>com.h2database</groupId>
            <artifactId>h2</artifactId>
            <version>1.3.176</version>
            <scope>runtime</scope>
        </dependency>

        <dependency>
            <groupId>org.springframework.boot</groupId>
            <artifactId>spring-boot-starter-data-jpa</artifactId>
        </dependency>

        <dependency>
            <groupId>org.modelmapper</groupId>
            <artifactId>modelmapper</artifactId>
            <version>2.3.8</version>
        </dependency>

    </dependencies>
    <dependencyManagement>
        <dependencies>
            <dependency>
                <groupId>org.springframework.cloud</groupId>
                <artifactId>spring-cloud-dependencies</artifactId>
                <version>${spring-cloud.version}</version>
                <type>pom</type>
                <scope>import</scope>
            </dependency>
        </dependencies>
    </dependencyManagement>

... 생략 - Eureka Discovery Client 설정
- DB는 H2를 이용했으며 1.3 대를 이용해 테이블이 자동생성되도록 했다(상위 버전에서는 자동생성이 되지 않는다)
- JPA를 이용하기 위해 jpa 관련 dependecy 추가
- 데이터 변환을 편리하게 하기 위해 model mapper 추가
application.yml
server:
  port: 0

spring:
  application:
    name: user-service
  h2:
    console:
      enabled: true
      settings:
        web-allow-others: true #dashboard 설정
      path: /h2-console #dashboard path
  datasource:
    driver-class-name: org.h2.Driver
    url : jdbc:h2:mem:testdb
    #username: sa
    #password : 1234

eureka:
  instance:
    instance-id: ${spring.application.name}:${spring.application.instance_id:${random.value}}
  client:
    register-with-eureka: true
    fetch-registry: true #외부 검색 가능하도록
    service-url:
      defaltZone: http://192.168.0.20:8761/eureka #server의 위치 지정

greeting:
  message: Welcome to the Simple E-commerce
- /h2-console로 요청을 하면 h2 dashboard를 볼 수 있도록 설정
@SpringbootApplication 부분
@SpringBootApplication
@EnableDiscoveryClient
public class UserServiceApplication {

    public static void main(String[] args) {
        SpringApplication.run(UserServiceApplication.class, args);
    }
}- @EnableDiscoveryClient 를 통해 유레카 클라이언트 등록
UserController
package com.zzarbttoo.userservice.controller;

import com.netflix.discovery.converters.Auto;
import com.zzarbttoo.userservice.dto.UserDto;
import com.zzarbttoo.userservice.service.UserService;
import com.zzarbttoo.userservice.vo.Greeting;
import com.zzarbttoo.userservice.vo.RequestUser;
import com.zzarbttoo.userservice.vo.ResponseUser;
import org.dom4j.util.UserDataAttribute;
import org.modelmapper.ModelMapper;
import org.modelmapper.convention.MatchingStrategies;
import org.springframework.beans.factory.annotation.Autowired;
import org.springframework.core.env.Environment;
import org.springframework.http.HttpStatus;
import org.springframework.http.ResponseEntity;
import org.springframework.web.bind.annotation.*;

@RestController
@RequestMapping("/")
public class UserController {

    private Environment env;
    private UserService userService;


    @Autowired
    private Greeting greeting;


    @Autowired //bean이 자동 주입
    public UserController(Environment env, UserService userService) {
        this.env = env;
        this.userService = userService;
    }

    @GetMapping("/health_check")
    public String status(){

        return "It's Working in User Service";
    }

    @GetMapping("/welcome")
    public String welcome(){
        //return env.getProperty("greeting.message");
        return greeting.getMessage();
    }


    // 회원가입
    @PostMapping("/users")
    public ResponseEntity<ResponseUser> createUser(@RequestBody RequestUser user){
        ModelMapper mapper = new ModelMapper();
        mapper.getConfiguration().setMatchingStrategy(MatchingStrategies.STRICT);

        UserDto userDto = mapper.map(user, UserDto.class);

        userService.createUser(userDto);
        ResponseUser responseUser = mapper.map(userDto, ResponseUser.class);

        //created = 201로 반환한다
        return ResponseEntity.status(HttpStatus.CREATED).body(responseUser);
    }

}- Environment, UserService를 직접 @Autowired 하는 것 보다는 생성자를 이용해 주입하는 것이 권장된다
- 혹은 직접 주입하는 파일을 따로 만들어서 이용하는 것이 좋다
@Component
@Data
//@AllArgsConstructor //모든 생성자
//@NoArgsConstructor //default 생성자
public class Greeting {
    @Value("${greeting.message}")
    private String message;
}
- /welcome을 이용하면 Environment 객체를 이용해 application.yml 파일의
- @RequestBody를 이용해 body 값을 RequestUser 객체로 받음
- userService로 추출한 UserDto를 전송해 DB에 insert를 하도록 함
- userDto 객체는 다시 ResponseUser 객체로 바꾸어 client측에 전송함
- HttpStatus 값은 단순히 Success(200)으로 하는 것이 아니라 HttpStatus.CREATED(201)로 하는 것이 정확하다
- Request 값(UserRequest), 통신할 때 사용하는 DTO(UserDTO), DB 엔티티 값(UserEntity), Response 값(ResponseUser) 값은 안의 내용이 같더라 하더라도 분리해서 사용해야한다
- ModelMapper 객체를 이용해 값이 같은 객체를 빠르게 변환하도록 함
[RequestUser -> UserDTO -> UserEntity] -> ResponseUser
RequestUser
package com.zzarbttoo.userservice.vo;

import lombok.Data;

import javax.validation.constraints.Email;
import javax.validation.constraints.NotNull;
import javax.validation.constraints.Size;

@Data
public class RequestUser {

    @NotNull(message = "Email cannot be null")
    @Size(min = 2, message = "Email not be less than two characters")
    @Email
    private String email;

    @NotNull(message = "Name cannot be null")
    @Size(min = 2, message = "Name not be less than two chracters")
    private String name;

    @NotNull(message = "Password cannot be null")
    @Size(min = 8, message = "Password must be equal or greater than 8 letters")
    private String pwd;
}- post 요청을 할 때 body 값들을 RequestUser로 받는다
- 최초로 받는 값이기 때문에 Validation 체크를 해준다
UserDTO
package com.zzarbttoo.userservice.dto;

import lombok.Data;

import java.util.Date;

@Data
public class UserDto {

    private String email;
    private String name;
    private String pwd;
    private String userId;
    private Date createAt;

    private String encryptedPwd;


}- 프로그램 내부에서 이동을 할 때 사용이되는 값
UserEntity
package com.zzarbttoo.userservice.jpa;

import lombok.Data;

import javax.persistence.*;

@Data
@Entity
@Table(name = "users")
public class UserEntity {

    @Id
    @GeneratedValue(strategy = GenerationType.IDENTITY)
    private Long id;

    @Column(nullable = false, length = 50, unique = true)
    private String email;

    @Column(nullable = false, length = 50)
    private String name;

    @Column(nullable = false, unique = true)
    private String userId;

    @Column(nullable = false, unique = true)
    private String encryptedPwd;

}- DB에 실질적으로 저장되는 Entity이며 Table과 매칭된다
ResponseUser
package com.zzarbttoo.userservice.vo;

import lombok.Data;

@Data
public class ResponseUser {

    private String email;
    private String name;
    private String userId;

}- Response 할 때 UserDto를 전송하는 것이 아니라 필요한 값만 전송하기 위해 ResponseUser 객체를 따로 만들었다
Service
package com.zzarbttoo.userservice.service;

import com.zzarbttoo.userservice.dto.UserDto;

public interface UserService {
    UserDto createUser(UserDto userDto);
}- Service interface 먼저 선언
ServiceImpl
package com.zzarbttoo.userservice.service;

import com.netflix.discovery.converters.Auto;
import com.zzarbttoo.userservice.dto.UserDto;
import com.zzarbttoo.userservice.jpa.UserEntity;
import com.zzarbttoo.userservice.jpa.UserRepository;
import org.modelmapper.ModelMapper;
import org.modelmapper.convention.MatchingStrategies;
import org.modelmapper.spi.MatchingStrategy;
import org.springframework.beans.factory.annotation.Autowired;
import org.springframework.stereotype.Service;

import java.util.UUID;

@Service
public class UserServiceImpl implements UserService{

    @Autowired
    UserRepository userRepository;

    @Override
    public UserDto createUser(UserDto userDto) {

        userDto.setUserId(UUID.randomUUID().toString());

        ModelMapper mapper = new ModelMapper();
        // 설정 정보가 딱 맞아떨어져야지 변환 가능
        mapper.getConfiguration().setMatchingStrategy(MatchingStrategies.STRICT);
        UserEntity userEntity = mapper.map(userDto, UserEntity.class);
        userEntity.setEncryptedPwd("encrypted_password");

        userRepository.save(userEntity);

        //DB에 저장하기 위해서는 UserEntity 가 필요
        //Mapper : DTO Class -> Entity Class

        UserDto returnUserDto = mapper.map(userEntity, UserDto.class);

        return returnUserDto;
    }
}- Service를 상속받은 ServiceImpl
- @Service 를 이용해 서비스 로직을 처리하는 것을 알려준다
- 여기에서 비즈니스 로직 처리를 한다
- UserDto에 랜덤 ID를 추가하고, UserEntity로 변환한다
- 이후 이를 DB에 저장하도록 Repository로 전달
- return 할 때는 UserDto로 값을 다시 변환해서 보내도록 한다
Repository
package com.zzarbttoo.userservice.jpa;

import org.springframework.data.repository.CrudRepository;

//CRUD 작업을 하기 때문에 CrudRepository 상속
//Entity 정보 입력, 기본키 classType 입력
public interface UserRepository extends CrudRepository<UserEntity, Long> {

}- CrudRepository<Entity 객체, 기본키의 데이터형태>를 상속해서 CRUD, JPA를 사용할 수 있도록 한다
- save 등 기본 명령어는 선언을 하지 않고 사용할 수 있다
- 조금 더 복잡할 경우 선언해서 사용하면 된다
| 실행


- 유레카 서버를 실행하고, user-service를 실행해 클라이언트로 등록

- user-service가 실행된 포트에서 /h2-console로 들어가면 h2 대시보드 접속 가능
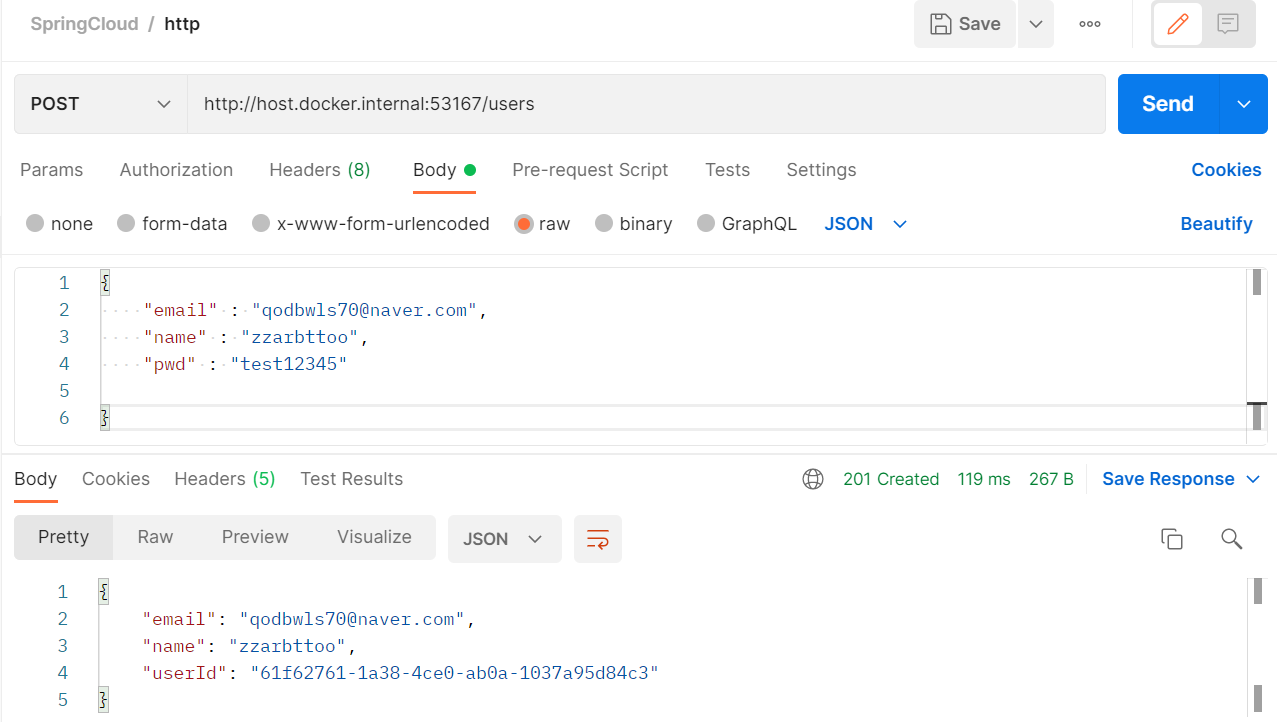
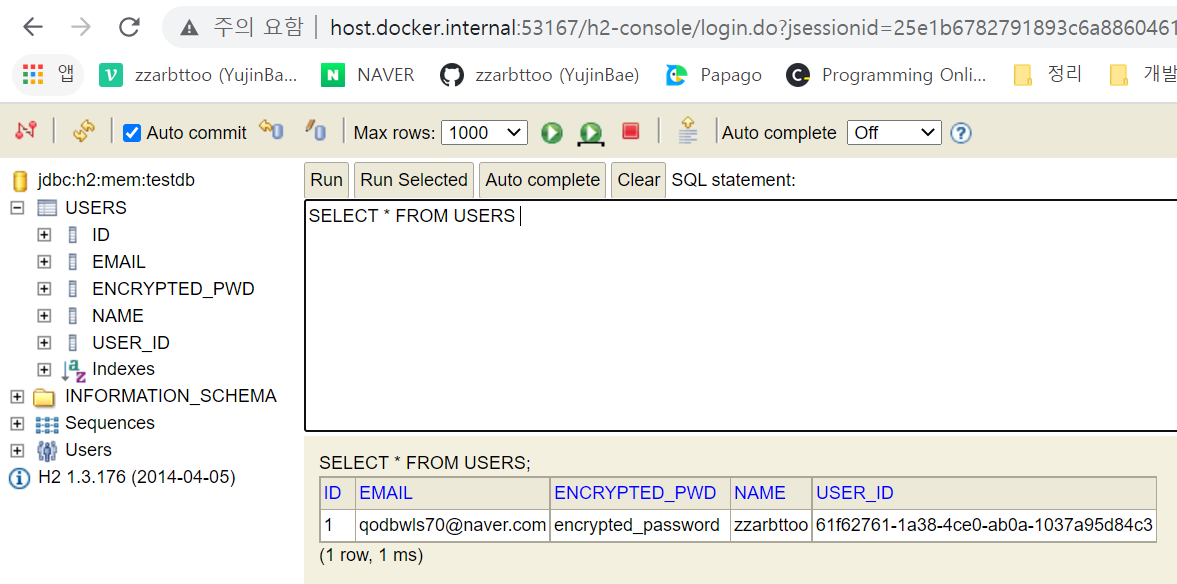
- 회원가입 요청 후 select 실행을 하면 데이터가 생성된 것을 확인할 수 있다
User Microservice - Security
Authentication(인증) + Authorization(권한)
패스워드를 해싱해서 저장할 것이다
pom.xml
  	<dependency>
            <groupId>org.springframework.boot</groupId>
            <artifactId>spring-boot-starter-security</artifactId>
</dependency>- spring security 의존성 추가
WebSecurity
package com.zzarbttoo.userservice.security;

import org.springframework.context.annotation.Configuration;
import org.springframework.security.config.annotation.web.builders.HttpSecurity;
import org.springframework.security.config.annotation.web.configuration.EnableWebSecurity;
import org.springframework.security.config.annotation.web.configuration.WebSecurityConfigurerAdapter;

@Configuration //configuration은 우선순위가 높다
@EnableWebSecurity //webSecurity로 등록한다는 얘기
public class WebSecurity extends WebSecurityConfigurerAdapter {

    @Override
    protected void configure(HttpSecurity http) throws Exception {
        http.csrf().disable();

        // /users/로 시작하는 모든 것은 permit
        http.authorizeRequests().antMatchers("/users/**").permitAll();
        http.headers().frameOptions().disable(); //h2가 frame별로 구분되어있기 때문에 이것을 설정하지 않으면 에러 발생
    }
}- @Configuration은 우선순위가 높다
- @EnableWebSecurity 를 이용해 WebSecurity로 등록을 해준다
- csrf 방지
- /users/~~ 로 들어오는 요청은 모두 허용
- frameOptions 를 추가해서 h2 작동할 수 있도록 한다(h2가 frame 별로 쪼개져있기 때문에 이를 허용)
UserServiceImpl
package com.zzarbttoo.userservice.service;

import com.netflix.discovery.converters.Auto;
import com.zzarbttoo.userservice.dto.UserDto;
import com.zzarbttoo.userservice.jpa.UserEntity;
import com.zzarbttoo.userservice.jpa.UserRepository;
import org.modelmapper.ModelMapper;
import org.modelmapper.convention.MatchingStrategies;
import org.modelmapper.spi.MatchingStrategy;
import org.springframework.beans.factory.annotation.Autowired;
import org.springframework.security.crypto.bcrypt.BCryptPasswordEncoder;
import org.springframework.stereotype.Service;

import java.util.UUID;

@Service
public class UserServiceImpl implements UserService{

    UserRepository userRepository;
    BCryptPasswordEncoder passwordEncoder;

    //인자들도 Bean 등록이 되어야 메모리에 적재를 할 수 있음
    //userRepository는 Bean 등록이 되어있는데, BCryptPasswordEncoder은 등록이 되어있지 않음
    //가장 먼저 등록이 진행되는 곳에 BCryptPasswordEncoder Bean 등록
    @Autowired
    public UserServiceImpl(UserRepository userRepository, BCryptPasswordEncoder passwordEncoder){
        this.userRepository = userRepository;
        this.passwordEncoder = passwordEncoder;
    }

    @Override
    public UserDto createUser(UserDto userDto) {

        userDto.setUserId(UUID.randomUUID().toString());

        ModelMapper mapper = new ModelMapper();
        // 설정 정보가 딱 맞아떨어져야지 변환 가능
        mapper.getConfiguration().setMatchingStrategy(MatchingStrategies.STRICT);
        UserEntity userEntity = mapper.map(userDto, UserEntity.class);
        //userEntity.setEncryptedPwd("encrypted_password");

        userEntity.setEncryptedPwd(passwordEncoder.encode(userDto.getPwd()));
        userRepository.save(userEntity);

        //DB에 저장하기 위해서는 UserEntity 가 필요
        //Mapper : DTO Class -> Entity Class

        UserDto returnUserDto = mapper.map(userEntity, UserDto.class);

        return returnUserDto;
    }
}- 비밀번호 암호화를 위해 ServiceImple 부분 수정
- password를 해싱하기 위해 Bycrpt 알고리즘 사용(랜덤 salt를 부여해 여러번 Hash를 적용한 암호화 방식)
- BCryptPassword를 @Autowired 해야하는데 Bean 등록이 안되어있다(Repository의 경우 CRUDRepository를 상속받아 자동으로 bean 등록이 되어있는 듯 하다)
- 그래서 가장 먼저 Bean 등록이 되는 곳에 BCryptPassword Bean을 등록시킨다
@SpringBootApplication 부분
@SpringBootApplication
@EnableDiscoveryClient
public class UserServiceApplication {

    public static void main(String[] args) {
        SpringApplication.run(UserServiceApplication.class, args);
    }

    //초기화를 위해 인자의 bean도 초기화되어 메모리에 적재되어야 한다
    //하지만 선언할 곳이 없다(legacy에서는 xml로 bean 등록)
    // springboot에서는 가장 먼저 실행되는 springbootApplication에 Bean 등록을 해줘야한다

    @Bean
    public BCryptPasswordEncoder passwordEncoder(){
        return new BCryptPasswordEncoder();
    }
}- 가장 먼저 등록이 되는 @SpringBootApplication 부분에 @Bean 등록을 진행
| 실행

- security 설정을 하면 실행 중간 console 창에 security password가 뜨는 것을 확인할 수 있다
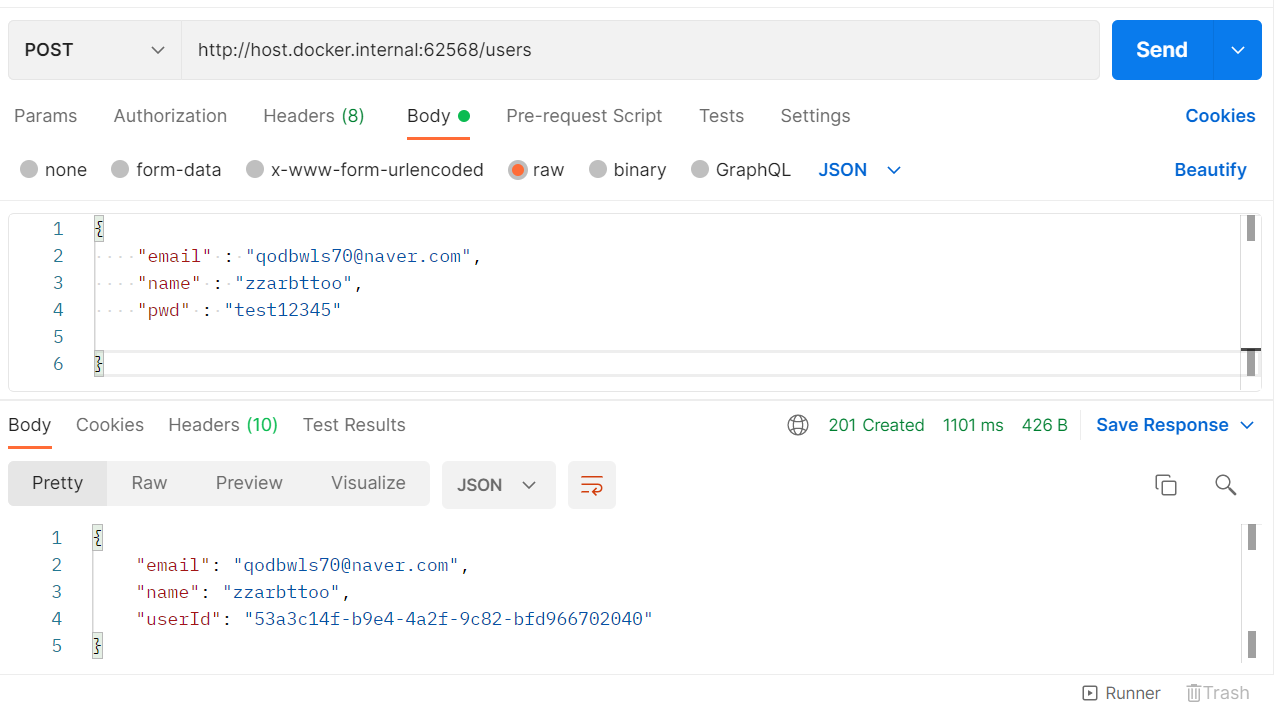
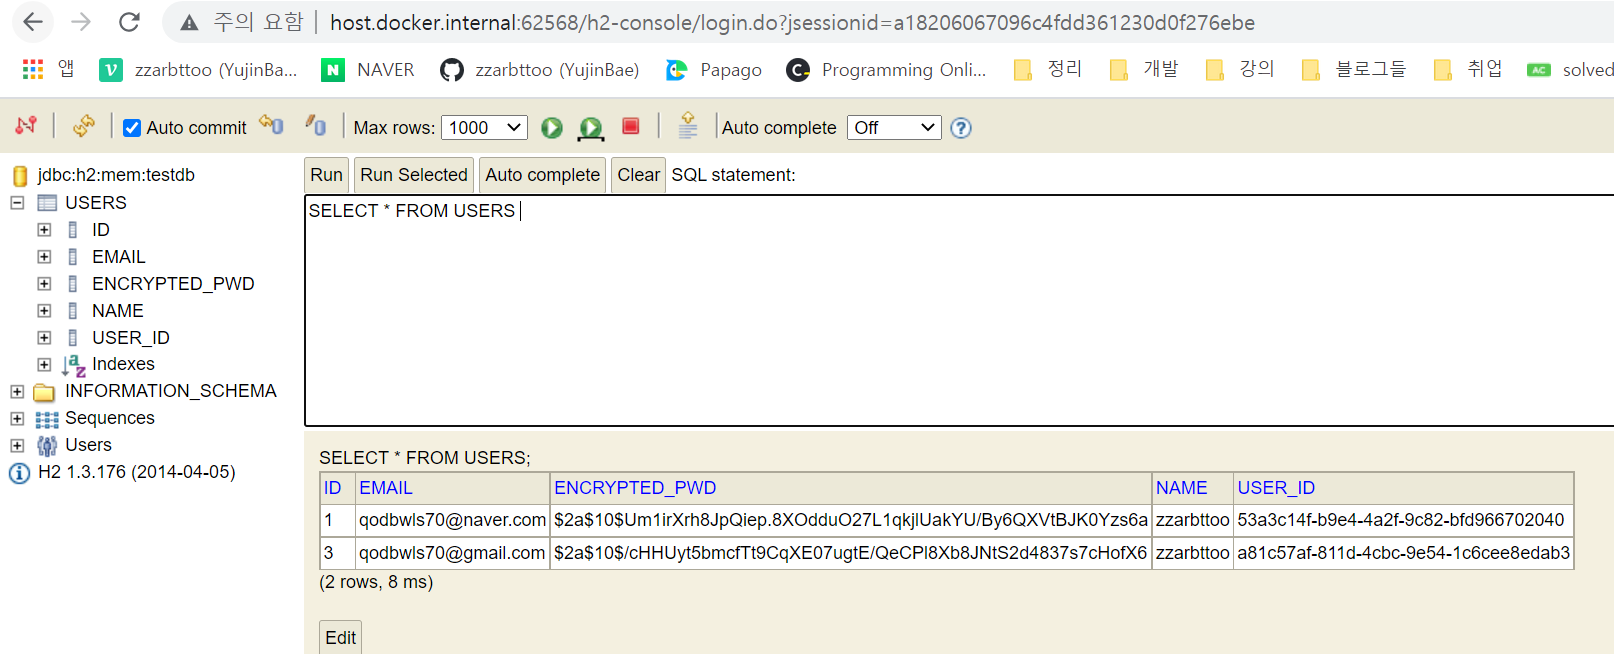
- 비밀번호가 Hashing 되어있는 것을 확인할 수 있다

나는야 누워있는 개발머신